
Popular queries
How to clean the bin and cyclone
Press the release catch located at the top of the bin and detach from the machine.
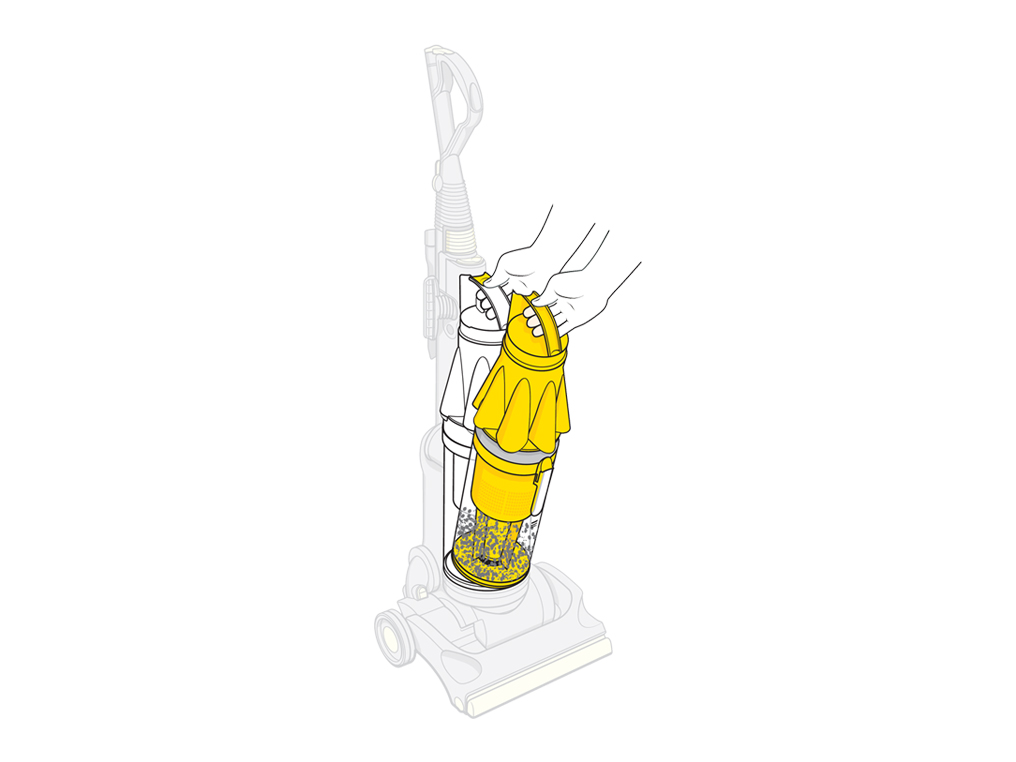
Pull the release catch located on the cyclone top, under the handle.
Release the bin from the cyclone by pressing the front release catch.

Clean the cyclone with a cloth and tap gently to remove dust.
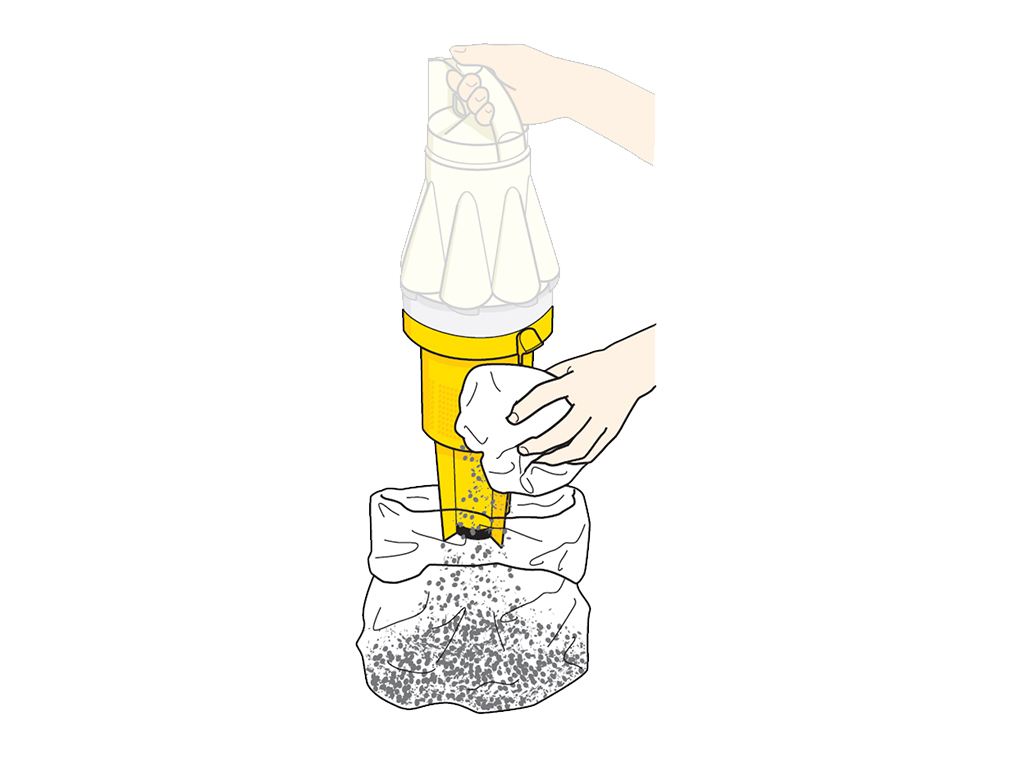
You can use cold water to clean the clear bin. Do not use detergents or other chemicals.
Reassemble clear bin and close the bin lid before placing on the machine.
Please select the appropriate option


Test the suction
A whistle suggests that air is escaping due to a missing seal or blockage.
Make sure the machine is standing in the upright position.
Pull back the Wand cap.
Turn the machine on and place your hand of the end of the Wand.
Is the suction strong or weaker than usual?
Keep your hands and clothing away from the Brush bar area at all times.
Inspect the Brush bar
Tilt the machine back into the vacuuming position.
Lay the machine on its side, keeping it in the vacuuming position.
Turn the machine on and check to see if the Brush bar is spinning.
If the machine has a Brush bar on/off control, check that the arrow on the clutch control dial moves forward to the carpeted floors position
Inspect for any debris or damage
Remove the valve pipe, near to the base of the machine.
Check the valve pipe for blockages and remove as necessary.
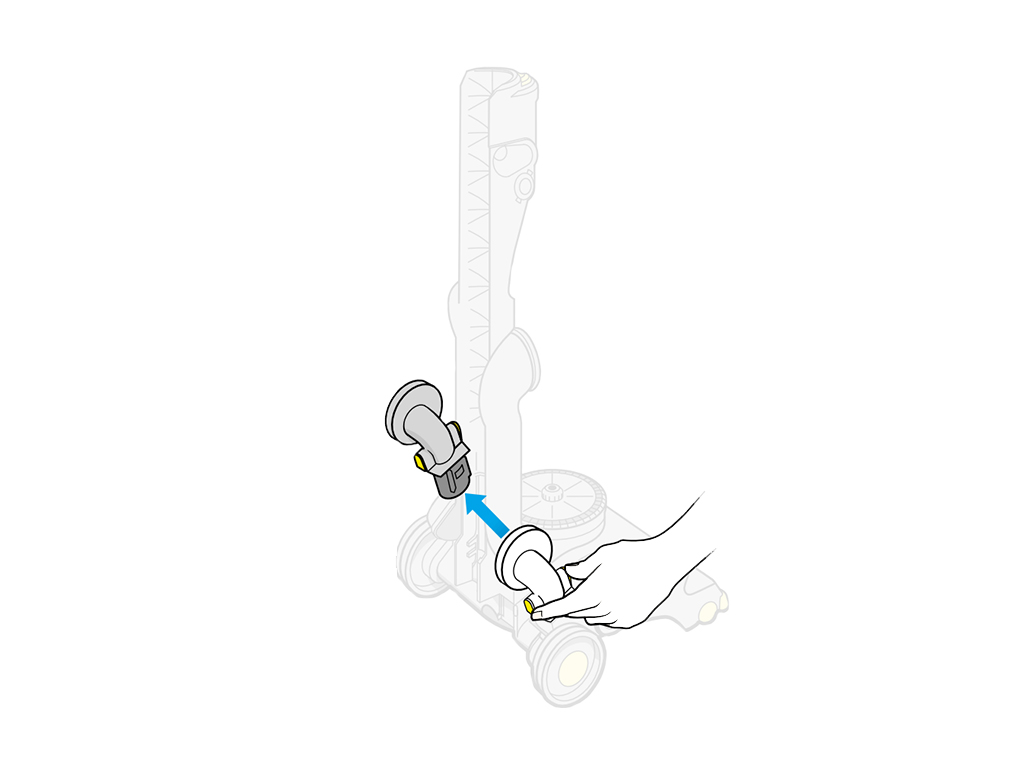
Check the seal on the valve pipe for any damage.
Check the seal on the machine for any damage.
Plug the machine in and switch ON. Place your hand over the airway inspection and test the suction.
Is the suction strong or weaker than usual?
Switch off and unplug the machine before proceeding.
Inspect the Cleaner head
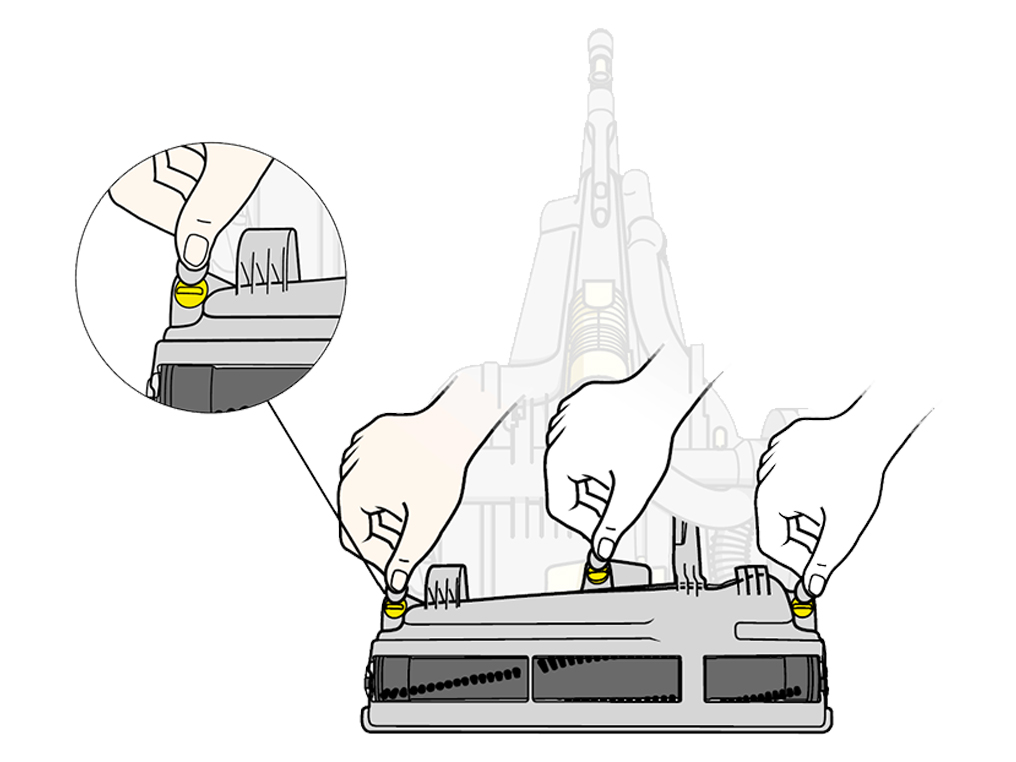
Turn off power, lay the machine flat on the floor and turn over so that the base can be viewed.
Using a coin turn each fastener a quarter of a turn to the left. Remove the soleplate.
Carefully remove any blockages from the Brush bar using a pair of scissors to cut away any hair and fibres if necessary.
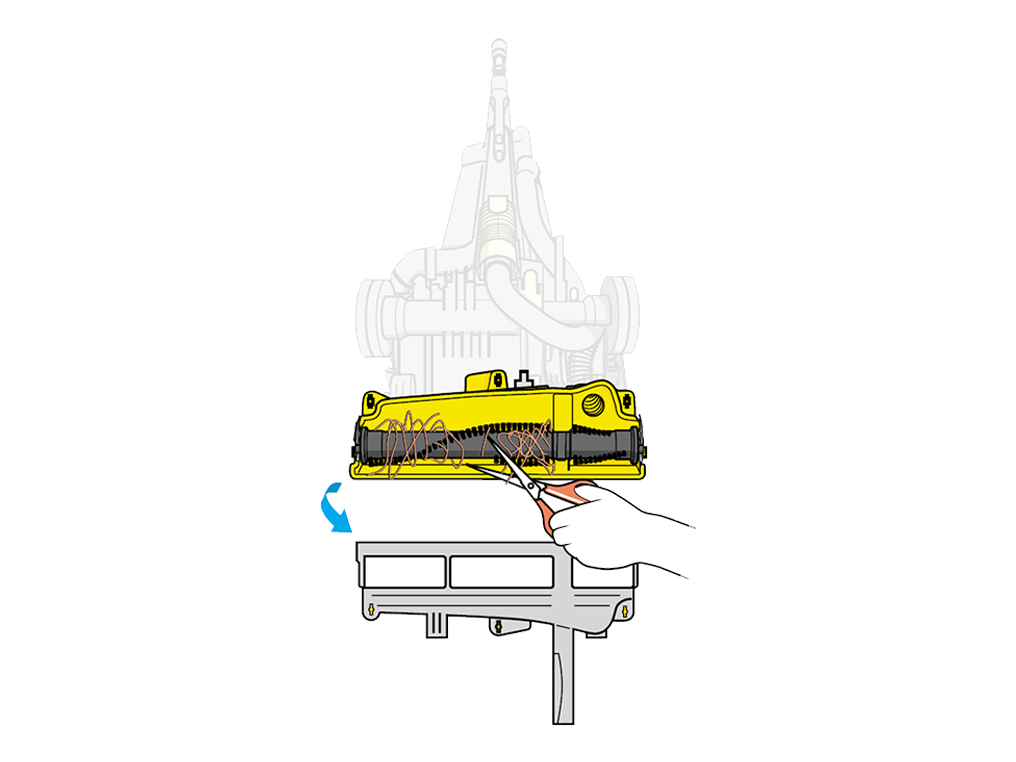
Inspect the internal hose for blockages and damage and ensure that both ends of the hose are fitted securely.
If a blockage is present, remove any debris.
Reassemble and test the machine.
Clearing duct, bin and cyclone
Turn the machine off and remove the cyclone and bin.

Check the duct:
Check the entry seal located on the left side of the duct is not missing or damaged.
Check the entry pipe and exhaust pipe on the main duct for any blockages and remove as necessary.
Check the bin and cyclone:
Check the cyclone entry seal is not missing or damaged.
Check both entry inlets on the bin and cyclone for blockages, and remove as necessary.
Empty the bin and ensure the bin base remains open.
Release the clear bin by pressing the bin release catch on the front of the cyclone.

Clean cyclone shroud as necessary and check the cyclone seal is not missing or damaged.

Reassemble and test the machine.
Washing the filter
Press the release catch and remove the filter housing from the machine.

Remove the filter from the housing. (Only the blue foam and yellow cage should be washed).

Wash both parts in cold water only.
WARNING: Do not use detergent. Do not wash in a dishwasher or washing machine.
Repeat until the water runs clear.

Leave filter to dry in a warm place until filter is completely dry. Do not dry the filter in a tumble dryer, microwave, oven or near an open flame.
Ensure the filter is completely dry before replacing in the machine.

The filter should be washed at least once every 3-6 months.
NB: The post-motor filter located under the clear bin should last the lifetime of the machine and does not need to be washed.
Inspect the duct, bin and cyclone
Turn the machine off and remove the cyclone and bin assembly.
Check the duct:
Check the entry seal located on the left side of the duct is not missing or damaged.
Check the entry pipe and exhaust pipe on the main duct for any blockages and remove as necessary.
Check the bin and cyclone:
Check the cyclone entry seal is not missing or damaged.
Check both entry inlets on the bin and cyclone for blockages, and remove as necessary.
Open the bin lid being careful to ensure dust is captured.
Release the clear bin by pressing the bin release catch on the front of the cyclone.
Clean cyclone shroud as necessary and check the cyclone seal is not missing or damaged.
Reassemble and test the machine.
Inspect the Cleaner head
Turn off the power and lay the machine flat on the floor, and turn over so that the base can be viewed.
Remove the soleplate
Using a coin, turn each fastener by a quarter turn to the left. Remove the soleplate.
Carefully remove any blockages from the Brush bar using a pair of scissors to cut away any hair and fibres if necessary.
Inspect the internal hose for blockages and damage and ensure that both ends of the hose are fitted securely.
If a blockage is present, remove any debris.
Reassemble and test the machine.
Switch off and unplug the machine before proceeding.
Checking the upright lock
The upright lock can become displaced and cause the machine to not stand correctly. This can be easily resolved by following the procedure shown on the video.
The video may show a different variant although the process remains the same.
Recline the machine and stand behind.
On the right side, by the back wheel you will find the valve pipe carriage.
Check the valve pipe is clear of blockages by pressing the push button to remove it from the valve carriage.

Lock the valve carriage into place by pressing the large push button in front (visible when reclined).
Retest the machine.
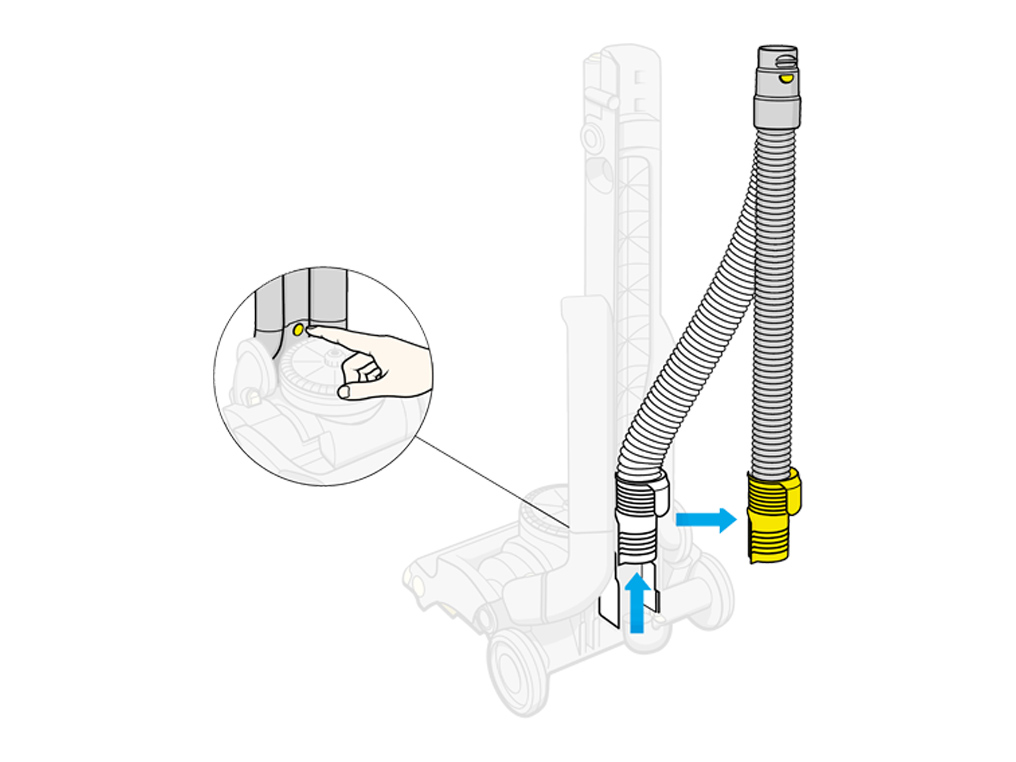
Check for any debris or damage
Remove the valve pipe, near to the base of the machine.
Check for blockages:
Check the valve pipe for blockages and remove as necessary. Ensure that the entry seal located on the left side of the duct is not missing or damaged.
Check the seal on the valve pipe for any damage.
Check the seal on the machine for any damage.
Plug the machine in and switch ON. Place your hand over the airway inspection and test the suction.
Is the suction strong or weaker than usual?
Hose inspection
Please refit the Valve pipe before continuing.
Disconnect the Wand from the hose. Stretch out the hose and check for any splits.

Plug the machine in and switch it ON. Place your hand over the end of the hose and test the suction.

Is the suction from the hose strong or weaker than usual?
Inspect the duct, bin and cyclone
Turn the machine off and remove the cyclone and bin assembly.
Check the duct:
Check the entry seal located on the left side of the duct is not missing or damaged
Check the entry pipe and exhaust pipe on the main duct for any blockages, and remove as necessary
Check the duct:
Check the entry seal located on the left side of the duct is not missing or damaged.
Check the entry pipe and exhaust pipe on the main duct for any blockages and remove as necessary.
Empty the bin and ensure the bin base remains open.
Release the clear bin by pressing the bin release catch on the front of the cyclone.
Clean cyclone shroud as necessary and check the cyclone seal is not missing or damaged.
Reassemble and test the machine.
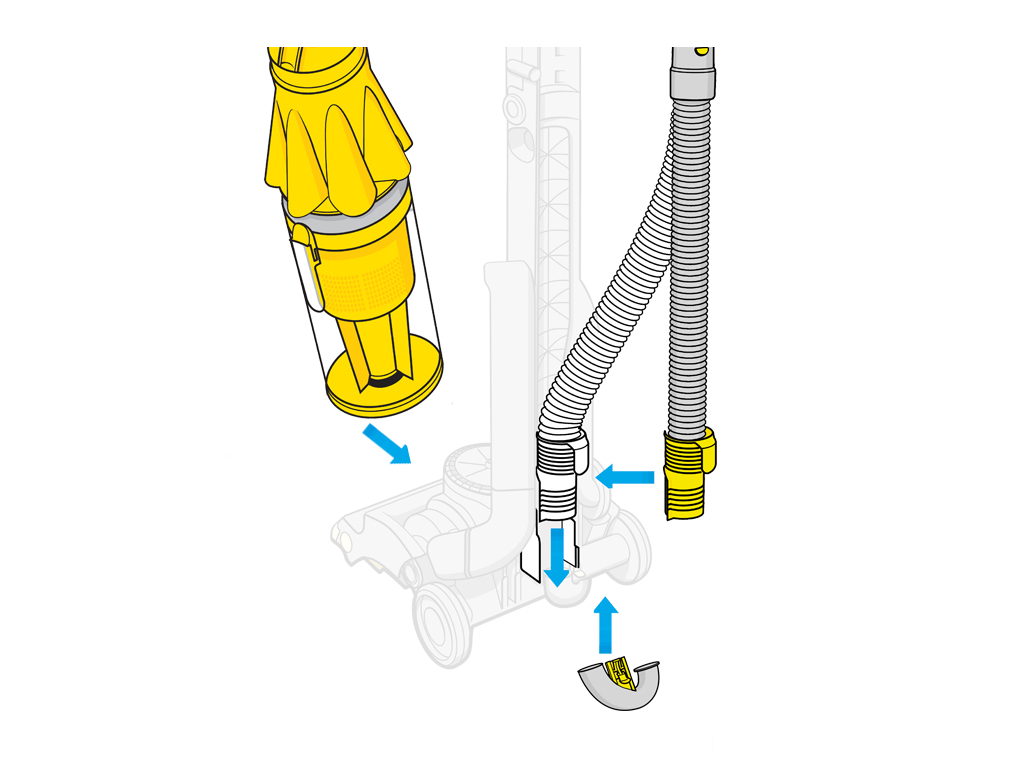
Inspect the U-bend and hose
Tilt the machine forward and unclip the U-bend airway inspection which is located at the base of the hose.
Check for blockages and remove as necessary.

Remove the hose.
Remove the bin from the machine.
The hose release is located at the front. Press the release catch and pull the hose from the back at the same time.
Check the hose at both ends for blockages, and remove as necessary
Reassemble:
Reconnect the bin
Reconnect the hose, ensuring it clicks into place and is secure
Reconnect the U-bend, ensuring it clicks into place.
Inspect the duct, bin and cyclone
Turn the machine off and remove the cyclone and bin assembly.
Check the duct:
Check the entry seal located on the left side of the duct is not missing or damaged.
Check the entry pipe and exhaust pipe on the main duct for any blockages and remove as necessary.
Check the bin and cyclone:
Check the cyclone entry seal is not missing or damaged.
Check both entry inlets on the clear bin and cyclone for blockages, and remove as necessary.
Open the bin lid being careful to ensure dust is captured.
Release the clear bin by pressing the bin release catch on the front of the cyclone.
Clean cyclone shroud as necessary and check the cyclone seal is not missing or damaged.
Reassemble and test the machine.
Keep your hands and clothing away from the Brush bar area at all times.
Check the Brush bar
Turn the machine off.
Tilt the machine back into the vacuuming position.
Check that the arrow on the Brush bar control clutch moves forward to the carpeted floors position.
Lay the machine on its side, keeping it in the vacuuming position:
Turn the machine on
Test without the bin and cyclone
Plug the machine in at the wall.
Remove the bin and cyclone, and check to ensure the entry seal located on the left side of the duct is not missing or damaged.
Turn the machine on.

Inspect duct, bin and cyclone
Turn the machine off and remove the cyclone and bin assembly.
Check the duct:
Check the entry seal located on the left side of the duct is not missing or damaged.
Check the entry pipe and exhaust pipe on the main duct for any blockages and remove as necessary.
Check the bin and cyclone:
Check the cyclone entry seal is not missing or damaged.
Check both entry inlets on the clear bin and cyclone for blockages, and remove as necessary.
Open the bin lid being careful to ensure dust is captured.
Release the clear bin by pressing the bin release catch on the front of the cyclone.
Clean cyclone shroud as necessary and check the cyclone seal is not missing or damaged.
Reassemble and test the machine.
Inspect the Cleaner head
Turn off the power and lay the machine flat on the floor, and turn over so that the base can be viewed.
Remove the soleplate by using a coin to turn the fasteners by a quarter.
Carefully remove any blockages from the Brush bar using a pair of scissors to cut away any hair and fibres if necessary.
Inspect the internal hose for blockages and damage and ensure that both ends of the hose are fitted securely.
If a blockage is present, remove any debris.
Reassemble and test the machine.
Inspect the U-bend and hose
Tilt the machine forward and unclip the U-bend airway inspection which is located at the base of the hose.
Check for blockages and remove as necessary.
Remove the hose.
Remove the bin from the machine.
The hose release is located at the front. Press the release catch and pull the hose from the back at the same time.
Check the hose at both ends for blockages, and remove as necessary
Reassemble:
Reconnect the bin
Reconnect the hose, ensuring it clicks into place and is secure
Reconnect the U-bend, ensuring it clicks into place.
Retest the machine.
Check the Wand
Disconnect the Wand from the hose.
Look through the Wand. You should see light shining through. If not, remove the blockage.
Washing the filter
Press the release catch and remove the filter housing from the machine.
Remove the filter from the housing. (Only the blue foam and yellow cage should be washed).
Wash both parts in cold water only.
WARNING: Do not use detergent. Do not wash in a dishwasher or washing machine.
Repeat until the water runs clear.
Leave filter to dry in a warm place until filter is completely dry. Do not dry the filter in a tumble dryer, microwave, oven or near an open flame.
Ensure the filter is completely dry before replacing in the machine.
The filter should be washed at least once every 3-6 months.
NB: The post-motor filter located under the clear bin should last the lifetime of the machine and does not need to be washed.
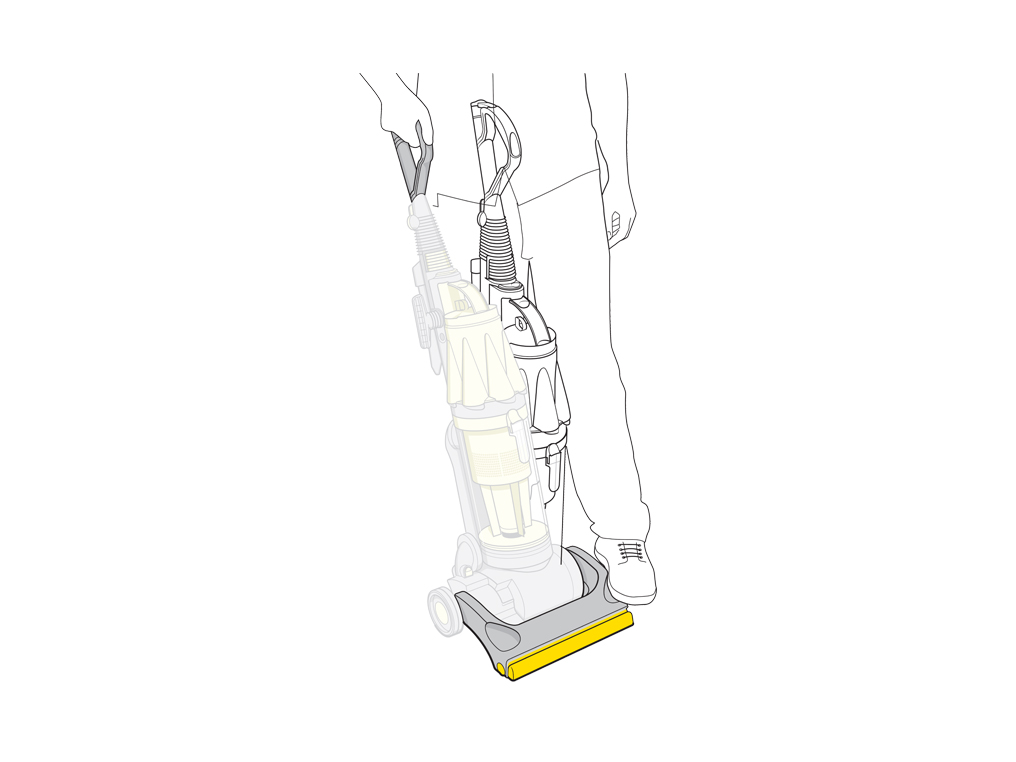
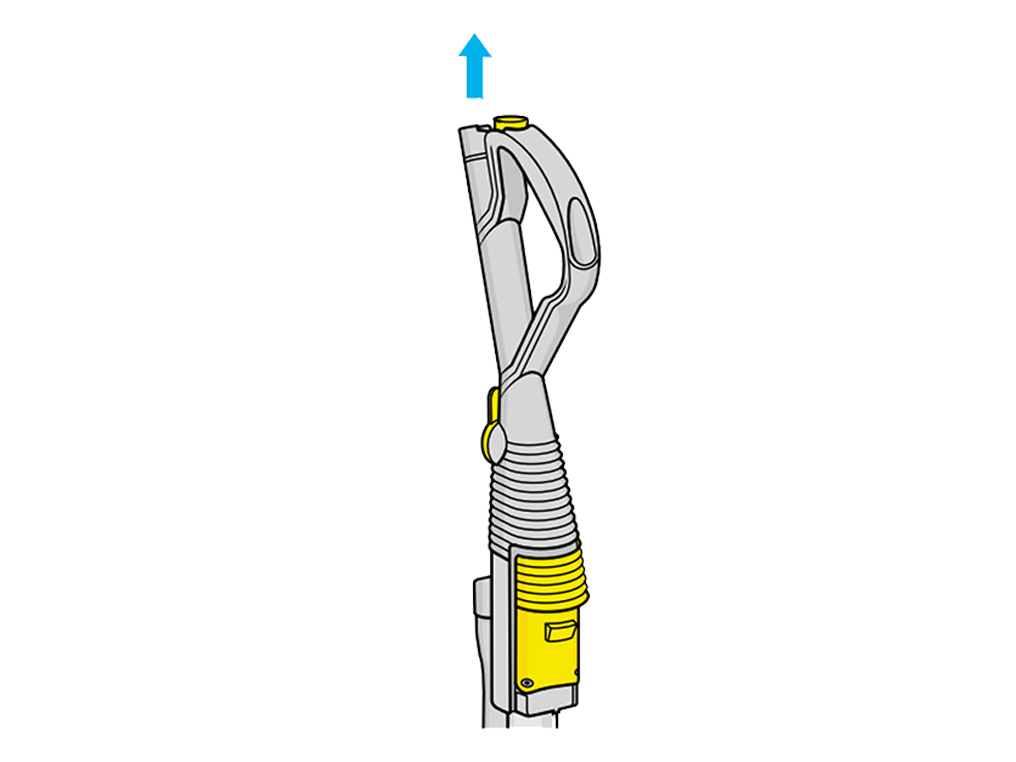
Test the Wand
Make sure the machine is standing in the upright position.
Pull back the Wand cap.
Turn the machine on and place your hand on the end of the Wand.

Is the suction strong or weaker than usual?
Washing the filter
Press the release catch and remove the filter housing from the machine.
Remove the filter from the housing. (Only the blue foam and yellow cage should be washed).
Wash both parts in cold water only.
WARNING: Do not use detergent. Do not wash in a dishwasher or washing machine.
Repeat until the water runs clear.
Leave filter to dry in a warm place until filter is completely dry. Do not dry the filter in a tumble dryer, microwave, oven or near an open flame.
Ensure the filter is completely dry before replacing in the machine.
The filter should be washed at least once every 3-6 months.
NB: The post-motor filter located under the clear bin should last the lifetime of the machine and does not need to be washed.
Clean the bin and cyclone
Empty the clear bin
Place the bin inside a bag, close the bag around the bin and press the button to release the dust and debris.
Shake or tap firmly to remove all dust and debris from inside the bin and fine dust collector.
Remove the clear bin:
With the bin base open, press release catch at the top of the clear bin to separate the bin from the cyclone
Clean the cyclone.
Clean the shroud with a dry cloth or by using the combination tool.
Tap gently to remove dust from within the cyclone.
WARNING: Do not use any liquids to clean the cyclone.
Clean the bin:
WARNING: Clean the bin with cold water only, do not use any detergents or polish on the bin
Reconnect cyclone and close lid to place back onto the machine.

Rebuild and test the machine.
Washing the filter
Press the release catch and remove the filter housing from the machine.
Remove the filter from the housing. (Only the blue foam and yellow cage should be washed).
Wash both parts in cold water only.
WARNING: Do not use detergent. Do not wash in a dishwasher or washing machine.
Repeat until the water runs clear.
Leave filter to dry in a warm place until filter is completely dry. Do not dry the filter in a tumble dryer, microwave, oven or near an open flame.
Ensure the filter is completely dry before replacing in the machine.
The filter should be washed at least once every 3-6 months.
NB: The post-motor filter located under the clear bin should last the lifetime of the machine and does not need to be washed.
Check the suction
The Mini turbine head will work if the suction is strong. This issue can be resolved by carrying out performance checks or washing the filter.
If the Mini turbine head is damaged, order a replacement.
Please select the appropriate option
Keep your hands and clothing away from the Brush bar area at all times.
Checking the Brush bar
Turn the machine off.
Tilt the machine back into the vacuuming position.
Check that the arrow on the Brush bar control clutch moves forward to the carpeted floors position.
Lay the machine on its side, keeping it in the vacuuming position:
Turn the machine on
Test the suction
If the machine is spitting out dust, there may be a blockage.
Make sure the machine is standing in the upright position.
Pull back the Wand cap.

Turn the machine on and place your hand on the end of the Wand.
Is the suction strong or weaker than usual?
Checking the upright lock
The upright lock can become displaced and cause the machine to not stand correctly. This can be easily resolved by following the procedure shown on the video.
The video may show a different variant although the process remains the same.
Recline the machine and stand behind.
On the right side, by the back wheel you will find the valve pipe carriage.
Check the valve pipe is clear of blockages by pressing the push button to remove it from the valve carriage.
Lock the valve carriage into place by pressing the large push button in front (visible when reclined).
Retest the machine.
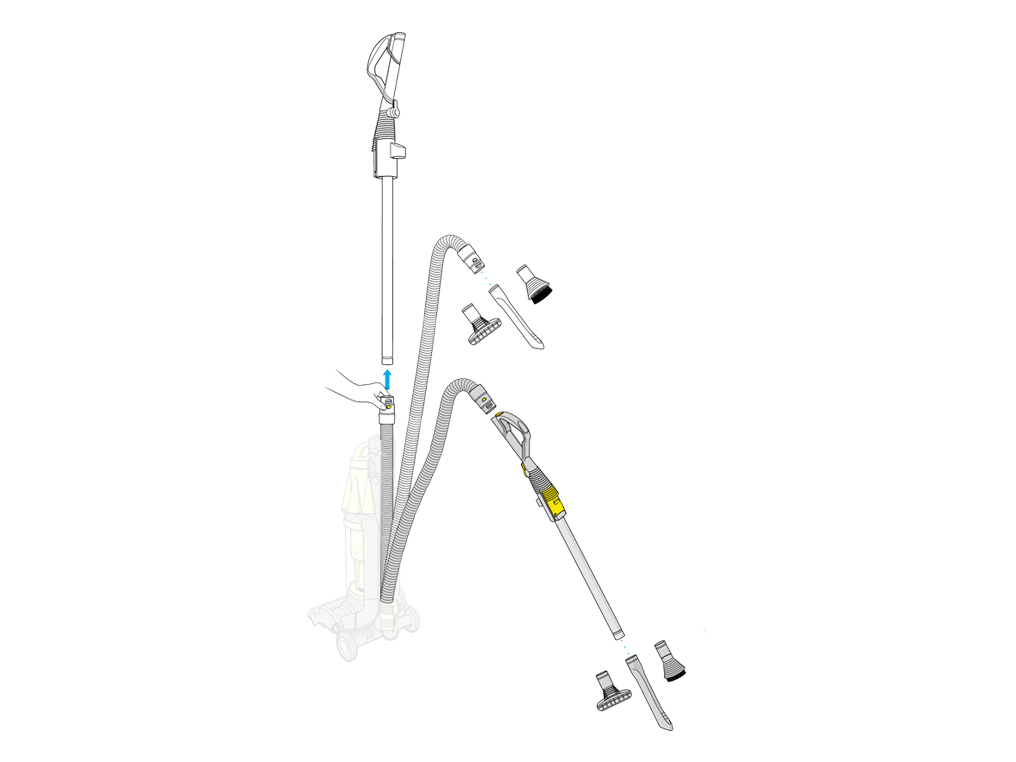
How to assemble your Dyson machine
Connect the hose to the bottom of the machine, ensure the hose clicks into place.
The wand is thread through the hose and clicks to the top of the duct.

The brush and stair tool attach to the top of the duct, and the crevice tool attaches to the wand.
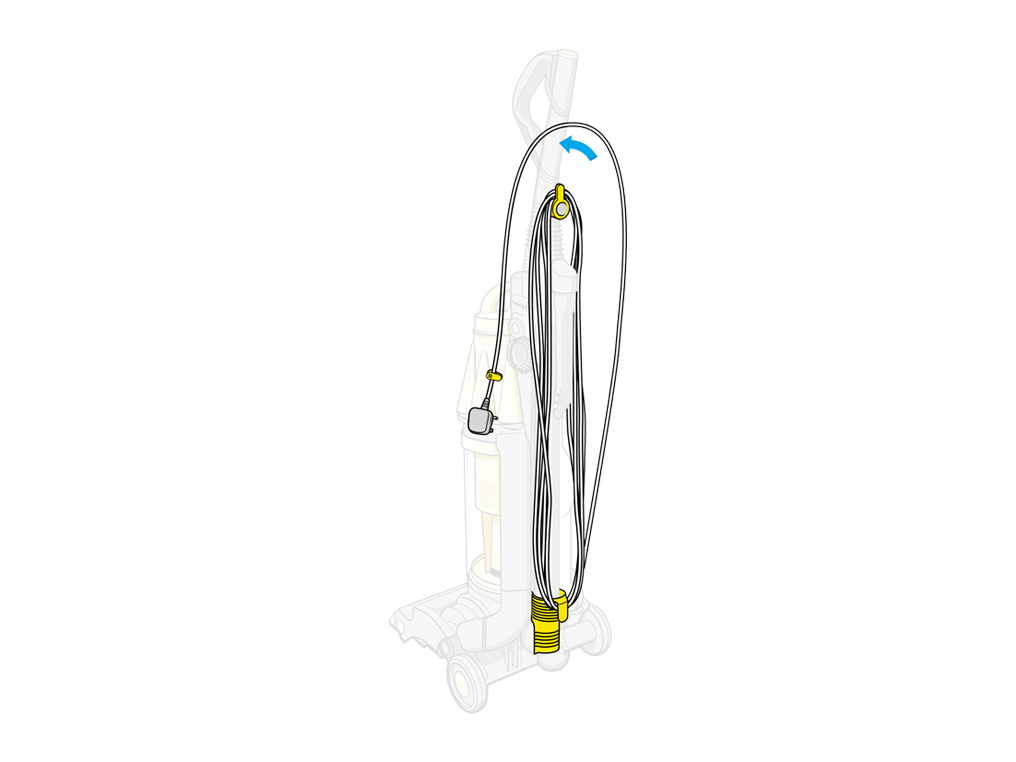
The cable wraps around the bottom hose cuff and the top of the Wand.
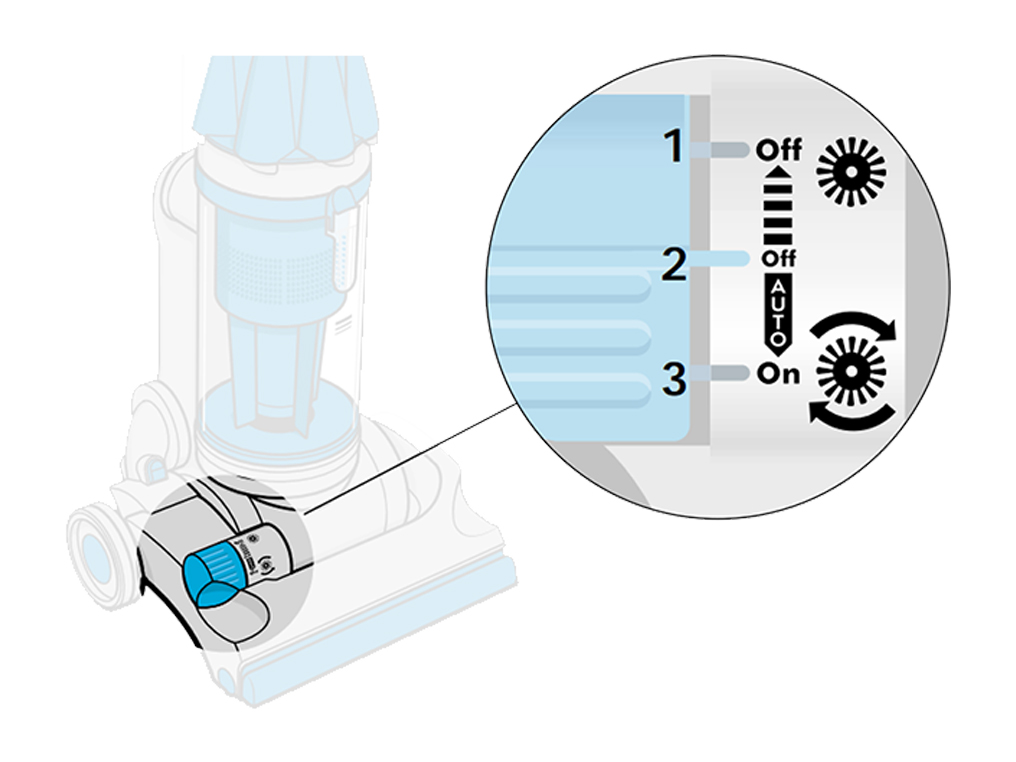
How to use the Brush bar
To start vacuuming, push the Cleaner head down with the foot and pull the handle towards you.
You can control the Brush bar with three settings:
- Manual brush off - for delicate rugs and floors.
- Brush off - when upright.
- Auto brush on - for carpet cleaning.
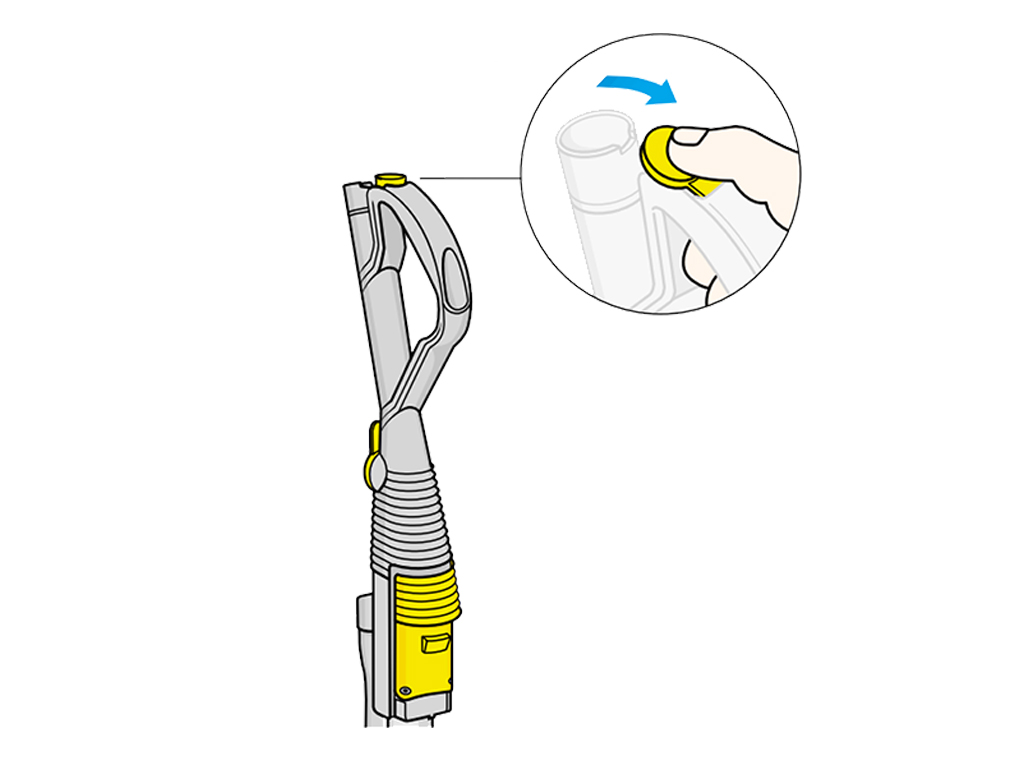
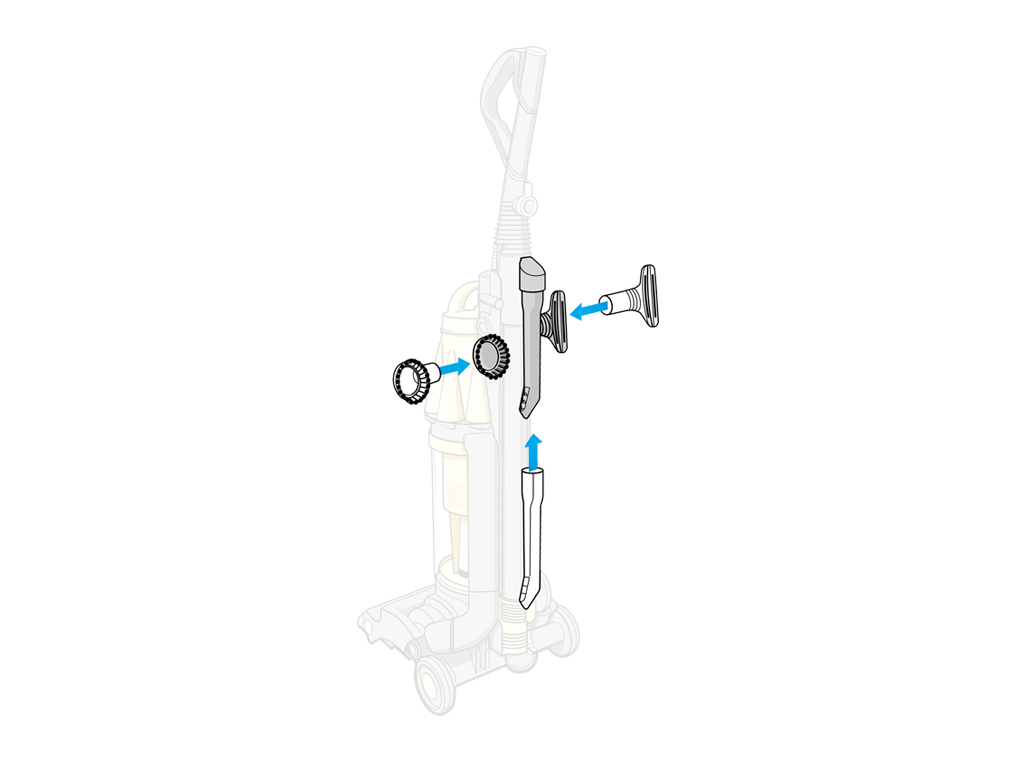
How to attach the accessories
Ensure the machine is in upright position before using tools.
Press the release catch on the wand to release from the duct.
Attaching tools:
Attach tools to either side of the Wand. Slide the Wand cap back to attach on this side
Attach tools direct to the hose
How to empty the bin
Press the release catch located at the top of the bin and detach from the machine.
Pull the release catch located on the cyclone top, under the handle.
Release the bin from the cyclone by pressing the front release catch.

Clean the cyclone with a cloth and tap gently to remove dust.
Reassemble clear bin and close the bin lid before placing on the machine.
Washing the filter
Press the release catch and remove the filter housing from the machine.
Remove the filter from the housing. (Only the blue foam and yellow cage should be washed).
Wash both parts in cold water only.
WARNING: Do not use detergent. Do not wash in a dishwasher or washing machine.
Repeat until the water runs clear.
Leave filter to dry in a warm place until filter is completely dry. Do not dry the filter in a tumble dryer, microwave, oven or near an open flame.
Ensure the filter is completely dry before replacing in the machine.
The filter should be washed at least once every 3-6 months.
NB: The post-motor filter located under the clear bin should last the lifetime of the machine and does not need to be washed.


Further help
DC07 Animal™