Let's get your machine working
DC18 Allergy™
Let's get your machine working
DC18 Allergy™
Popular queries
Please select the appropriate option
Clean the bin and cyclone
Press the silver button on the main duct above the bin handle.

Press the red button on the back of the clear handle to open the bin base and release the dust.
This can be done directly into a Bin, or into a bag wrapped around the cyclone.
To completely detach the bin from the cyclone - press the silver release catch at the top of the clear bin.
- Clean the cyclone with a cloth.
- Check through the middle of the cyclone for any blockages and remove as necessary.

The clear bin can be wiped with a damp cloth.
WARNING: Do not use any detergent or polish on any part of the machine. Do not use any water on the cyclone.

Please select the appropriate option
Please select the appropriate option


What sort of noise?
Turn off the Brush bar
Plug the machine in.
Recline it into the vacuuming position.
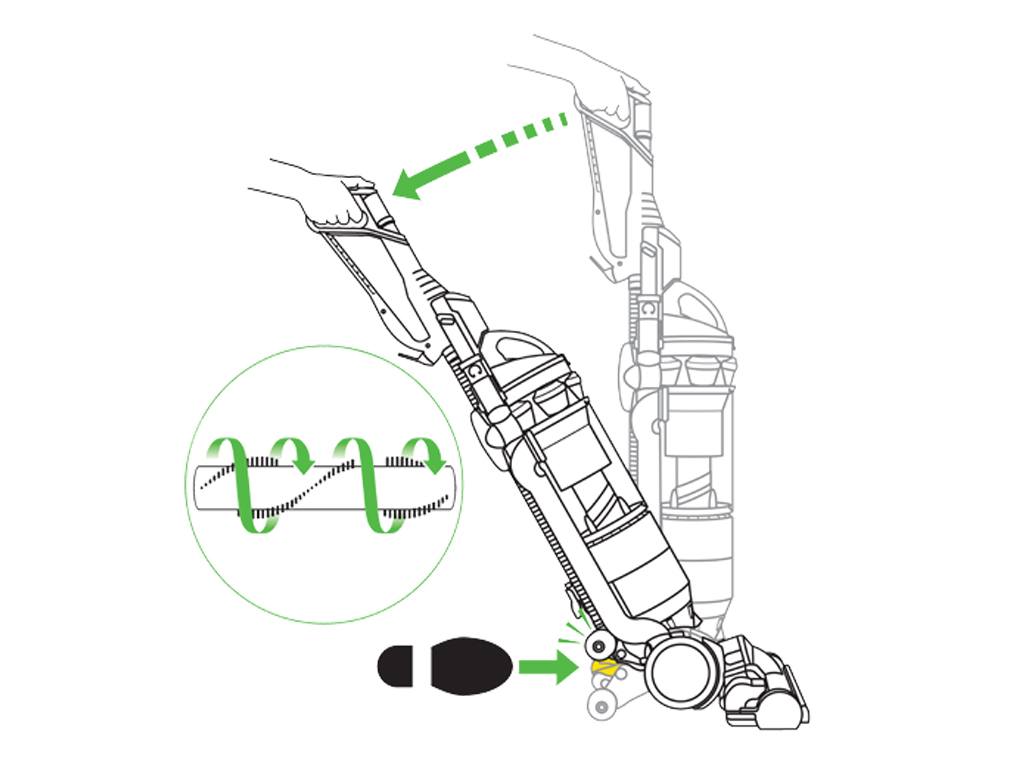
Turn it on and turn the Brush bar off using the grey switch next to the on button.
Clear the Cleaner head
Turn off and unplug the machine.
Remove the Cleaner head
Recline the machine using the pedal and lay on its back.
Remove the Cleaner head by pushing the two tabs on either side of the Cleaner head and pulling off.
Removing the end cap
Using a coin, undo the end cap fastener and remove the Brush bar.
Rotate the end caps and pull away from the Cleaner head.
Cleaning the Cleaner head
Carefully cut away any hair or fibres using scissors.
Check the Brush bar and end cap for signs of damage.
Check the openings of the Cleaner head for blockages and remove as necessary.
Remove the push fit internal hose. Check the hose is clear and fitted correctly.
Check the two metal connector pins are clean and undamaged.
Replace the end caps and Cleaner head to the machine ensuring the Cleaner head clicks into place.
Check the Cleaner head reset
Recline the machine back into the vacuuming position and turn the machine on.
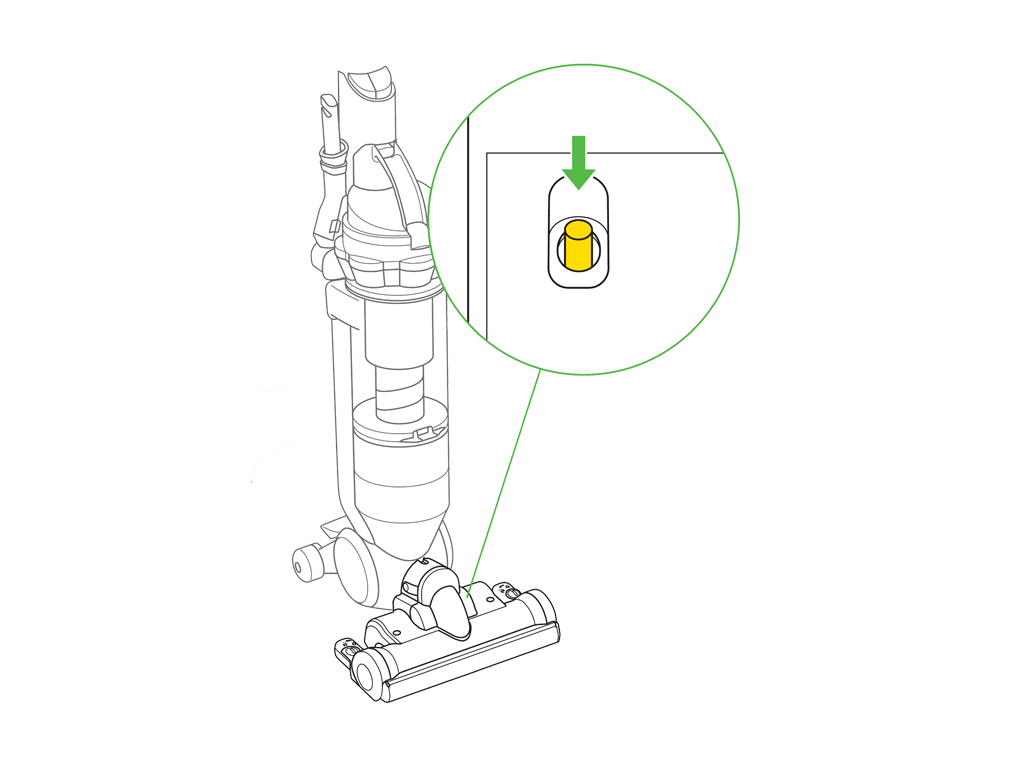
Press the Brush bar reset button on the back of the Cleaner head.
Remove the bin and cyclone
Press the button at the top of the cyclone handle.
Remove the bin and cyclone from the machine.
Turn the machine on, keeping it in the upright position.
Check the seals
Check the seals on the main duct for signs of wear or damage.
Flex out the seals' outer edges to make sure they sit flush against the corresponding openings.
Please follow the next step.
Check the bleed valve
The bleed valve can be found at the rear of the cyclone, towards the top.
Check that there is no debris clogging the valve and that is moves freely when pressed.
With the cyclone is fitted to the machine the bleed valve should not open while the machine is running. If it does, there may be a blockage.
Check cyclone
Check the openings for any blockages and remove as necessary.
Open the bin lid by pressing the red catch at the top of the cyclone and check the bin seal is attached and not damaged.
Clean the cyclone
Remove the bin by pressing the silver release catch (the bin lid must be open for this to work).
Clean the cyclone with a cloth or brush tool.
Check through the middle of the cyclone for fine dust.
Reassemble and test the machine.
Check internal hose
Turn power off and unplug the machine.
Inspect the internal hose for blockages and damage and ensure that both ends of the hose are fitted securely.
If a blockage is present, remove any debris.
Wash the filter
Please follow the steps in the video.
Has washing the filter resolved the problem?
Wash the filter
To maintain your Dyson machine we recommend that you wash your filter(s) at least once every 3 months.
Remove the clear bin and cyclone top from your machine by pressing the cyclone release catch.
Lift the filter release catch to remove the filter from the machine.
The permanent filter located under the clear bin should last the lifetime of the machine and does not need to be washed. Please do not remove this filter.

Removing the filter
To remove the washable filter: Pull it out of the plastic case it is in.

Washing the filter
Soak the filter in cold water for at least 5 minutes.
WARNING: Please do not use detergent on the filter, or wash the filter in a dishwasher or in a washing machine.
After 5 minutes rinse the filter under cold running water and squeeze gently, repeating until the water runs clear.

Drying the filter
Leave the filter to dry in a warm place until completely dry.
Do not dry the filter inside a clothing dryer, hair dryer, microwave the filter, place the filter in an oven, or near an open flame.
Make sure the filter is completely dry before replacing in the machine.

Replacing the filter
Replace the filter into the filter casing and then put back into the cyclone top.
Reassemble and test the machine.

Test the Wand
Make sure the machine is standing in the upright position.
Pull back the wand cap.
Turn the machine on and place your hand on the end of the wand.
Is the suction strong or weaker than usual?
The Brush bar will not rotate when the vacuum cleaner is in the upright position.
Check the Brush bar
Tilt the machine back into the vacuuming position.
Turn the machine on and look through the clear Brush bar housing to see if the Brush bar is spinning.
Check the Cleaner head
Separate the Cleaner head from the machine by pressing both of the release catches on the Cleaner head.
Plug the machine in and turn it ON.
Place your hand over the internal hose on the machine
Is the suction strong or weaker than usual?
Check internal hose
Turn off power and unplug the machine.
Inspect the internal hose for blockages and damage and ensure that both ends of the hose are fitted securely.
If a blockage is present, remove any debris.
Clear the Cleaner head
Turn off and unplug the machine.
Remove the Cleaner head by pushing the two tabs on either side of the Cleaner head and pulling off.
Removing the end caps
Using a coin, undo the end cap fastener and remove the Brush bar.
Rotate the end caps and pull away from the Cleaner head.
Cleaning the Cleaner head
Carefully cut away any hair or fibres using scissors.
Check the Brush bar and end cap for signs of damage.
Check the openings of the Cleaner head for blockages and remove as necessary.
Replace the end caps and Cleaner head to the machine ensuring the Cleaner head clicks into place.
Retest the machine.
Checking the duct, cyclone and bin
Remove the bin and cyclone.
Check the exhaust and entry seals to ensure they are fitted correctly.
Check the bin
Open the bin lid, ensuring you capture any dust held inside the bin.
Check the inlets for any blockages and remove as necessary.
Check the bin base seal for any damage.
Cleaning the cyclone
With the bin lid open, press the silver bin release and remove the clear bin.
Clean the cyclone with a cloth or brush tool to remove fine dust.
Check through the middle of the cyclone for blockages and remove as necessary.
Reassemble and test machine.
Check internal hose
Turn off power and unplug the machine.
Inspect the internal hose for blockages and damage and ensure that both ends of the hose are fitted securely.
If a blockage is present, remove any debris.
Clear the Cleaner head
Turn off and unplug the machine.
Remove the Cleaner head
Recline the machine using the pedal and lay on its back.
Remove the Cleaner head by pushing the two tabs on either side of the Cleaner head and pulling off.
Removing the end cap
Using a coin, undo the end cap fastener and remove the Brush bar.
Rotate the end caps and pull away from the Cleaner head.
Cleaning the Cleaner head
Carefully cut away any hair or fibres using scissors.
Check the Brush bar and end cap for signs of damage.
Check the openings of the Cleaner head for blockages and remove as necessary.
Remove the push fit internal hose. Check the hose is clear and fitted correctly.
Check the two metal connector pins are clean and undamaged.
Replace the end caps and Cleaner head to the machine ensuring the Cleaner head clicks into place.
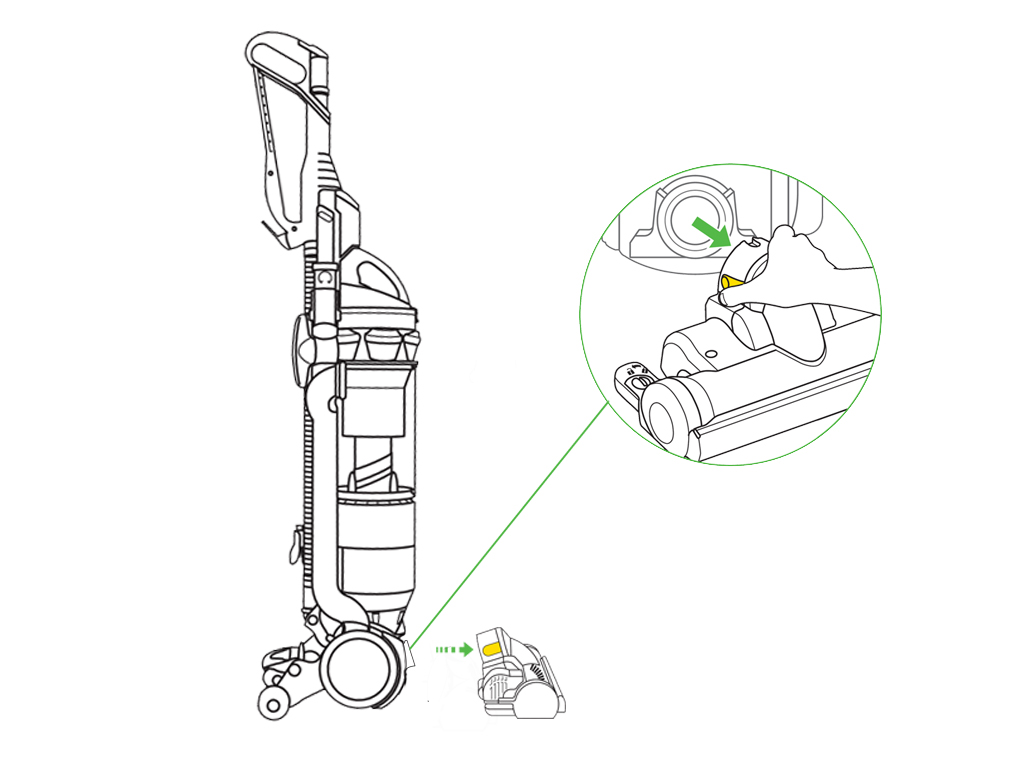
Check the Cleaner head reset
Recline the machine back into the vacuuming position and turn the machine on.
Press the Brush bar reset button on the back of the Cleaner head.
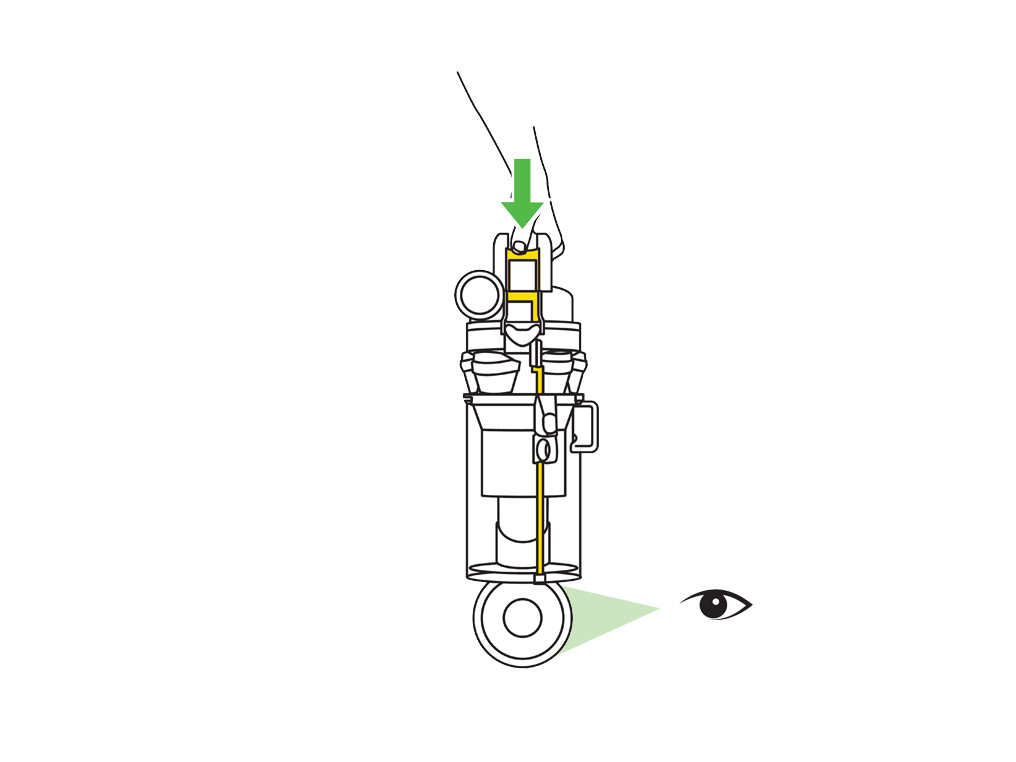
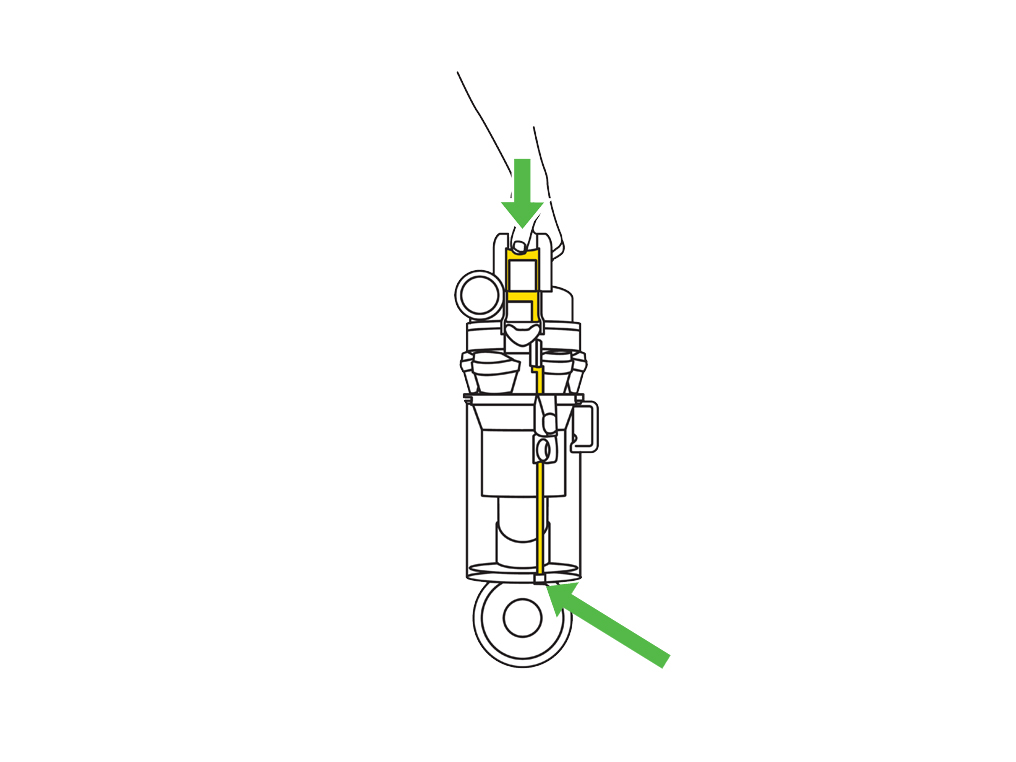
Check the hose and valve assembly
Remove the Wand and hose.
Push back the Wand cap and carefully pull the metal tube from inside the Wand upwards until the Wand handle and hose come away from the machine.

To separate the Wand from the hose press the release button located on the Wand handle and pull the hose and Wand apart.
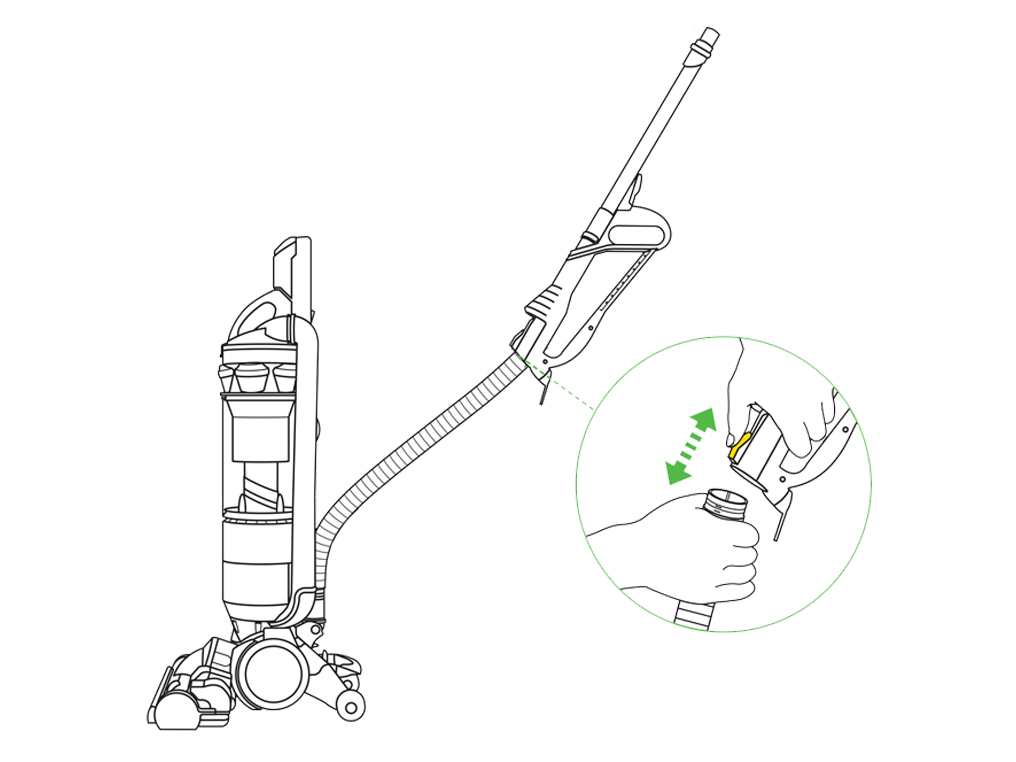
Remove the hose by pressing the hose release catch upwards and carefully pulling the hose away from the machine.
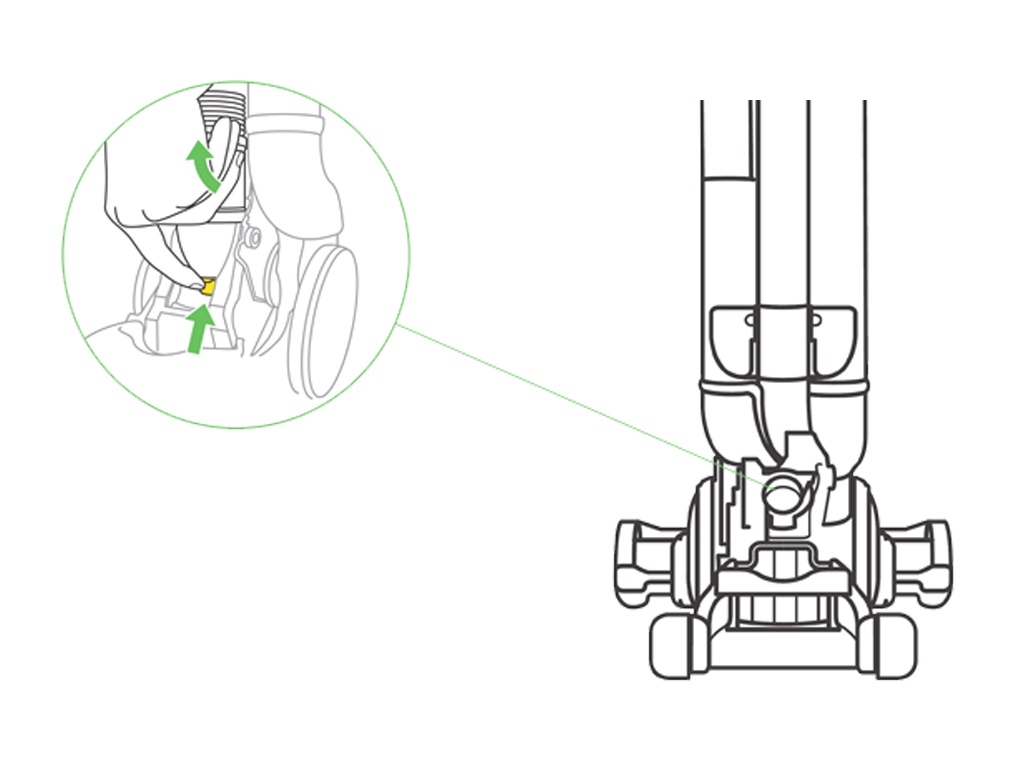
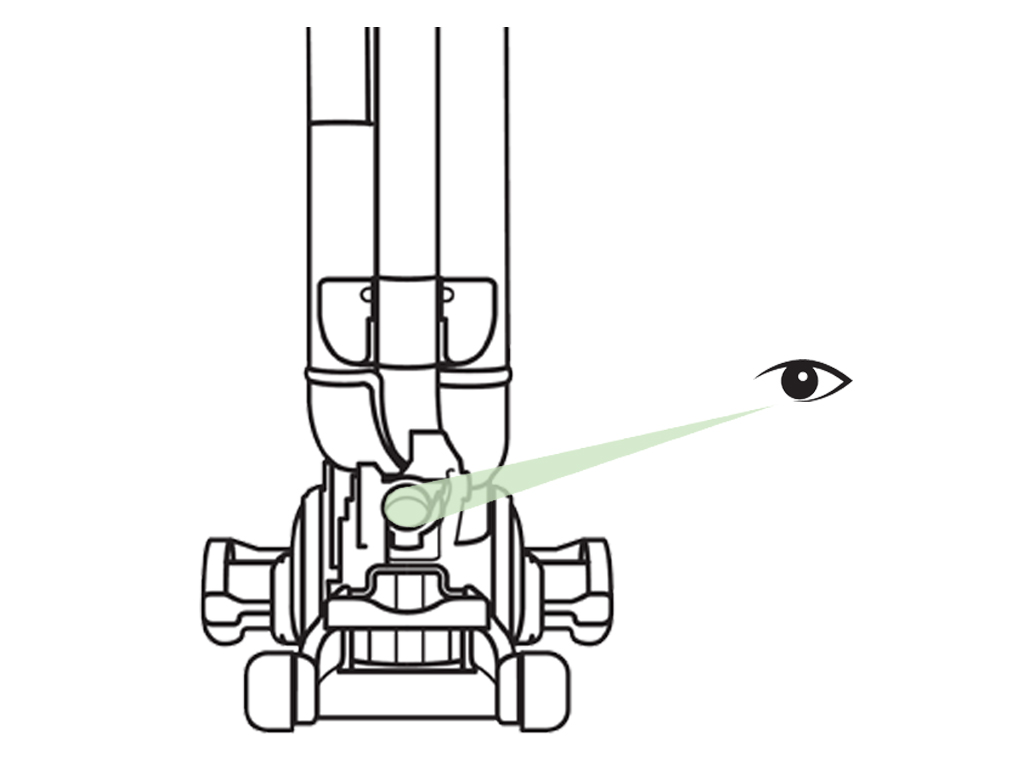
Check the valve assembly for blockages and remove as necessary.
Hose check
Check the hose for any damage.
Check the hose for blockages and remove if necessary.
Test the hose suction
Reconnect the hose to the duct ensuring it clicks into place.

Turn the machine on and test the suction from the hose.
Is the suction strong or weaker than usual?
Checking the Wand
Look into the wand and remove any debris if necessary. Ensure any tools are removed.
Retest the machine.
Check the duct, bin and cyclone
Remove the bin and cyclone.
Check the exhaust and entry seals to ensure they are fitted correctly.
Check the bin
Open the bin lid, ensuring you capture any dust held inside the bin.
Check the inlets for any blockages and remove as necessary.
Check the bin base seal for any damage.
Cleaning the cyclone
With the bin lid open, press the silver bin release and remove the clear bin.
Clean the cyclone with a cloth or brush tool to remove fine dust.
Check through the middle of the cyclone for blockages and remove as necessary.
Reassemble and test machine.
Please select the appropriate option
The switch does not light up.
Press the switch
Press the rear of the switch to make sure it stays in the on position.
Please select the appropriate option
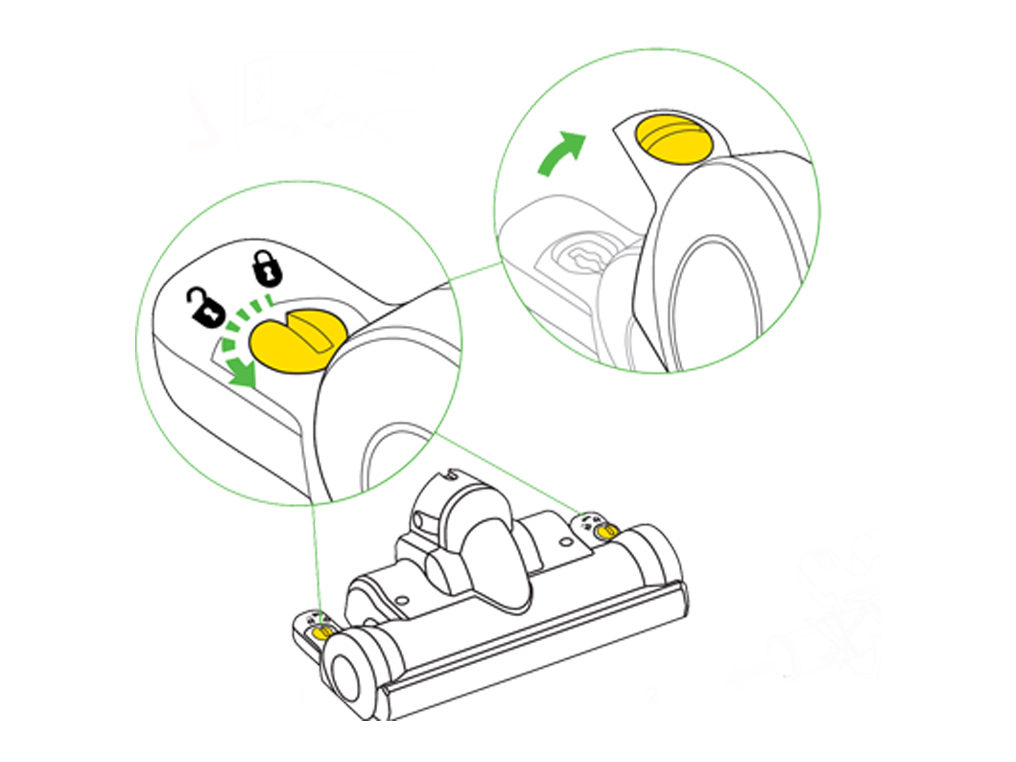
Clear the Cleaner head
Turn off and unplug the machine.
Remove the Cleaner head
Recline the machine using the pedal and lay on its back.
Remove the Cleaner head by pushing the two tabs on either side of the Cleaner head and pulling off.
Removing the end caps
Using a coin, undo the end cap fastener and remove the Brush bar.
Rotate the end caps and pull away from the Cleaner head.
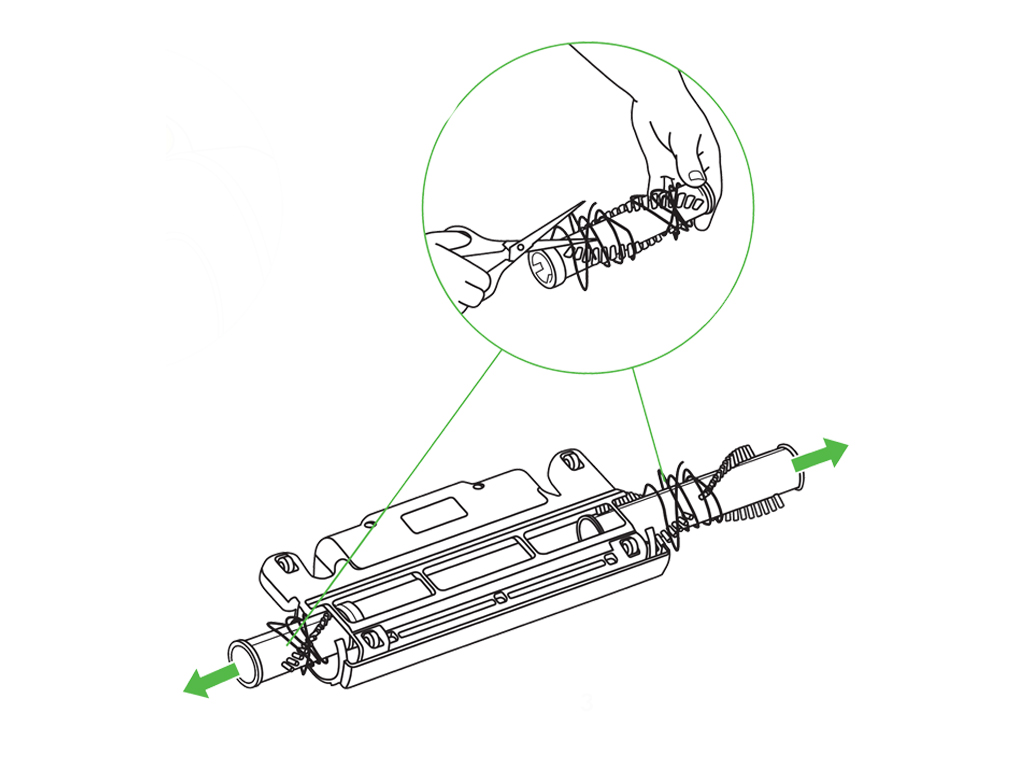
Cleaning the Cleaner head
Carefully cut away any hair or fibres using scissors.
Check the Brush bar and end cap for signs of damage.
Check the openings of the Cleaner head for blockages and remove as necessary.
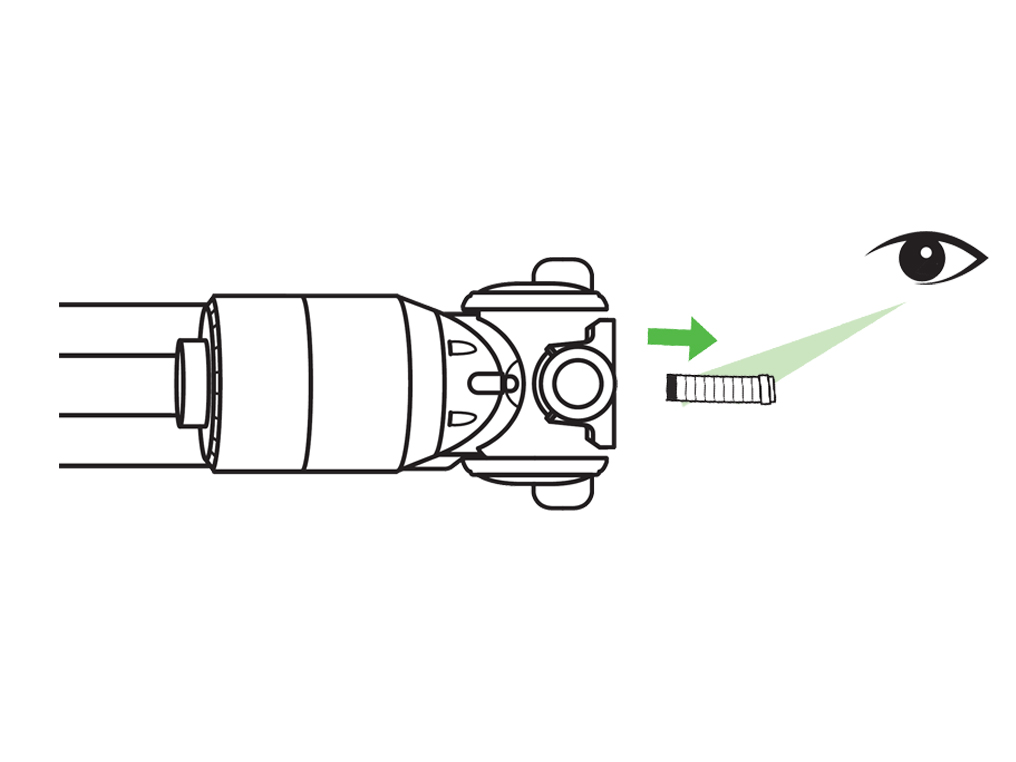
Check hose
Remove the push fit internal hose. Check the hose is clear and fitted correctly.
Check pins
Check the two metal connector pins are clean and undamaged.
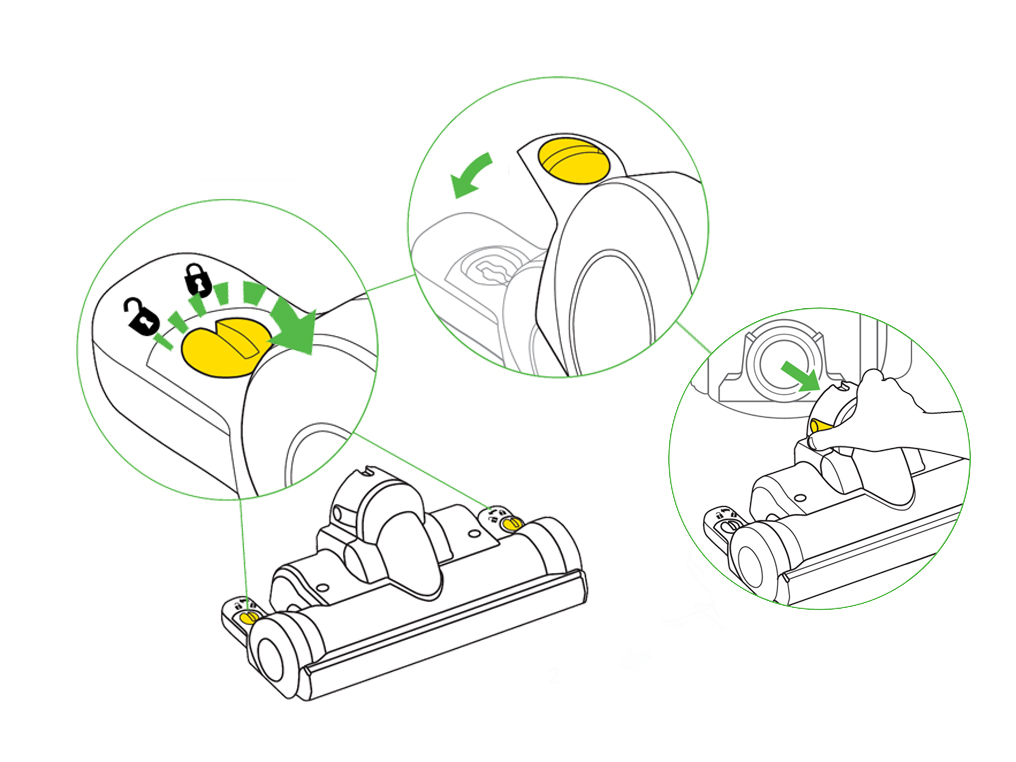
Replace the end caps and Cleaner head to the machine ensuring the Cleaner head clicks into place.
Please follow the next step.
Check Cleaner head reset button
Recline the machine back into the vacuuming position and turn the machine on.
Press the Brush bar reset button on the back of the Cleaner head.
Check electrical supply
Is the power cord or plug damaged?
Are the other household appliances working?
Does the vacuum work when plugged into another socket?
When did the machine last have power?
Thermal cut out
Most Dyson vacuums have a built in safety system that stops the machine if it begins to overheat. This usually happens because the filters need washing or your machine is blocked.
Carry out the performance checks, and if your machine cuts out unplug and leave for at least 2 hours to cool down.
Please select the appropriate option
Test the Wand
Make sure the machine is standing in the upright position.
Pull back the wand cap.
Turn the machine on and place your hand on the end of the wand.
Is the suction strong or weaker than usual?
Wash the filter
Please follow the steps in the video.
Is there anything else we can help you with?
Wash the filter
To maintain your Dyson machine we recommend that you wash your filter(s) at least once every 3 months.
Remove the clear bin and cyclone top from your machine by pressing the cyclone release catch.
Lift the filter release catch to remove the filter from the machine.
The permanent filter located under the clear bin should last the lifetime of the machine and does not need to be washed. Please do not remove this filter.
Removing the filter
To remove the washable filter: Pull it out of the plastic case it is in.
Washing the filter
Soak the filter in cold water for at least 5 minutes.
WARNING: Please do not use detergent on the filter, or wash the filter in a dishwasher or in a washing machine.
After 5 minutes rinse the filter under cold running water and squeeze gently, repeating until the water runs clear.
Drying the filter
Leave the filter to dry in a warm place until completely dry.
Do not dry the filter inside a clothing dryer, hair dryer, microwave the filter, place the filter in an oven, or near an open flame.
Make sure the filter is completely dry before replacing in the machine.
Replacing the filter
Replace the filter into the filter casing and then put back into the cyclone top.
Reassemble and test the machine.
What sort of smell?
How to clean the bin and cyclone
Remove the bin by pressing the silver catch on the main duct.
Push the red button on the back of the clear bin handle to release dust directly into a dustbin or bag.
Cleaning the cyclone
Release the bin from the cyclone by pressing the silver release catch located on the clear bin.
Clean the cyclone with a dry cloth and shake or tap firmly to remove all dust from inside the fine dust collector. Do not get any part of the cyclone damp or wet.
Cleaning the bin
You can use cold water to clean the clear bin.
WARNING: Do not get any part of the cyclone assembly damp or wet. Do not use detergents or other chemicals.
Ensure the bin is completely dry before attaching back to the cyclone, and press firmly on the centre of the clear bin base to close before placing back on the machine.
Wash the filter
Please follow the steps in the video.
Has washing the filters resolved the problem?
Wash the filter
To maintain your Dyson machine we recommend that you wash your filter(s) at least once every 3 months.
Remove the clear bin and cyclone top from your machine by pressing the cyclone release catch.
Lift the filter release catch to remove the filter from the machine.
The permanent filter located under the clear bin should last the lifetime of the machine and does not need to be washed. Please do not remove this filter.
Removing the filter
To remove the washable filter: Pull it out of the plastic case it is in.
Washing the filter
Soak the filter in cold water for at least 5 minutes.
WARNING: Please do not use detergent on the filter, or wash the filter in a dishwasher or in a washing machine.
After 5 minutes rinse the filter under cold running water and squeeze gently, repeating until the water runs clear.
Drying the filter
Leave the filter to dry in a warm place until completely dry.
Do not dry the filter inside a clothing dryer, hair dryer, microwave the filter, place the filter in an oven, or near an open flame.
Make sure the filter is completely dry before replacing in the machine.
Replacing the filter
Replace the filter into the filter casing and then put back into the cyclone top.
Reassemble and test the machine.
Release the catch by hand
Pull the clear plastic catch on the base away from the bin.
Open the bin base and tip away the contents.
Press the bin release button on the cyclone handle.
Clean the bin seal
Clean any fine dust from the bin seal with a damp cloth and retest the bin release. Allow to fully dry before testing the bin release catch again.
Please select the appropriate option
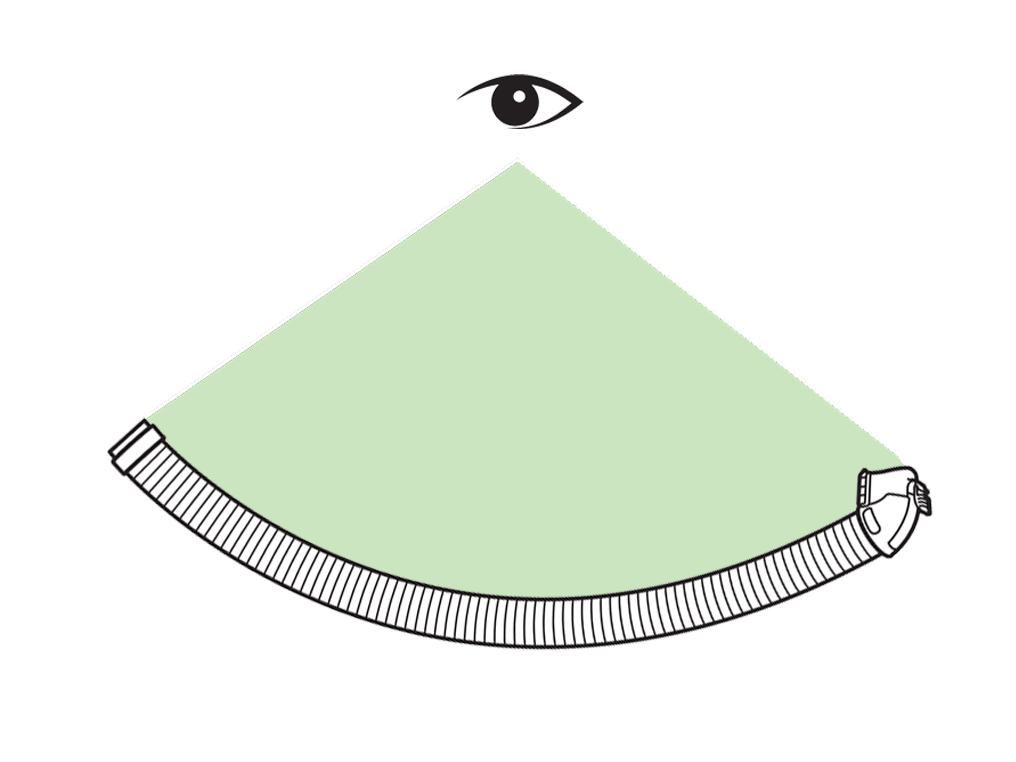
Checking the hose
When standing the machine upright, push the wand handle quickly and firmly to ensure the stabiliser has engaged.
Remove the hose from the duct by pressing the release catch.
Check the hose for blockages and remove as necessary.
Retest the machine.
Checking the hose
Remove the hose from the duct by pressing the release catch.
Check the hose for blockages and remove as necessary.
Retest the machine.
Blockage issue
This is likely caused by a blockage.
From where is the dust falling?
Check the Brush bar
Plug in and switch on the machine.
Recline it into the vacuuming position.
Check the Brush bar through the window at the front of the Cleaner head.
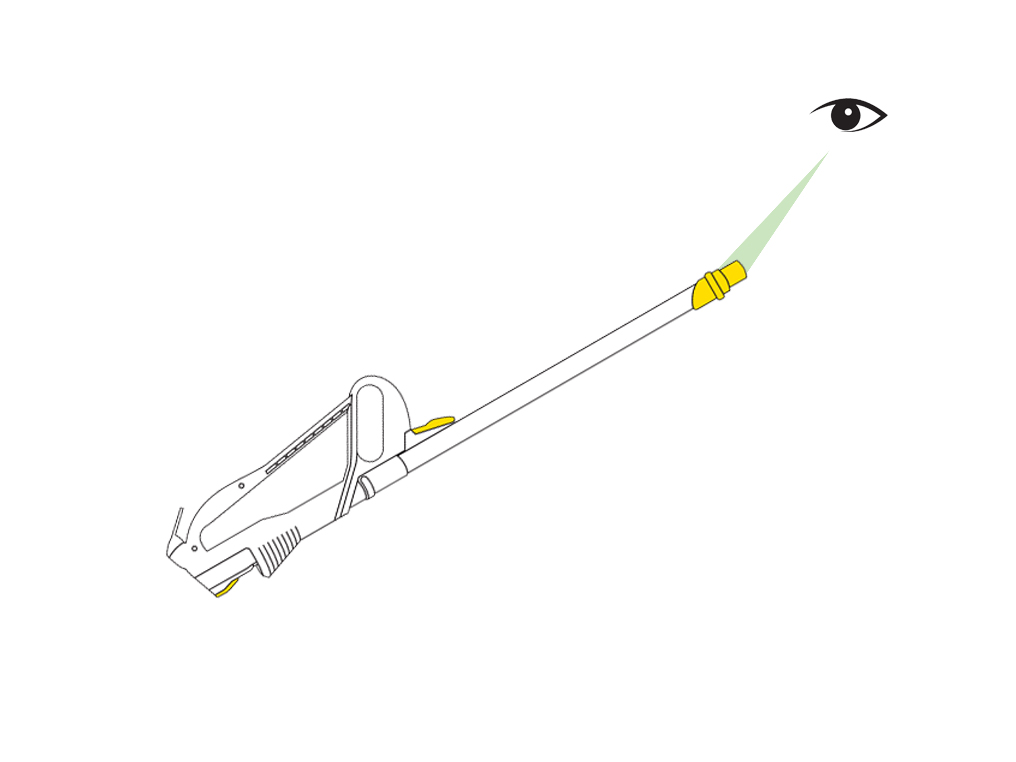
Test the hose
Make sure the machine is standing in the upright position.
Open the Wand cap and pull the Wand away from the main duct.
Disconnect the wand and hose by pressing the release catch on the wand.
Turn the machine on and test the suction from the hose.
Is the suction from the hose strong or weaker than usual?
Check the hose and valve assembly
Remove the hose by pressing the hose release catch upwards and carefully pulling the hose away from the machine.
Check the valve assembly for blockages.
Hose check
Check the hose for any damage.
Check the hose for blockages and remove if necessary.
Test the Wand
Make sure the machine is standing in the upright position.
Pull back the Wand cap.
Turn the machine on and place your hand on the end of the Wand.

Is the suction strong or weaker than usual?
Please open the PDF for the user guide.
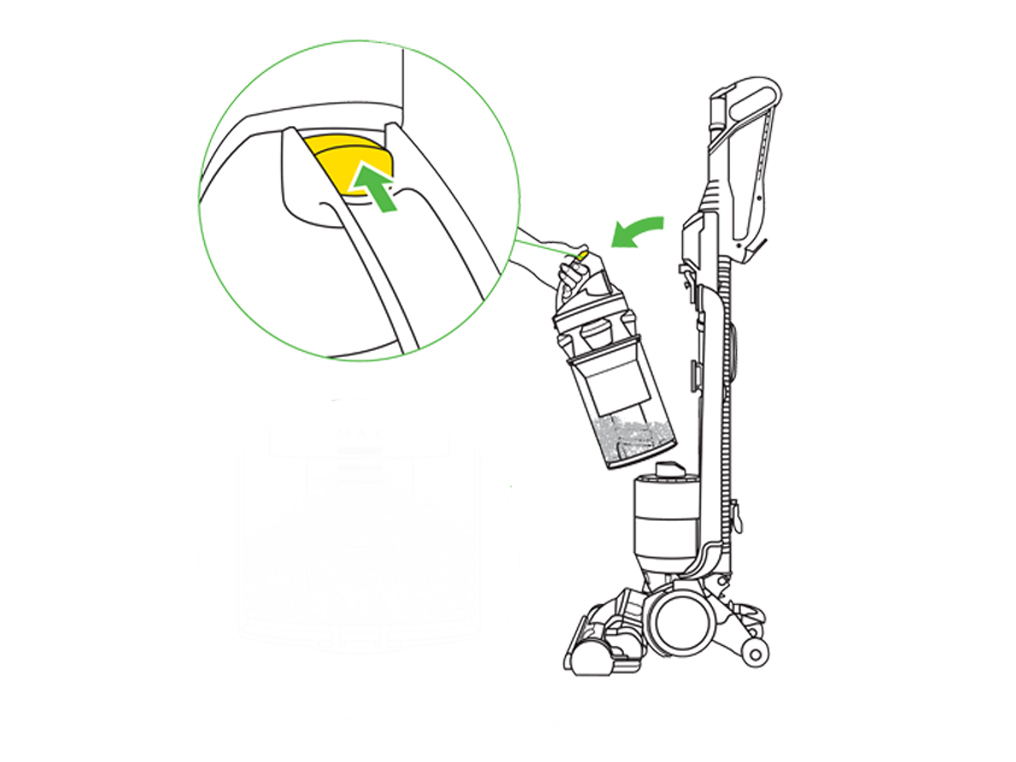
Empty the bin
Press the silver button on the main duct above the bin handle.
Press the red button on the back of the clear handle to open the bin base and release the dust.
This can be done directly into a Bin, or into a bag wrapped around the cyclone.
To completely detach the bin from the cyclone - press the silver release catch at the top of the clear bin.
Use a cloth or brush tool to clean the cyclone if required.
How to assemble your Dyson machine
Connect the hose to the bottom of the machine, ensuring the hose clicks into place.
Connect the wand to the hose and press the button on the hose cuff to slide through. Ensure the handle clicks into place at the top of the duct.
Wind the cable around the cable winders, in an anti-clockwise direction.
Attach tools to the top of the main duct.

The Cleaner head connects to the front of the main duct. Ensure it clicks into place.
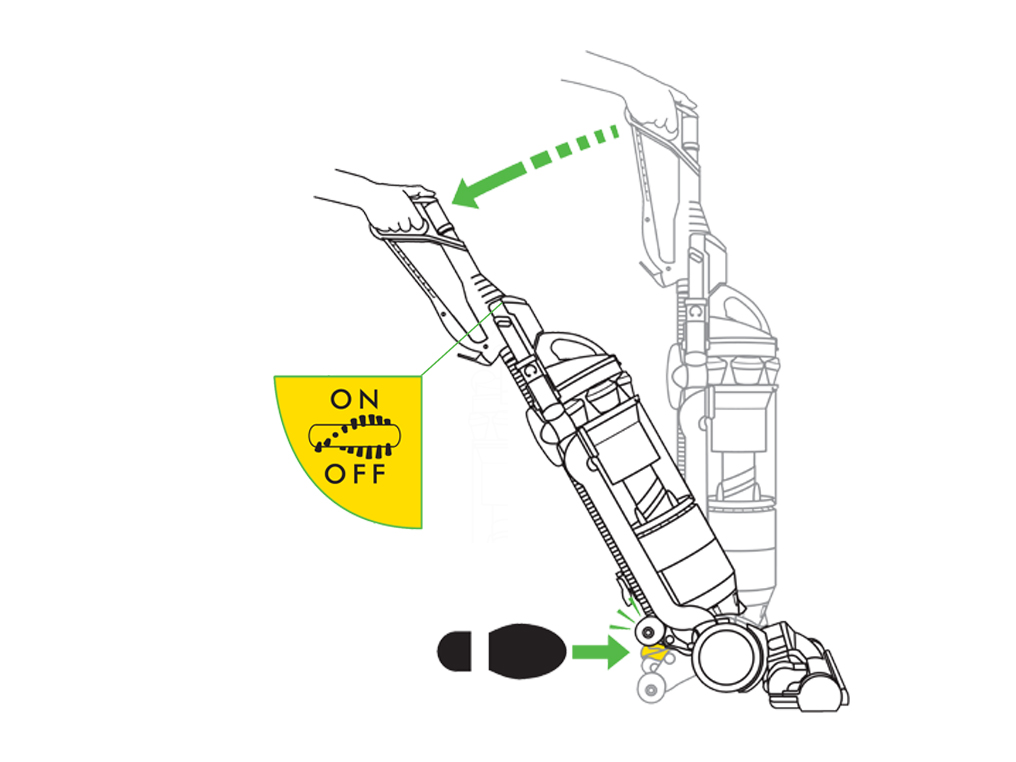
How to operate the brush control
The Brush bar will start automatically once the machine is switched on and lowered into the vacuuming position.
Press the brush control button located next to the ON/OFF switch to turn the Brush bar off for vacuuming delicate rugs, looped carpets and hard floors.
Press the button again to restart the Brush bar for vacuuming carpets.
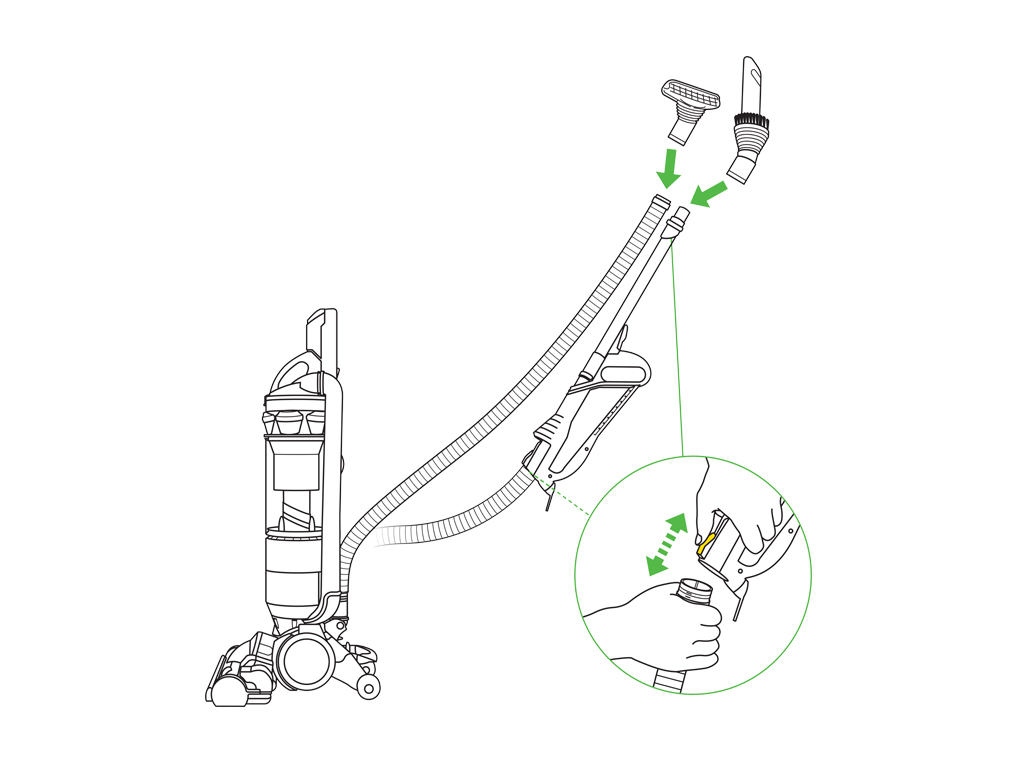
Attaching the accessories
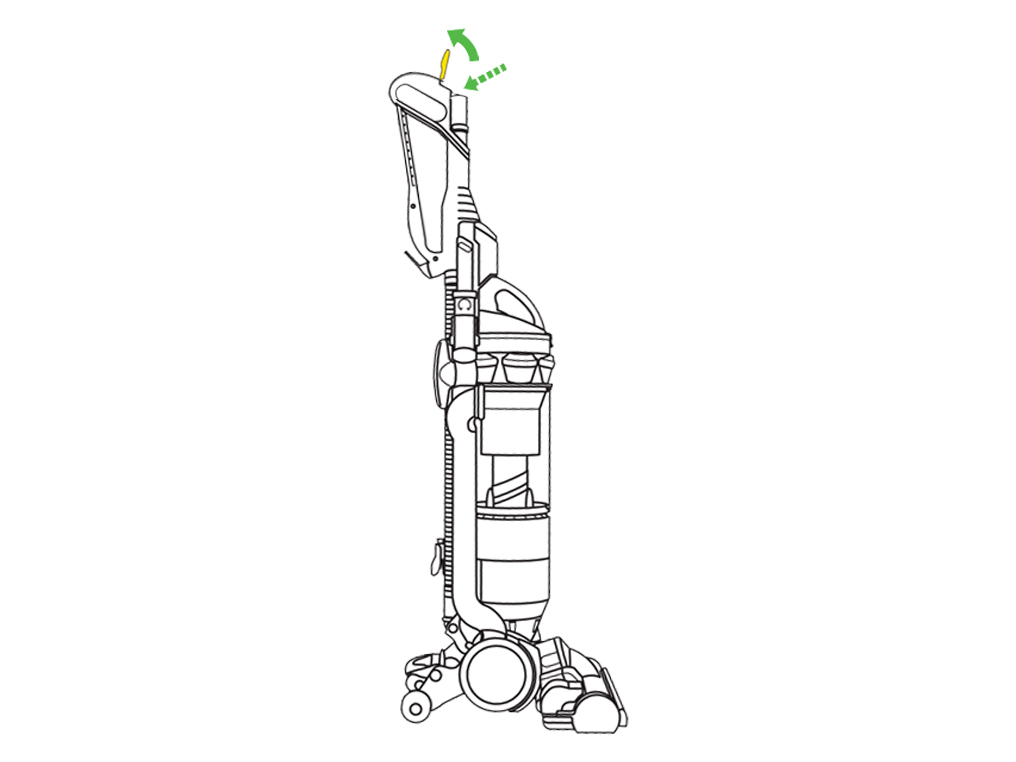
Pull the Wand upwards and out of the machine.
Attach either the combination tool or the stair tool to the Wand or hose.
Carrying your Dyson machine
Lift the machine only by the carry handle on the cyclone top.
For your safety, do not press the cyclone release when carrying your machine.

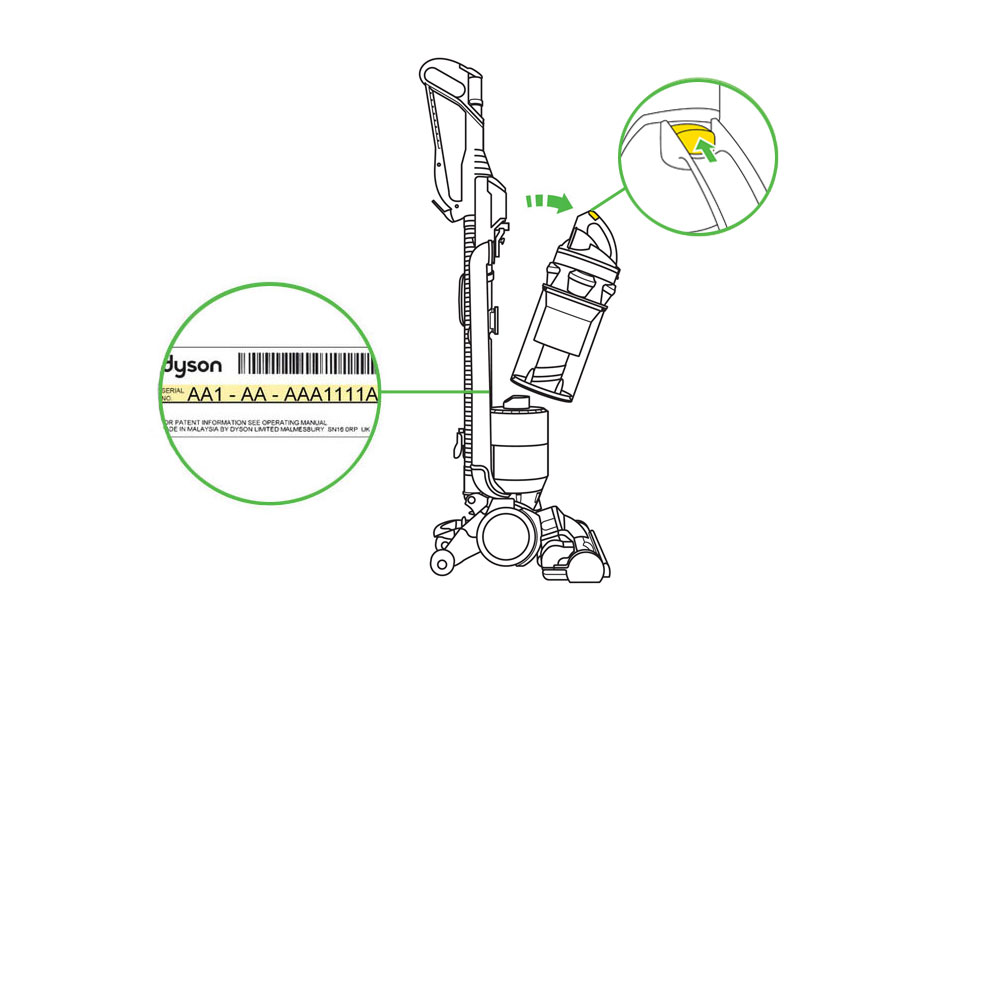
Serial number location
Remove the bin from the machine.
The serial number can be found behind the bin on the Main duct.
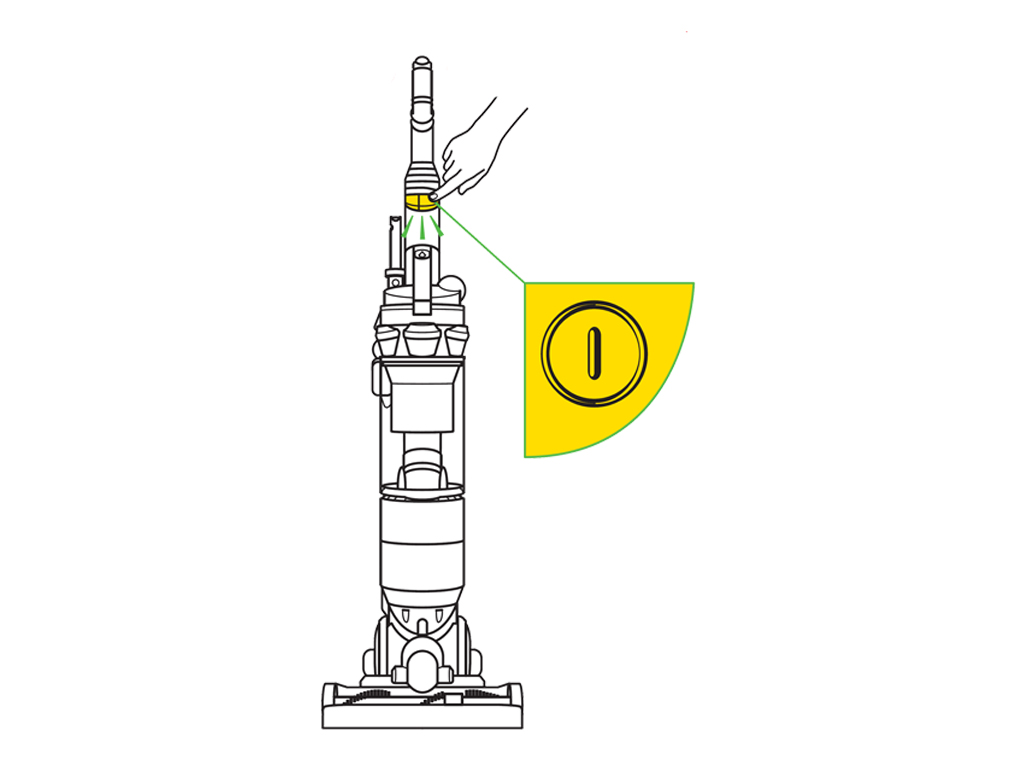
How to start vacuuming
Plug the machine in and press the ON/OFF switch.
Press the pedal at the back of the machine with your foot and lower the machine into the vacuuming position.
Ensure the stabilising wheels are fully retracted.
Small movements of the wrist will create a zigzag motion in the Cleaner head allowing easier cleaning around furniture.
When you have finished vacuuming push the machine into an upright position to drop the stabilising wheels.
Ensure the wheels are fully locked in place before letting go of the machine.
We need a little more information to help us solve your issue.
Please contact our customer service team on 01-475-7109, or directly on Live Chat through our Digital Assistant by clicking the purple icon at the bottom of the page. You can start a conversation with an Expert by clicking the agent icon at the bottom left of the chat window.
We're glad the problem's been solved.
Please let us know if there's anything else we can help you with.
The Dyson guarantee

'How to ' videos and tips

Exclusive owner benefits

Expert advice. 7 days a week.

Hassle-free repairs and replacement
Please get in touch.
Our experts are ready to help you.
UK based helpline open
8:00am- 8:00pm Monday to Friday
8:00am- 6:00pm Saturday and Sunday
Further help
DC18 Allergy™