Let's get your machine working
CSYS Desk light
Let's get your machine working
CSYS Desk light
Popular queries
Please select the appropriate option

Please select the appropriate option
Please check the following:
Is the power cord or plug damaged?
Check other household appliances.
Check the light in another socket.
Has checking the electrics resolved the problem?
Carefully turn the light on its side.
Ensure the power cord is plugged into the centre of the base.
Carefully lay the cord through the indicated groove ensuring it does not become twisted.
Place the light upright ensuring cord remains in the slot.

Ensure the light is plugged into a wall socket and switched on.

Check the dimmer switch
Press the power button to switch on.
Hold the switch down to use the dimmer switch.
Check wheel carriage plates
Check that the wheel carriage plates are screwed together currently.
Follow the procedure image for correct assembly.
Disconnect the carriage plates
Ensure the following before starting the checks.
Ensure the light is at the top before carrying out the checks. Failure to do this will cause the weight to drop.

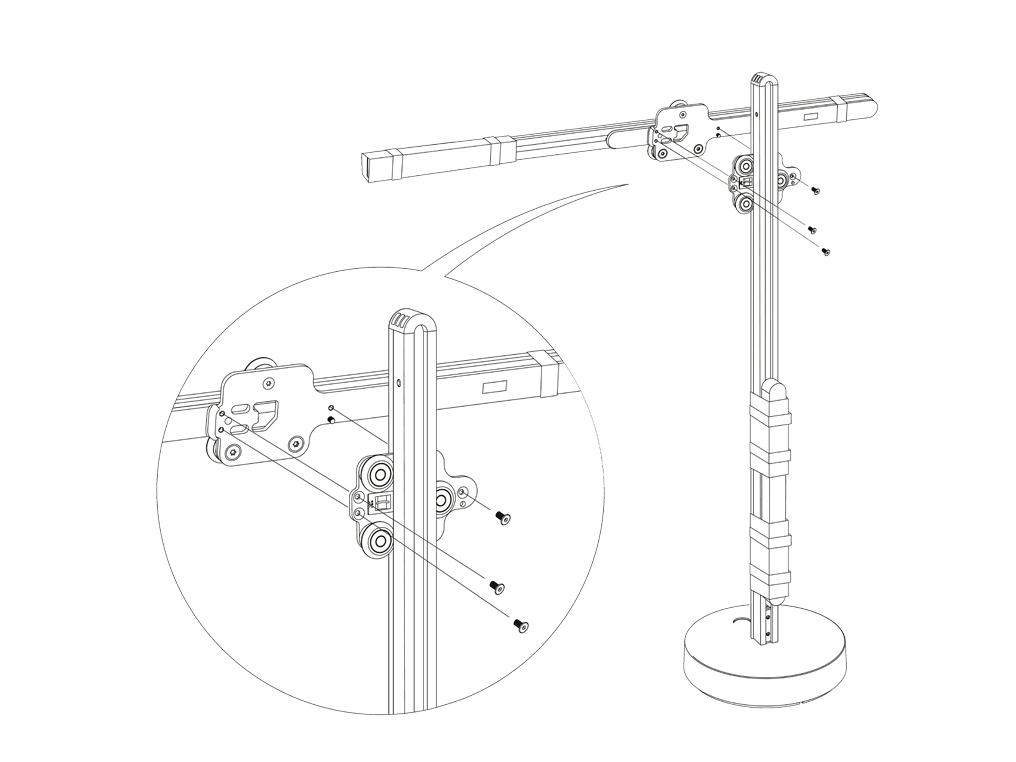
Use Hex key provided to remove the three screws.
Be careful to capture all screws when they are loosened.
Hold the heat sink at all times when removing from the upright.
Ensure the red tape on the plates covering the contacts has been removed.

Please follow the next step.
Align the square shapes and screw holes on the heat sink arm and the upright.

Press the two parts together with one hand.
Loosely screw in the three screws.

Recheck alignment.
Proceed to screw until securely clamped.
Unplug the light and leave for 5 minutes.

Plug the light in and switch on.
Check wheel carriage plates
Check that the wheel carriage plates are screwed together currently.
Disconnect the carriage plates
Follow the procedure image for correct assembly.
Ensure the following before starting the checks.
Ensure the light is at the top before carrying out the checks. Failure to do this will cause the weight to drop.
Use Hex key provided to remove the three screws.
Be careful to capture all screws when they are loosened.
Hold the heat sink at all times when removing from the upright.
Ensure the red tape on the plates covering the contacts has been removed.

Please follow the next step.
Reassemble the carriage plates
Align the square shapes and screw holes on the heat sink arm and the upright.
Loosely screw in the three screws.
Recheck alignment.
Proceed to screw until securely clamped.
Check electrical supply
Please check the following:
Is the power cord or plug damaged?
Check other household appliances.
Check the light in another socket.
Has checking the electrics resolved the problem?
Check power cord
Carefully turn the light on its side.
Ensure the power cord is plugged into the centre of the base.
Carefully lay the cord through the indicated groove ensuring it does not become twisted.
Place the light upright ensuring the cord remains in the slot.
Ensure the light is plugged into a wall socket and switched on.
Check the dimmer switch
Press the power button to switch on.
Hold the switch down to use the dimmer switch.
Check wheel carriage plates
Check that the wheel carriage plates are screwed together currently.
Follow the procedure image for correct assembly.
Disconnect the carriage plates
Ensure the following before starting the checks.
Ensure the light is at the top before carrying out the checks. Failure to do this will cause the weight to drop.
Use Hex key provided to remove the three screws.
Be careful to capture all screws when they are loosened.
Hold the heat sink at all times when removing from the upright.
Ensure the red tape on the plates covering the contacts has been removed.
Reassemble the carriage plates
Align the square shapes and screw holes on the heat sink arm and the upright.
Press the two parts together with one hand.
Loosely screw in the three screws.
Recheck alignment.
Proceed to screw until securely clamped.
Is the problem with the arm going backwards and forwards, up and down or both?
Please select the appropriate option
How to assemble your Dyson light
Please follow the steps in the video.
Find the text version of the step-by-step guide instead, under "Is there anything else we can help you with?"
Is there anything else we can help with?
Please select the appropriate option
Getting started
Your box contents will include: the Instruction manual, the Power supply unit, a microfibre cloth, the Horizontal arm assembly, the Fixing pack and the Vertical assembly.
Carefully read the assembly and important safety instructions.
Stand the Vertical assembly on a flat surface.
Remove both pieces of red tape covering the electrical contacts.
Align the screw holes on the plates and press both parts together with one hand.
Loosely screw in the three screws using the provided Allen key.
Ensure the plates are aligned, then secure all three screws fully. Do not over tighten the screws.
Remove any packaging from the base of the Vertical assembly.
Turn the light on its side.
Carefully fit the cord into the indicated groove ensuring it's not twisted.
Place the light upright ensuring the cord remains in place.
Remove the transit tape and all packaging from the product.
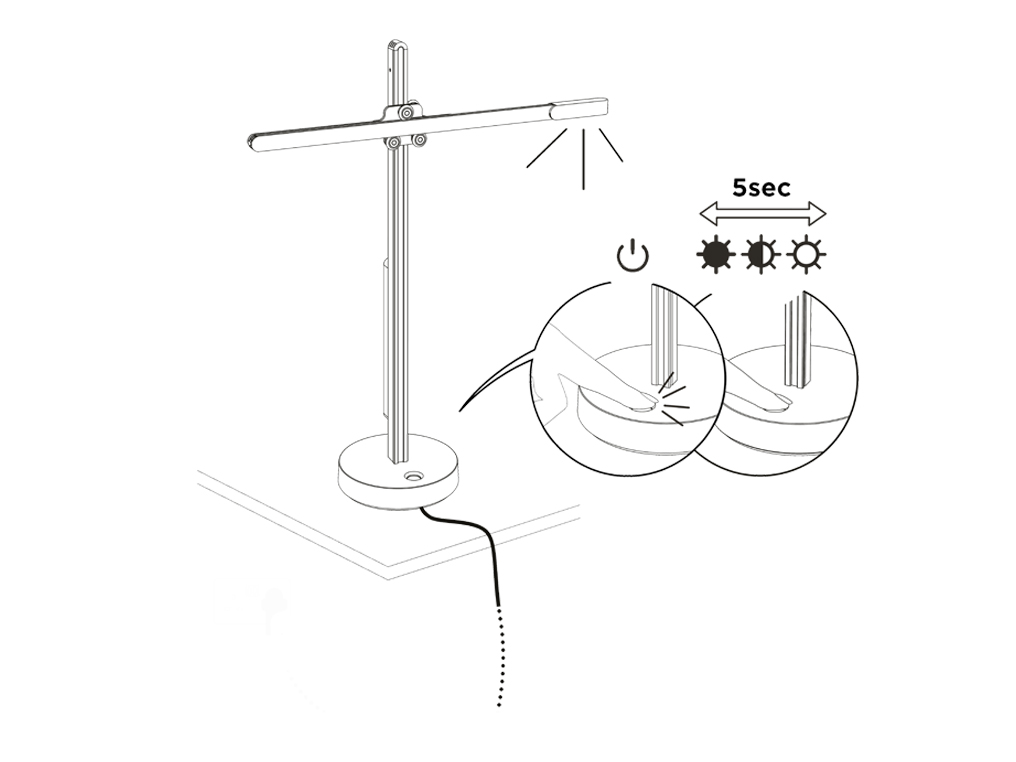
Plug in the power supply unit and turn on the light using the button.
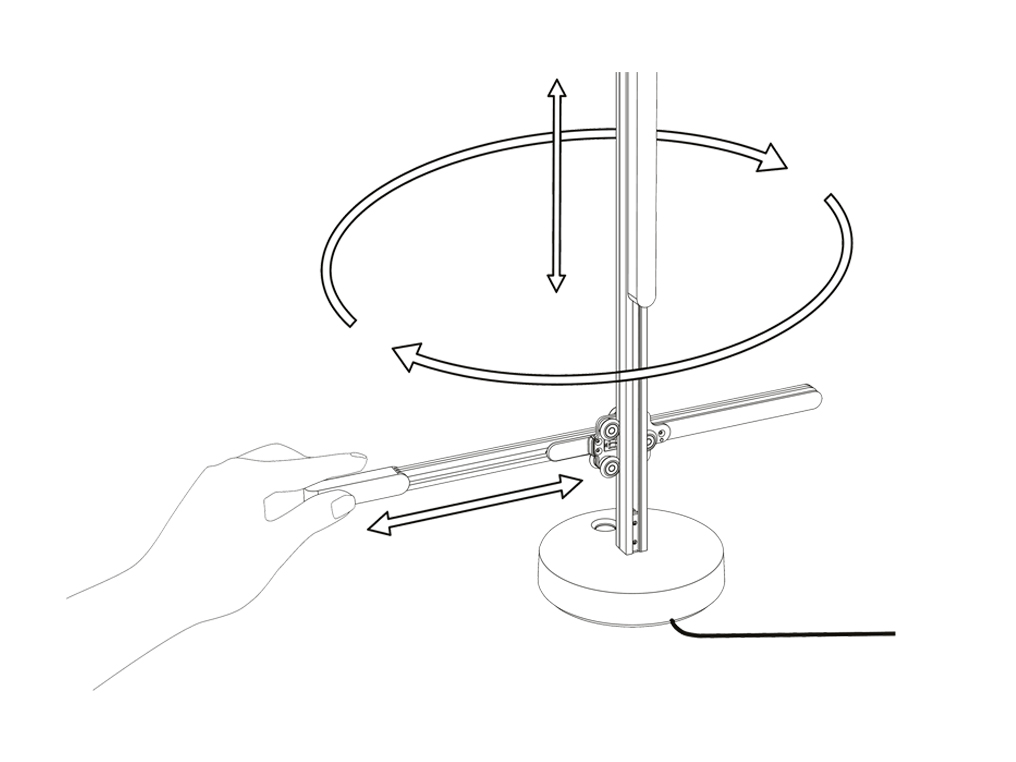
The light can be adjusted, vertically, horizontally and rotate through 360°. Adjust the position of the light by moving the arm not the weight.
CSYS lights have touch-sensitive, continuous dimming. Adjust the level of the light you need by keeping your finger held on the button.
Using the dimmer
Press the power button to switch on.
Hold the switch down to use the dimmer switch.
How to reposition the Dyson light
The LED head can be positioned directionally in 3 axes.
Only use the heat sink arm to reposition.
We need a little more information to help us solve your issue.
Please contact our customer service team on 01-475-7109, or directly on Live Chat through our Digital Assistant by clicking the purple icon at the bottom of the page. You can start a conversation with an Expert by clicking the agent icon at the bottom left of the chat window.
We're glad the problem's been solved.
Please let us know if there's anything else we can help you with.
The Dyson guarantee

'How to ' videos and tips

Exclusive owner benefits

Expert advice. 7 days a week.

Hassle-free repairs and replacement
Please get in touch.
Our experts are ready to help you.
UK based helpline open
8:00am- 8:00pm Monday to Friday
8:00am- 6:00pm Saturday and Sunday
Further help
CSYS Desk light