
Popular queries
Clean the bin and cyclone
Press the button at the top of the cyclone handle and remove the bin from the machine.

Press the button again to open the bin base.
Press the button near the rectangular inlet to separate the clear bin from the cyclone.
The clear bin can be wiped with a damp cloth.
Do not use any detergent or polish on any part of the machine.

Check the bin and cyclone for blockages and remove as necessary.
Clear any hair or fibres from the cyclone shroud
Do not use any water on the cyclone.
Once the parts are completely dry, reassemble and test the machine.
Please select the appropriate option


Check inlet suction
Turn off and unplug the machine.
Recline the machine into the vacuuming position.

Lay the machine on its front. There is a latch on the connection between the ball and Cleaner head. Slide it towards the ball, supporting the machine as you do so.
Pull the Cleaner head away from the machine. Use a constant, firm pressure.
Turn the vacuum over so that the bin is facing upwards. Place your hand over the opening then turn on and test the suction.

Is the suction at the Cleaner head inlet strong or is it weaker than usual?
Check the duct and internal hose
Turn off and unplug the machine.
Press the release catch on top of the cyclone and remove the bin.
Pull the red internal hose collar down, unclip it and then check for blockages.

Plastic Access Cover
To look for blockages behind the clear bin you will need to remove the plastic access cover.
Recline the machine and remove the outer cover of the ball.
Remove the crosshead screw and unhook the plastic access cover.
Remove the blockage.
To replace the plastic access cover:
Hook it back into the plastic slot, then push it towards the filter ball.
Fasten the crosshead screw back into position and replace the outer cover of the ball.
Reassemble and test machine.

Has this resolved the problem?
Check the bin and cyclone
Press the button at the top of the cyclone handle and remove the bin from the machine.
Press the button again to open the bin base.
Press the button near the rectangular inlet to remove the clear bin from the cyclone.

Check the bin and cyclone for blockages and remove as necessary.
Clear any hair or fibres from the cyclone shroud
Do not use any water on the cyclone.
Gently tap the side of the cyclone over a bin - this will remove any fine dust clogged up in the cyclone.

Has clearing the bin and cyclone resolved the problem?
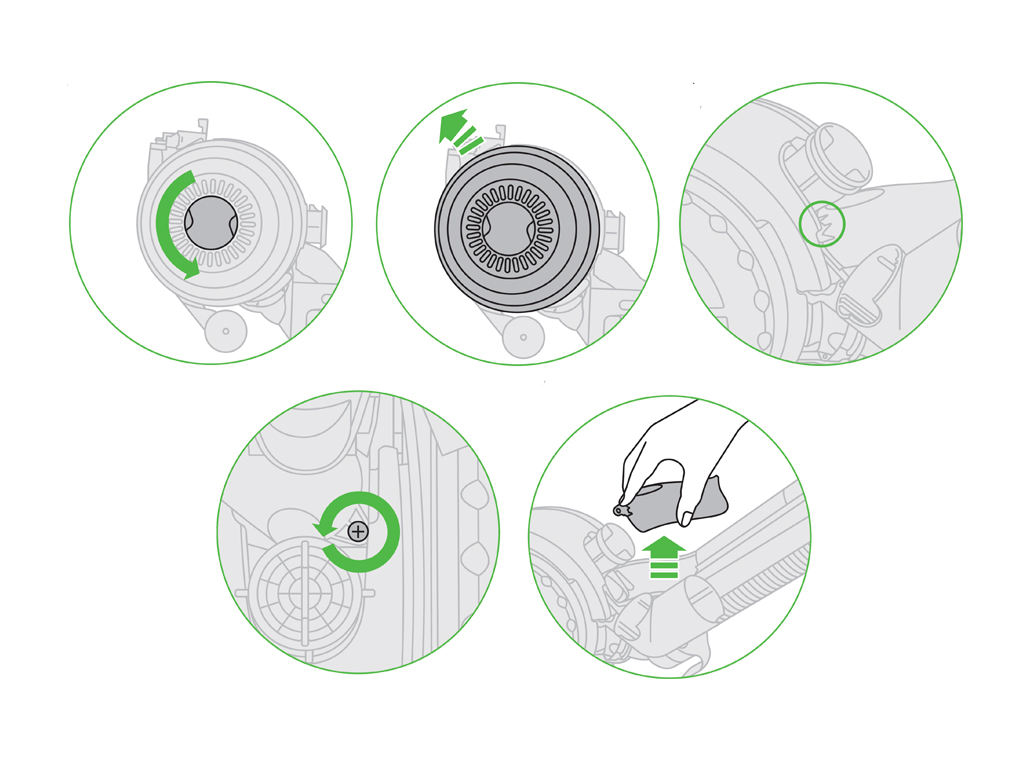
Remove the pre-filter
Remove the bin and cyclone from the machine and unclip the cyclone top handle.
Pull the filter out from the cyclone.

Wash with cold water only. Do not use detergents.

Remove the post-filter
Turn the central locking dial on the outer cover of the ball counter-clockwise until the cover is released. Lift off the cover.

Turn the filter one-quarter counter-clockwise to release.

Separate the inner foam ring from the outer filter and shell.
The filter should be rinsed and tapped out until the water runs clean, then tapped out again to ensure all excess water is removed.

Dry the filter
Leave to dry completely for 24 hours.

Test the machine
Reassemble and test machine.

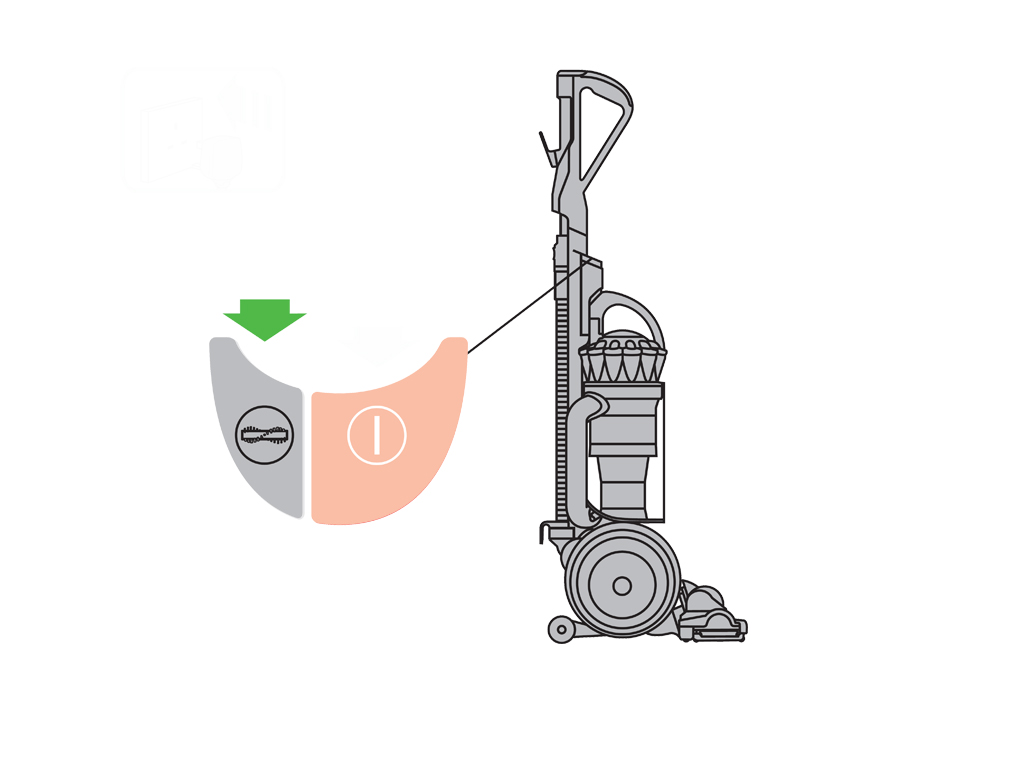
Turn off the Brush bar
Plug the machine in and recline into the vacuuming position.
Turn the machine on.
Turn the Brush bar off using the switch next to the power button.
Remove the post-filter
Recline the machine and lay it on its back or side.
Turn the centre circle and remove the ball cover.
Separate the inner foam ring from the outer filter and shell.
Turn the machine on.
Remove the bin and cyclone
Press the button at the top of the cyclone handle.
Remove the bin and cyclone from the machine.
Turn the machine on, keeping it in the upright position.

Remove the post-filter
Recline the machine and lay it on its back or side.
Turn the centre circle and remove the ball cover.
Separate the inner foam ring from the outer filter and shell.
Turn the machine on.
Check inlet suction
Turn off and unplug the machine.
Recline the machine into the vacuuming position.
Lay the machine on its front. There is a latch on the connection between the ball and Cleaner head. Slide it towards the ball, supporting the machine as you do so.
Pull the Cleaner head away from the machine. Use a constant, firm pressure.
Turn the vacuum over so that the bin is facing upwards. Place your hand over the opening then turn on and test the suction.
Is the suction at the Cleaner head inlet strong or is it weaker than usual?
Remove the post-filter
Recline the machine and lay it on its back or side.
Turn the centre circle and remove the ball cover.
Twist the filter and remove from the ball.
Check the housing for any debris and remove as necessary.
Replace post-filter cover and move machine without post-filter in place.
Remove the post-filter
Recline the machine and lay it on its back or side.
Turn the centre circle and remove the ball cover.
Separate the inner foam ring from the outer filter and shell.
Turn the machine on.
Reset the Brush bar
To reset the Brush bar press the Brush bar control button twice or switch the machine off and back on.
Please note: In normal use, the Brush bar automatically turns off when the machine is upright and automatically turns on when the machine is in the vacuuming position.
Check the inlet suction
Turn off and unplug the machine.
Recline the machine into the vacuuming position.
There is a latch on the connection between the ball and Cleaner head. Slide it towards the ball, supporting the appliance as you do so.
Pull the Cleaner head away from the appliance. Use a constant, firm pressure.
Turn the vacuum over so that the bin is facing upwards. Place your hand over the opening then turn on and test the suction.
Is there strong suction from the inlet?
Reset the Brush bar
To reset the Brush bar press the Brush bar control button twice or switch the machine off and back on.
Please note: In normal use, the Brush bar automatically turns off when the machine is upright and automatically turns on when the machine is in the vacuuming position.
Test the hose suction
To release the Wand, open the Wand cap and pull the Wand up and away from the handle until it clicks into place.

Press the button on the hose collar to release the Wand from the hose.
Test the suction from the hose.

Check the Wand
Look through both ends of the Wand and remove any blockages.
Check the Wand for damage.

Check the bin and cyclone
Press the button at the top of the cyclone handle and remove the bin from the machine.
Press the button again to open the bin base.
Press the button near the rectangular inlet to remove the clear bin from the cyclone.
Check the bin and cyclone for blockages and remove as necessary.
Clear any hair or fibres from the cyclone shroud
Do not use any water on the cyclone.
Gently tap the side of the cyclone over a bin (this will remove any fine dust clogged up in the cyclone).
Remove the pre-filter
Pull the filter out from the cyclone.
Wash with cold water only. Do not use detergents.
Remove the post-filter
Turn the central locking dial on the outer cover of the ball counter-clockwise until the cover is released. Lift off the cover.
Turn the filter one-quarter counter-clockwise to release.
Separate the inner foam ring from the outer filter and shell.
The filter should be rinsed and tapped out until the water runs clean, then tapped out again to ensure all excess water is removed.
Dry filters
Leave to dry completely for 24 hours.
Test the machine
Reassemble and test the machine.
Check the hose
Press the button at the top of the cyclone handle and remove the bin from the machine.
To remove the hose press the release catch firmly and pull on the hose.

Check the hose for any holes or tears and remove any blockages.

Check for debris in the airway in the rear of the machine.
Reassemble and test the machine.
Check the bin and cyclone
Press the button at the top of the cyclone handle and remove the bin from the machine.
Press the button again to open the bin base.
Press the button near the rectangular inlet to remove the clear bin from the cyclone.
Check the bin and cyclone for blockages and remove as necessary.
Clear any hair or fibres from the cyclone shroud
Do not use any water on the cyclone.
Gently tap the side of the cyclone over a bin (this will remove any fine dust clogged up in the cyclone).
Check the duct and internal hose
Turn off and unplug the machine.
Press the release catch on top of the cyclone and remove the bin.
Pull the red internal hose collar down, unclip it and then check for blockages.
Plastic Access Cover
To look for blockages behind the clear bin you will need to remove
the plastic access cover.
Recline the machine and remove the outer cover of the ball.
Remove the crosshead screw and unhook the plastic access cover.
Remove the blockage.
To replace the plastic access cover:
Hook it back into the plastic slot, then push it towards the filter ball.
Fasten the crosshead screw back into position and replace the outer cover of the ball.
Reassemble and test the machine.
Has clearing the duct and internal hose resolved the problem?
Thermal cut out
Most Dyson vacuums have a built in safety system that stops the machine if it begins to overheat. This usually happens because the filters need washing or your machine is blocked.
Carry out the performance checks, and if your machine cuts out unplug and leave for at least 2 hours to cool down.
Please select the appropriate option
Reset the Brush bar
To reset the Brush bar press the Brush bar control button twice or switch the machine off and back on.
Please note: In normal use, the Brush bar automatically turns off when the machine is upright and automatically turns on when the machine is in the vacuuming position.

Please select the appropriate option
Check the bin and cyclone
Press the button at the top of the cyclone handle and remove the bin from the machine.
Press the button again to open the bin base.
Press the button near the rectangular inlet to separate the clear bin from the cyclone.
The clear bin can be wiped with a damp cloth.
Do not use any detergent or polish on any part of the machine.
Check the bin and cyclone for blockages and remove as necessary.
Clear any hair or fibres from the cyclone shroud
Do not use any water on the cyclone.
Once the parts are completely dry, reassemble and test the machine.

Check the cyclone bin release button
Press the bin release button on the cyclone. This should then make contact with the red rod on the outside of the bin.
This in turn should make contact with the bin release catch, this is the clear hook at the end of the red rod.

Manually open the bin
During first use the bin base can be tightly sealed in place.
Attempt to open the bin base manually by pulling the bin base catch. This is the clear hook at the end of the red rod.

If the bin is now open, does the red rod on the outside of the bin slide up and down freely?
Reset the Brush bar
To reset the Brush bar press the Brush bar control button twice or switch the machine off and back on.
Please note: In normal use, the Brush bar automatically turns off when the machine is upright and automatically turns on when the machine is in the vacuuming position.
Please select the appropriate option
Check the inlet suction
Turn off and unplug the machine.
Recline the machine into the vacuuming position.
There is a latch on the connection between the ball and Cleaner head. Slide it towards the ball, supporting the appliance as you do so.
Pull the Cleaner head away from the appliance. Use a constant, firm pressure.
Turn the vacuum over so that the bin is facing upwards. Place your hand over the opening then turn on and test the suction.
Is there strong suction from the inlet?
Check the duct and internal hose
Turn off and unplug the machine.
Press the release catch on top of the cyclone and remove the bin.

Check the entry duct hatch for obstructions and that the seal is correctly seated.
Pull the internal hose collar down, unclip it and then check for blockages.
Check the duct and internal hose
Turn off and unplug the machine.
Press the release catch on top of the cyclone and remove the bin.
Check the entry duct hatch for obstructions and that the seal is correctly seated.

Replace the bin onto the machine.
Recline the machine into the vacuuming position. Lay the machine on its front.
Pull the internal hose collar down, unclip it and then check for blockages.
Ensure there is no debris or blockages in the changeover valve.

Check the duct and internal hose
Turn off and unplug the machine.
Press the release catch on top of the cyclone and remove the bin.
Check the entry duct hatch for obstructions and that the seal is correctly seated.
Pull the internal hose collar down, unclip it and then check for blockages.
Has clearing the Cleaner head resolved the problem?
Assembly instructions
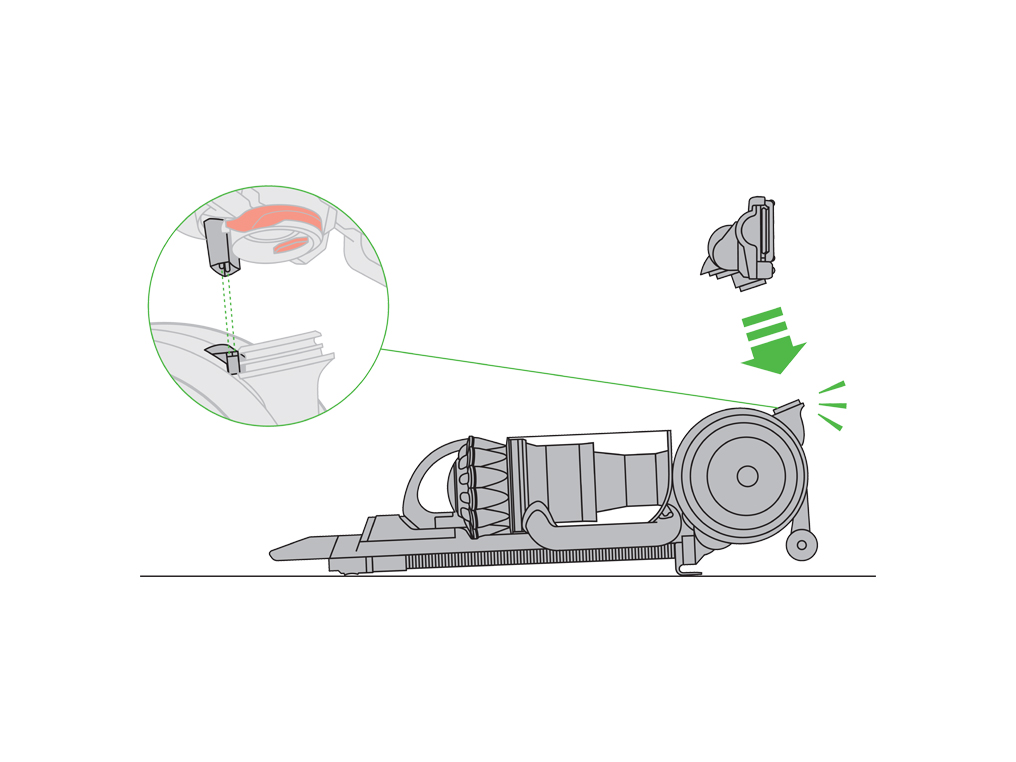
Attach the Cleaner head
- Lay the machine on its back and fit the Cleaner head onto the connections.
- Push firmly until the Cleaner head clicks into place and the latch engages.
How to attach the accessories
Lower the Wand handle onto the machine ensuring it clicks.
Slide the Wand into the hose and fit to the back of the machine until it 'clicks' into position.

Store the tools.
Remove the cyclone and bin.
Slide the tool holder onto the side of the duct as shown.
Attach the combination tool to the tool holder on the side of the machine.
Attach the stair tool to the tool holder on the side of the machine.

How to use the Brush bar
Note: The Brush bar will automatically switch on when the machine is reclined into the vacuuming position.
Press the brush control button next to the On/Off switch to stop the brushes for use on delicate rugs, loop pile carpets and hard floors.
Press the button again to restart the Brush bar for vacuuming carpets.
Carrying your Dyson machine
Lift the machine only by the carry handle on the cyclone top.
For your safety, do not press the cyclone release when carrying your machine.

How to start vacuuming
Plug the machine in.
Pull handle back and recline machine into vacuuming position ensuring the stabilising wheels are facing up towards the back of the machine.
Press the ON/OFF switch.
Small movements of the wrist will create a zig zag motion in the Cleaner head allowing easier cleaning around furniture.
Extend the wand until it clicks.
Press the wand release button and lift the wand out of the hose.
Lift the wand handle cap and push on to the hose until it clicks into place.
Push the combination tool on to the end of the wand handle.
Alternatively, click the combination tool directly to the hose.
Remove the pre-filter
Remove the bin and cyclone from the machine and unclip the cyclone top handle.
Pull the filter out from the cyclone.
Remove the post-filter
Turn the central locking dial on the outer cover of the ball counter-clockwise until the cover is released. Lift off the cover.
Turn the filter one-quarter counter-clockwise to release.
Separate the inner foam ring from the outer filter and shell.
The filter should be rinsed and tapped out until the water runs clean, then tapped out again to ensure all excess water is removed.
Dry filters
Leave to dry completely for 24 hours.
Test the machine
Reassemble and test the machine.
Empty the bin
Press the button at the top of the handle and remove the bin from the machine.
Press the button again to open the bin base and release the dust.
This can be done directly into a Bin, or into a bag wrapped around the cyclone.


Further help
Dyson Light Ball Multi Floor vacuum