Popular queries
Empty the bin
Turn off the power and unplug the machine.
Press the release catch on the cyclone and remove the cyclone and clear bin from the machine.

Push the button on top of the cyclone to open the bin lid, being careful to ensure dust is captured.
Shake or tap firmly to remove all dust from inside the fine dust collector.
Press firmly on the centre of the clear bin base to close.
Please select the appropriate option


Check the floor tool
Remove the floor tool from the extension tube.

Check the floor tool openings for blockages and remove if necessary.

Check the floor tool
Remove the floor tool from the extension tube.
Check the floor tool openings for blockages and remove if necessary.

Check bleed valve for blockages and remove as necessary.

Check the Cleaner head
Check the opening of the floor tool for blockages and remove if necessary.
Use a coin to unlock the fastener marked with a padlock.
Carefully remove the Brush bar and clear any debris.
Remove any debris from the Brush bar.
Checking the Turbine head openings
With the Turbine head removed, check the openings on the tool for blockages and remove if necessary.
Unlock the Brush bar end cap
Use a coin to unlock the fastener marked with a padlock.
Remove the Brush bar
Carefully remove the Brush bar and clear any debris.
Remove any debris from the Brush bar.
Remove the bin
Press the release catch on the cyclone and remove the cyclone and clear bin from the machine.

Turn on and test the machine.
Check the bin and cyclone
With the bin and cyclone removed from the machine, press the button at the top of the handle to open the bin base.
Press the tab at the rear of the clear bin to release it from the cyclone.

Wash the bin with cold water or a damp cloth.
WARNING: Do not use detergents or polishes on the clear bin.
Wipe any dust and fibres off the cyclone with a dry cloth or soft dusting brush.

Rebuild and test the machine.

Check the floor tool
Remove the floor tool from the extension tube.
Check the floor tool openings for blockages and remove if necessary.
Remove the hose and test the machine
Using a coin, undo the 2 fasteners on the underside of the machine.

Remove the post-filter cover as shown.

Release the hose bracket.

Unclip the hose from the hose inlet.

Turn the machine on and check for suction.

Remove the bin and turn on the machine
Remove the bin.
Turn the machine on.
Check the hose and Wand
Check along the length of the hose for damage or blockages and remove as necessary.
With the Wand handle removed, check the openings for blockages and remove if necessary.
Has this resolved the problem?
Check the floor tool
Remove the floor tool.

Clear the wheels and castors of any hair or fibres.
Check that the wheels turn freely and are free from damage.
Has this resolved the problem?
Check the suction
Remove the floor tool from the extension tube by pressing the release catch located on the bottom of the extension tube.

Ensure that the extension tube is fully extended and clicks firmly into place.

Turn the machine on and place your hand at the base of the extension tube.

Is the suction strong or weaker than usual?
Check the floor tool
Remove the floor tool from the extension tube.
Check the floor tool openings for blockages and remove if necessary.
How to remove the hose
Using a coin, undo the 2 fasteners on the underside of the machine.
Remove the post-filter cover as shown.

Release the hose bracket.
Unclip the hose from the hose inlet.
Place your hand over the hose inlet and test the suction.
Is the suction at the inlet strong or weak?
Checking the duct, cyclone and bin
Press the release catch on the cyclone and remove the cyclone and clear bin from the machine.
Check the duct for blockages.
Push the button on top of the cyclone to open the bin lid, being careful to ensure dust is captured.
Shake or tap firmly to remove all dust from inside the fine dust collector.
Press the silver button at the rear of the cyclone to separate it from the clear bin.
Wipe any dust and fibres off the cyclone with a dry cloth or soft dusting brush.

To maintain your Dyson machine we recommend that you wash your filter at least once a month.
Wash the filters
Undo the fastener alongside the wheel with a coin.

Open the filter cover and remove the filter.

Wash the filter in cold water
WARNING: Do not use detergents or put the filter in the washing machine or dishwasher.

Leave filter to dry in a warm place until filter is completely dry.
Do not dry filter in a tumble dryer, microwave, oven, or near an open flame.

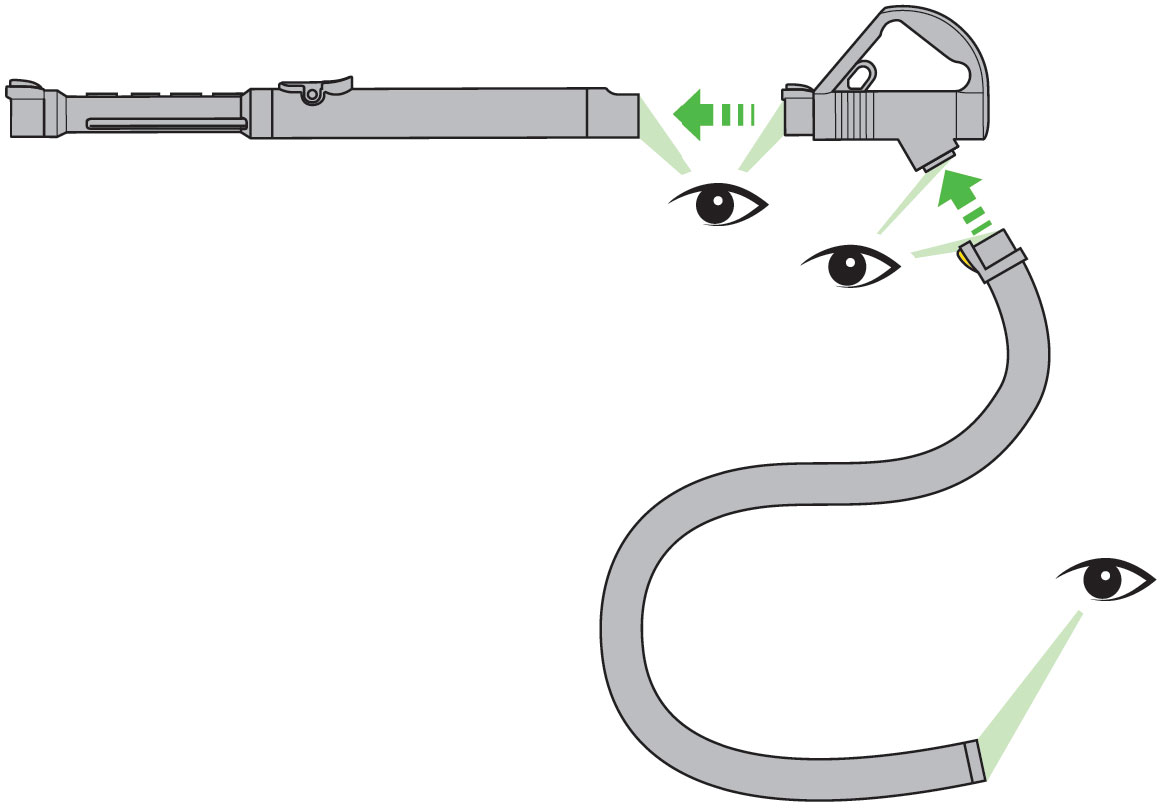
Inspect the hose and wand
Check along the length of the hose for blockages and remove as necessary.
With the Wand handle removed, check the openings for blockages and remove as necessary.

Inspect the extension tube
Detach the extension tube from the Wand and hose by pressing the retaining clips on the Wand and extension tube.
Ensure the extension tube is fully extended.
Look through the extension tube and remove any debris.
Reassemble and test the machine.

Checking the duct, cyclone and bin
Press the release catch on the cyclone and remove the cyclone and clear bin from the machine.
Check the duct for blockages.
Press the silver button at the rear of the cyclone to separate it from the clear bin.
Press the silver button at the rear of the cyclone to separate it from the clear bin.
Wipe any dust and fibres off the cyclone with a dry cloth or soft dusting brush.
Check the floor tool
Remove the floor tool from the extension tube.
Check the floor tool openings for blockages and remove if necessary.

Check bleed valve for blockages and remove as necessary.
Check the Cleaner head
Check the opening of the floor tool for blockages and remove if necessary.
Use a coin to unlock the fastener marked with a padlock.
Carefully remove the Brush bar and clear any debris.
Remove any debris from the Brush bar.
Check Wand handle controls
Turn the Brush bar on/off.

Clear the Brush bar
Remove the floor tool from the extension tube by pressing the release catch located on the bottom of the extension tube.

With the Motorhead removed, check the electrical contacts on the tool for signs of damage.

Check the jockey wheel underneath the floor tool for obstructions or damage.
Test the jockey wheel with the floor tool the right way up as a safety mechanism locks the wheel in place when upside down.

Use a coin to unlock the fastener marked with a padlock.

Carefully remove the Brush bar and clear any debris.

Check the soleplate
If you cannot clear an obstruction, the sole-plate can also be removed.
Removing the base plate.
To gain access to blockages in the floor tool, remove the sole-plate by using a coin to loosen the screw marked with a padlock.

Check the opening for blockages and remove as necessary.

Refit the base plate and lock it in place.
Refit the Brush bar
Replace the Brush bar and secure it by tightening the fastener.
Ensure it is fixed firmly before operating the appliance.

Reassemble and test the machine.
Test the Wand
Remove the Cleaner head from the Wand, and remove the Wand from the machine.

Attach the floor tool to the wand handle.

Turn the Brush bar on.

Check the Wand handle
Remove the floor tool.

Check the electrical contacts on the Wand handle for signs of damage.

Check the hose
Remove the hose from the inlet on the machine.

Check the electrical contacts on the hose for signs of damage.
Check the inlet
Check the corresponding connectors on the inlet for signs of damage.

Reassemble the machine.

Remove the hose
Using a coin, undo the 2 fasteners on the underside of the machine.
Remove the post-filter cover as shown.
Release the hose bracket.
Unclip the hose from the hose inlet.
Place your hand over the hose inlet and test the suction.
Is the suction at the inlet strong or weak?
Checking the Turbine head openings
With the Turbine head removed, check the openings on the tool for blockages and remove if necessary.
Unlock the Brush bar end cap
Use a coin to unlock the fastener marked with a padlock.
Remove the Brush bar
Carefully remove the Brush bar and clear any debris.
Remove any debris from the Brush bar.
How to remove the hose
Using a coin, undo the 2 fasteners on the underside of the machine.
Remove the post-filter cover as shown.
Release the hose bracket.
Unclip the hose from the hose inlet.
Place your hand over the hose inlet and test the suction.
Is the suction at the inlet strong or weak?
Switch off and unplug the machine.
How to remove the hose
Using a coin, undo the 2 fasteners on the underside of the machine.
Remove the post-filter cover as shown.
Release the hose bracket.
Unclip the hose from the hose inlet.
Place your hand over the hose inlet and test the suction.
Is the suction at the inlet strong or weak?
Washing the filters
Undo the fastener alongside the wheel with a coin.
Open the filter cover and remove the pre-filter.
Undo the fasteners on the bottom of the cylinder using a coin.

Remove the post-filter cover from the bottom of the cylinder.

Remove the post-filter.

Wash the filters
Wash the pre-filter in cold water.
WARNING: Do not use detergents or put the filter in the washing machine or dishwasher.
Wash the post-filter in cold water, and tap 10 times.
WARNING: Do not use detergents or put the filter in the washing machine or dishwasher.

Leave the filter in a warm place for 24 hours, until completely dry. Do not dry the filter in a tumble dryer, oven, microwave or near an open flame.
Check the suction
Remove the floor tool from the extension tube by pressing the release catch located on the bottom of the extension tube.
Ensure that the extension tube is fully extended and clicks firmly into place.
Turn the machine on and place your hand at the base of the extension tube.
Is the suction at the extension tube strong or weaker than usual?
Cleaning the machine
A damp or musty smell is caused when dust in the cyclone has come into contact with water.
It may not be a direct contact with water, for example when vacuuming pet hair that is slightly damp, this moisture will combine with the dust in the cyclone causing the smell.
Additionally the smell may occur if the filter goes back into the machine wet.
Clean the bin and cyclone
Switch off and unplug the machine.
Press the release catch on the cyclone and remove the cyclone and clear bin from the machine.
Push the button on top of the cyclone to open the bin lid, being careful to ensure dust is captured.
Shake or tap firmly to remove all dust from inside the fine dust collector.
With the bin and cyclone removed from the machine, press the button at the top of the handle to open the bin base.
Press the tab at the rear of the clear bin to release it from the cyclone.
Wash the bin with cold water or a damp cloth.
WARNING: Do not use detergents or polishes on the clear bin.
Clean the cyclone with a dry cloth and shake or tap firmly to remove all dust from inside the fine dust collector. Do not get any part of the cyclone assembly damp or wet.
Reassemble the machine
Reassemble and test the machine.
Washing the filters
Undo the fastener alongside the wheel with a coin.
Open the filter cover and remove the pre-filter.
Undo the fasteners on the bottom of the cylinder using a coin.
Remove the post-filter cover from the bottom of the cylinder.
Remove the post-filter.
Wash the filters
Wash the pre-filter in cold water.
WARNING: Do not use detergents or put the filter in the washing machine or dishwasher.
Wash the post-filter in cold water, and tap 10 times.
WARNING: Do not use detergents or put the filter in the washing machine or dishwasher.
Leave the filter in a warm place for 24 hours, until completely dry. Do not dry the filter in a tumble dryer, oven, microwave or near an open flame.
The likely cause for the machine to spit out dust is a blockage.
Check the suction
Remove the floor tool from the extension tube by pressing the release catch located on the bottom of the extension tube.
Ensure that the extension tube is fully extended and clicks firmly into place.
Turn the machine on and place your hand at the base of the extension tube.
Is the suction strong or weaker than usual?
Using the cable
Turn off and unplug the machine.
If the cable does not rewind, firmly pull it out and fully extend it until the red tape is visible.
The cord rewind button needs to be pressed down firmly to retract the cord for storage after use. When the button is pressed down far enough you should feel and hear a click, and the cord will retract.

Please select the appropriate option


Checking the Turbine head openings
With the Turbine head removed, check the openings on the tool for blockages and remove if necessary.
Unlock the Brush bar end cap
Use a coin to unlock the fastener marked with a padlock.
Remove the Brush bar
Carefully remove the Brush bar and clear any debris.
Remove any debris from the Brush bar.
Extension tube keeps collapsing
Press the release catch and extend the Extension tube to the length required, ensuring it 'clicks' firmly into place.

Release the pressure on the wheel
Lay the machine on its side with the filter door facing upwards.

With one hand, gently press down on the wheel.
Using the other hand, press the release catch until it clicks.
Release the pressure on the wheel and open the filter door.
Open the post-filter door
Undo the fasteners on the bottom of the cylinder using a coin.
Remove the post-filter cover from the bottom of the cylinder.
Hose won't reattach
Ensure the hose retaining clip is in the correct position.

Check the inlet pipe for any obstructions.
Ensure hose retaining bracket is pushed home firmly (there will be an audible click when it slots into place).
Assembling your Dyson machine
The floor tool in the image may differ to the tool that you have, however the process remains the same.
Clip the Wand handle to the extension tube.

Press the release catch and extend the Extension tube to the length required, ensuring it 'clicks' firmly into place.
Attach the floor tool to the telescopic wand.
Serial number
The serial number can be found on the Main body of the machine behind the bin.

How to store your Dyson machine
Attach the tools to the extension tube.

Attach the floor tool to the parking yoke on the rear of the vacuum cleaner.

How to store the tools on the machine
To store the tools, insert them into the holster and attach to the extension tube as shown.
How to attach the accessories
Attach the accessories or floor tool to the Wand or hose ensuring they 'click' into place.
Alternatively, remove the Wand and Wand handle and attach the accessory tools directly to the hose ensuring they 'click' into place.

Do not use detergents or polishes on the clear bin. Do not use any liquids to clean the cyclone.
Clean the bin and cyclone
With the bin and cyclone removed from the machine, press the button at the top of the handle to open the bin base.
Press the tab at the rear of the clear bin to release it from the cyclone.
Wash the bin with cold water or a damp cloth.
WARNING: Do not use detergents or polishes on the clear bin.
Wipe any dust and fibres off the cyclone with a dry cloth or soft dusting brush.
Washing the filters
Undo the fastener alongside the wheel with a coin.
Open the filter cover and remove the pre-filter.
Undo the fasteners on the bottom of the cylinder using a coin.
Remove the post-filter cover from the bottom of the cylinder.
Remove the post-filter.
Wash the filters
Wash the pre-filter in cold water.
WARNING: Do not use detergents or put the filter in the washing machine or dishwasher.
Wash the post-filter in cold water, and tap 10 times.
WARNING: Do not use detergents or put the filter in the washing machine or dishwasher.
Dry filters
Leave the filter in a warm place for 24 hours, until completely dry. Do not dry the filter in a tumble dryer, oven, microwave or near an open flame.


Further help
DC26i™