Let's get your machine working
DC44 Animal™
Let's get your machine working
DC44 Animal™
Please select the appropriate option
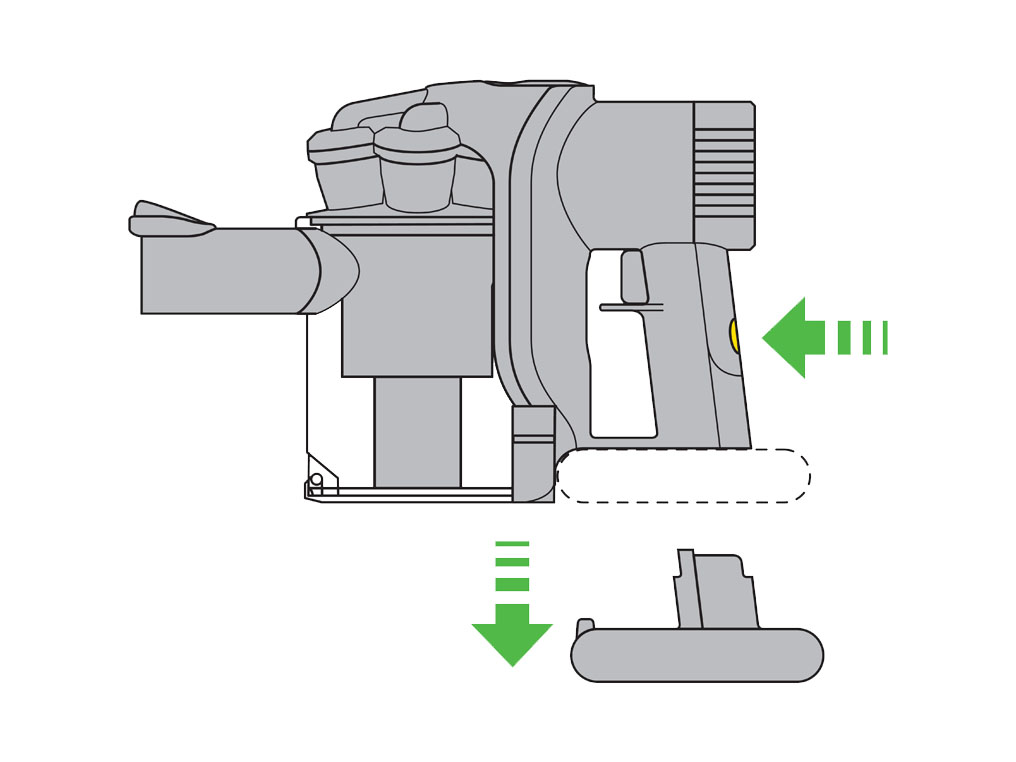
Empty the bin
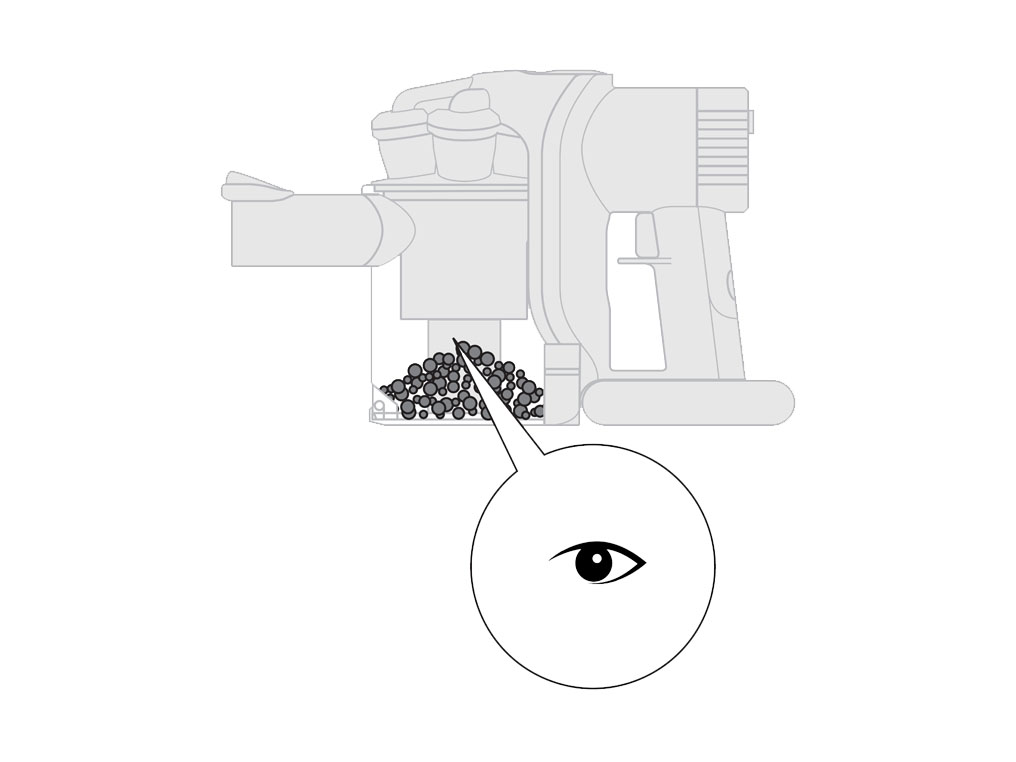
To ensure your machine continues to clean effectively, the bin must be emptied as soon as the dust reaches the MAX mark.
Push the button on the Main body of the machine downwards to release dust directly into a dustbin.
Shake or tap firmly to remove all dust from inside the fine dust collector.
Press firmly underneath the catch of the clear bin base to close.
Please select the appropriate option
Please select the appropriate option
Please open the PDF for the user guide.
Please select the appropriate option
Please select the appropriate option


Please select the appropriate option
Unusual noise
The machine is designed to pulsate. This is an audible feature that indicates a problem, as well as preventing damage to the motor. This is usually caused by a restriction in airflow or a blockage within the machine.
Check the machine
Open the bin base fully by pressing the bin release catch.

Press the catch located behind the bin release catch to separate the bin from the cyclone.

Remove the bin fully from the machine.
Clean the shroud with a cloth or dry brush to remove the fluff and dust.

With the bin removed, check the bin inlet flap for blockages and remove as necessary.
Ensure that it moves freely, fluff or fibres jamming the hinge can cause the flap to close resulting in low suction and pulsating noise.

Check the tools
Inspect all tools to check for blockages and remove any debris as necessary.

Check the Wand
Check both ends of the Wand for blockages and remove as necessary.

Mini motorised head
Using a coin, undo the end cap fastener and remove the Brush bar.

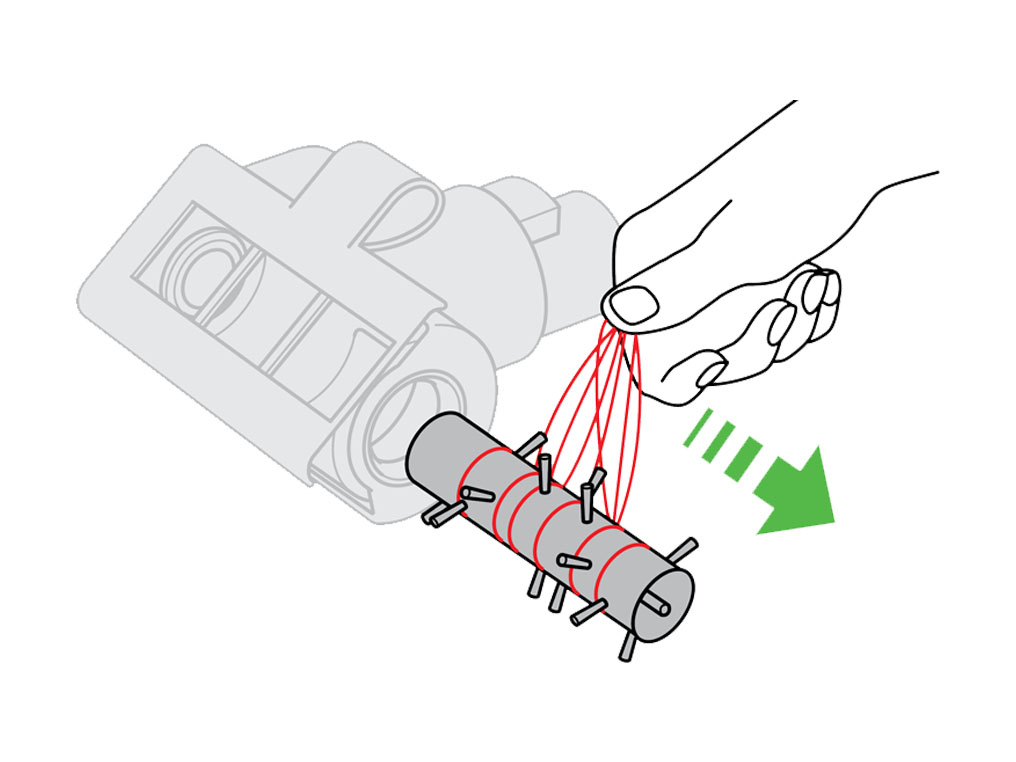
Carefully cut away any hair or fibres from the Brush bar.

Reassemble and test the machine.

Wash the filter
The filter needs to be washed at least once per month.
Please follow the steps in the video.
Has this resolved the problem?
Remove the filter
The filter needs to be washed at least once per month.
Press the filter release catch located on the top of the machine and pull the cyclone away from the Main body.

Wash the filter
Run cold water through the open end of the filter for approximately 10 seconds.
Turn the filter up side down and tap 10 times.
Squeeze and twist the filter.
Repeat until clean.

Dry the filter
Leave the filter in a warm place until completely dry.

Ensure the filter is completely dry before refitting into machine.

Make sure the filter sits correctly between the Main body and cyclone.

Test the machine.
Check the machine
Press the catch located behind the bin release catch to separate the bin from the cyclone.
Press and hold the trigger for 10 seconds.
Clean the machine
Clean the shroud with a cloth or dry brush to remove the fluff and dust.
Check the tools
Inspect all tools to check for blockages and remove any debris as necessary.
Mini motorised head
Using a coin, undo the end cap fastener and remove the Brush bar.
Check the Wand
Check both ends of the Wand for blockages and remove as necessary.
Carefully cut away any hair or fibres from the Brush bar.
Please select the appropriate option
Check the machine
Open the bin base fully by pressing the bin release catch.
Press the catch located behind the bin release catch to separate the bin from the cyclone.
Remove the bin fully from the machine.
Clean the shroud with a cloth or dry brush to remove the fluff and dust.
Check the tools
Inspect all tools to check for blockages and remove any debris as necessary.
Check the Wand
Check both ends of the Wand for blockages and remove as necessary.
Mini motorised head
Using a coin, undo the end cap fastener and remove the Brush bar.
Carefully cut away any hair or fibres from the Brush bar.
Reassemble and test the machine.
Wash the filter
The filter needs to be washed at least once per month.
Please follow the steps in the video.
Has this resolved the problem?
Remove the filter
The filter needs to be washed at least once per month.
Press the filter release catch located on the top of the machine and pull the cyclone away from the Main body.
Wash the filter
Run cold water through the open end of the filter for approximately 10 seconds.
Turn the filter up side down and tap 10 times.
Squeeze and twist the filter.
Repeat until clean.
Dry the filter
Leave the filter in a warm place until completely dry.
Ensure the filter is completely dry before refitting into machine.
Make sure the filter sits correctly between the Main body and cyclone.
Test the machine.
Machine working normally
This indicates that there is no issue with the machine.
Please ensure the filter has been washed thoroughly and all the parts are fitted together correctly.
Check the machine
Open the bin base fully by pressing the bin release catch.
Press the catch located behind the bin release catch to separate the bin from the cyclone.
Remove the bin fully from the machine.
Clean the shroud with a cloth or dry brush to remove the fluff and dust.
With the bin removed, check the bin inlet flap for blockages and remove as necessary.
Ensure that it moves freely, fluff or fibres jamming the hinge can cause the flap to close resulting in low suction and pulsating noise.
Check the tools
Inspect all tools to check for blockages and remove any debris as necessary.
Check the Wand
Check both ends of the Wand for blockages and remove as necessary.
Mini motorised head
Using a coin, undo the end cap fastener and remove the Brush bar.
Carefully cut away any hair or fibres from the Brush bar.
Reassemble and test the machine.
Wash the filter
The filter needs to be washed at least once per month.
Please follow the steps in the video.
Has this resolved the problem?
Remove the filter
The filter needs to be washed at least once per month.
Press the filter release catch located on the top of the machine and pull the cyclone away from the Main body.
Wash the filter
Run cold water through the open end of the filter for approximately 10 seconds.
Turn the filter up side down and tap 10 times.
Squeeze and twist the filter.
Repeat until clean.
Dry the filter
Leave the filter in a warm place until completely dry.
Ensure the filter is completely dry before refitting into machine.
Make sure the filter sits correctly between the Main body and cyclone.
Test the machine.
Paper test
This would indicate that there is no issue with the machine. To test that there is not a further blockage, tear up some small pieces of paper and vacuum them.
Please select the appropriate option
Removing blockages from the Mini motorised head
Remove the Motorised head from the machine using the release catch on the top of the inlet.

Using a coin, undo the end cap as shown and remove the Brush bar.
Carefully cut away any hair or fibres from the Brush bar.
Reassemble and test the machine.
Type A machine
Type A machines have a small battery release catch, located just below the MAX power or boost button. Once pressed, the battery is released from the machine.

Type B machine
Type B machines have a small screw located just below the MAX power or boost button. To release the battery, use a small screwdriver to remove the screw. Once the screw has been taken out, the battery can be fully removed from the machine.

Filter
Make sure the filter sits correctly between the Main body and cyclone.
Check for blockages
Open the bin base fully by pressing the bin release catch.
Press the catch located behind the bin release catch to separate the bin from the cyclone.
Remove the bin fully from the machine.
Clean the shroud with a cloth or dry brush to remove the fluff and dust.
With the bin removed, check the bin inlet flap for blockages and remove as necessary.
Ensure that it moves freely, fluff or fibres jamming the hinge can cause the flap to close resulting in low suction and pulsating noise.
Check the tools
Inspect all tools to check for blockages and remove any debris as necessary.
Check the Wand
Check both ends of the Wand for blockages and remove as necessary.
Mini motorised head
Using a coin, undo the end cap fastener and remove the Brush bar.
Carefully cut away any hair or fibres from the Brush bar.
Reassemble and test the machine.
Machine is pulsating
The machine is designed to pulsate. This is an audible feature that indicates a problem, as well as preventing damage to the motor. This is usually caused by a restriction in airflow or a blockage within the machine.
If the machine does not have any power, please check the status light and select which light is showing.
Please select the appropriate option
Test the machine
Hold the trigger and run the machine.
Type A
Press the release catch and remove the battery.

Check that the contacts on the battery are not damaged.
Wipe with a dry clean cloth.
Refit the battery and test the machine.

Type B
Using a screw driver remove the two small screws, the 1st is located above the charging point and the 2nd is located behind the washable filter at the bottom.
Remove the battery.
Check that the contacts on the battery are not damaged.
Wipe with a dry clean cloth.
Refit the battery, the two screws and test the machine.
Type A machine
Type A machines have a small battery release catch, located just below the max power or boost button. Once pressed the battery assembly is released from the machine.
Type B machine
Type B machines have a small screw located just below the MAX power or boost button. To release the battery, use a small screwdriver to remove the screw. Once the screw has been taken out, the battery can be fully removed from the machine.
Charge the machine
Plug the machine into the charger.

What does the light on the charger show?
Run the machine
Run the machine without the charger plugged in.
What does the light on the main body show?
Flat surface
Place the machine on a flat surface, pull the trigger and pull the bin away from the main body.

Type A machine
Type A machines have a small battery release catch, located just below the MAX power or boost button. Once pressed, the battery is released from the machine.
Type B machine
Type B machines have a small screw located just below the MAX power or boost button. To release the battery, use a small screwdriver to remove the screw. Once the screw has been taken out, the battery can be fully removed from the machine.
Type A machine
Type A machine
Type A machines have a small battery release catch, located just below the max power or boost button. Once pressed the battery assembly is released from the machine.
Type B machine
Type B machines have a small screw located just below the MAX power or boost button. To release the battery, use a small screwdriver to remove the screw. Once the screw has been taken out, the battery can be fully removed from the machine.
Type A machine
Type A machines have a small battery release catch, located just below the max power or boost button. Once pressed the battery assembly is released from the machine.
Type B machine
Type B machines have two small screws, the 1st is located just below the max power or boost button and the 2nd is located just below the washable filter. To release the battery assembly, use a small screwdriver to remove the screw. Once the screws have been taken out, the battery can be fully removed from the machine.
Type A machine
Type A machines have a small battery release catch, located just below the max power or boost button. Once pressed the battery assembly is released from the machine.
Type B machine
Type B machines have a small screw located just below the MAX power or boost button. To release the battery, use a small screwdriver to remove the screw. Once the screw has been taken out, the battery can be fully removed from the machine.
Test the machine
Run the machine without the charger plugged in.
What does the charger light on the main body show?
Flat surface
Place the machine on a flat surface, pull the trigger and pull the bin away from the main body.
Type A machine
Type A machines have a small battery release catch, located just below the max power or boost button. Once pressed the battery assembly is released from the machine.
Type B machine
Type B machines have a small screw located just below the MAX power or boost button. To release the battery, use a small screwdriver to remove the screw. Once the screw has been taken out, the battery can be fully removed from the machine.
Is the machine a Type A or Type B?
Type B Machine
Remove the cyclone/bin assembly and pre-filter.
Undo both Phillips screws - one on the Main body handle and the other located on the reverse side where the pre-filter was removed from.
Type B Machine
Remove the cyclone/bin assembly and pre-filter.
Undo both Phillips screws - one on the Main body handle and the other located on the reverse side where the pre-filter was removed from.
Pull trigger and move machine body
Place the machine on a flat surface, pull the trigger and pull the bin away from the main body.
Type A machine
Type A machines have a small battery release catch, located just below the max power or boost button. Once pressed the battery assembly is released from the machine.
Type B machine
Type B machines have a small screw located just below the MAX power or boost button. To release the battery, use a small screwdriver to remove the screw. Once the screw has been taken out, the battery can be fully removed from the machine.
Type A or Type B?
Type A machines have a small battery release catch, located just below the max power or boost button. Once pressed the battery assembly is released from the machine.
Type B machine
Type B machines have two small screws, the first is located just below the max power or boost button and the second is located just below the washable filter. To release the battery assembly, use a small screwdriver to remove the screw. Once the screws have been taken out, the battery can be fully removed from the machine.
Type A machine
Type A machines have a small battery release catch, located just below the max power or boost button. Once pressed the battery assembly is released from the machine.
Type B machine
Type B machines have a small screw located just below the MAX power or boost button. To release the battery, use a small screwdriver to remove the screw. Once the screw has been taken out, the battery can be fully removed from the machine.
Test the machine
Run the machine without the charger plugged in.
What does the light on the main body show?
Type A machine
Type A machines have a small battery release catch, located just below the max power or boost button. Once pressed the battery assembly is released from the machine.
Type B machine
Type B machines have a small screw located just below the MAX power or boost button. To release the battery, use a small screwdriver to remove the screw. Once the screw has been taken out, the battery can be fully removed from the machine.
Type A machine
Type A machine
Type A machines have a small battery release catch, located just below the max power or boost button. Once pressed the battery assembly is released from the machine.
Type B machine
Type B machines have a small screw located just below the MAX power or boost button. To release the battery, use a small screwdriver to remove the screw. Once the screw has been taken out, the battery can be fully removed from the machine.
Charge the machine
Charge the machine for 5.5 hours.
Type A
Type A machine
Type A machines have a small battery release catch, located just below the max power or boost button. Once pressed the battery assembly is released from the machine.
Type B
Type B machines have a small screw located just below the MAX power or boost button. To release the battery, use a small screwdriver to remove the screw. Once the screw has been taken out, the battery can be fully removed from the machine.
Has a replacement charger or battery been sent in the last three months for this issue?
Remove clear plastic bin
Place the machine on a flat surface, pull the trigger and pull the bin away from the main body.
Type A or Type B?
Type A machine
Type A machines have a small battery release catch, located just below the max power or boost button. Once pressed the battery assembly is released from the machine.
Type B machine
Type B machines have two small screws; the first is located just below the MAX power or boost button and the second is located just below the washable filter. To release the battery assembly, use a small screwdriver to remove the screw. Once the screws have been taken out, the battery can be fully removed from the machine.
Type A machine
Type A machine
Type A machines have a small battery release catch, located just below the max power or boost button. Once pressed the battery assembly is released from the machine.
Type B machine
Type B machine
Type B machines have two small screws, the first is located just below the max power or boost button and the second is located just below the washable filter. To release the battery assembly, use a small screwdriver to remove the screw. Once the screws have been taken out, the battery can be fully removed from the machine.
Run the machine
Run the machine without the charger plugged in.
What does the light on the main body show?
Full charge
Charge machine for 5.5 hours.
Place on flat surface
Place the machine on a flat surface, pull the trigger and pull the bin away from the main body.

Type A machine
Type A machine
Type A machines have a small battery release catch, located just below the max power or boost button. Once pressed the battery assembly is released from the machine.
Type B machine
Type B machines have a small Phillips screw - located just below the max power or boost button.
Type A machine
Type A machine
Type A machines have a small battery release catch, located just below the max power or boost button. Once pressed the battery assembly is released from the machine.
Type B machine
Type B machines have a small Phillips screw - located just below the max power or boost button.
Type A machine
Type A machines have a small battery release catch, located just below the max power or boost button. Once pressed the battery assembly is released from the machine.
Type B machine
Type B machines have a small screw located just below the MAX power or boost button. To release the battery, use a small screwdriver to remove the screw. Once the screw has been taken out, the battery can be fully removed from the machine.
No light
Place the machine on a flat surface, pull the trigger and pull the bin away from the main body.
Type A machine
Type A machines have a small battery release catch, located just below the MAX power or boost button. Once pressed, the battery is released from the machine.
Type B machine
Type B machines have a small screw located just below the MAX power or boost button. To release the battery, use a small screwdriver to remove the screw. Once the screw has been taken out, the battery can be fully removed from the machine.
What do the lights show when the trigger is pulled?
Charge the machine
Put the machine on charge for 3.5 hours and test it again.
Check the filter
This suggests that the filter is not fitted correctly.
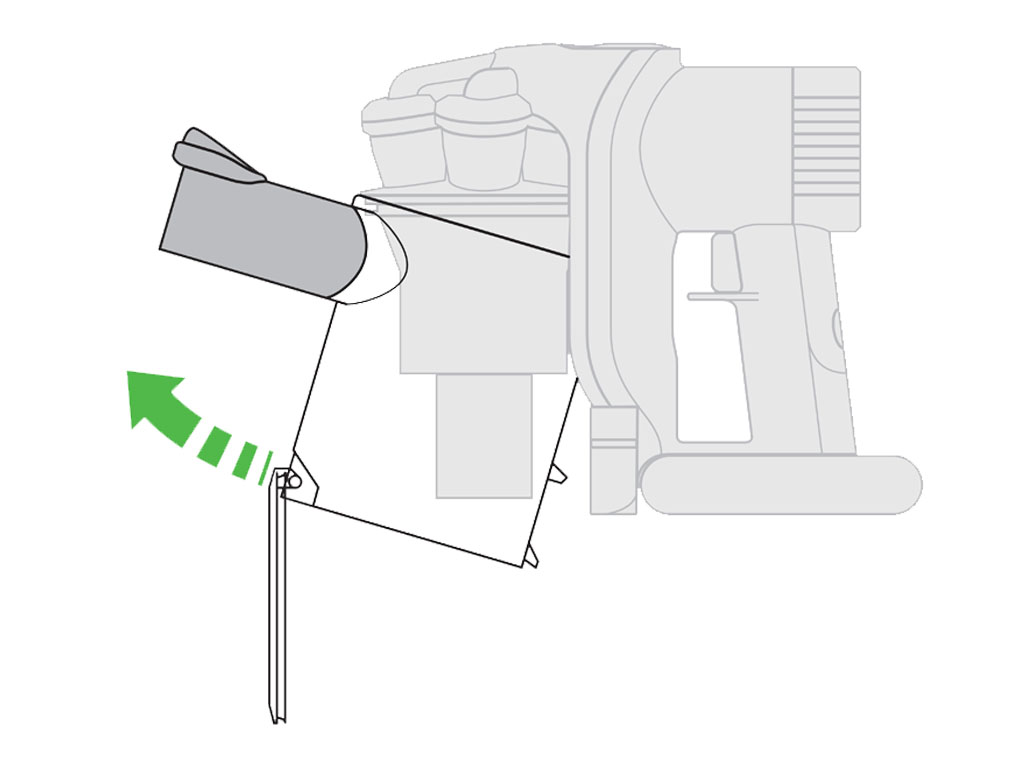
Remove the filter
Press the filter release catch located on the top of the machine and pull the cyclone away from the Main body.
Make sure the filter sits correctly between the Main body and cyclone.
Reassemble and test the machine.
Check the machine
Open the bin base fully by pressing the bin release catch.
Press the catch located behind the bin release catch to separate the bin from the cyclone.
Remove the bin fully from the machine.
Clean the shroud with a cloth or dry brush to remove the fluff and dust.
Check the tools
Inspect all tools to check for blockages and remove any debris as necessary.
Check the Wand
Check both ends of the Wand for blockages and remove as necessary.
Mini motorised head
Using a coin, undo the end cap fastener and remove the Brush bar.
Carefully cut away any hair or fibres from the Brush bar.
Reassemble and test the machine.
Wash the filter
The filter needs to be washed at least once per month.
Please follow the steps in the video.
Has this resolved the problem?
Remove the filter
The filter needs to be washed at least once per month.
Press the filter release catch located on the top of the machine and pull the cyclone away from the Main body.
Wash the filter
Run cold water through the open end of the filter for approximately 10 seconds.
Turn the filter up side down and tap 10 times.
Squeeze and twist the filter.
Repeat until clean.
Dry the filter
Leave the filter in a warm place until completely dry.
Ensure the filter is completely dry before refitting into machine.
Make sure the filter sits correctly between the Main body and cyclone.
Test the machine.
What do the lights show when the trigger is pulled?
MAX power
The machine will run for 8 minutes on MAX power.
Standard mode
The machine will run for 20 minutes on Standard mode
Please select the appropriate option
Damp or musty smell
A damp or musty smell is caused when dust in the cyclone has come into contact with water.
It may not be a direct contact with water, for example when vacuuming pet hair that is slightly damp, this moisture will combine with the dust in the cyclone causing the smell.
Additionally the smell may occur if the filter goes back into the machine wet.
Only the filter can be washed, the bin can be cleaned with a damp cloth only, and both must be completely dry before being refitted to the machine.
Clean the bin
To ensure your machine continues to clean effectively, the clear bin must be emptied as soon as the dust reaches the MAX mark.
Push the button on the Main body of the machine downwards to release dust directly into a dustbin.
Clean the clear bin with a damp cloth only.
WARNING: Do not use detergents, polishes or air fresheners to clean the clear bin. Do not put the clear bin in a dishwasher.
Refit the bin
Ensure the bin is completely dry before replacing. To replace the bin, push it up and in to the Main body of the machine until it clicks in to place.
Mini motorised head
Using a coin, undo the end cap fastener and remove the Brush bar.
Carefully cut away any hair or fibres from the Brush bar.
Reassemble and test the machine.
Wash the filter
The filter needs to be washed at least once per month.
Please follow the steps in the video.
Has this resolved the problem?
Remove the filter
The filter needs to be washed at least once per month.
Press the filter release catch located on the top of the machine and pull the cyclone away from the Main body.
Wash the filter
Run cold water through the open end of the filter for approximately 10 seconds.
Turn the filter up side down and tap 10 times.
Squeeze and twist the filter.
Repeat until clean.
Dry the filter
Leave the filter in a warm place until completely dry.
Ensure the filter is completely dry before refitting into machine.
Make sure the filter sits correctly between the Main body and cyclone.
Test the machine.
Machine working normally
This indicates that there is no issue with the machine.
Please ensure the filter has been washed thoroughly and all the parts are fitted together correctly.
Damp or musty smell still present
Under normal use, any unpleasant smell can only be caused by something the machine has picked up. Please select pick up issues to carry out checks.
If you are able to locate the smell to a part of the machine, replacing the part may help eliminate the smell. For this, please select Part broken.
Please select the appropriate option
No longer supported
Dyson machines are built to last. Unfortunately this machine is no longer supported, meaning that we are not able to supply spare parts, or carry out services or repairs.
Check the machine
Open the bin base fully by pressing the bin release catch.
Press the catch located behind the bin release catch to separate the bin from the cyclone.
Remove the bin fully from the machine.
Clean the shroud with a cloth or dry brush to remove the fluff and dust.
Check the tools
Inspect all tools to check for blockages and remove any debris as necessary.
Mini motorised head
Using a coin, undo the end cap fastener and remove the Brush bar.
Carefully cut away any hair or fibres from the Brush bar.
Reassemble and test the machine.
Wash the filter
The filter needs to be washed at least once per month.
Please follow the steps in the video.
Has this resolved the problem?
Remove the filter
The filter needs to be washed at least once per month.
Press the filter release catch located on the top of the machine and pull the cyclone away from the Main body.
Wash the filter
Run cold water through the open end of the filter for approximately 10 seconds.
Turn the filter up side down and tap 10 times.
Squeeze and twist the filter.
Repeat until clean.
Dry the filter
Leave the filter in a warm place until completely dry.
Ensure the filter is completely dry before refitting into machine.
Make sure the filter sits correctly between the Main body and cyclone.
Test the machine.
Paper test
This would indicate that there is no issue with the machine. To test that there is not a further blockage, tear up some small pieces of paper and vacuum them.
Machine working normally
This would indicate that the machine is working as intended.
Clear the floor tool
On the side of the Cleaner head, locate the end cap. Using a coin, turn the end cap anticlockwise a quarter of the way to remove it.
Note: There should be a small padlock icon along with directional arrows to help you unlock the end cap.

Remove the Brush bar from the Cleaner head and clear away any hair or fibres.
Check the neck of the Cleaner head (where the Cleaner head connects to the Wand) for any blockages. Ensure there is no build up of dust or debris in the small crevice between where the Brush bar sits and the neck of the Cleaner head.

With the Brush bar clear from any debris, refit it back into the Cleaner head and securely fasten the end cap.
Place the Cleaner head onto the bin and test the machine.

Wash the filter
The filter needs to be washed at least once per month.
Please follow the steps in the video.
Has this resolved the problem?
Remove the filter
The filter needs to be washed at least once per month.
Press the filter release catch located on the top of the machine and pull the cyclone away from the Main body.
Wash the filter
Run cold water through the open end of the filter for approximately 10 seconds.
Turn the filter up side down and tap 10 times.
Squeeze and twist the filter.
Repeat until clean.
Dry the filter
Leave the filter in a warm place until completely dry.
Ensure the filter is completely dry before refitting into machine.
Make sure the filter sits correctly between the Main body and cyclone.
Test the machine.
Separate the cyclone from the Main body
Remove all tools and accessories from the machine.

Lay the machine on its back, on a firm stable surface, so that bin entry nozzle points towards the ceiling.
Place your hand on the bin and apply pressure downwards.
While applying pressure, press the cyclone release catch.

MAX power
The machine will run for 8 minutes on MAX power.
Standard mode
The machine will run for 20 minutes on Standard mode
Serial number location
The serial number can be found on the Main body, behind the filter.

Crevice tool
Slide the crevice tool into the inlet pipe on the cyclone until it ''clicks'' into position.

Combination tool
The brush must be positioned at the back of the combination tool to use the crevice function.
To use the brush function. press the button on the brush section.
Slide the brush section towards the front of the combination tool.

Mini motorised head
Slide the Mini motorised tool into the inlet pipe on the bin until it 'clicks' into position.

Charge the battery
Plug the charger directly in to the machine via the charger cable.
The Battery should be fully charged after 3.5 hours.

Check the machine
Open the bin base fully by pressing the bin release catch.
Press the catch located behind the bin release catch to separate the bin from the cyclone.
Remove the bin fully from the machine.
Clean the shroud with a cloth or dry brush to remove the fluff and dust.
With the bin removed, check the bin inlet flap for blockages and remove as necessary.
Ensure that it moves freely, fluff or fibres jamming the hinge can cause the flap to close resulting in low suction and pulsating noise.
Check the tools
Inspect all tools to check for blockages and remove any debris as necessary.
Check the Wand
Check both ends of the Wand for blockages and remove as necessary.
Mini motorised head
Using a coin, undo the end cap fastener and remove the Brush bar.
Carefully cut away any hair or fibres from the Brush bar.
Reassemble and test the machine.
Wash the filter
The filter needs to be washed at least once per month.
Please follow the steps in the video.
Is there anything else we can help with?
Remove the filter
The filter needs to be washed at least once per month.
Press the filter release catch located on the top of the machine and pull the cyclone away from the Main body.
Wash the filter
Run cold water through the open end of the filter for approximately 10 seconds.
Turn the filter up side down and tap 10 times.
Squeeze and twist the filter.
Repeat until clean.
Dry the filter
Leave the filter in a warm place until completely dry.
Ensure the filter is completely dry before refitting into machine.
Make sure the filter sits correctly between the Main body and cyclone.
Reassemble and test the machine.
We need a little more information to help us solve your issue.
Please contact our customer service team on 01-475-7109, or directly on Live Chat through our Digital Assistant by clicking the purple icon at the bottom of the page. You can start a conversation with an Expert by clicking the agent icon at the bottom left of the chat window.
We're glad the problem's been solved.
Please let us know if there's anything else we can help you with.
The Dyson guarantee

'How to ' videos and tips

Exclusive owner benefits

Expert advice. 7 days a week.

Hassle-free repairs and replacement
Please get in touch.
Our experts are ready to help you.
UK based helpline open
8:00am- 8:00pm Monday to Friday
8:00am- 6:00pm Saturday and Sunday
Further help
DC44 Animal™