Let's get your machine working
AM05 Hot+Cool Heater™
Let's get your machine working
AM05 Hot+Cool Heater™
Please select the appropriate option


Please select the appropriate option
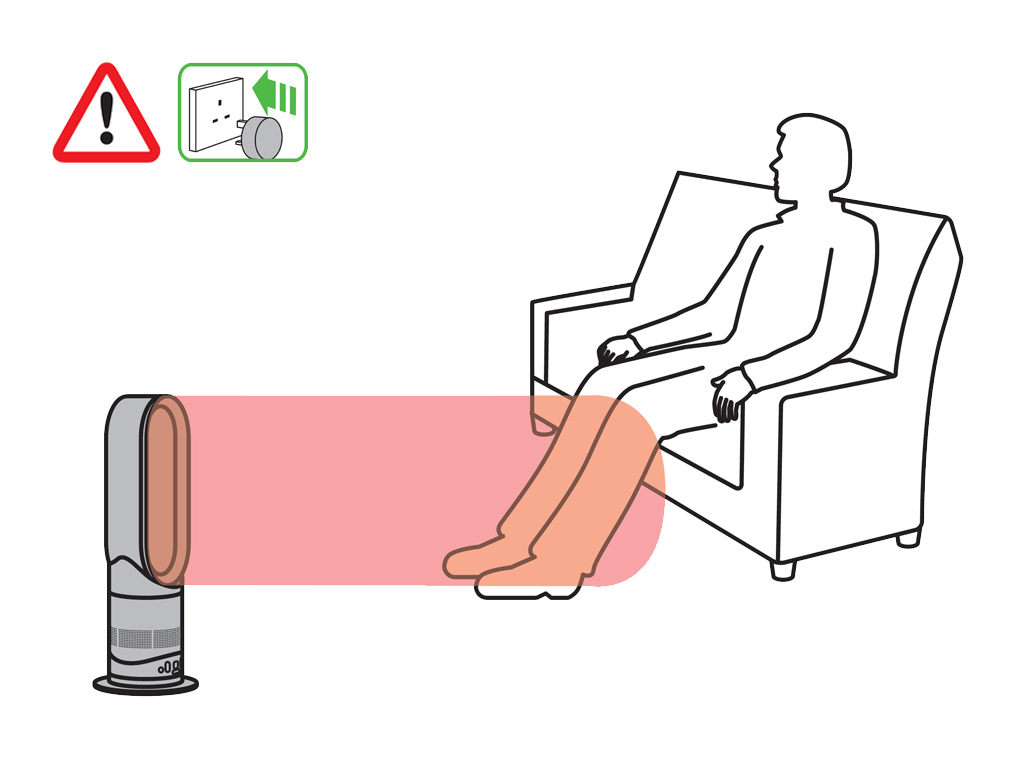
The heater is fitted with automatic cut-out switches that operate if the heater tips over or overheats. If the cut-out operates, unplug the heater and allow it to cool.
Hard reset
Unplug the machine and leave it for 10 seconds.
Hard reset
Unplug the machine and leave it for 10 seconds.
Plug the machine back in and retest.
Ensure the correct button on remote is being pressed
Point the remote directly at the front of the machine while pressing the button.
Hard reset
Unplug the machine and leave it for 10 seconds.
Plug the machine back in and retest.
No power
Check that the household electrics are on.
Check the plug and power cord for signs of damage.
Try the machine in a different plug socket.
Ensure the correct button on remote is being pressed
Point the remote directly at the front of the machine while pressing the button.
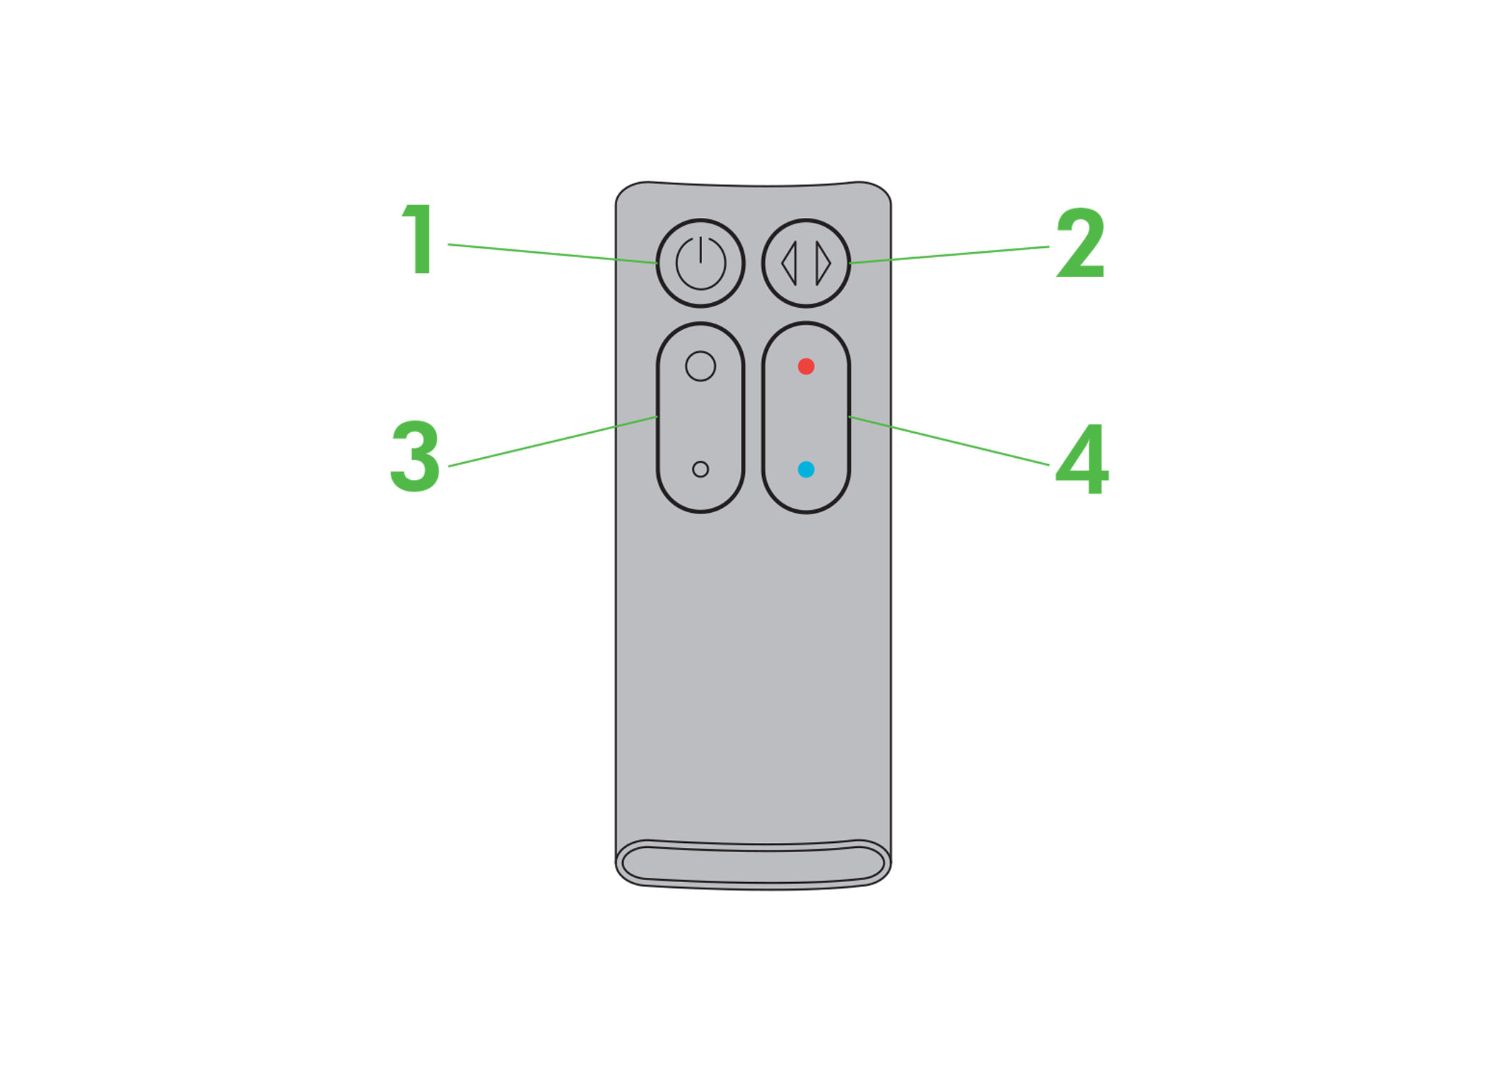
1) On/Off
2) Oscillation
3) Airflow speed
4) Temperature control
Please select the appropriate option
Check and clean machine
Clean the loop and base
Check for blockages and remove as necessary.
When is the machine clicking?
Machine is working
This is normal and the machine is working as expected.
Machine is working normally
This is completely normal.
The machine will run very slowly when in idle mode to keep air flowing over the thermostat so it can constantly regulate the temperature of the air.
There is no safety concern.
If the noise is intrusive, switching the machine off at the wall will stop the noise, or altering the position of the product in the room might make the noise less audible.
If pressed, it should be stated that the noise is caused by some of the electrical components emitting a frequency which can sometimes be heard as an electrical humming noise. This is not specific to Dyson products.
Your machine may be hot to the touch if it has been used as a heater in the last couple of hours. Please do not touch the sides of the loop amplifier until it has cooled.
Ensure the correct button on remote is being pressed
1) On/Off
2) Oscillation
3) Airflow speed
4) Temperature control

Select a different option on the remote
Point the remote directly at the front of the machine while pressing a different option.
Test the remote buttons
Airflow can be set by the airflow buttons on the remote.
Airflow can also be set on the machine. Use the middle control toggle to adjust the speed of the airflow.
Paper test
The fan has a strong, smooth airflow when switched on. The airflow should be strong enough to lift a sheet of newspaper past 45 degrees.

Hold a newspaper approximately 2 meters (6' 6'') away from the product with the airflow control dial turned to maximum.
Do not use polish or detergent on any part of the machine.
Wipe the machine
The following areas should be checked and cleaned to maintain the machine's performance.
Main body
Loop amplifier

The heating elements turn on one at a time and so this is to be expected when the machine first turns on.
Run the heater for 1 minute at the highest temperature setting.
Retry machine at 32°F/0°C
On first use, the heater will default to a temperature 1°C/33°F higher than the current room temperature.
Thereafter, the heater will remember the last target temperature set.
The heater will not operate unless the target temperature is above the room temperature.
Please retry the machine at temperature setting 37°C/99°F.
The heater will not operate unless the target temperature is above the room temperature, or the target temperature is set to 32°F/ 0°C for cooling.
Please retry the machine at temperature setting 32°F/ 0°C.
Retry machine at 37°C/99°F
On first use, the heater will default to a temperature 1°C/33°F higher than the current room temperature.
Thereafter, the heater will remember the last target temperature set.
The heater will not operate unless the target temperature is above the room temperature.
Please retry the machine at temperature setting 37°C/99°F.

Test oscillation
Before switching on, please make sure the fan is positioned so that the airflow or oscillation is not obstructed.
Please select the appropriate option
Check the feet are attached correctly
Ensure all the feet are attached to the base of the machine.
Place the fan on a flat, non-slip surface.
Select a different option on the remote
Point the remote directly at the front of the machine while pressing a different option.

Test the other buttons on the remote
1) On/Off
2) Oscillation
3) Airflow speed
4) Temperature control
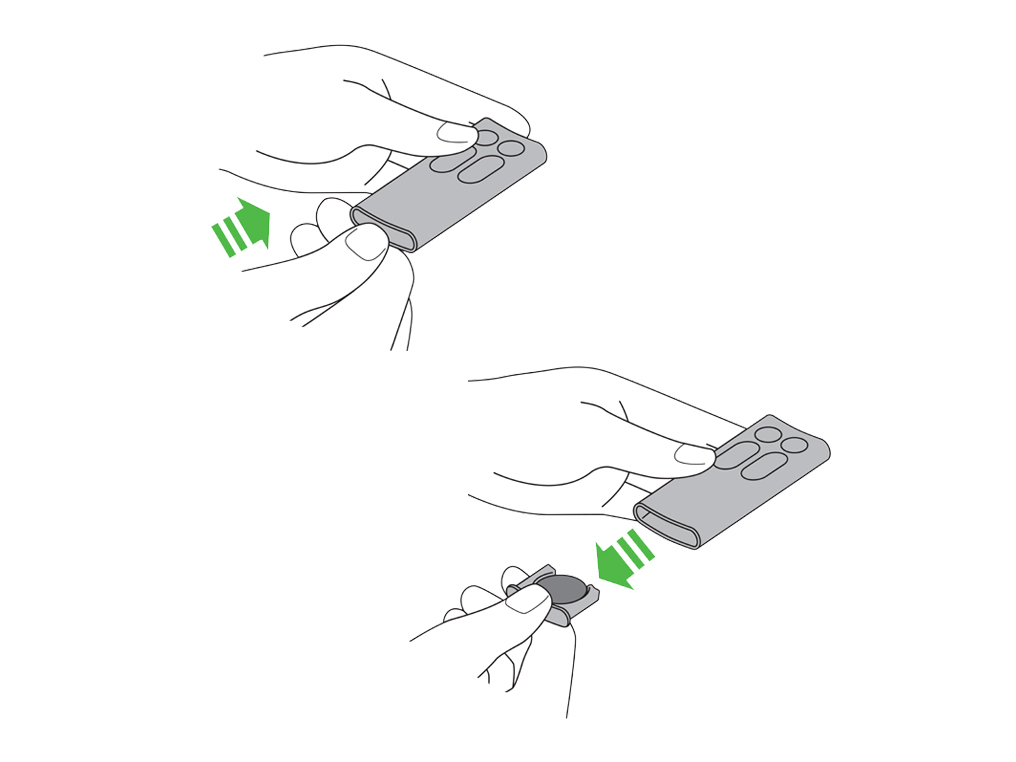
Change the remote battery
Push the remote control's battery compartment.

Loosen the base and pull it away from the remote. Replace the battery with type CR 2032.
Test the buttons on the front of the machine.

Ensure the correct button on remote is being pressed
1) On/Off
2) Oscillation
3) Airflow speed
4) Temperature control
Select a different option on the remote
Point the remote directly at the front of the machine while pressing a different option.
Check the bottom of the base unit has not come away, there will be a visible gap.
If there is a visible gap, press firmly down on the loop amplifier until the base clicks into place.
Target temperature explanation
The temperature set on the machine is the target temperature of the room, not the temperature of the fan.
The temperature from the fan when in heating mode will not change.
Please select the appropriate option
Wipe the machine
The following areas should be checked and cleaned to maintain the machine's performance.
Main body
Loop amplifier
Please select the appropriate option
Test the remote buttons
Point the remote directly at the front of the machine while pressing the button.
A common cause of E fault is when the machine has been turned off directly at the socket, or the plug has been pulled out, whilst the fan was still running.
Please turn the fan off using either the power button on the remote or the Main body in future.
Unplug the machine for at least 5 seconds or until the LED goes out.
Plug the machine back in and retest.
This issue can occur if the machine is running and the power is cut e.g. plug pulled out, power cut etc.
Unplug the machine for at least 5 seconds or until the LED goes out.
Plug the machine back in and retest.
How to tilt the machine
Place the machine on a flat, stable surface.
Tilt the loop amplifier forwards slightly.
The loop should stay in the position it was left in.
Please select the appropriate option
Where to clean your machine
The following areas should be checked and cleaned to maintain the machine's performance.
- Loop amplifier - clean with a dry or damp cloth.
- Main body - clean with a dry cloth
- Shroud - clean with a dry cloth or soft brush
WARNING: Do not use polish or detergent on any part of the machine.
Please select the appropriate option
Your machine may be hot to the touch if it has been used as a heater in the last couple of hours. Please do not touch the sides of the loop amplifier until it has cooled.
Please select the appropriate option
Serial number location
The serial number can be found on the base of the machine.

Please open the PDF for the user guide.
Quick start guide
Watch the simple video below for an easy guide to getting started with your new Dyson heater.
The model shown may vary from the product selected but the process remains the same.
If you are unable to view the video or prefer to follow a step by step guide choose the appropriate option.
Is there anything else we can help you with?
Assembling your machine
NB: Before switching on, please make sure the heater is positioned so that the airflow or oscillation is not obstructed.
Align the black arrows located on the base and Main body of the machine.
Please follow the next step.
How to change the airflow speed
To change the airflow speed press the airflow control button.
The digital display will show the new speed; after 3 seconds it will change back to the target temperature.

Please follow the next step.
How to tilt
Carefully hold the base and top of the loop amplifier. Tilt forward or backwards for the required airflow angle.

Please follow the next step.
Heating modes
For heating in a single spot, select a low flow of air.
For heating a whole room, select a high flow of air. For best results turn on the oscillation control.

Please follow the next step.
Please follow the next step.
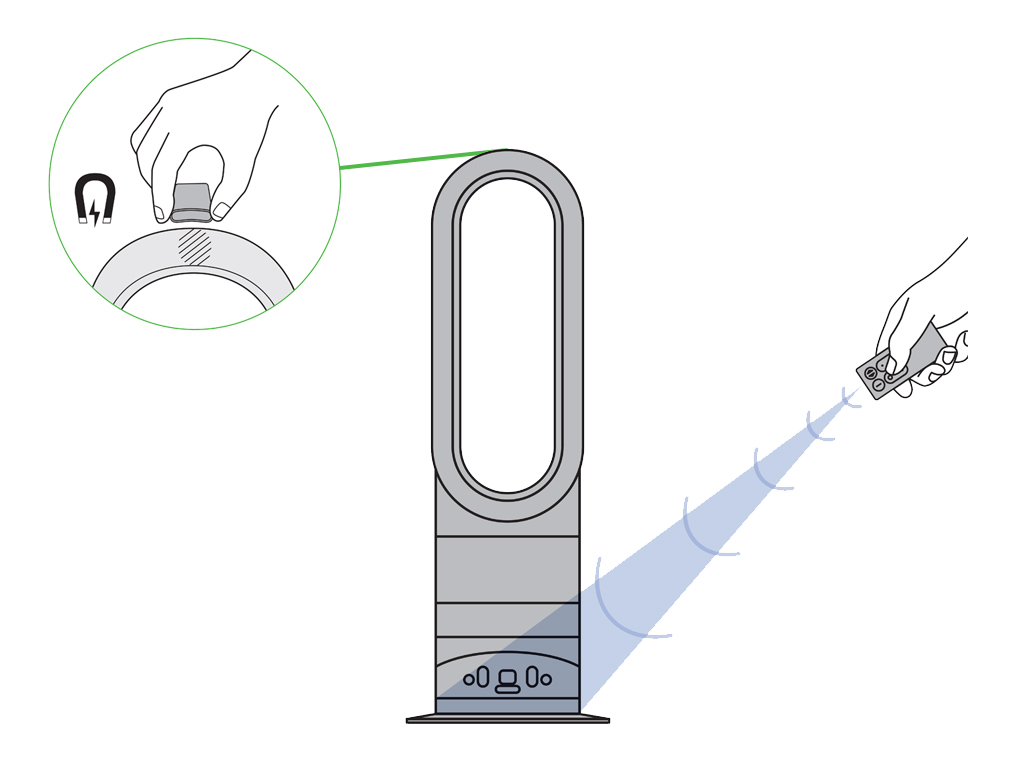
Remote control
Use the ON/OFF, oscillation, airflow speed and thermostat controls as shown: To operate, point remote control toward the front of the base. The remote control docks magnetically on the top of the heater with the buttons facing down.

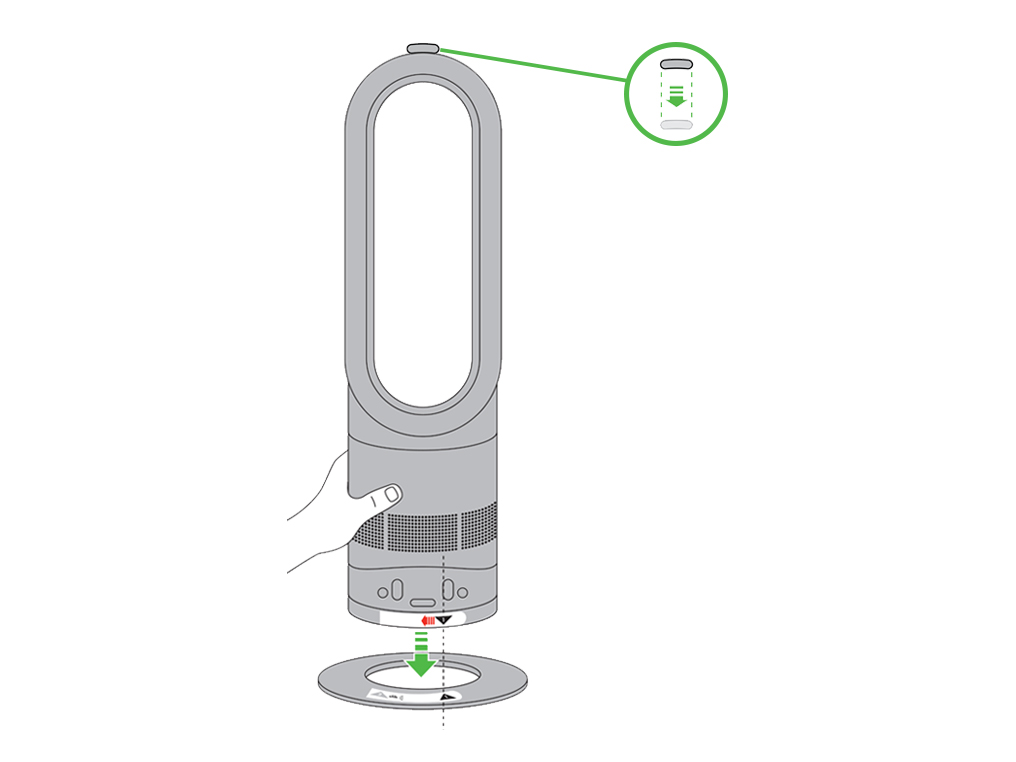
Assembling your machine
NB: Before switching on, please make sure the heater is positioned so that the airflow or oscillation is not obstructed.
Align the black arrows located on the base and Main body of the machine.

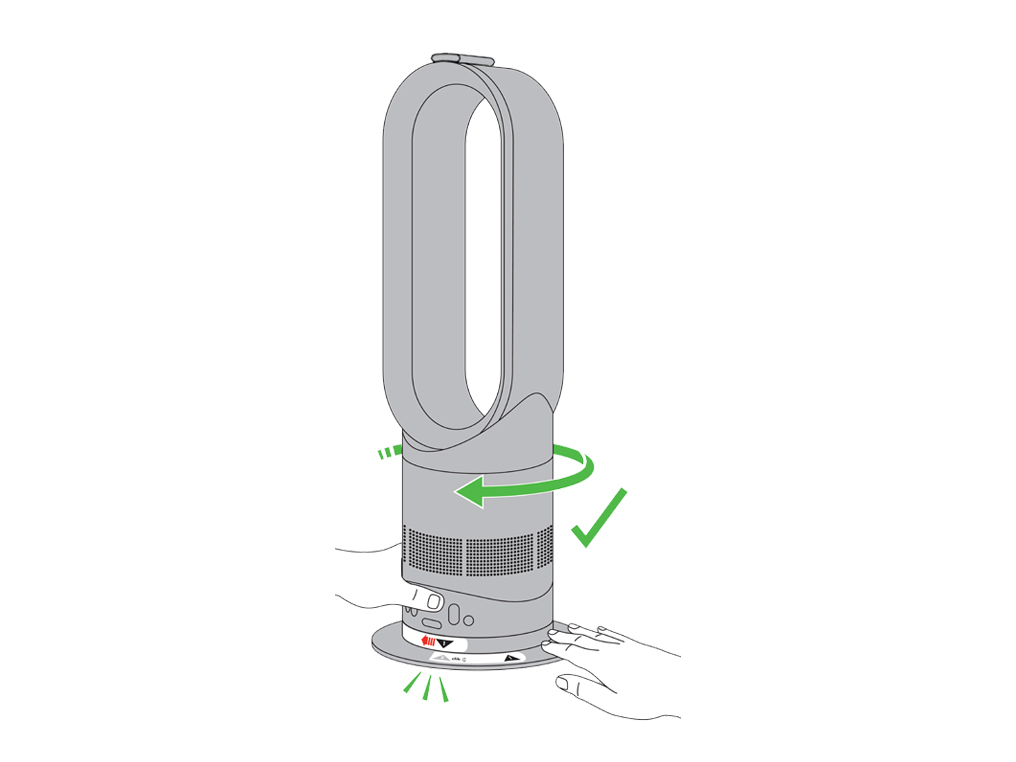
Twist the machine clockwise until it locks, as shown below. The remote control docks magnetically on the top of the heater as shown.
Please follow the next step.
How to use your heater
Plug the heater in and switch ON at the wall.
NB: Before switching on, please make sure the heater is positioned so that the airflow or oscillation is not obstructed.
Ensure that the machine is placed on a stable solid surface. Turn the machine on using the ON/OFF button on the machine.
NB: On first use, the heater will default to a temperature 1°C higher than the current room temperature. Thereafter, the heater will remember the last target temperature set.
Please follow the next step.
Temperature setting
Select the desired room temperature. Pressing red increases the target temperature, blue decreases it.

Please follow the next step.
Replace the remote control battery
Please follow the steps in the video.
Is there anything else we can help with?
Replace the remote control battery
Turn off power and unplug the machine.
Push the base of the remote.
The battery compartment will open and you will be able to pull it out.
Replace battery (type CR 2032) and reinsert the compartment until you hear a click.
We need a little more information to help us solve your issue.
Please contact our customer service team on 01-475-7109, or directly on Live Chat through our Digital Assistant by clicking the purple icon at the bottom of the page. You can start a conversation with an Expert by clicking the agent icon at the bottom left of the chat window.
We're glad the problem's been solved.
Please let us know if there's anything else we can help you with.
The Dyson guarantee

'How to ' videos and tips

Exclusive owner benefits

Expert advice. 7 days a week.

Hassle-free repairs and replacement
Please get in touch.
Our experts are ready to help you.
UK based helpline open
8:00am- 8:00pm Monday to Friday
8:00am- 6:00pm Saturday and Sunday
Further help
AM05 Hot+Cool Heater™