Let's get your machine working
Dyson 360 Vis Nav™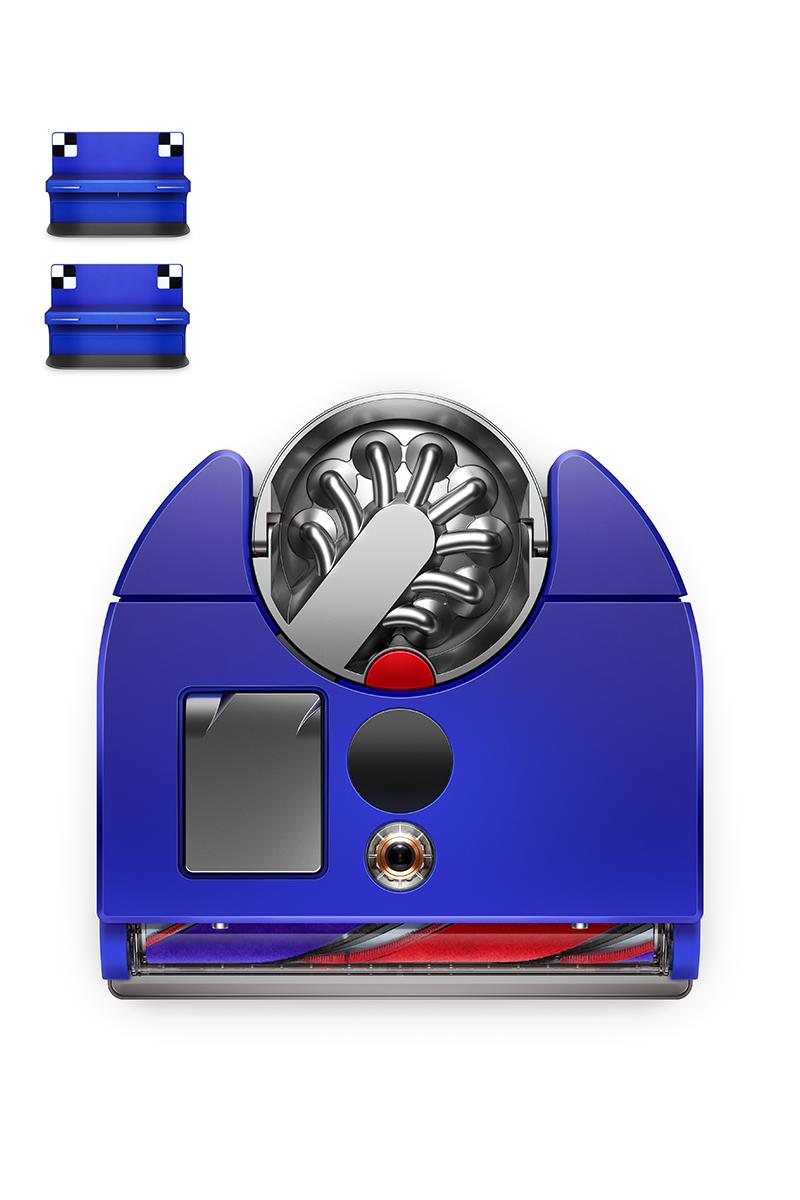
Let's get your machine working
Dyson 360 Vis Nav™
Popular queries
Please select the appropriate option
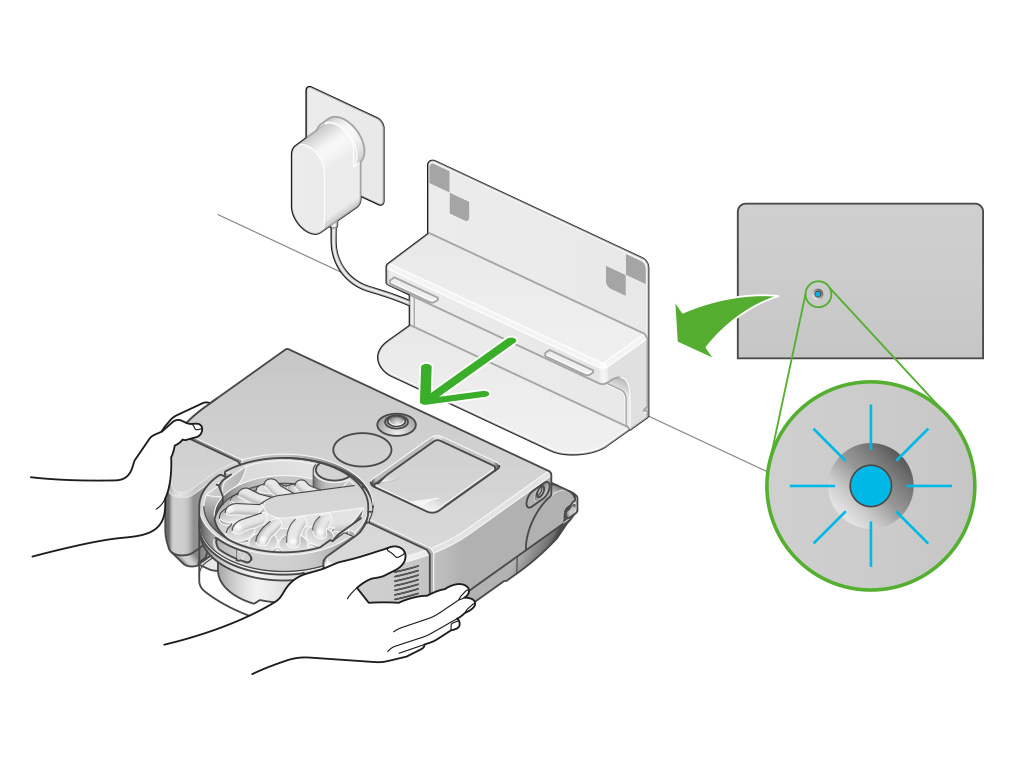
Check that your machine has been connected
If you have previously connected your machine to the MyDyson™ app, you should be able to see it on the app home screen. If you have multiple machines connected, you can switch between them using the burger menu in the top left of the home screen.
Has your machine been connected to the MyDyson™ app?
Please select the appropriate option
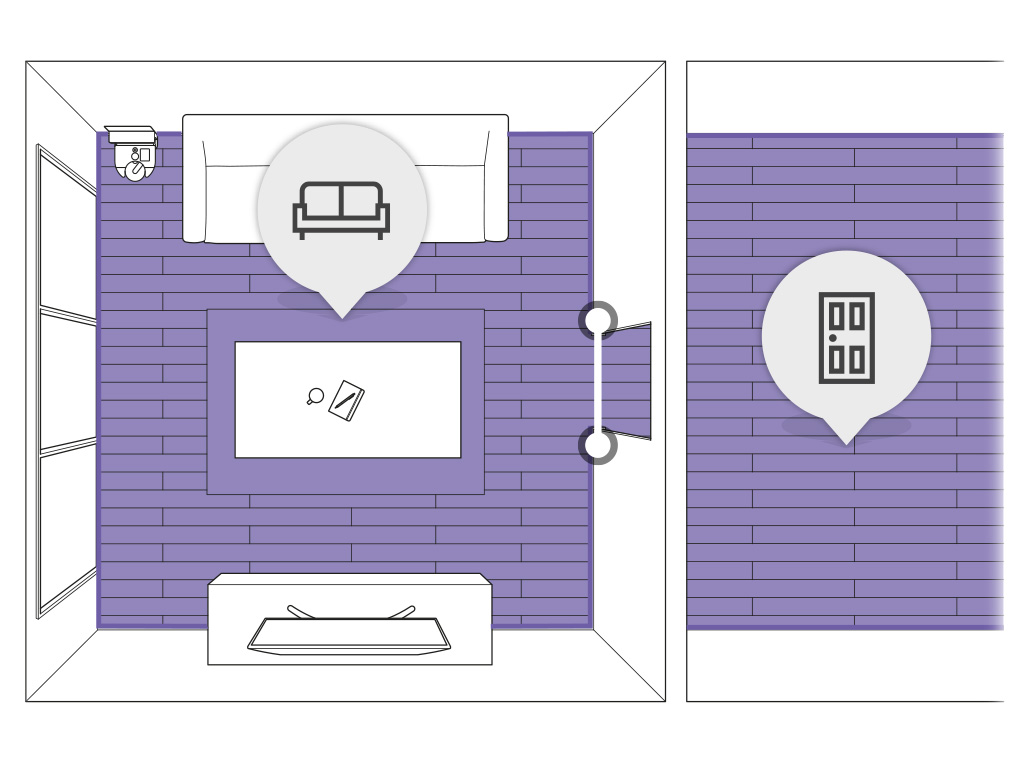
Incorrect activity maps
If the robot has trouble detecting its location in a room, the activity map may differ from the mapped area.
This can be caused by a combination of the robot becoming lost, a change in ambient lighting, the sensors needing to be cleaned or the room not being prepared correctly. Each of which will need to be checked.
This can also occur when the dock is moved or rotated. We advise remapping your floorspace if the dock needs to be moved.
If the environment has changed significantly, if furniture has been moved or inner doors closed for example, the peristent map may not appear in your robot's activity map. If the environment has changed and your activity maps frequently show without your persistent map, we would recommend remapping your home.
Ambient lighting
Your robot will compensate for low light by using its LEDs to selectively illuminate dark areas. It is not designed to operate in complete darkness.
Make sure your robot has adequate illumination to navigate by for the duration of the clean.
It is normal for the LEDs to change in brightness depending on the lighting conditions.
Cleaning the sensors
To maintain optimum performance, keep your camera lens and sensors clean. Use a soft, dry, lint-free cloth to wipe the sensors and camera lens.
Preparing your home
Remove thin rugs or loose objects that your robot may suck up. Tidy small items such as shoe laces or thin cables that your robot won't detect and may get tangled in the brush bar.
Clean any liquid spills or sharp items that could damage your robot.
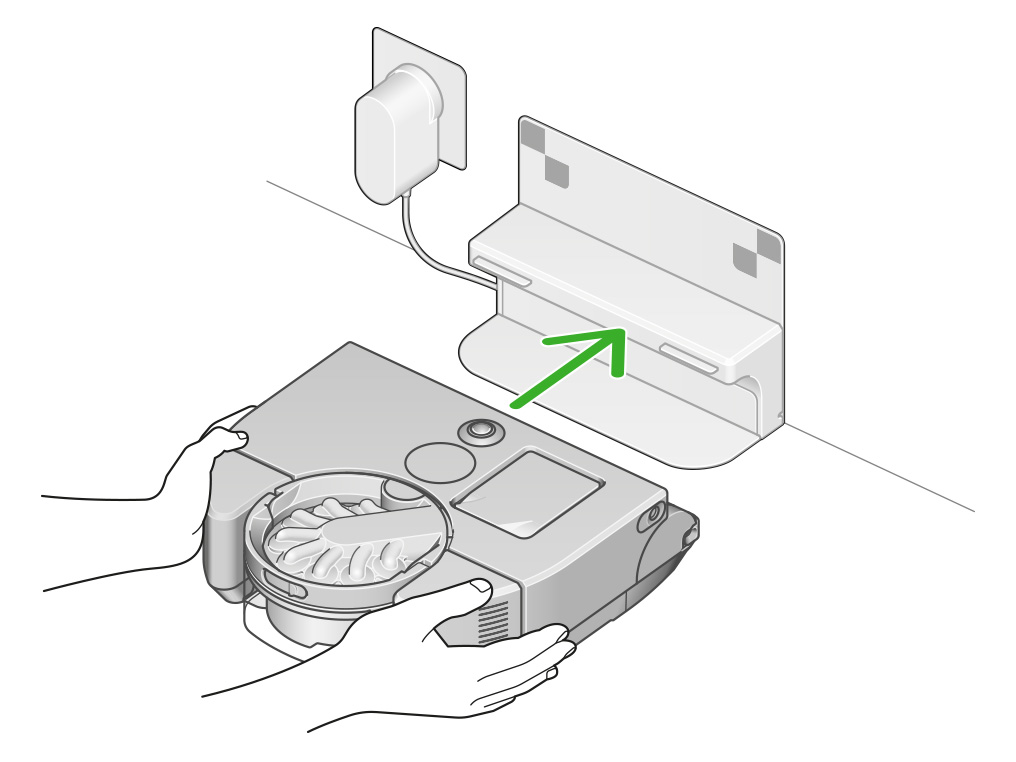
Dock placement
Your dock should be located against a wall, in a place close to a mains power supply, out of bright sunlight and not obscured under a table or other furniture. It needs at least 50cm of clear space around the front.
You should choose a location close to your Wi-Fi access point to avoid connection issues.
We recommend a location close to the centre of your home, as this can lead to more reliable cleans.

Auto-update software
Always enable Auto update in your settings menu for the latest software upgrades. This ensures your robot receives important optimisations, bug fixes and features.
Connection unstable
Try moving your robot and the dock to a different location. If the signal is poor, your machine's connection may not be stable.
Dock placement
You should choose a location close to your Wi-Fi access point to avoid connection issues.
We recommend a location close to the centre of your home, as this can lead to more reliable cleans.
Software update required
Some MyDyson™ app features may not be available if your machine is not up to date.
Please ensure Auto-update software is turned on. You can do this by going to your machine's settings.
This will ensure you automatically receive the latest features and your machine functions correctly.
It can take up to 24 hours for your machine to receive updates after it is enabled.
Check the airway
Debris caught in the brush bar or the machine's airways could interfere with the piezo sensor readings.
If your robot is detecting abnormally high volumes of dust, we would suggest carrying out the following checks.
Removing a blockage
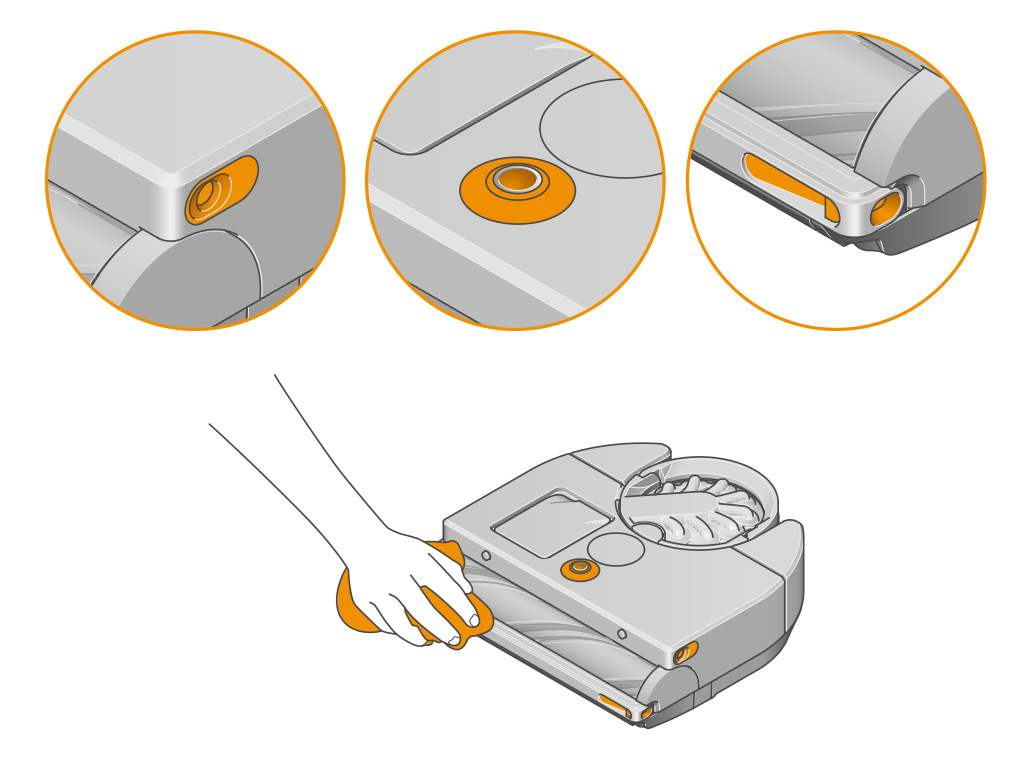
Press the cyclone pack release button on the top of your robot and lift your bin away. Use the handle to carry your bin.
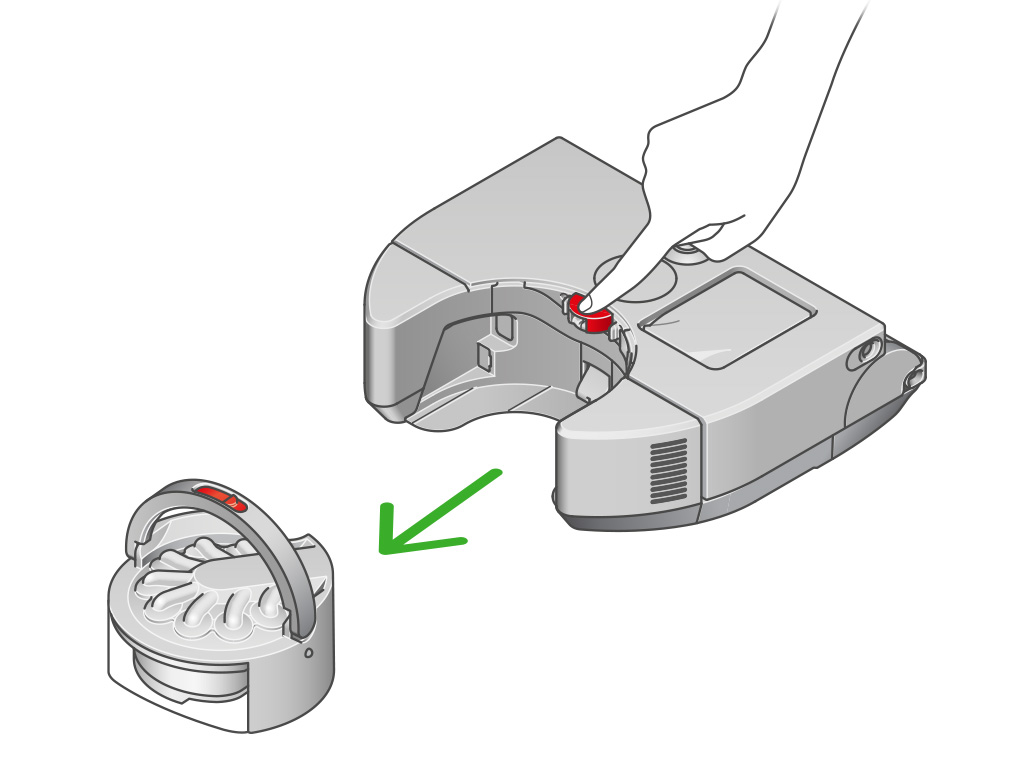
Check the cyclone unit and inlet for any obstructions. Empty the bin if it is full.
If hair or debris is stuck in the shroud, you can use the release catch to remove the cyclone for easier cleaning. Use a soft brush to clear any hair or debris from the shroud.
Check the airway on the machine where the bin connects for blockages.
Check the filter
Click to release the filter unit and it will pop up out of your robot.

Remove the filter from the filter unit and check it for blockages.
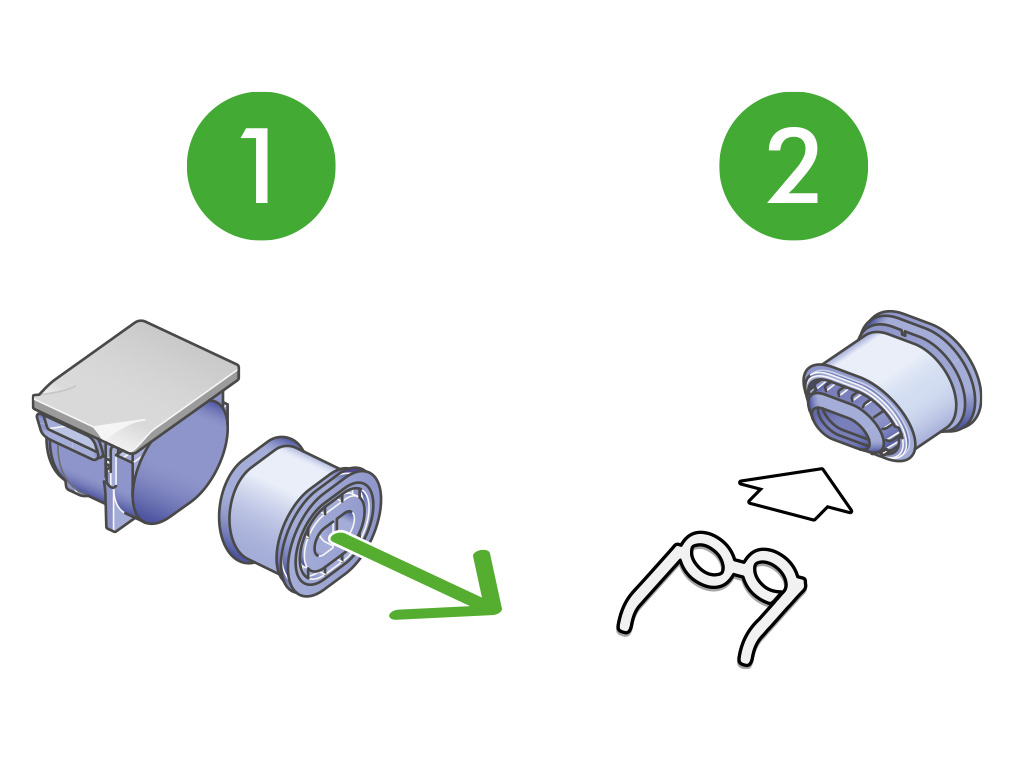
Reinsert the filter into the filter unit and refit to the machine.
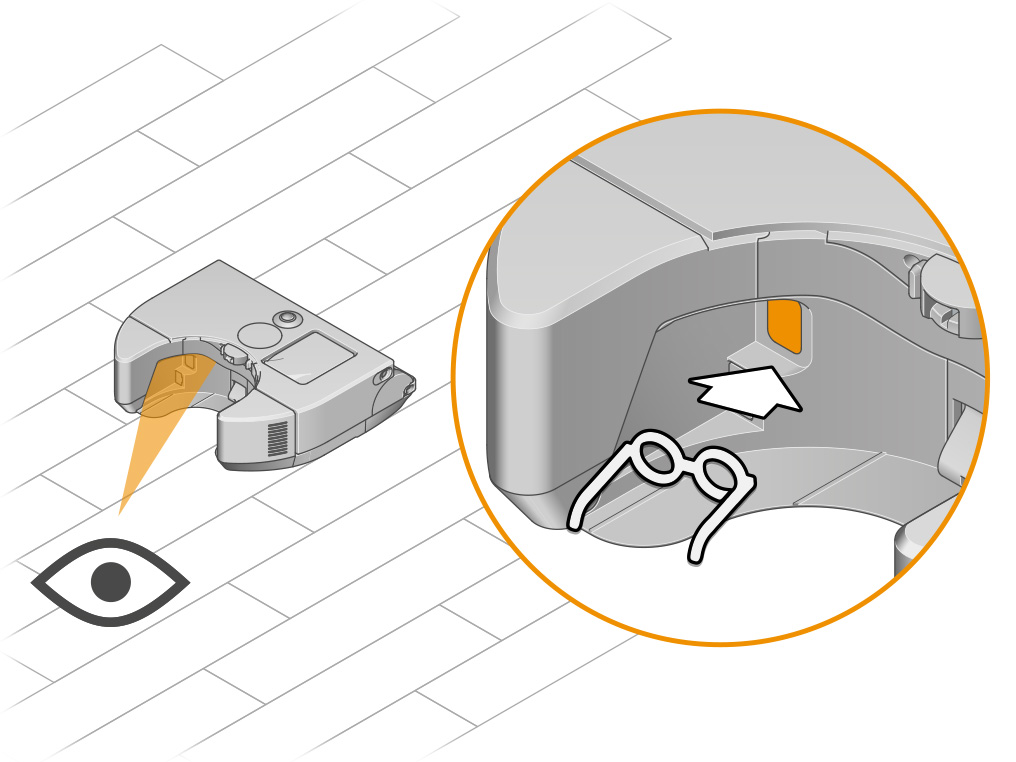
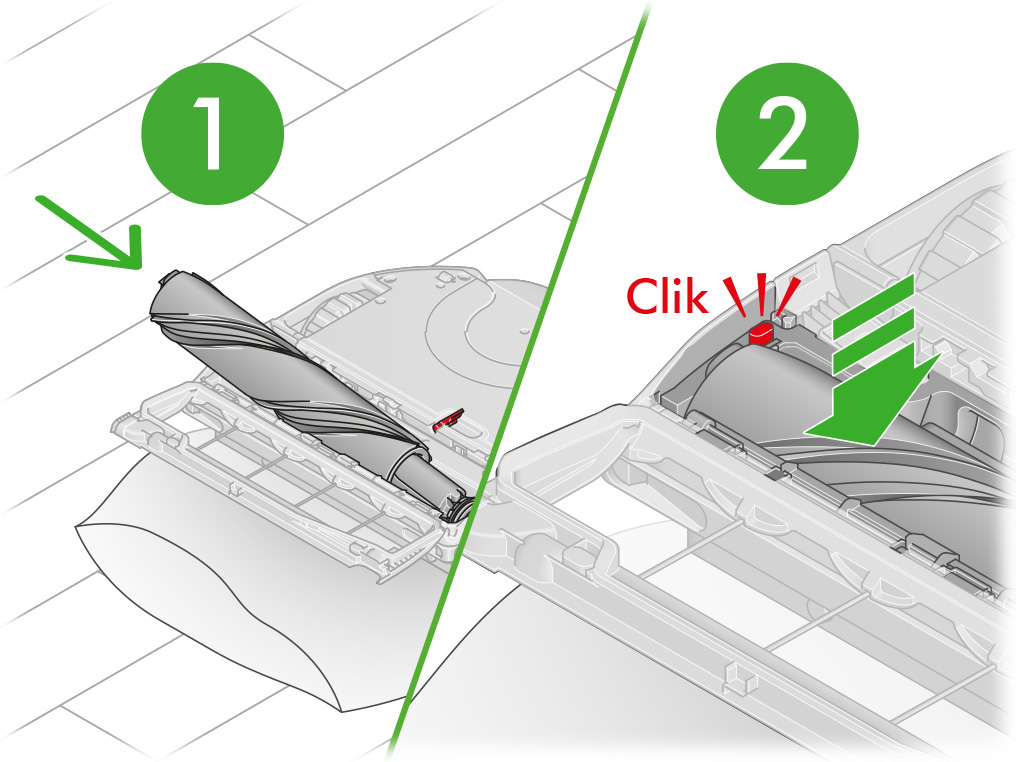
Check the brush bar
Turn your robot over and place it on a soft surface.
Lift the red brush bar cover lever on the base of your robot.
Check the airway on the underside of the machine for any blockages.
Press the red brush bar release button and slide the brush bar out of your robot. Remove any debris or objects. Also ensure any hair or other threads are removed from the brush bar bearing.
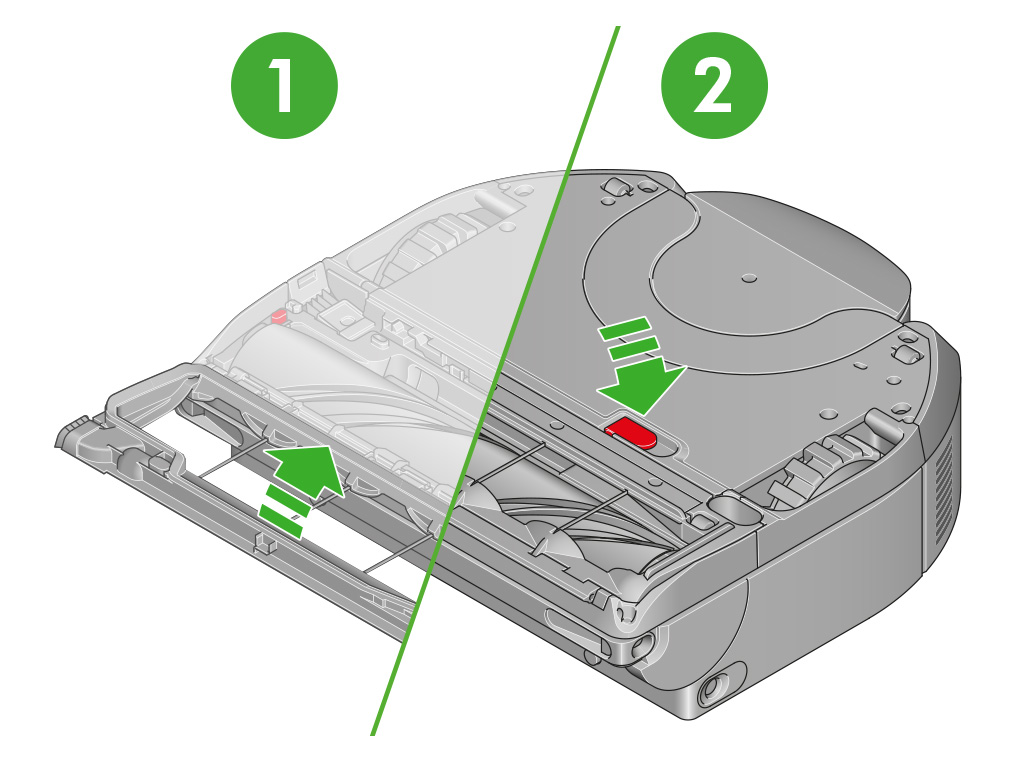
Replace your brush bar
Slide the brush bar into your robot and push down until the release button pops up.
Close the brush bar cover and push the lever down to lock the cover in place.
Ensure the brush bar cover is fully aligned along the width of the machine before securing the lever.
Scheduling not working
Please check the following:
- Your robot should be on the dock and the dock should be powered. Scheduled cleans cannot start off the dock.
- Your robot should not be in a fault state. If an alert is showing on the screen, this needs to be cleared before the robot can clean.
- Your robot must be connected to the Dyson cloud. If there is a problem with your robot's connection to the cloud or Wi-Fi router, it may not start its scheduled clean
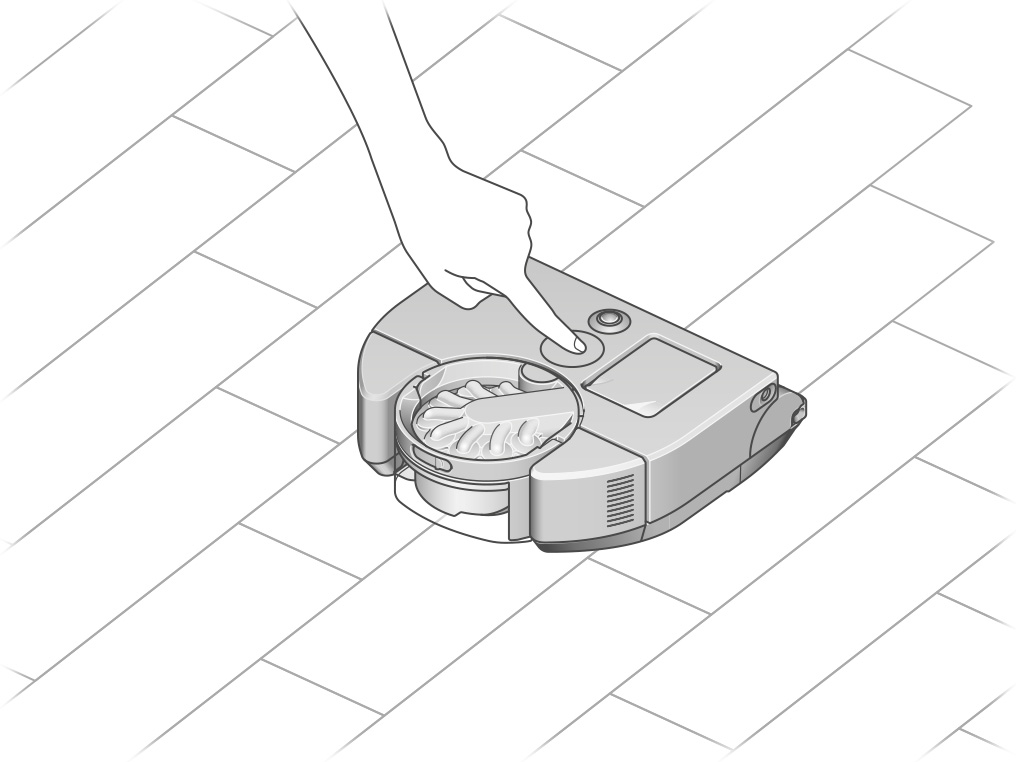
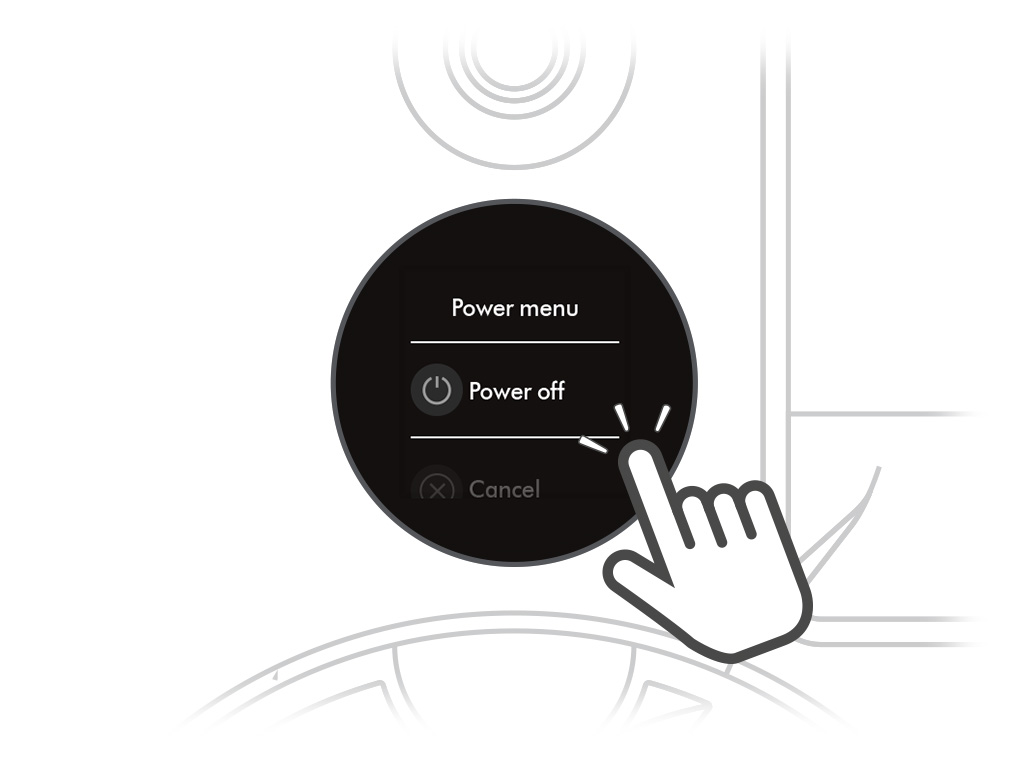
Power cycle
To resolve these issues, remove your robot from the dock and press the LCD screen until the power menu appears.
Click the screen to select "Power off" and wait for your robot to power off.
Once your robot has successfully powered off, return it to the dock. It will power on automatically and should re-establish a connection.
Enable Auto-update software
Please ensure Auto-update software is turned on. You can do this by going to your machine's settings.
This will make sure your machine automatically receives the latest features and improvements.
If Auto-update software is already enabled, you may need to power cycle your machine. It can take up to 24 hours for your machine to receive updates after it is enabled.
Dock your robot
Your robot needs to be docked and powered on in order to start a clean with the MyDyson™ app. Place your robot onto the dock.
Power cycle
If your robot is already docked, remove it from the dock and hold the LCD screen until the power menu appears.
Click the screen to select "Power off" and wait for your robot to power off.
Once your robot has successfully powered off, return it to the dock. It will power on automatically and should re-establish a connection.
Adding a new Wi-Fi router or access point
Your robot is able to remember up to 10 different Wi-Fi network configurations. You can connect your robot to a new Wi-Fi router or access point in its machine settings.
To access your machine's settings, select your machine from the hamburger menu and then select the settings menu icon.
What stage of the connection journey are you having trouble with?
Please follow the next step
Slow response
The app will show an error if the connection has failed. Tap retry/continue to try connecting again. If the issue is resolved, continue to the next step.
Please follow the next step
Machine connected
Your machine is now connected to the MyDyson™ app.
Please follow the rest of the steps to complete the set-up process.
Taking ownership
If this product has been connected before and you decide to take ownership, the previous owner will be notified and will no longer be able to use this machine with their MyDyson™ app.
If the robot is already connected and you do not take ownership, then you still have access to all the robot's connected functions, but you cannot delete personal data.
Naming your robot
To personalise your robot and use it with voice control services, give it a name.
Purchase date
Enter the date of purchase. We'll need this for your guarantee.
It is recommended that you keep hold of your proof of purchase.
Set-up complete
Your machine is now fully connected and set-up.
Trouble connecting
Ensure your robot is docked and that the dock is powered.
Keep your device close to the machine and try again.
If the connection continues to fail, re-start the connection. Select "Connecting your robot". If this has already been tried, select "Issue not resolved"
Please follow the next step
MyDyson™ app
You'll need to have the MyDyson™ app installed to connect to your machine.
Ensure Bluetooth and Wi-Fi are enabled on your device.
You have the option to create a new account or log in if you have previously created a Dyson account on the app or online. Select the appropriate option.
Ensure your robot is docked and that the dock is powered.
Please follow the next step
Add machine
You can add a machine from the hamburger menu or from the main screen if no machines are registered. If Bluetooth is not enabled, you will be prompted to enable it.
Location services
To scan for Wi-Fi networks, the app needs to access your device's location services. Allow this when prompted.
Select machine
Select your machine when it appears. The app will display its serial number.
Please follow the next step
Pairing
Hold your device next to your machine's display. For security, your device needs to remain close to the machine throughout the pairing process.
Press the screen on your machine when prompted to activate pairing.
Once paired, continue to the next step.
Please follow the next step
Manual pairing
If you are still not able to pair the machine, it's possible that your device does not support automatic pairing. Follow the on-screen prompts to manually pair.
You will need your machine's 8-digit code located on the machine behind the bin.
Enter your machine's code to continue.
Please follow the next step
If you have previously connected your machine to your Wi-Fi network and you are not prompted to enter Wi-Fi details, select "Complete set-up".
Enter network details
Your robot will scan for available networks and send these to your device.
Select your network from the list of available networks.
To complete the connection to your chosen router, your robot needs its Wi-Fi password, which will be sent across the secure Bluetooth link you set up in the Pairing step.
Enter the Wi-Fi password for the chosen network.
Please follow the next step
Connection stage
Your robot will connect to your Wi-Fi router before establishing a secure connection to the Dyson cloud, then finally authenticating your device's connection to your robot.
You should see a confirming connection message. The connection progress is represented by purple dots at the top of the screen.
Please follow the next step
Network not found
If your network does not show on your device, your robot may be having trouble detecting your router's Wi-Fi signal.
Please check the following:
- Your robot, the dock and your device should be in range of your Wi-Fi router's signal.
- If your Wi-Fi router's SSID is hidden, you'll need to enter it manually.
- Check that your Wi-Fi router is on and is connected to the internet.
Please follow the next step
Unable to find machine
If you are not able to see your machine, selecting the correct category and model of your machine will take you through suggested checks for making your machine visible to the app.
Please check the following:
- Ensure Bluetooth and Wi-Fi are enabled on your device.
- Your robot should be docked and the dock should be powered. Your robot will only perform the connection journey while docked.
- Ensure you keep your device close to the machine during the connection process. Initial pairing with your robot happens using Bluetooth, which has limited range.
Select machine
Select your machine when it appears. The app will display its serial number.
Please follow the next step
Please select the appropriate option
Two-factor authentication
Check that the email address shown on the login screen is correct. The code will be sent to the address shown.
The email may have incorrectly been marked as spam or junk. Please check any junk folders for the code email.
Please note that the authentication code will expire 5 minutes after being sent. Codes will also expire when a new one is sent.
If you enter the password or authentication code incorrectly more than four times, your account will be locked. It will be automatically unlocked after 30 minutes.
MyDyson™ app
Download the latest version of the MyDyson™ app from the app store on your phone. For users of Android phones, it can be downloaded from major Android app stores.
Minimum requirements:
- iOS 12
- Android 7.0 Nougat
Your MyDyson™ account
Once you have downloaded and updated the MyDyson™ app, please login or register a MyDyson™ account.
To set up an account you will require a valid email address and password.
Password reset
After changing the password on your MyDyson™ account, you'll need to wait 30 minutes before logging back in.
If you enter the password or authentication code incorrectly more than four times, your account will be locked. It will be automatically unlocked after 30 minutes.
MyDyson™ app
You'll need to have the MyDyson™ app installed to connect to your machine.
Ensure Bluetooth and Wi-Fi are enabled on your device.
You have the option to create a new account or log in if you have previously created a Dyson account on the app or online. Select the appropriate option.
Ensure your robot is docked and that the dock is powered.
Please follow the next step
Downloading software
Setting up your robot offline requires manually installing software via a USB stick. This can be downloaded from our Software Download page. Connecting to the MyDyson™ app is what activates your robot's intelligent features and enables automatic software updates. This is why connection to the MyDyson™ app is an integral part of the set-up process.
Please select the appropriate option
Reconnecting your machine
Your robot is able to remember up to 10 different Wi-Fi network configurations. You can connect your robot to a new Wi-Fi router or access point in its machine settings.
To access your machine's settings, select your machine from the hamburger menu and then select the settings menu icon.
Please select the appropriate option
Reviewing cleans
The activity map shows where your robot has cleaned. Your robot will update its map at the end and periodically during a clean.
You can use the map to see where your robot has got stuck during a clean, then use this as a guide to add restrictions.
If you have mapped your home with your robot, the clean coverage will be shown over your floorspace.
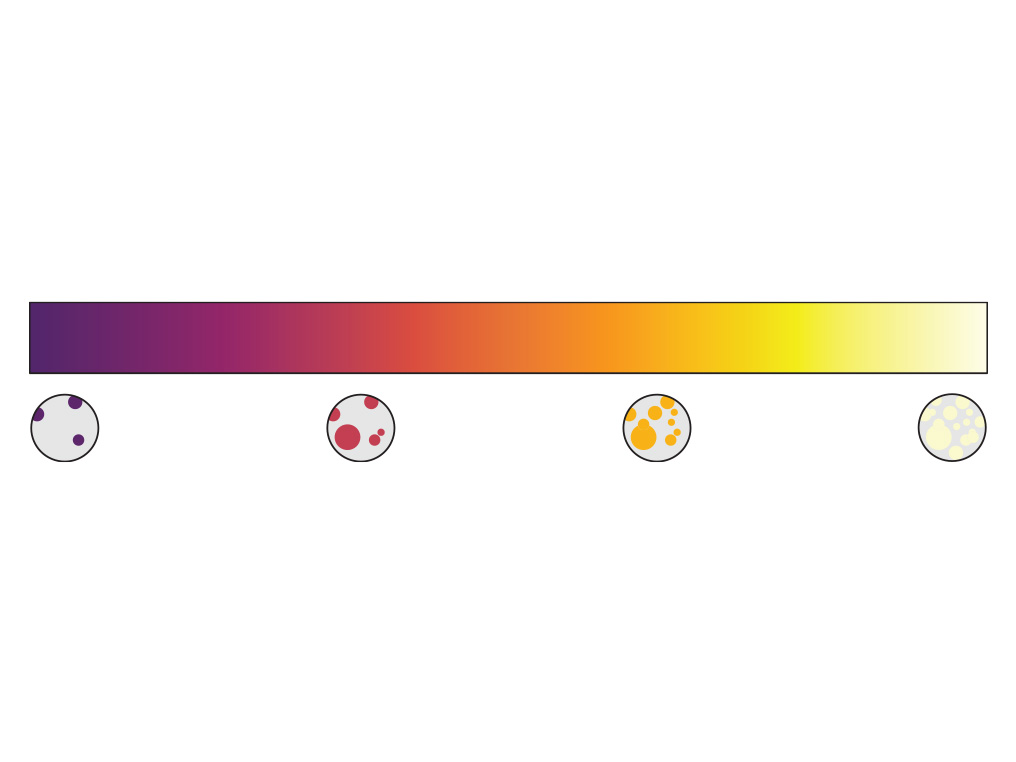
Dust maps
Your map will indicate the levels of dust detected during the clean, you may want to clean areas with higher dust more often.
The heatmap shown in your robot's activity map shows the amount of dust collected. The darker purple areas indicate low levels of dust, whereas the lighter yellow areas indicate much higher levels of dust.
Accessing Mapping and Zoning
Mapping, zoning and restriction features can be found by selecting the settings icon.
Creating a map of your home with the MyDyson™ app lets your robot learn the layout. This gives you more control over where and how your robot cleans areas of your home.
Please select the appropriate option
Mapping your home
To get the most out of your Dyson robot, we recommend letting it map your home's floorspace.
Preparing your home
Before mapping, it's a good idea to tidy up any loose objects from the floor, open internal doors and remove any items that may be moved between cleans. Place your robot on the dock and you can start mapping.
Building a complete map can take time, and depends on the size of your home (100 sq m may take approximately 90 minutes). During the mapping process, leave your robot to create your map. It will return to the dock by itself when mapping is complete.
Ensure that there is a clear path for your robot to navigate, so that it can map your whole home.
Clean any liquid spills or sharp items that could damage your robot.
Create a map
In the Mapping and Zoning menu, create a new map. Follow the prompts on the screen to start the mapping process.
Your robot follows an optimised route to systematically clean your home, with the brush bar and suction turned off to minimise the time taken to map. For best results, avoid interrupting your robot while it's mapping.
Your robot needs a complete and accurate map of your home, so if there are any problems during mapping, it's better to start again.
Multiple floors
If your home has more than one level, you can create a map for each storey or level of your home.
You'll need to move your robot's dock to each floor and start the mapping process from the dock.
To start a clean from the dock on a mapped floor of your home, the dock must be in the same location as it was when the map was created.
You can purchase additional docks to avoid having to move your robot's dock between floors. Each floor should only have one dock.
What next?
After your home has been successfully mapped, you'll be able to assign zones to your map for directed cleaning. You'll also be able to create restrictions that your robot will follow when cleaning.
Did you find this helpful?
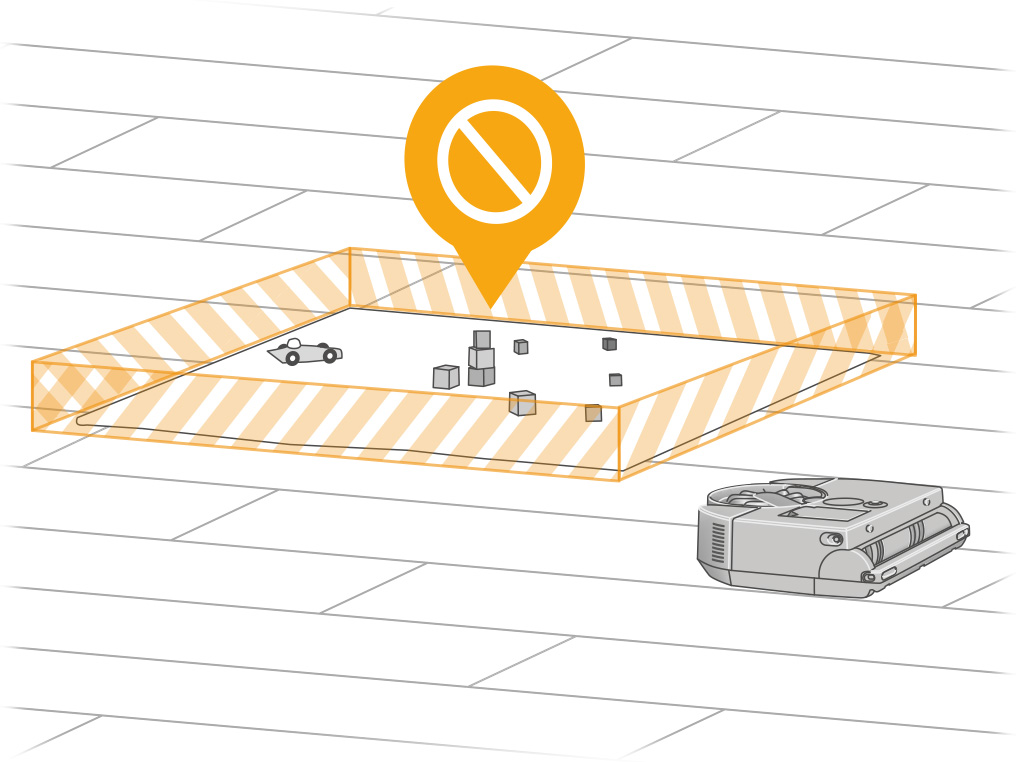
Creating restrictions
If you have mapped your home you'll be able to create restrictions, leading to more reliable cleans from your robot. You can create these in the Mapping and Zoning menu.
There are three different types of restrictions you can create to suit your home.
Avoid areas
You can select areas on your map for your robot to avoid. This can be used in areas with cables, clothing or toys, where your robot might get stuck. You can also avoid entire rooms, such as the bathroom.
Ensure that any avoid areas you create do not block off access to areas you want your robot to clean.
No brush bar
In a "No brush bar" area, your robot will vacuum with the brush bar turned off. This is useful where there are delicate floors or long-pile rugs.
If your robot's brush bar regularly gets caught in the same area, we would advise creating this type of restriction.
No climb
In a "No climb" area, your robot will avoid climbing in areas where obstacles may cause it to get stuck, such as furniture with pedestals or low level items.
If your robot repeatedly gets caught on inclines or small objects, we would recommend creating this type of restriction.
Zoning your home
After your robot has finished mapping you'll be prompted to create zones for your new map.
If your map was left unzoned or if you would like to recreate your zones, you can do so in the Mapping and Zoning menu.
Splitting your map
The MyDyson™ app will prompt you to split your map into zones using lines.
You can split the map up as you like, but we recommend dragging the lines onto doorways and other thresholds between rooms. Lines can't be set where they would intersect other lines.
Naming your zones
After splitting the map, you can assign names to the individual zones. You can choose from a list of common room names or set a custom name.
What next?
Once your map has been zoned, you can assign a cleaning mode to each zone and direct your robot to clean specific zones.
Did you find this helpful?
Starting a clean
Using the MyDyson™ app, you can choose between an all area clean or directed cleaning.
Directed cleaning
By selecting a specific map, you can set which zones you want your robot to clean. Tapping each of the zones will select or deselect them for the clean. You can select a power mode for each zone.
Your robot will clean zones in the order that minimises the time taken to complete the clean.
Cleaning modes
Before starting a clean, you can set cleaning modes for each of your zones to customise your clean or set a cleaning mode for all areas.
All areas
When starting a clean from this menu, your robot will clean all accessible areas using a single cleaning mode.
Directed cleaning
By selecting a specific map, you can set which cleaning modes you want the robot to use per zone.
Did you find this helpful?
Starting a clean
Using the MyDyson™ app, you can choose between an all area clean or directed cleaning.
All areas
When starting a clean from this menu, your robot will clean all accessible areas using a single cleaning mode.
Directed cleaning
By selecting a specific map, you can set which zones you want your robot to clean. Tapping each of the zones will select or deselect them for the clean. You can select a power mode for each zone.
Your robot will clean zones in the order that minimises the time taken to complete the clean.
Machine schedules
Schedules can be added or changed in your machine's settings.
Add events to set a schedule for when your machine should start cleans.
If you have mapped and zoned your floorspace, you can also customise which zones are included in the scheduled clean.
Accessing the settings
To access your machine's settings, select your machine from the hamburger menu and then select the settings menu icon.
Please select the appropriate option
Location setting
Your home location can be changed by selecting the appropriate time zone.
Select a location from the list. You can also search for a location to filter the list.
Once a new location has been chosen, update to save.
Notification settings
The MyDyson™ app will occasionally send you notifications from your machines to keep you informed on their status.
You can control which notifications you see from your machine in the settings menu.
Robot name
Your robot's name can be changed in the settings menu. If you are using voice control, this name is what will be used to refer to your robot.
Once a new name has been selected, follow the prompts in the app to change.
Switching machines
To switch between your machines, select the hamburger menu. A list of your machines will show on the left.
You can also swipe between your connected machines by swiping the sides of your screen. For Android users, screen gestures may need to be disabled for this feature to work.
Please select the appropriate option
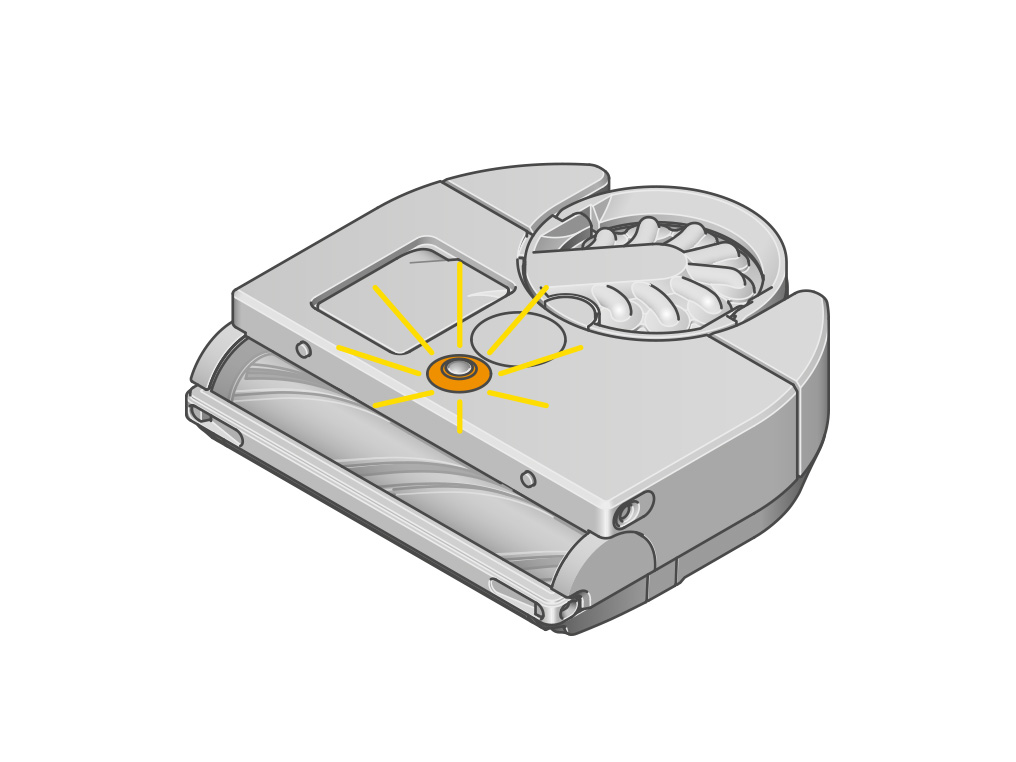
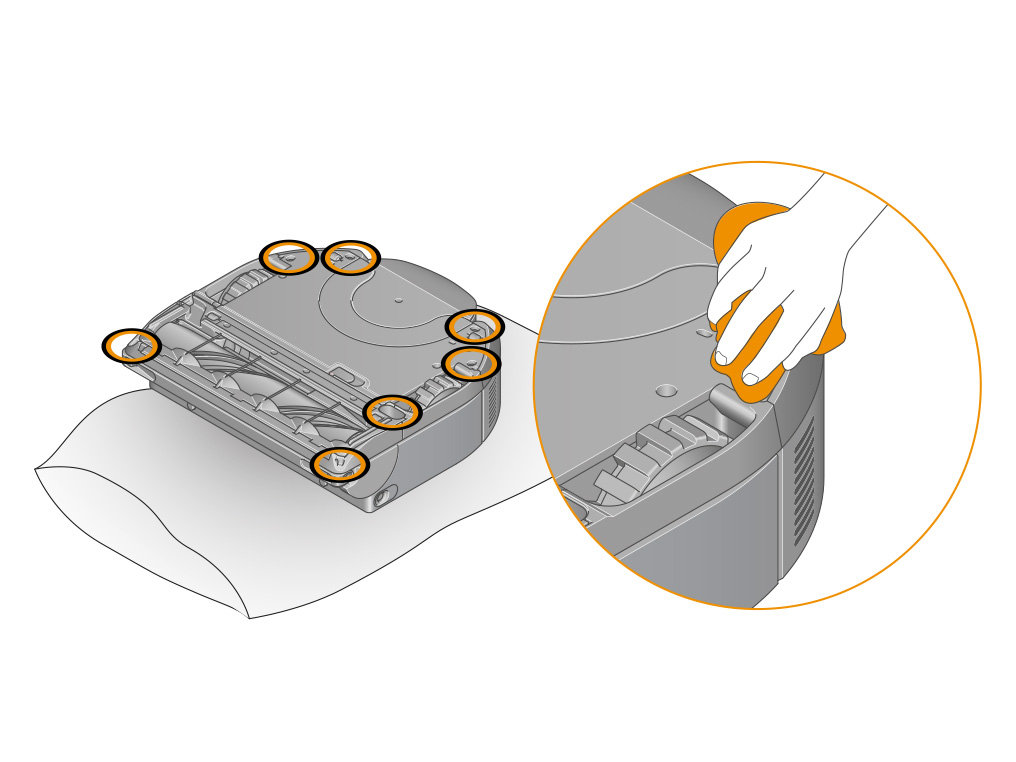
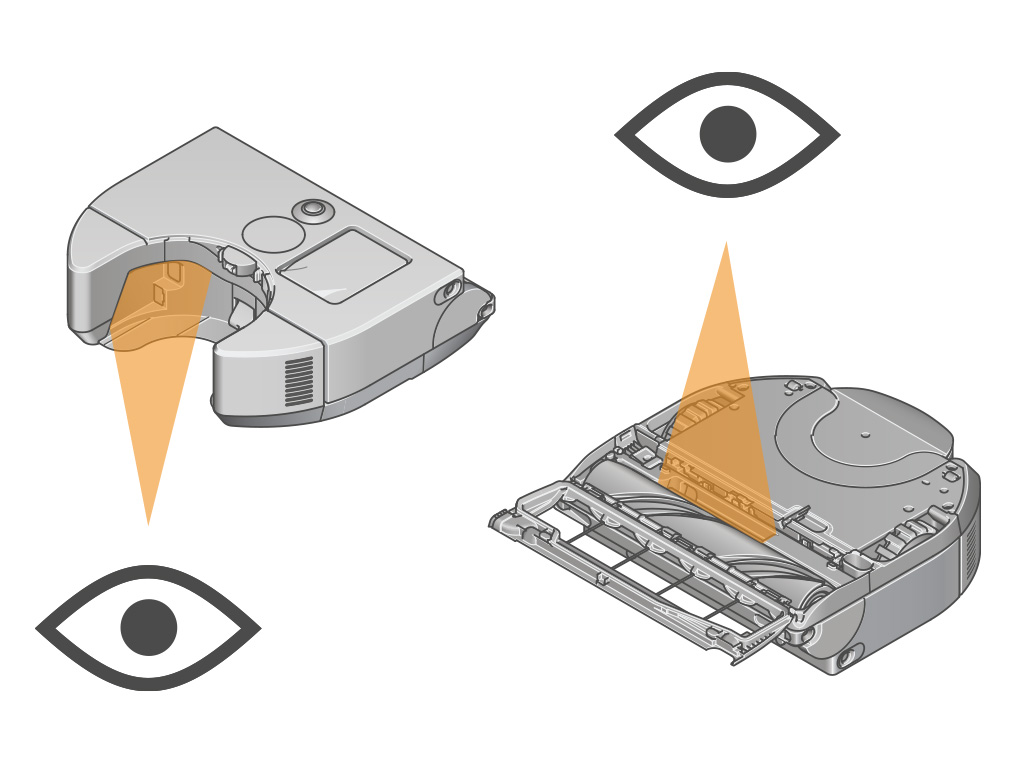
Cleaning the sensors
To maintain optimum performance, regularly check and clean dust, debris and smears on the sensors.
We recommend that you check and clean your robot's sensors at least once a month.
To maintain optimum performance, keep your camera lens and sensors clean. Use a soft, dry, lint-free cloth to wipe the sensors and camera lens.
Check all sensor covers and the navigational camera for dirt, dust, fingerprints and smears.
Do not use cleaning fluids, liquids or sprays of any kind.
Turn your robot over and place it on a soft surface.
Use a soft, dry, lint-free cloth to wipe the optical flow sensor and each drop sensor on the base of your robot. There are seven sensors in total.
Further help required
If you are having trouble with your machine, please select one of the available troubleshooting categories for further assistance.
Please select the appropriate option
Fault code history
If your robot has encountered a fault at any point that displayed a fault code, you can find this code in your robot's fault history on the LCD screen.
Swipe up on your robot's LCD screen to access the menu.
Diagnosing a fault code
Please select the appropriate option based on the fault code shown in your robot's fault history.
1.-.- includes faults beginning with 1.
3.-.- includes faults beginning with 3.
ADC error
One of your robot's ADCs has experienced an error. This is likely a temporary issue.
Many of your robot's onboard sensors use an Analogue to Digital Converter (ADC) that allow the robot to monitor the sensors digitally, ensuring they are operating correctly.
If you have just encountered this fault, select "How do I resolve this fault?" from the available options.
For information on how to prevent this fault in future, select "Preventing this fault" from the available options.
Please select the appropriate option
Auto-update software
Always enable Auto update in your settings menu for the latest software upgrades. This ensures your robot receives important optimisations, bug fixes and features.
If this problem persists, please speak to our Customer Support Team who will be able to assist further.
Return to dock
Return your robot to the dock. You can start your next clean as usual.
Bin not detected
Your robot has detected that the bin has been removed.
Your robot uses a sensor to detect the proximity of the bin. The bin needs to be fitted for there to be suction at the cleaner head.
If you have just encountered this fault, select "How do I resolve this fault?" from the available options.
Please follow the next step
Refitting the bin
Return the cyclone unit, ensuring it clicks into place.

Press the LCD touchscreen on your robot to resume cleaning.
Unable to dock
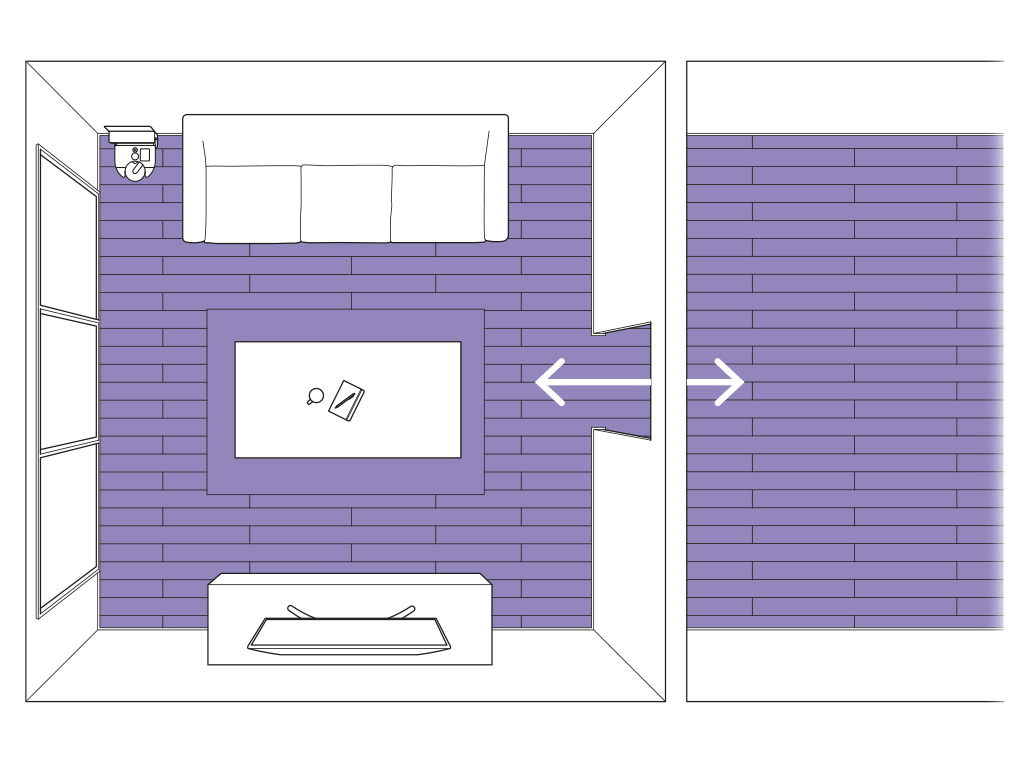
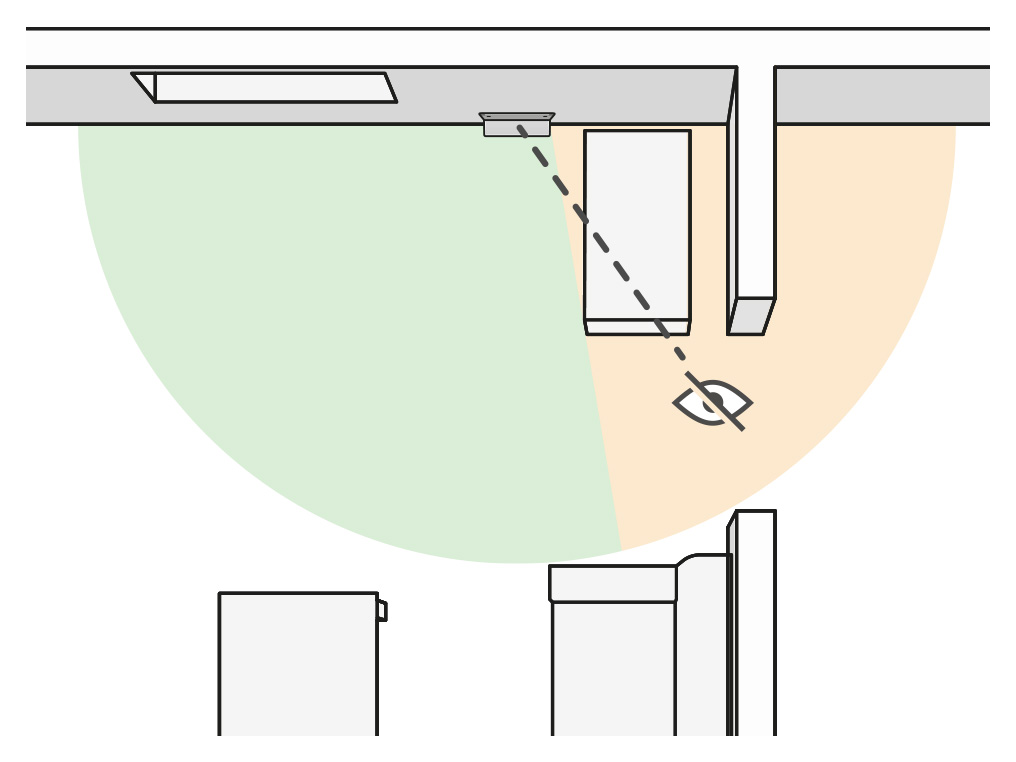
Your robot hasn't been able to dock after multiple attempts. It has either been unable to locate the dock markers, its approach to the dock was obstructed, the dock is placed incorrectly, or the robot didn't detect any charge from the charge contacts.
At the end of a clean or when the battery runs low, your robot will return to the dock to charge. It uses the checkered markers to align itself and will complete the docking manoeuvre when it detects power from its charge contacts. In low light your robot will use its illumination to see the dock markers.
If you have just encountered this fault, select "How do I resolve this fault?" from the available options.
For information on how to prevent this fault in future, select "Preventing this fault" from the available options.
Please select the appropriate option
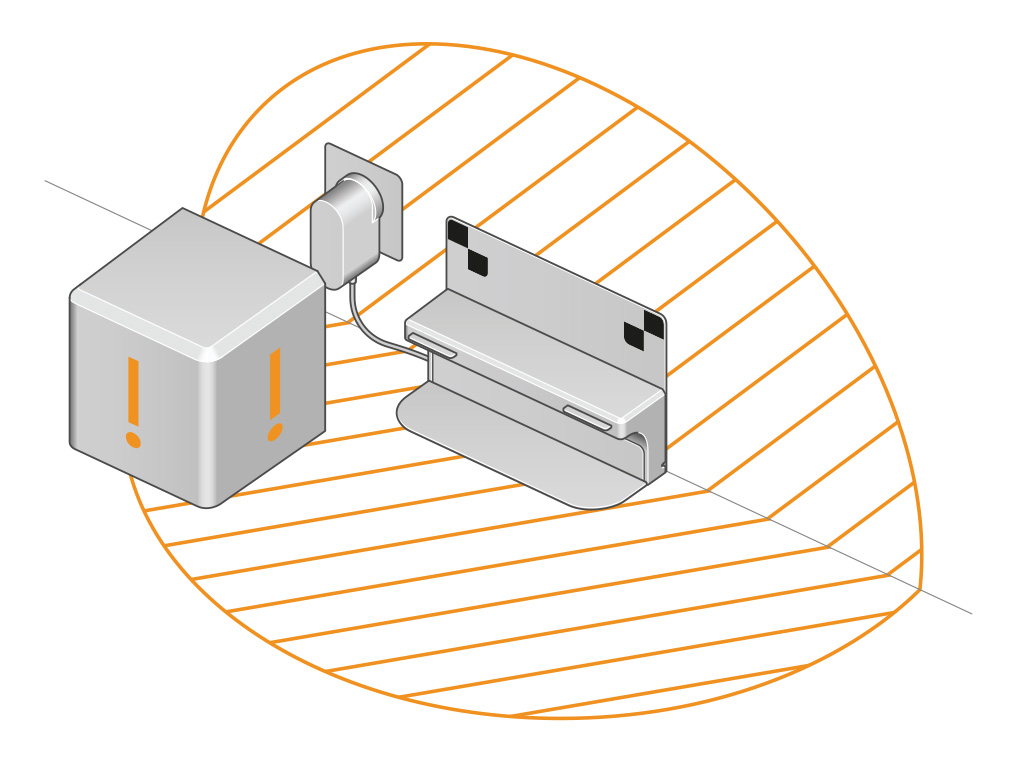
Dock placement
Your dock should be located against a wall, in a place close to a mains power supply, out of bright sunlight and not obscured under a table or other furniture. It needs at least 50cm of clear space around the front.
You should choose a location close to your Wi-Fi access point to avoid connection issues.
We recommend a location close to the centre of your home, as this can lead to more reliable cleans.
Ensure the dock markers are clearly visible to your robot and placed directly against the wall. If the dock is not level with the floor, the markers will be at an angle and your robot may fail to dock.
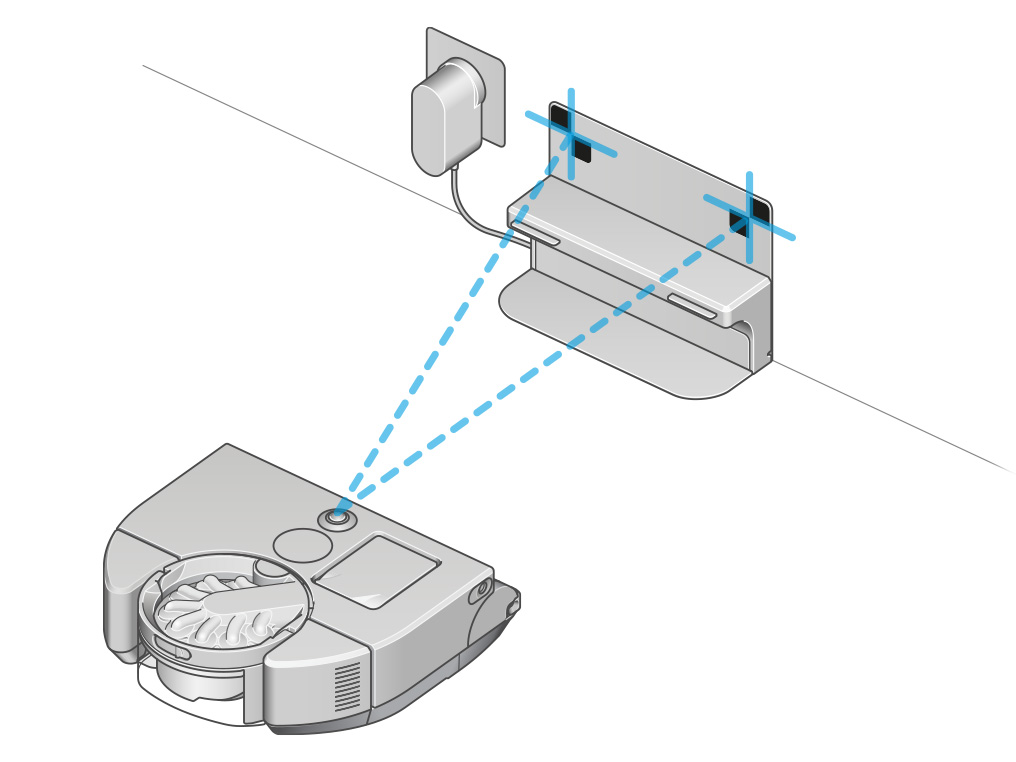
The dock should not be placed in direct sunlight or complete darkness. Your robot may struggle to detect the markers if the ambient light is not balanced.

Make sure your dock is powered, indicated by the blue light on the back of the dock.
To test the power, ensure the robot is undocked.
Airways blocked
Your robot has detected a blockage.
Your robot constantly monitors its impeller speed to ensure it has sufficient airflow to prevent over-heating and damage to the motor.
If you have just encountered this fault, select "How do I resolve this fault?" from the available options.
For information on how to prevent this fault in future, select "Preventing this fault" from the available options.
Please select the appropriate option
Removing a blockage
Press the cyclone release button and remove the cyclone unit.
Check the cyclone unit and inlet for any obstructions. Empty the bin if it is full.
If hair or debris is stuck in the shroud, you can use the release catch to remove the cyclone for easier cleaning. Use a soft brush to clear any hair or debris from the shroud.
Check the airway on the machine where the bin connects for blockages.
Check the filter
Click to release the filter unit and it will pop up out of your robot.
Remove the filter from the filter unit and check it for blockages.
Reinsert the filter into the filter unit and refit to the machine.
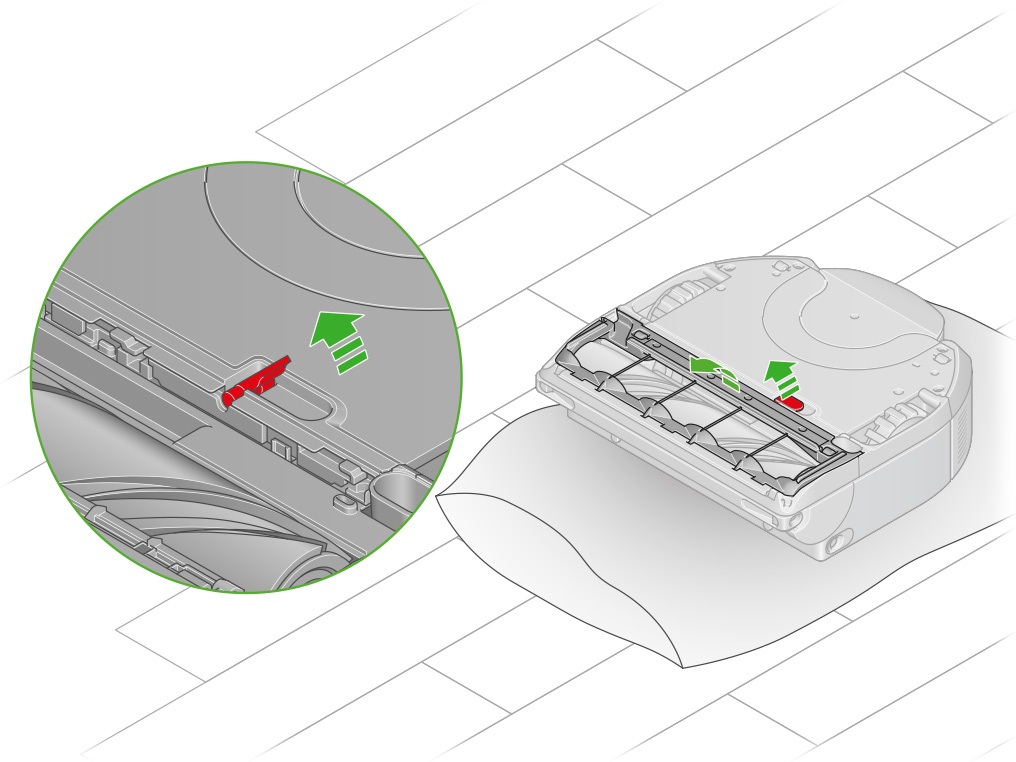
Check the brush bar
Turn your robot over and place it on a soft surface.
Lift the red brush bar cover lever on the base of your robot.
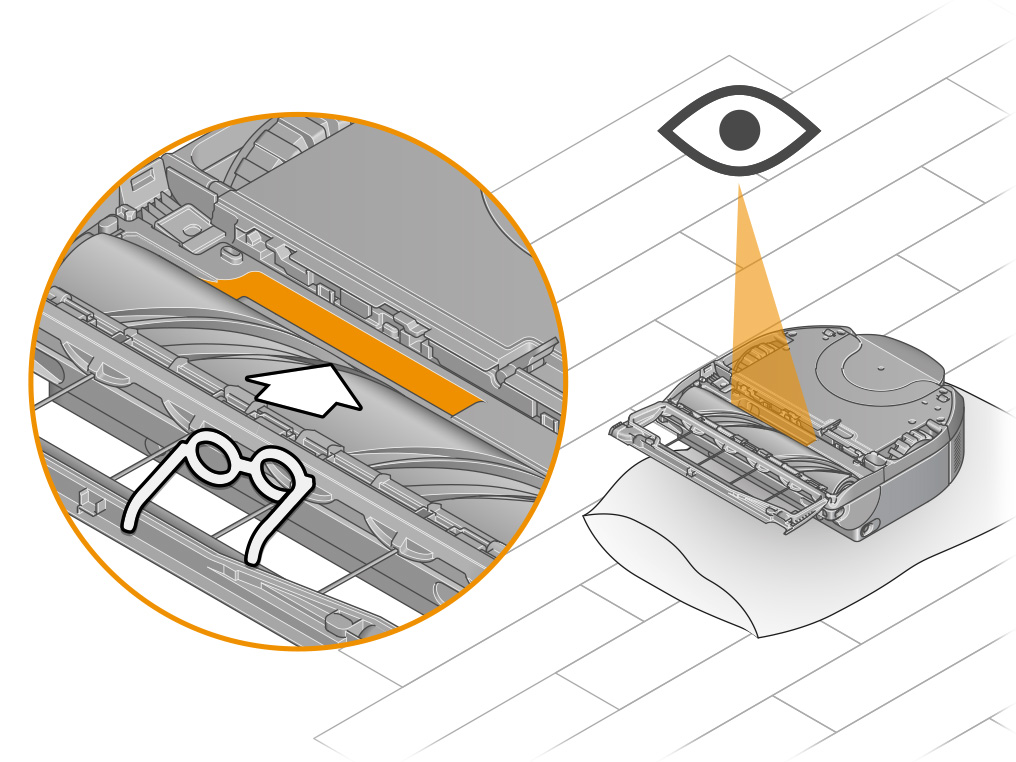
Check the airway on the underside of the machine for any blockages.
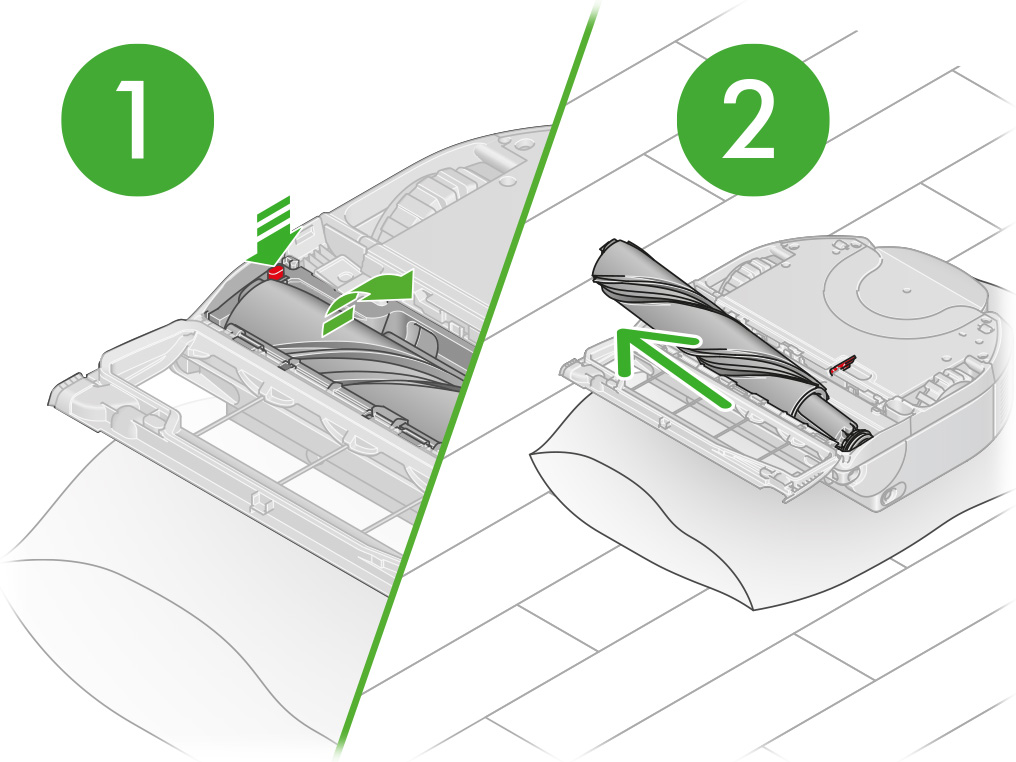
Press the red brush bar release button and slide the brush bar out of your robot. Remove any debris or objects. Also ensure any hair or other threads are removed from the brush bar bearing.
Replace your brush bar
Slide the brush bar into your robot and push down until the release button pops up.
Close the brush bar cover and push the lever down to lock the cover in place.
Ensure the brush bar cover is fully aligned along the width of the machine before securing the lever.
Clear the alert
Return the robot to the same point on the floor, press the LCD screen and step away to resume cleaning.
Creating restrictions
If your robot repeatedly encounters problems in the same area, consider setting up a suitable map restriction.
If you have mapped your home you'll be able to create restrictions, leading to more reliable cleans from your robot. You can create these in the Mapping and Zoning menu.
There are three different types of restrictions you can create to suit your home.
Avoid areas
You can select areas on your map for your robot to avoid. This can be used in areas with cables, clothing or toys, where your robot might get stuck. You can also avoid entire rooms, such as the bathroom.
Ensure that any avoid areas you create do not block off access to areas you want your robot to clean.
No brush bar
In a "No brush bar" area, your robot will vacuum with the brush bar turned off. This is useful where there are delicate floors or long-pile rugs.
If your robot's brush bar regularly gets caught in the same area, we would advise creating this type of restriction.
No climb
In a "No climb" area, your robot will avoid climbing in areas where obstacles may cause it to get stuck, such as furniture with pedestals or low level items.
If your robot repeatedly gets caught on inclines or small objects, we would recommend creating this type of restriction.
Did you find this helpful?
Check bin level
Your robot has detected a problem with its vacuum motor. This is most likely due to a blockage in its airways.
Your robot continuously monitors its vacuum motor for any errors that may indicate a fault. Each vacuum motor is specifically calibrated at manufacture to compensate for slight variations.
If you have just encountered this fault, select "How do I resolve this fault?" from the available options.
For information on how to prevent this fault in future, select "Preventing this fault" from the available options.
Please select the appropriate option
Vacuum calibration missing
Your robot detected that its vacuum motor calibration is missing. This is likely a temporary software issue.
Your robot continuously monitors its vacuum motor for any errors that may indicate a fault. Each vacuum motor is specifically calibrated at manufacture to compensate for slight variations.
If you have just encountered this fault, select "How do I resolve this fault?" from the available options.
For information on how to prevent this fault in future, select "Preventing this fault" from the available options.
Please select the appropriate option
Power cycle
Press and hold the LCD screen until the power menu appears, then press the screen again to power off your robot.
Return your robot to the dock. You can start your next clean as usual.
If the issue persists, we recommend leaving your robot off of the dock overnight.
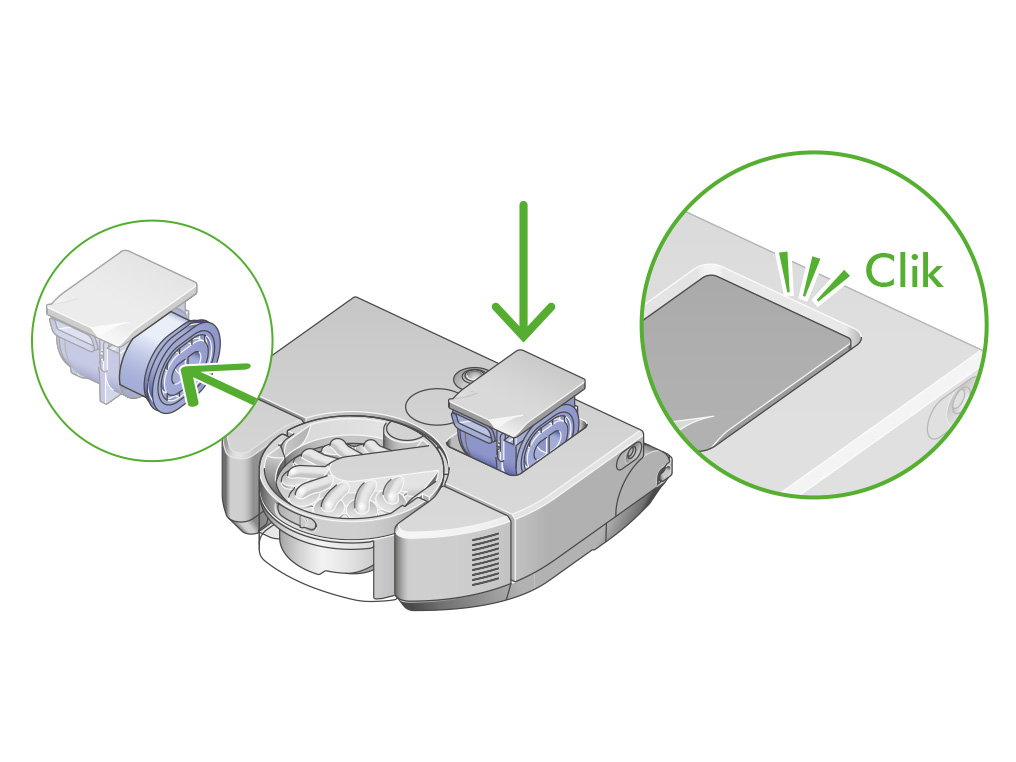
Filter not detected
Your robot has detected that the filter or filter housing has been removed.
Your robot uses a sensor to detect the proximity of the filter and filter housing. Both the housing and filter need to be fitted for there to be suction at the cleaner head.
If you have just encountered this fault, select "How do I resolve this fault?" from the available options.
Please follow the next step
Check the filter
The filter unit needs to be fitted correctly before starting a clean.
Return the filter unit, ensuring it clicks into place.
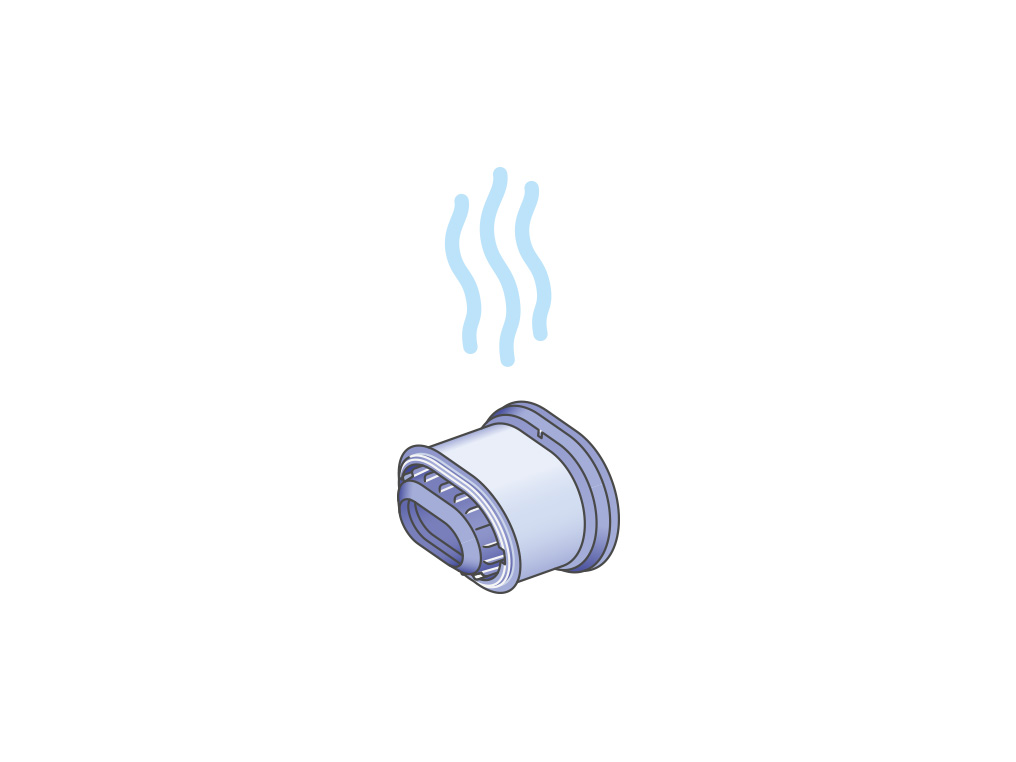
Dry the filter
If the filter was removed and washed, it must be completely dry before being refitted to the machine.
Place your filter on its side and leave to dry for at least 24 hours in a well-ventilated, warm place.
Don't dry the filter in a tumble dryer, microwave or near a naked flame.
Filter not detected
Your robot has detected that the filter or filter housing has been removed.
Your robot uses a sensor to detect the proximity of the filter and filter housing. Both the housing and filter need to be fitted for there to be suction at the cleaner head.
If you have just encountered this fault, select "How do I resolve this fault?" from the available options.
Please follow the next step
Check bin level
Your robot has detected a drop in suction during the clean. This is most likely caused by the bin being full but can also be due to a blockage in your robot's airways.
Your robot constantly monitors its impeller speed to ensure it has sufficient airflow to prevent over-heating and damage to the motor.
If you have just encountered this fault, select "How do I resolve this fault?" from the available options.
For information on how to prevent this fault in future, select "Preventing this fault" from the available options.
Please select the appropriate option
Check airways
Your robot has detected a drop in suction during the clean. This is most likely caused by the bin being full but can also be due to a blockage in your robot's airways.
Your robot constantly monitors its impeller speed to ensure it has sufficient airflow to prevent over-heating and damage to the motor.
If you have just encountered this fault, select "How do I resolve this fault?" from the available options.
For information on how to prevent this fault in future, select "Preventing this fault" from the available options.
Please select the appropriate option
Distance sensor calibration error
Your robot has detected a problem with its sensor calibration that may cause the sensors to measure incorrectly. This is likely a temporary issue.
Your robot uses a range of optical sensors to measure distance to nearby obstacles, detect vertical drops, and build a map of the environment. Your robot uses this information to react to obstacles and determine the most efficient route to clean your home.
If you have just encountered this fault, select "How do I resolve this fault?" from the available options.
For information on how to prevent this fault in future, select "Preventing this fault" from the available options.
Please select the appropriate option
Drop detected at start of clean
A drop was detected at the start of the clean. Your robot may also detect dark or reflective surfaces as drops.
Your robot measures its distance to the floor using optical sensors that will prevent motion when they detect a drop that the robot can't traverse. These sensors may occasionally detect very dark or reflective surfaces as drops. They can also be obscured by dirt and debris.
If you have just encountered this fault, select "How do I resolve this fault?" from the available options.
For information on how to prevent this fault in future, select "Preventing this fault" from the available options.
Please select the appropriate option
Relocating the dock
If your robot encounters this issue often, the location of your dock may need to be reconsidered. We recommend that you also remap your home after relocating the dock.
Check the dock
Ensure your dock is placed on a level surface that extends at least 50cm around it.
Your dock should be located against a wall, in a place close to a mains power supply, out of bright sunlight and not obscured under a table or other furniture. It needs at least 50cm of clear space around the front.
You should choose a location close to your Wi-Fi access point to avoid connection issues.
We recommend a location close to the centre of your home, as this can lead to more reliable cleans.
Ensure the dock is on a level surface and aligned with the wall. Do not place the dock against glass.
For future cleans, ensure there is a clear path back to the dock from all areas of your home or selected zones.
Clean the contacts
Use a soft, dry, lint-free cloth to wipe both metal contacts on the front of the robot and on the dock.
ADC error
One of your robot's ADCs has experienced an error. This is likely a temporary issue.
Many of your robot's onboard sensors use an Analogue to Digital Converter (ADC) that allow the robot to monitor the sensors digitally, ensuring they are operating correctly.
If you have just encountered this fault, select "How do I resolve this fault?" from the available options.
For information on how to prevent this fault in future, select "Preventing this fault" from the available options.
Please select the appropriate option
Unclean distance sensor
Your robot has detected an obstruction in one or more of its distance sensors that are obscuring its vision. This is most likely caused by dust or dirt on the sensors.
Your robot uses a range of optical sensors to measure distance to nearby obstacles, detect vertical drops, and build a map of the environment. Your robot uses this information to react to obstacles and determine the most efficient route to clean your home.
If you have just encountered this fault, select "How do I resolve this fault?" from the available options.
For information on how to prevent this fault in future, select "Preventing this fault" from the available options.
Please select the appropriate option
Clean the sensors
To maintain optimum performance, keep your camera lens and sensors clean. Use a soft, dry, lint-free cloth to wipe the sensors and camera lens.
Check all sensor covers and the navigational camera for dirt, dust, fingerprints and smears.
Do not use cleaning fluids, liquids or sprays of any kind.
Turn your robot over and place it on a soft surface.
Use a soft, dry, lint-free cloth to wipe the optical flow sensor and each drop sensor on the base of your robot. There are seven sensors in total.
Clear the alert
Return the robot to the same point on the floor, press the LCD screen and step away to resume cleaning.
Distance sensor error
Your robot has detected a problem with one of its distance sensors. This is likely a temporary issue.
Your robot uses a range of optical sensors to measure distance to nearby obstacles, detect vertical drops, and build a map of the environment. Your robot uses this information to react to obstacles and determine the most efficient route to clean your home.
If you have just encountered this fault, select "How do I resolve this fault?" from the available options.
For information on how to prevent this fault in future, select "Preventing this fault" from the available options.
Please select the appropriate option
Distance sensor communication error
Your robot couldn't communicate with a distance sensor. This is likely a temporary issue but could also indicate a disconnect or damage to the internal sensor cable.
Your robot uses a range of optical sensors to measure distance to nearby obstacles, detect vertical drops, and build a map of the environment. Your robot uses this information to react to obstacles and determine the most efficient route to clean your home.
If you have just encountered this fault, select "How do I resolve this fault?" from the available options.
For information on how to prevent this fault in future, select "Preventing this fault" from the available options.
Please select the appropriate option
Distance sensor calibration error
Your robot has detected a problem with its sensor calibration that may cause the sensors to measure incorrectly. This is likely a temporary issue.
Your robot uses a range of optical sensors to measure distance to nearby obstacles, detect vertical drops, and build a map of the environment. Your robot uses this information to react to obstacles and determine the most efficient route to clean your home.
If you have just encountered this fault, select "How do I resolve this fault?" from the available options.
For information on how to prevent this fault in future, select "Preventing this fault" from the available options.
Please select the appropriate option
Drop sensor maintenance alert
Your robot has raised a maintenance alert. It does this to ensure its sensors are regularly cleaned.
Your robot measures its distance to the floor using optical sensors that will prevent motion when they detect a drop that the robot can't traverse. These sensors may occasionally detect very dark or reflective surfaces as drops. They can also be obscured by dirt and debris.
If you have just encountered this fault, select "How do I resolve this fault?" from the available options.
Please follow the next step
Clean the sensors
To maintain optimum performance, keep your camera lens and sensors clean. Use a soft, dry, lint-free cloth to wipe the sensors and camera lens.
Check all sensor covers and the navigational camera for dirt, dust, fingerprints and smears.
Do not use cleaning fluids, liquids or sprays of any kind.
Turn your robot over and place it on a soft surface.
Use a soft, dry, lint-free cloth to wipe the optical flow sensor and each drop sensor on the base of your robot. There are seven sensors in total.
Clear the alert
To clear the alert, turn your robot off: press and hold the LCD screen until the power menu appears.
Return to dock
Return your robot to the dock. You can start your next clean as usual.
ADC error
One of your robot's ADCs has experienced an error. This is likely a temporary issue.
Many of your robot's onboard sensors use an Analogue to Digital Converter (ADC) that allow the robot to monitor the sensors digitally, ensuring they are operating correctly.
If you have just encountered this fault, select "How do I resolve this fault?" from the available options.
For information on how to prevent this fault in future, select "Preventing this fault" from the available options.
Please select the appropriate option
Non-drop sensor maintenance alert
Your robot has raised a maintenance alert. It does this to ensure its sensors are regularly cleaned.
Your robot uses a range of optical sensors to measure distance to nearby obstacles, detect vertical drops, and build a map of the environment. Your robot uses this information to react to obstacles and determine the most efficient route to clean your home.
If you have just encountered this fault, select "How do I resolve this fault?" from the available options.
Please follow the next step
Distance sensor error
Your robot's drop sensors have compensated for an internal clock error. This does not indicate a problem with your robot.
Your robot uses a range of optical sensors to measure distance to nearby obstacles, detect vertical drops, and build a map of the environment. Your robot uses this information to react to obstacles and determine the most efficient route to clean your home.
Unclean distance sensor
Your robot has detected an obstruction in one or more of its distance sensors that are obscuring its vision. This is most likely caused by dust or dirt on the sensors.
Your robot uses a range of optical sensors to measure distance to nearby obstacles, detect vertical drops, and build a map of the environment. Your robot uses this information to react to obstacles and determine the most efficient route to clean your home.
If you have just encountered this fault, select "How do I resolve this fault?" from the available options.
For information on how to prevent this fault in future, select "Preventing this fault" from the available options.
Please select the appropriate option
Distance sensor error
Your robot has detected a problem with one of its distance sensors. This is likely a temporary issue.
Your robot uses a range of optical sensors to measure distance to nearby obstacles, detect vertical drops, and build a map of the environment. Your robot uses this information to react to obstacles and determine the most efficient route to clean your home.
If you have just encountered this fault, select "How do I resolve this fault?" from the available options.
For information on how to prevent this fault in future, select "Preventing this fault" from the available options.
Please select the appropriate option
Camera calibration error
Your robot has detected a problem with its sensor calibration that may cause the sensors to measure incorrectly. This is likely a temporary issue.
As your robot moves through your home it uses its 360° camera to identify and track visual features. These features move relative to the camera as your robot navigates which is how it determines its location in your home.
In low light, your robot will illuminate the area around it to maintain exposure to those visual features. In cases where it cannot identify features, such as when it navigates under furniture, your robot relies on its other sensors to track its motion. The camera, an accelerometer, the rotation of its wheels and an optical flow sensor collectively help the robot determine its location.If you have just encountered this fault, select "How do I resolve this fault?" from the available options.
For information on how to prevent this fault in future, select "Preventing this fault" from the available options.
Please select the appropriate option
Camera unplugged
Your robot couldn't communicate with its camera. This is likely a temporary issue.
As your robot moves through your home it uses its 360° camera to identify and track visual features. These features move relative to the camera as your robot navigates which is how it determines its location in your home.
In low light, your robot will illuminate the area around it to maintain exposure to those visual features. In cases where it cannot identify features, such as when it navigates under furniture, your robot relies on its other sensors to track its motion. The camera, an accelerometer, the rotation of its wheels and an optical flow sensor collectively help the robot determine its location.If you have just encountered this fault, select "How do I resolve this fault?" from the available options.
For information on how to prevent this fault in future, select "Preventing this fault" from the available options.
Please select the appropriate option
Distance sensor error
Your robot has detected a problem with one of its distance sensors. This is likely a temporary issue.
Your robot measures its distance to the floor using optical sensors that will prevent motion when they detect a drop that the robot can't traverse. These sensors may occasionally detect very dark or reflective surfaces as drops. They can also be obscured by dirt and debris.
If you have just encountered this fault, select "How do I resolve this fault?" from the available options.
For information on how to prevent this fault in future, select "Preventing this fault" from the available options.
Please select the appropriate option
Distance sensor calibration error
Your robot has detected a problem with its sensor calibration that may cause the sensors to measure incorrectly. This is likely a temporary issue.
Your robot uses a range of optical sensors to measure distance to nearby obstacles, detect vertical drops, and build a map of the environment. Your robot uses this information to react to obstacles and determine the most efficient route to clean your home.
If you have just encountered this fault, select "How do I resolve this fault?" from the available options.
For information on how to prevent this fault in future, select "Preventing this fault" from the available options.
Please select the appropriate option
Distance sensor calibration error
Your robot has detected a problem with its sensor calibration that may cause the sensors to measure incorrectly. This is likely a temporary issue.
Your robot measures its distance to the floor using optical sensors that will prevent motion when they detect a drop that the robot can't traverse. These sensors may occasionally detect very dark or reflective surfaces as drops. They can also be obscured by dirt and debris.
If you have just encountered this fault, select "How do I resolve this fault?" from the available options.
For information on how to prevent this fault in future, select "Preventing this fault" from the available options.
Please select the appropriate option
Please select the appropriate fault
Cannot find a route back to dock
Your robot believes it knows where it is but is unable to find an unobstructed path back to its dock. It may have become boxed in, a door may have closed, or an obstacle might have been placed in its path. If your robot's sensors are unclean or obstructed this can also cause it to detect false obstacles.
Your robot continuously builds a map of its environment while cleaning which it uses to locate itself when navigating to a new area. It will use this information to calculate the most efficient cleaning path, avoiding obstacles it has detected during the clean.
If you have just encountered this fault, select "How do I resolve this fault?" from the available options.
For information on how to prevent this fault in future, select "Preventing this fault" from the available options.
Please select the appropriate option
Preparing your home
For future cleans, ensure there is a clear path back to the dock from all areas of your home or selected zones.
Restrictions
If your robot repeatedly encounters problems in the same area, consider setting up a suitable map restriction.
We recommend regularly maintaining your robot's sensors to they perform optimally.
Make sure your robot has adequate illumination to navigate by for the duration of the clean.

Dirty obstacle sensors - Cannot find a route back to dock
Your robot believes it knows where it is but is unable to find an unobstructed path back to its dock. It may have become boxed in, a door may have closed, or an obstacle might have been placed in its path. If your robot's sensors are unclean or obstructed this can also cause it to detect false obstacles.
Your robot continuously builds a map of its environment while cleaning which it uses to locate itself when navigating to a new area. It will use this information to calculate the most efficient cleaning path, avoiding obstacles it has detected during the clean.
If you have just encountered this fault, select "How do I resolve this fault?" from the available options.
For information on how to prevent this fault in future, select "Preventing this fault" from the available options.
Please select the appropriate option
Regular maintenance
We recommend regularly maintaining your robot's brush bar and airways.
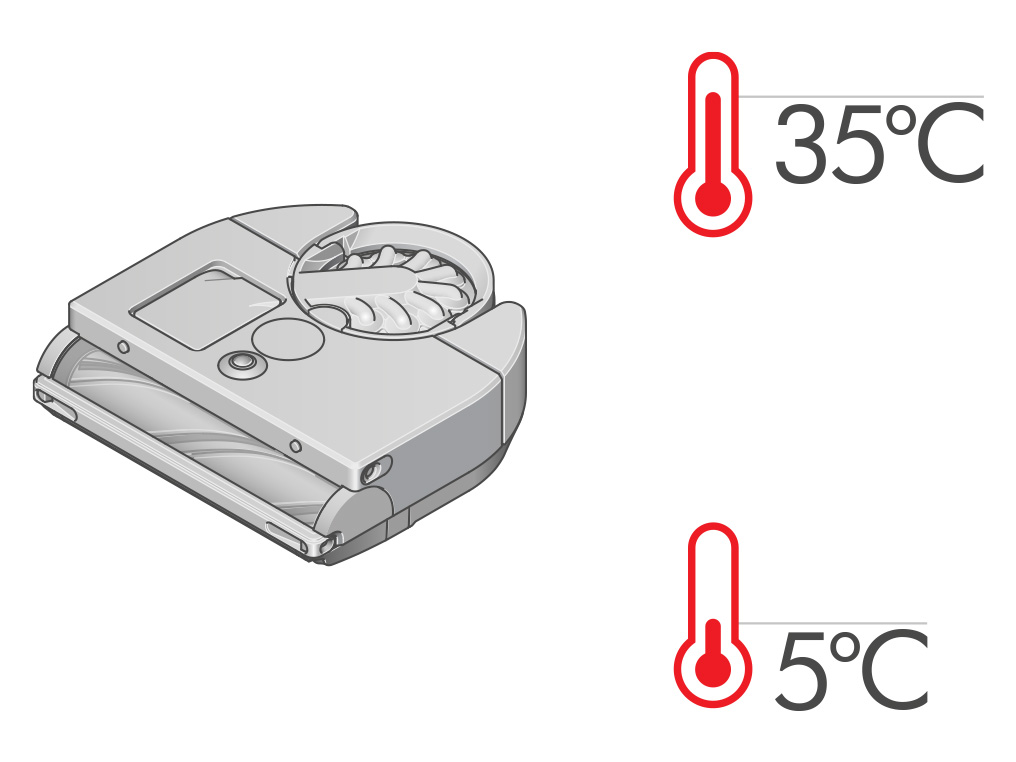
Your robot is designed to operate in an ambient temperature between 5°C and 35°C.
Cannot find a route back to dock
Your robot believes it knows where it is but is unable to find an unobstructed path back to its dock. It may have become boxed in, a door may have closed, or an obstacle might have been placed in its path. If your robot's sensors are unclean or obstructed this can also cause it to detect false obstacles.
Your robot continuously builds a map of its environment while cleaning which it uses to locate itself when navigating to a new area. It will use this information to calculate the most efficient cleaning path, avoiding obstacles it has detected during the clean.
If you have just encountered this fault, select "How do I resolve this fault?" from the available options.
For information on how to prevent this fault in future, select "Preventing this fault" from the available options.
Please select the appropriate option
Insufficient features to find location
Your robot has been unable to identify sufficient visual features to re-establish its location and has stopped to avoid becoming lost. Your robot will try to re-establish its location at the start of the clean, when it has been lifted, when navigating between zones or grids and when attempting to dock.
As your robot moves through your home it uses its 360° camera to identify and track visual features. These features move relative to the camera as your robot navigates which is how it determines its location in your home.
In low light, your robot will illuminate the area around it to maintain exposure to those visual features. In cases where it cannot identify features, such as when it navigates under furniture, your robot relies on its other sensors to track its motion. The camera, an accelerometer, the rotation of its wheels and an optical flow sensor collectively help the robot determine its location.If you have just encountered this fault, select "How do I resolve this fault?" from the available options.
For information on how to prevent this fault in future, select "Preventing this fault" from the available options.
Please select the appropriate option
Preparing your home
Your robot may struggle to balance its camera exposure if it is placed in direct sunlight or in a bright, white location at the start of the clean. If this problem occurs, try an alternative start location out of direct sunlight.
Try to make sure that your robot's dock is located in an open area. Your robot should be able to easily see the targets from all angles in front of the dock.
Make sure your robot has adequate illumination to navigate by for the duration of the clean.
Safety prevents motion
Your robot has detected a problem and has prevented any further motion. This is likely a temporary issue.
Your robot continuously monitors its safety critical systems such as motors and drop sensors. It will prevent itself from moving if they are not operating as intended.
If you have just encountered this fault, select "How do I resolve this fault?" from the available options.
For information on how to prevent this fault in future, select "Preventing this fault" from the available options.
Please select the appropriate option
Safety prevents motion
Your robot has detected a problem and has prevented any further motion. This is likely a temporary issue.
Your robot continuously monitors its safety critical systems such as motors and drop sensors. It will prevent itself from moving if they are not operating as intended.
If you have just encountered this fault, select "How do I resolve this fault?" from the available options.
Please follow the next step
High uncertainty in discovery
Your robot hasn't been able to determine its location and has had to end the clean. This could be due to low light, lack of visible features at the start of the clean or it could not match its location within the specified floor map.
When starting a directed clean your robot will establish its location by completing a T-manoeuvre in front of the dock.
If you have just encountered this fault, select "How do I resolve this fault?" from the available options.
For information on how to prevent this fault in future, select "Preventing this fault" from the available options.
Please select the appropriate option
Prepare your home and robot
Try to make sure that your robot's dock is located in an open area. Your robot should be able to easily see the targets from all angles in front of the dock.
Ensure there are no obstacles blocking the approach to the dock.
Make sure your robot has adequate illumination to navigate by for the duration of the clean.
Your robot may struggle to balance its camera exposure if it is placed in direct sunlight or in a bright, white location at the start of the clean. If this problem occurs, try an alternative start location out of direct sunlight.
Navigation sensor error
Your robot has encountered a software problem and has had to end the clean. We are continually updating and improving our robotics software so it is likely this will be fixed in the next release.
Our robotics software is being continuously tested and improved. Despite this, occasional bugs can be found. Dyson engineers widely monitor all robot errors and regularly update the robotics software to resolve these.
If you have just encountered this fault, select "How do I resolve this fault?" from the available options.
For information on how to prevent this fault in future, select "Preventing this fault" from the available options.
Please select the appropriate option
Auto-update software
Please ensure Auto-update software is turned on. You can do this by going to your machine's settings.
Always enable Auto update in your settings menu for the latest software upgrades. This ensures your robot receives important optimisations, bug fixes and features.
Persistent location lost
Your robot hasn't been able to match its position within the persistent zone map in its memory and cannot navigate to the next zone. This is likely caused by obstructed sensors or a change in the layout of your home since the zone map was created.
During a clean, your robot uses its location and observations from its sensors to build a map of its surroundings. It compares this map with the persistent zone map in its memory to track its position as it navigates between zones.
If you have just encountered this fault, select "How do I resolve this fault?" from the available options.
For information on how to prevent this fault in future, select "Preventing this fault" from the available options.
Please select the appropriate option
Clean your robot's sensors
We recommend regularly maintaining your robot's sensors and keeping its software up to date. Relocating the dock as close to the centre of your home as possible would also help to avoid this fault in future.
If your robot continues to encounter this issue, we recommend re-mapping and zoning your home.
Internal temperature too cold
Your robot's internal temperature is too low.
To avoid damaging its systems, your robot continuously monitors its internal temperature and will stop cleaning when it is outside of the normal operating limits. It is designed to operate in an ambient temperature between 5°C and 35°C.
If you have just encountered this fault, select "How do I resolve this fault?" from the available options.
For information on how to prevent this fault in future, select "Preventing this fault" from the available options.
Please select the appropriate option
Machine operating temperature
Your robot is designed to operate in an ambient temperature between 5°C and 35°C.
Your robot has a built in safety system that stops the machine if it begins to overheat. This usually happens because the filters need washing or your machine is blocked.
If your machine continues to overheat, please refrain from using it until it has cooled down sufficiently and then carry out the performance checks.
Internal temperature too hot
Your robot's internal temperature is too high. This is most likely caused by a blockage in its airways or debris may be wrapped around the brush bar.
To avoid damaging its systems, your robot continuously monitors its internal temperature and will stop cleaning when it is outside of the normal operating limits. It is designed to operate in an ambient temperature between 5°C and 35°C.
If you have just encountered this fault, select "How do I resolve this fault?" from the available options.
For information on how to prevent this fault in future, select "Preventing this fault" from the available options.
Please select the appropriate option
Safety prevents motion
Your robot has detected a problem and has prevented any further motion. This is likely a temporary issue.
Your robot continuously monitors its safety critical systems such as motors and drop sensors. It will prevent itself from moving if they are not operating as intended.
If you have just encountered this fault, select "How do I resolve this fault?" from the available options.
For information on how to prevent this fault in future, select "Preventing this fault" from the available options.
Please select the appropriate option
Discovered wrong floor
Your robot has matched its current surroundings with a different floor map than the one it was directed to clean and cannot continue.
During a clean, your robot uses its location and observations from its sensors to build a map of its surroundings. It compares this map with the persistent zone map in its memory to track its position as it navigates between zones.
If you have just encountered this fault, select "How do I resolve this fault?" from the available options.
For information on how to prevent this fault in future, select "Preventing this fault" from the available options.
Please select the appropriate option
Safety prevents motion
Your robot has detected a problem and has prevented any further motion. This is likely a temporary issue.
Your robot continuously monitors its safety critical systems such as motors and drop sensors. It will prevent itself from moving if they are not operating as intended.
If you have just encountered this fault, select "How do I resolve this fault?" from the available options.
For information on how to prevent this fault in future, select "Preventing this fault" from the available options.
Please select the appropriate option
Persistent location jump
Your robot has matched its current surroundings with a significantly different area in the same floor map and cannot continue.
During a clean, your robot uses its location and observations from its sensors to build a map of its surroundings. It compares this map with the persistent zone map in its memory to track its position as it navigates between zones.
If you have just encountered this fault, select "How do I resolve this fault?" from the available options.
For information on how to prevent this fault in future, select "Preventing this fault" from the available options.
Please select the appropriate option
Safety prevents motion
Your robot has detected a problem and has prevented any further motion. This is likely a temporary issue.
Your robot continuously monitors its safety critical systems such as motors and drop sensors. It will prevent itself from moving if they are not operating as intended.
If you have just encountered this fault, select "How do I resolve this fault?" from the available options.
Please follow the next step
Safety prevents motion
Your robot has detected a problem and has prevented any further motion. This is likely a temporary issue.
Your robot continuously monitors its safety critical systems such as motors and drop sensors. It will prevent itself from moving if they are not operating as intended.
If you have just encountered this fault, select "How do I resolve this fault?" from the available options.
For information on how to prevent this fault in future, select "Preventing this fault" from the available options.
Please select the appropriate option
Software error
Your robot has detected a problem with its internal clocks and must restart to synchronise these.
If you have just encountered this fault, select "How do I resolve this fault?" from the available options.
Please follow the next step
Replacement fault
Your robot has experienced an error related to a previous fault. Refer to your robot's fault history for more details.
Occasionally your robot may encounter a fault that ends its clean. This fault is subsequently cleared, but a persistent fault is raised at this point to provide a consistent owner experience.
If you have just encountered this fault, select "How do I resolve this fault?" from the available options.
Please follow the next step
Low battery
Your robot may have become lost or has been left off its dock in a paused or fault state.
Your robot monitors the charge of its battery and will return to the dock if it requires charging. If your robot is not able to return it will end the clean and raise a low battery fault. If it is not recovered, it will shut itself off after a short period to protect the battery.
Your robot will not start a clean if its battery is not sufficiently charged.
If you have just encountered this fault, select "How do I resolve this fault?" from the available options.
For information on how to prevent this fault in future, select "Preventing this fault" from the available options.
Please select the appropriate option
Dirty obstacle sensors - Low battery
Your robot may have become lost or has been left off its dock in a paused or fault state. Your robot's sensors may also need cleaning.
Your robot monitors the charge of its battery and will return to the dock if it requires charging. If your robot is not able to return it will end the clean and raise a low battery fault. If it is not recovered, it will shut itself off after a short period to protect the battery.
Your robot will not start a clean if its battery is not sufficiently charged.
If you have just encountered this fault, select "How do I resolve this fault?" from the available options.
For information on how to prevent this fault in future, select "Preventing this fault" from the available options.
Please select the appropriate option
Preparing your home
For future cleans, ensure there is a clear path back to the dock from all areas of your home or selected zones.
Restrictions
If your robot repeatedly encounters problems in the same area, consider setting up a suitable map restriction.
We recommend regularly maintaining your robot's sensors to they perform optimally.
Make sure your robot has adequate illumination to navigate by for the duration of the clean.
Clean your robot's sensors
We recommend regularly maintaining your robot's sensors and keeping its software up to date. Relocating the dock as close to the centre of your home as possible would also help to avoid this fault in future.
Low battery
Your robot may have become lost or has been left off its dock in a paused or fault state.
Your robot monitors the charge of its battery and will return to the dock if it requires charging. If your robot is not able to return it will end the clean and raise a low battery fault. If it is not recovered, it will shut itself off after a short period to protect the battery.
Your robot will not start a clean if its battery is not sufficiently charged.
If you have just encountered this fault, select "How do I resolve this fault?" from the available options.
For information on how to prevent this fault in future, select "Preventing this fault" from the available options.
Please select the appropriate option
Low battery at clean start
Your robot doesn't have sufficient charge to start its clean.
Your robot monitors the charge of its battery and will return to the dock if it requires charging. If your robot is not able to return it will end the clean and raise a low battery fault. If it is not recovered, it will shut itself off after a short period to protect the battery
Your robot will not start a clean if its battery is not sufficiently charged.If you have just encountered this fault, select "How do I resolve this fault?" from the available options.
Please follow the next step
Camera exposure not settled
Your robot hasn't been able to balance its camera exposure at the start of the clean. This is usually due to it being in direct sunlight at the start of the clean.
As your robot moves through your home it uses its 360° camera to identify and track visual features. These features move relative to the camera as your robot navigates which is how it determines its location in your home.
In low light, your robot will illuminate the area around it to maintain exposure to those visual features. In cases where it cannot identify features, such as when it navigates under furniture, your robot relies on its other sensors to track its motion. The camera, an accelerometer, the rotation of its wheels and an optical flow sensor collectively help the robot determine its location.
If you have just encountered this fault, select "How do I resolve this fault?" from the available options.
For information on how to prevent this fault in future, select "Preventing this fault" from the available options.
Please select the appropriate option
Prepare your home and robot
Your robot may struggle to balance its camera exposure if it is placed in direct sunlight or in a bright, white location at the start of the clean. If this problem occurs, try an alternative start location out of direct sunlight.
Try to make sure that your robot's dock is located in an open area. Your robot should be able to easily see the targets from all angles in front of the dock.
Make sure your robot has adequate illumination to navigate by for the duration of the clean.
Unable to start
Your robot has encountered a software problem and has had to end the clean. We are continually updating and improving our robotics software so it is likely this will be fixed in the next release.
Our robotics software is being continuously tested and improved. Despite this, occasional bugs can be found. Dyson engineers widely monitor all robot errors and regularly update the robotics software to resolve these.
If you have just encountered this fault, select "How do I resolve this fault?" from the available options.
For information on how to prevent this fault in future, select "Preventing this fault" from the available options.
Please select the appropriate option
Failed to set state
Your robot has been unable to change its state. This is likely a temporary issue, however this can indicate a hardware fault if your robot repeatedly fails to set its state to "Active".
Your robot's "state" is what determines which functions receive power. Your robot switches between different states depending on the function it is performing. There are three states; active, paused and passive.
If you have just encountered this fault, select "How do I resolve this fault?" from the available options.
For information on how to prevent this fault in future, select "Preventing this fault" from the available options.
Please select the appropriate option
Unable to start
Your robot has been unable to start up. This is likely a temporary issue.
If you have just encountered this fault, select "How do I resolve this fault?" from the available options.
For information on how to prevent this fault in future, select "Preventing this fault" from the available options.
Please select the appropriate option
Software error
Your robot has encountered a software problem and has had to end the clean. We are continually updating and improving our robotics software so it is likely this will be fixed in the next release.
Our robotics software is being continuously tested and improved. Despite this, occasional bugs can be found. Dyson engineers widely monitor all robot errors and regularly update the robotics software to resolve these.
If you have just encountered this fault, select "How do I resolve this fault?" from the available options.
For information on how to prevent this fault in future, select "Preventing this fault" from the available options.
Please select the appropriate option
Software error
Your robot has encountered a software problem and has had to end the clean. We are continually updating and improving our robotics software so it is likely this will be fixed in the next release.
If you have just encountered this fault, select "How do I resolve this fault?" from the available options.
Please follow the next step
Unhandled alert
Your robot's low-level software platform has detected a problem. This is likely a temporary issue.
Your robot may detect a problem that is not currently handled with a specific fault code. In this scenario, the robot will communicate a generic fault code so that it can be recovered.
If you have just encountered this fault, select "How do I resolve this fault?" from the available options.
For information on how to prevent this fault in future, select "Preventing this fault" from the available options.
Please select the appropriate option
Safety prevents motion
Your robot has detected a problem and has prevented any further motion. This is likely a temporary issue.
Your robot continuously monitors its safety critical systems such as motors and drop sensors. It will prevent itself from moving if they are not operating as intended.
If you have just encountered this fault, select "How do I resolve this fault?" from the available options.
For information on how to prevent this fault in future, select "Preventing this fault" from the available options.
Please select the appropriate option
Edge actuator - Brush bar motor too hot
Your robot's internal temperature is too high. This is most likely caused by a blockage in its airways or debris may be wrapped around the brush bar.
To avoid damaging its systems, your robot continuously monitors its internal temperature and will stop cleaning when it is outside of the normal operating limits. It is designed to operate in an ambient temperature between 5°C and 35°C.
If you have just encountered this fault, select "How do I resolve this fault?" from the available options.
For information on how to prevent this fault in future, select "Preventing this fault" from the available options.
Please select the appropriate option
Could not start LCD screen
Your robot couldn't start its LCD screen. This is likely temporary but could also indicate a hardware fault.
Your robot has a touch and press sensitive LCD screen for user interaction.
If you have just encountered this fault, select "How do I resolve this fault?" from the available options.
For information on how to prevent this fault in future, select "Preventing this fault" from the available options.
Please select the appropriate option
Low level PCB communication error
Your robot's high-level software platform couldn't communicate with its low-level platform. This is likely a temporary issue but could also indicate a disconnect between the two internal PCBs.
Your robot's electronics are split into a high-level and a low-level platform. The high-level platform is responsible for controlling the robot's behaviours and the low-level platform manages your robot's sensors and actuators.
If you have just encountered this fault, select "How do I resolve this fault?" from the available options.
For information on how to prevent this fault in future, select "Preventing this fault" from the available options.
Please select the appropriate option
Wheel stuck
Your robot has detected that its wheel is stuck. It has ended the clean to prevent damage to the motor. This is likely a temporary issue.
When supplied with power, your robot's motors require rotation to maintain a normal operating temperature.
If you have just encountered this fault, select "How do I resolve this fault?" from the available options.
For information on how to prevent this fault in future, select "Preventing this fault" from the available options.
Please select the appropriate option
Failed to upgrade
One of your robot's microprocessors has failed to upgrade. This is likely a temporary issue but could also be due to a corrupted software upgrade file.
Your robot is designed so that the software on its microprocessors can be upgraded, either manually with the use of the USB port or remotely from the Dyson cloud.
If you have just encountered this fault, select "How do I resolve this fault?" from the available options.
For information on how to prevent this fault in future, select "Preventing this fault" from the available options.
Please select the appropriate option
Power cycle
Press and hold the LCD screen until the power menu appears, then press the screen again to power off your robot.
Return your robot to the dock. You can start your next clean as usual.
Any remote software upgrades that were pending will be restarted.
If your robot was upgraded manually with a USB memory stick, we advise retrying the upgrade with a different USB stick.
Low memory
Your robot has run low on internal memory. We are continually optimising our robotics software so it is likely this will be fixed in the next release.
As your robot cleans, it retains mapping and localisation data in its memory. The further your robot traverses, the more memory it uses.
For information on how to prevent this fault in future, select "Preventing this fault" from the available options.
Did you find this helpful?
Directed cleaning
If this problem persists, consider cleaning fewer zones at a time.
By selecting a specific map, you can set which zones you want your robot to clean. Tapping each of the zones will select or deselect them for the clean. You can select a power mode for each zone.
Auto-update software
Always enable Auto update in your settings menu for the latest software upgrades. This ensures your robot receives important optimisations, bug fixes and features.
Failed to save map
Your robot hasn't been able to save the zoned map to its internal memory.
When you create or update your zoned map in the MyDyson™ app it is saved in the Dyson cloud and your robot's memory.
For information on how to prevent this fault in future, select "Preventing this fault" from the available options.
Did you find this helpful?
Unable to start
Your robot hasn't been able to start its high-level software platform. This is likely a temporary issue.
If you have just encountered this fault, select "How do I resolve this fault?" from the available options.
For information on how to prevent this fault in future, select "Preventing this fault" from the available options.
Please select the appropriate option
Configuration data missing
Your robot is missing its configuration data and may not be able to function as intended. This is likely a temporary issue but may require the configuration to be reinstated.
Your robot is installed with unique configuration data that allows it to be identified, both when you contact Dyson or connect it to the Dyson cloud.
If you have just encountered this fault, select "How do I resolve this fault?" from the available options.
For information on how to prevent this fault in future, select "Preventing this fault" from the available options.
Please select the appropriate option
Unable to upload robot logs
There is a problem with the USB drive used for logging.
When developing our robotics software, the USB port can be used to retrieve telemetry data from the robot. This function is not supported in any released software versions.
If you have just encountered this fault, select "How do I resolve this fault?" from the available options.
For information on how to prevent this fault in future, select "Preventing this fault" from the available options.
Please select the appropriate option
USB requirements
USB flash drives should be formatted with FAT32 and have at least 1GB of free space. There should be no other files on the flash drive.
Ensure the flash drive is fully inserted, do not remove the flash drive during the update process.
Dhcp - Software error
Your robot has encountered a software problem and has had to end the clean. We are continually updating and improving our robotics software so it is likely this will be fixed in the next release.
Our robotics software is being continuously tested and improved. Despite this, occasional bugs can be found. Dyson engineers widely monitor all robot errors and regularly update the robotics software to resolve these.
If you have just encountered this fault, select "How do I resolve this fault?" from the available options.
For information on how to prevent this fault in future, select "Preventing this fault" from the available options.
Please select the appropriate option
IMU data error
Your robot didn't receive any data from its IMU. This is likely a temporary issue.
Your robot uses an Inertial Motion Unit (IMU) to keep track of its movements.
For information on how to prevent this fault in future, select "Preventing this fault" from the available options.
Did you find this helpful?
Zoned map error
The persistent zone map data is corrupted and cannot be used. In a non-directed clean, the robot will clean as normal but won't obey zones or restriction boundaries. If specific zones are selected, the robot will abandon the clean.
At the start of a clean, your robot downloads its persistent zone map from the Dyson cloud.
For information on how to prevent this fault in future, select "Preventing this fault" from the available options.
Did you find this helpful?
Prepare your home and robot
We recommend regularly maintaining your robot's sensors and keeping its software up to date. Relocating the dock as close to the centre of your home as possible would also help to avoid this fault in future.
Mapping and Zoning your home
If your robot continues to encounter this issue, we recommend re-mapping and zoning your home.
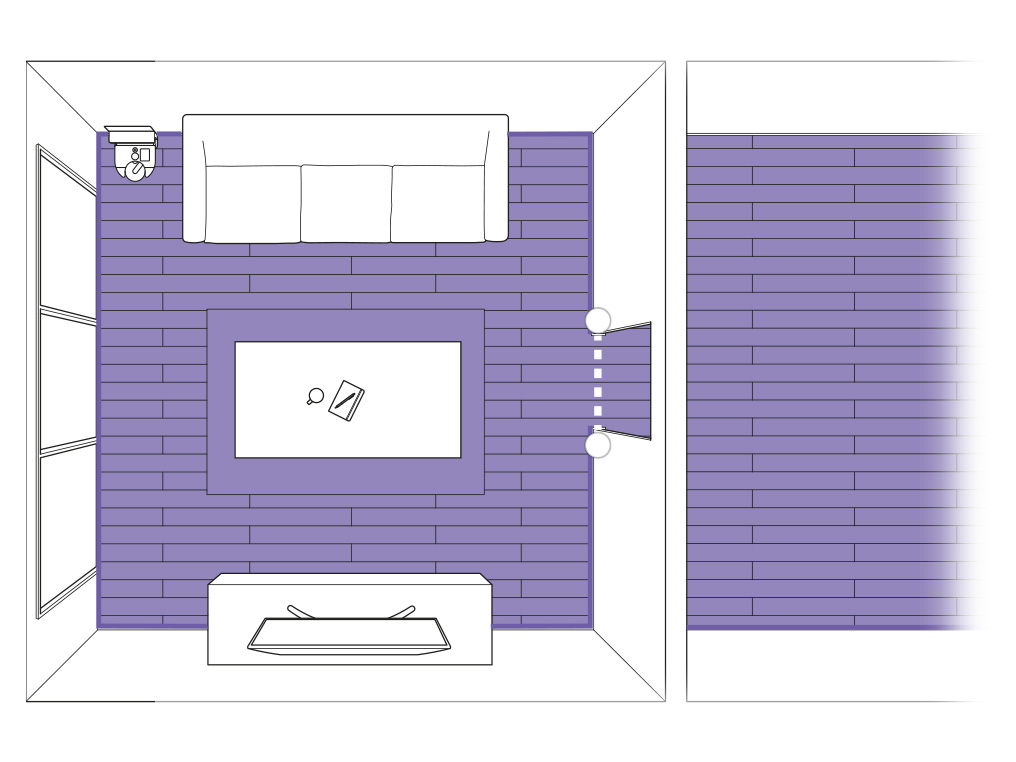
Software error
Your robot has encountered a software problem and has had to end the clean. We are continually updating and improving our robotics software so it is likely this will be fixed in the next release.
Our robotics software is being continuously tested and improved. Despite this, occasional bugs can be found. Dyson engineers widely monitor all robot errors and regularly update the robotics software to resolve these.
If you have just encountered this fault, select "How do I resolve this fault?" from the available options.
For information on how to prevent this fault in future, select "Preventing this fault" from the available options.
Please select the appropriate option
Unable to start
Your robot has been unable to start up. This is likely a temporary issue.
If you have just encountered this fault, select "How do I resolve this fault?" from the available options.
For information on how to prevent this fault in future, select "Preventing this fault" from the available options.
Please select the appropriate option
Configuration data missing
Your robot is missing its configuration data and may not be able to function as intended. This is likely a temporary issue but may require the configuration to be reinstated.
Your robot is installed with some configuration data that enables certain functions to operate as intended.
If you have just encountered this fault, select "How do I resolve this fault?" from the available options.
For information on how to prevent this fault in future, select "Preventing this fault" from the available options.
Please select the appropriate option
Unable to start
Your robot detected that its safety system was disabled at start up and it has ended the clean. This is likely a temporary issue but may require a software upgrade.
During development of our robotics software, it is sometimes necessary to turn off the safety functions of the robot. This function is not supported in any released software versions.
If you have just encountered this fault, select "How do I resolve this fault?" from the available options.
For information on how to prevent this fault in future, select "Preventing this fault" from the available options.
Please select the appropriate option
Unable to start
Your robot has been unable to start up. This is likely a temporary issue.
If you have just encountered this fault, select "How do I resolve this fault?" from the available options.
For information on how to prevent this fault in future, select "Preventing this fault" from the available options.
Please select the appropriate option
Inconsistent Sensor Time - Software error
Your robot has detected a problem with its internal clocks and must restart to synchronise these.
If you have just encountered this fault, select "How do I resolve this fault?" from the available options.
Please follow the next step
Robot too hot
Your robot's internal temperature is too high. This is most likely caused by a blockage in its airways or debris may be wrapped around the brush bar.
To avoid damaging its systems, your robot continuously monitors its internal temperature and will stop cleaning when it is outside of the normal operating limits. It is designed to operate in an ambient temperature between 5°C and 35°C.
If you have just encountered this fault, select "How do I resolve this fault?" from the available options.
For information on how to prevent this fault in future, select "Preventing this fault" from the available options.
Please select the appropriate option
Vacuum fault
Your robot couldn't communicate with its vacuum motor. This is likely a temporary issue.
Your robot continuously monitors its vacuum motor for any errors that may indicate a fault. Each vacuum motor is specifically calibrated at manufacture to compensate for slight variations.
If you have just encountered this fault, select "How do I resolve this fault?" from the available options.
For information on how to prevent this fault in future, select "Preventing this fault" from the available options.
Please select the appropriate option
Illumination ring error
Your robot couldn't communicate with its illumination ring. This is likely a temporary issue.
In low light your robot uses a ring of LEDs to selectively illuminate areas in the camera's field of view. This allows the camera to maintain a balanced exposure.
If you have just encountered this fault, select "How do I resolve this fault?" from the available options.
For information on how to prevent this fault in future, select "Preventing this fault" from the available options.
Please select the appropriate option
Routine maintenance
Your robot has raised a maintenance alert. It does this to ensure its sensors and brush bar are regularly maintained.
If you have just encountered this fault, select "How do I resolve this fault?" from the available options.
Please follow the next step
Clean the sensors
To maintain optimum performance, keep your camera lens and sensors clean. Use a soft, dry, lint-free cloth to wipe the sensors and camera lens.
Check all sensor covers and the navigational camera for dirt, dust, fingerprints and smears.
Do not use cleaning fluids, liquids or sprays of any kind.
Turn your robot over and place it on a soft surface.
Use a soft, dry, lint-free cloth to wipe the optical flow sensor and each drop sensor on the base of your robot. There are seven sensors in total.
Check the brush bar
Lift the red brush bar cover lever on the base of your robot.
Check the airway on the underside of the machine for any blockages.
Press the red brush bar release button and slide the brush bar out of your robot. Remove any debris or objects. Also ensure any hair or other threads are removed from the brush bar bearing.
Replace your brush bar
Slide the brush bar into your robot and push down until the release button pops up.
Close the brush bar cover and push the lever down to lock the cover in place.
Ensure the brush bar cover is fully aligned along the width of the machine before securing the lever.
Clear the alert
To clear the alert, turn your robot off: press and hold the LCD screen until the power menu appears.
Return to dock
Return your robot to the dock. You can start your next clean as usual.
Robot too hot
Your robot's internal temperature is too high. This is most likely caused by a blockage in its airways or debris may be wrapped around the brush bar.
To avoid damaging its systems, your robot continuously monitors its internal temperature and will stop cleaning when it is outside of the normal operating limits. It is designed to operate in an ambient temperature between 5°C and 35°C.
If you have just encountered this fault, select "How do I resolve this fault?" from the available options.
For information on how to prevent this fault in future, select "Preventing this fault" from the available options.
Please select the appropriate option
Safety prevents motion
Your robot has detected a problem and has prevented any further motion. This is likely a temporary issue.
Your robot continuously monitors its safety critical systems such as motors and drop sensors. It will prevent itself from moving if they are not operating as intended.
If you have just encountered this fault, select "How do I resolve this fault?" from the available options.
For information on how to prevent this fault in future, select "Preventing this fault" from the available options.
Please select the appropriate option
ADC error
One of your robot's ADCs has experienced an error. This is likely a temporary issue.
Many of your robot's onboard sensors use an Analogue to Digital Converter (ADC) that allow the robot to monitor the sensors digitally, ensuring they are operating correctly.
If you have just encountered this fault, select "How do I resolve this fault?" from the available options.
For information on how to prevent this fault in future, select "Preventing this fault" from the available options.
Please select the appropriate option
Wheel motor too hot
Your robot's internal temperature is too high. This is most likely caused by a blockage in its airways or debris may be wrapped around the brush bar.
To avoid damaging its systems, your robot continuously monitors its internal temperature and will stop cleaning when it is outside of the normal operating limits. It is designed to operate in an ambient temperature between 5°C and 35°C.
If you have just encountered this fault, select "How do I resolve this fault?" from the available options.
For information on how to prevent this fault in future, select "Preventing this fault" from the available options.
Please select the appropriate option
Check the wheels
Removing debris such as hair, fluff and dirt from your robot's wheels will help to prevent this fault.
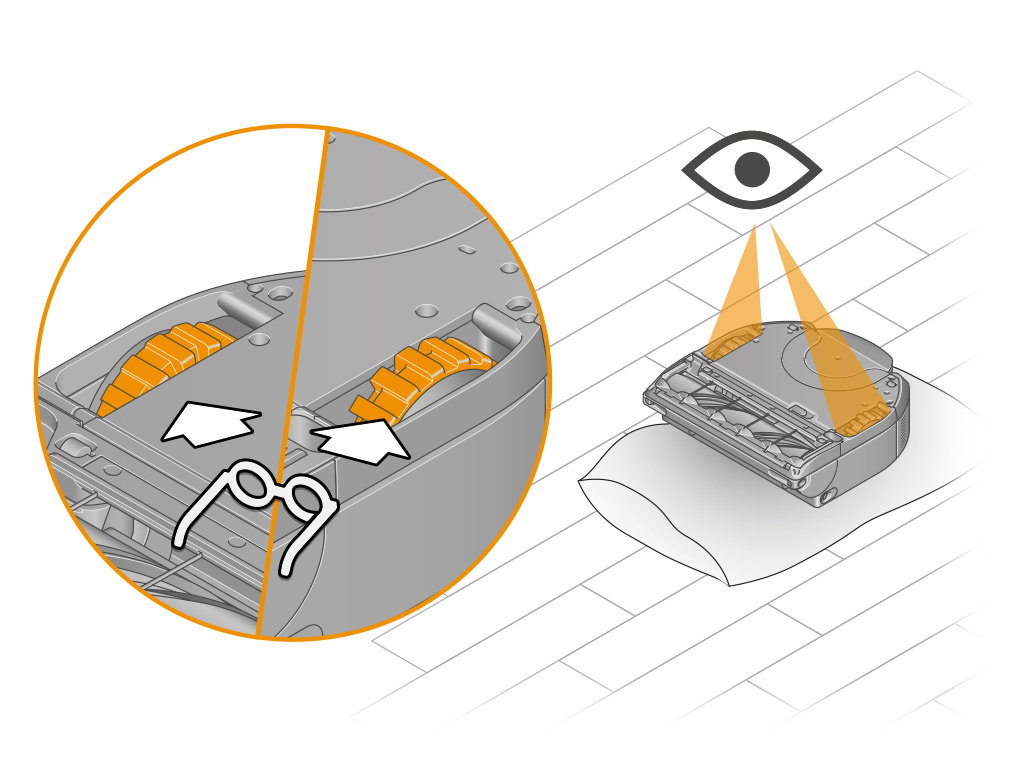
Your robot is designed to operate in an ambient temperature between 5°C and 35°C.
Charge contact too hot
Your robot's dock contact temperature is too high. This could either be due to misalignment between the robot and the dock, dirt and dust on the contacts or the robot may be operating in a high temperature environment.
Your robot monitors the temperature of its dock contacts while charging and will stop charging if they get too hot. Charging resumes when the contacts become cool again.
If you have just encountered this fault, select "How do I resolve this fault?" from the available options.
For information on how to prevent this fault in future, select "Preventing this fault" from the available options.
Please select the appropriate option
Check the dock
Your robot uses its camera to identify and align itself with its docking targets. It should be able to easily see the targets from all angles in front of the dock.
Your dock should be located against a wall, in a place close to a mains power supply, out of bright sunlight and not obscured under a table or other furniture. It needs at least 50cm of clear space around the front.
Cleaning the contacts
Use a soft, dry, lint-free cloth to wipe both metal contacts on the front of the robot and on the dock.
Do not use cleaning fluids, liquids or sprays of any kind.
Place the robot on the dock with the bin facing away from the wall, ensuring the metal contacts are touching.
The LCD touchscreen should indicate that your robot is charging.
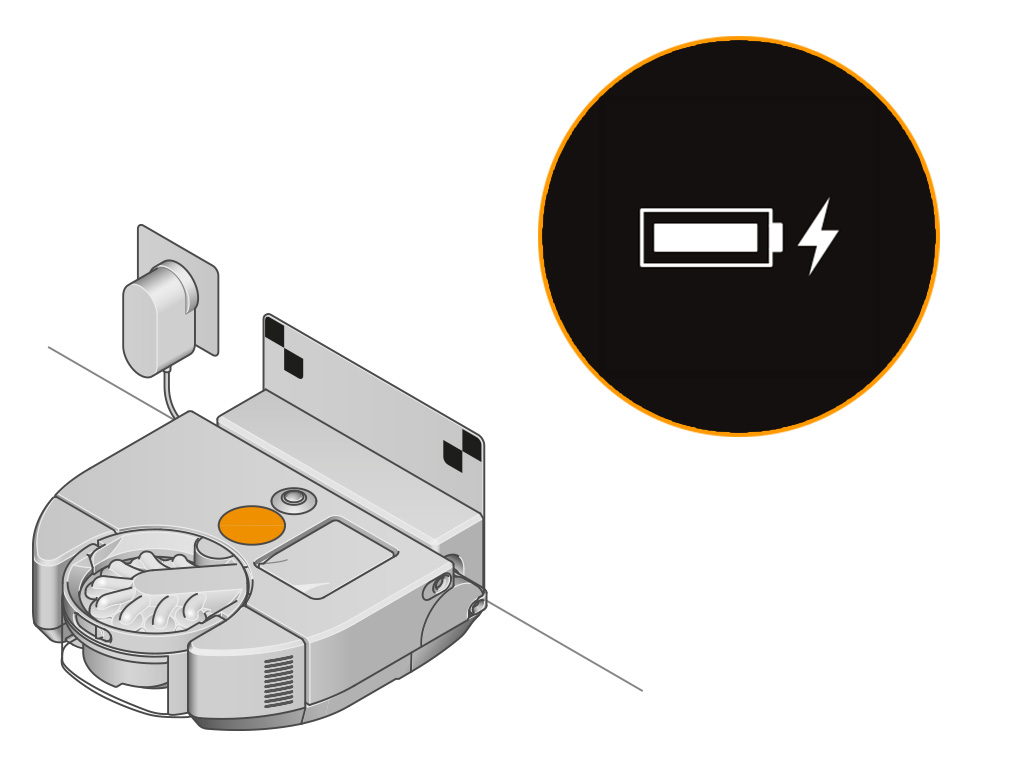
Check the dock
Ensure your dock is placed on a level surface that extends at least 50cm around it.
Your dock should be located against a wall, in a place close to a mains power supply, out of bright sunlight and not obscured under a table or other furniture. It needs at least 50cm of clear space around the front.
You should choose a location close to your Wi-Fi access point to avoid connection issues.
We recommend a location close to the centre of your home, as this can lead to more reliable cleans.
Ensure the dock is on a level surface and aligned with the wall. Do not place the dock against glass.
For future cleans, ensure there is a clear path back to the dock from all areas of your home or selected zones.
Clean the contacts
Use a soft, dry, lint-free cloth to wipe both metal contacts on the front of the robot and on the dock.
Your robot is designed to operate in an ambient temperature between 5°C and 35°C.
Your robot takes 90 minutes to fully charge but can take longer if the charge contacts have overheated. For safety reasons, your robot will not charge if the charge contacts exceed normal operating temperatures.
Dirt detect sensor error
Your robot has detected a problem with its dirt detection sensor calibration. This is likely a temporary issue.
Your robot uses a piezo sensor to measure the mass of dust collected during a clean. Each piezo sensor is specifically calibrated at manufacture to compensate for slight variations.
If you have just encountered this fault, select "How do I resolve this fault?" from the available options.
For information on how to prevent this fault in future, select "Preventing this fault" from the available options.
Please select the appropriate option
Optical flow sensor error
Your robot has detected a problem with its optical flow sensor calibration. This is likely a temporary issue.
Like the sensor in an optical mouse, your robot uses an optical flow sensor to keep track of its motion over different floor surfaces. Every optical flow sensor is specifically calibrated at manufacture to compensate slight variations.
If you have just encountered this fault, select "How do I resolve this fault?" from the available options.
For information on how to prevent this fault in future, select "Preventing this fault" from the available options.
Please select the appropriate option
Please select the appropriate fault
Robot lifted
Your robot has detected movement. If you have lifted or otherwise moved the robot, it will raise this fault.
Your robot uses its drop sensors and accelerometers to detect when it has been moved or lifted. It will turn off its motors and pause the clean when unexpectedly moved.
If you have just encountered this fault, select "How do I resolve this fault?" from the available options.
For information on how to prevent this fault in future, select "Preventing this fault" from the available options.
Please select the appropriate option
Reposition your robot
Place your robot somewhere it has cleaned before, then try to resume the clean by pressing the LCD screen.
Robot cannot recover from a drop
Your robot hasn't been able to navigate away from a drop. It may have become obstructed when trying to navigate away. Your robot may also detect dark or chrome surfaces as drops. Sometimes lifting the robot can also cause it to detect a drop.
Your robot uses sensors in front of and behind its wheels to detect and navigate away from drops. It also uses these sensors to detect when the robot has been lifted and will switch off its motors if this occurs. The clean will be paused until the robot is replaced and the clean is resumed.
If you have just encountered this fault, select "How do I resolve this fault?" from the available options.
For information on how to prevent this fault in future, select "Preventing this fault" from the available options.
Please select the appropriate option
Reposition your robot
Place your robot somewhere it has cleaned before, then try to resume the clean by pressing the LCD screen.
Rotated - Robot lifted
Your robot has detected movement. If you have lifted or otherwise moved the robot, it will raise this fault.
Your robot uses its drop sensors and accelerometers to detect when it has been moved or lifted. It will turn off its motors and pause the clean when unexpectedly moved.
If you have just encountered this fault, select "How do I resolve this fault?" from the available options.
For information on how to prevent this fault in future, select "Preventing this fault" from the available options.
Please select the appropriate option
Please select the appropriate fault
Safety prevents motion
Your robot has detected a problem and has prevented any further motion. This is likely a temporary issue.
Your robot continuously monitors its safety critical systems such as motors and drop sensors. It will prevent itself from moving if they are not operating as intended.
If you have just encountered this fault, select "How do I resolve this fault?" from the available options.
For information on how to prevent this fault in future, select "Preventing this fault" from the available options.
Please select the appropriate option
ADC error
One of your robot's ADCs has experienced an error. This is likely a temporary issue.
Many of your robot's onboard sensors use an Analogue to Digital Converter (ADC) that allow the robot to monitor the sensors digitally, ensuring they are operating correctly.
If you have just encountered this fault, select "How do I resolve this fault?" from the available options.
For information on how to prevent this fault in future, select "Preventing this fault" from the available options.
Please select the appropriate option
Left wheel - Wheel motor too cold
Your robot's internal temperature is too low.
To avoid damaging its systems, your robot continuously monitors its internal temperature and will stop cleaning when it is outside of the normal operating limits. It is designed to operate in an ambient temperature between 5°C and 35°C.
If you have just encountered this fault, select "How do I resolve this fault?" from the available options.
For information on how to prevent this fault in future, select "Preventing this fault" from the available options.
Please select the appropriate option
Left wheel - Wheel motor too hot
Your robot's internal temperature is too high. This is most likely caused by a blockage in its airways or debris may be wrapped around the brush bar.
To avoid damaging its systems, your robot continuously monitors its internal temperature and will stop cleaning when it is outside of the normal operating limits. It is designed to operate in an ambient temperature between 5°C and 35°C.
If you have just encountered this fault, select "How do I resolve this fault?" from the available options.
For information on how to prevent this fault in future, select "Preventing this fault" from the available options.
Please select the appropriate option
Safety prevents motion
Your robot has detected a problem and has prevented any further motion. This is likely a temporary issue.
Your robot continuously monitors its safety critical systems such as motors and drop sensors. It will prevent itself from moving if they are not operating as intended.
If you have just encountered this fault, select "How do I resolve this fault?" from the available options.
For information on how to prevent this fault in future, select "Preventing this fault" from the available options.
Please select the appropriate option
Right wheel - Wheel motor too cold
Your robot's internal temperature is too low.
To avoid damaging its systems, your robot continuously monitors its internal temperature and will stop cleaning when it is outside of the normal operating limits. It is designed to operate in an ambient temperature between 5°C and 35°C.
If you have just encountered this fault, select "How do I resolve this fault?" from the available options.
For information on how to prevent this fault in future, select "Preventing this fault" from the available options.
Please select the appropriate option
Right wheel - Wheel motor too hot
Your robot's internal temperature is too high. This is most likely caused by a blockage in its airways or debris may be wrapped around the brush bar.
To avoid damaging its systems, your robot continuously monitors its internal temperature and will stop cleaning when it is outside of the normal operating limits. It is designed to operate in an ambient temperature between 5°C and 35°C.
If you have just encountered this fault, select "How do I resolve this fault?" from the available options.
For information on how to prevent this fault in future, select "Preventing this fault" from the available options.
Please select the appropriate option
Safety prevents motion
Your robot has detected a problem and has prevented any further motion. This is likely a temporary issue.
Your robot continuously monitors its safety critical systems such as motors and drop sensors. It will prevent itself from moving if they are not operating as intended.
If you have just encountered this fault, select "How do I resolve this fault?" from the available options.
For information on how to prevent this fault in future, select "Preventing this fault" from the available options.
Please select the appropriate option
Brush bar motor too cold
Your robot's internal temperature is too low.
To avoid damaging its systems, your robot continuously monitors its internal temperature and will stop cleaning when it is outside of the normal operating limits. It is designed to operate in an ambient temperature between 5°C and 35°C.
If you have just encountered this fault, select "How do I resolve this fault?" from the available options.
For information on how to prevent this fault in future, select "Preventing this fault" from the available options.
Please select the appropriate option
Brush bar motor too hot
Your robot's internal temperature is too high. This is most likely caused by a blockage in its airways or debris may be wrapped around the brush bar.
To avoid damaging its systems, your robot continuously monitors its internal temperature and will stop cleaning when it is outside of the normal operating limits. It is designed to operate in an ambient temperature between 5°C and 35°C.
If you have just encountered this fault, select "How do I resolve this fault?" from the available options.
For information on how to prevent this fault in future, select "Preventing this fault" from the available options.
Please select the appropriate option
Wheel stuck
Your robot has detected that its wheel is stuck and has paused the clean to prevent damage to the motor. It's likely there is an obstruction restricting the wheel.
When supplied with power, your robot's motors require rotation to maintain a normal operating temperature.
If you have just encountered this fault, select "How do I resolve this fault?" from the available options.
For information on how to prevent this fault in future, select "Preventing this fault" from the available options.
Please select the appropriate option
Check for obstacles
Check that you robot is able to move freely and has not become boxed in by obstacles. If it is, simply move the robot off or away from the obstacle and place somewhere it has already cleaned nearby.
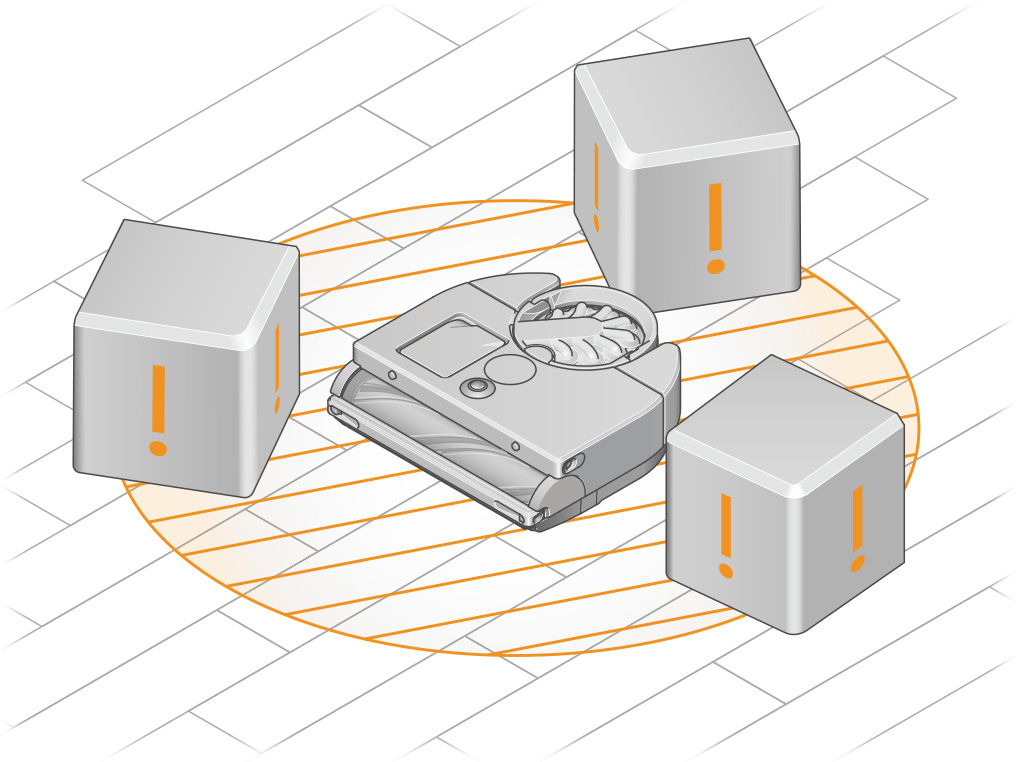
Check the wheels
If your robot is not stuck due to obstacles, the wheels will need to be checked for obstructions.
Turn your robot over and place it on a soft surface.
Check the wheels and remove any hair, dirt or debris by hand. Ensure the wheel rotates freely and the suspension is free to compress without obstruction.
Clear the alert
Return the robot to the same point on the floor, press the LCD screen and step away to resume cleaning.
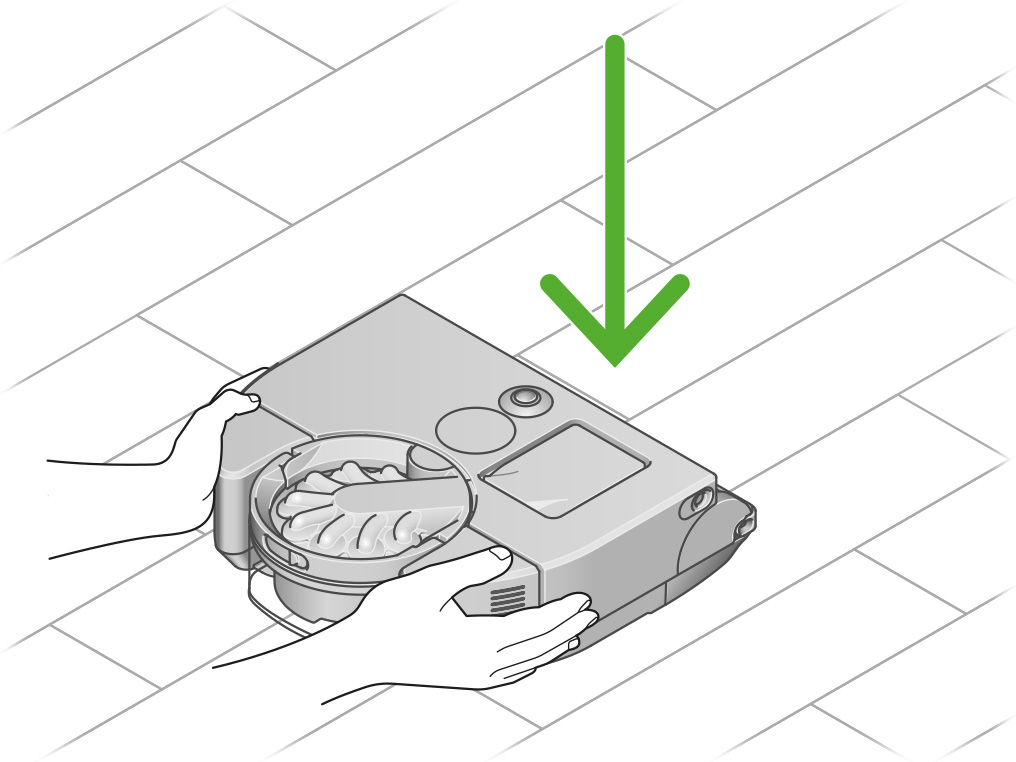
If your robot's wheels regularly get stuck in the same place, we'd recommend adding a restriction so your robot avoids that area.
Has this resolved the problem?
Edge actuator stuck
The edge cleaner actuator has become stuck. Your robot has paused the clean the prevent damage to the motor.
When supplied with power, your robot's motors require rotation to maintain a normal operating temperature.
If you have just encountered this fault, select "How do I resolve this fault?" from the available options.
For information on how to prevent this fault in future, select "Preventing this fault" from the available options.
Please select the appropriate option
Check the edge cleaner
Turn your robot over and place it on a soft surface.
Clear any dirt or debris blocking the edge cleaner.
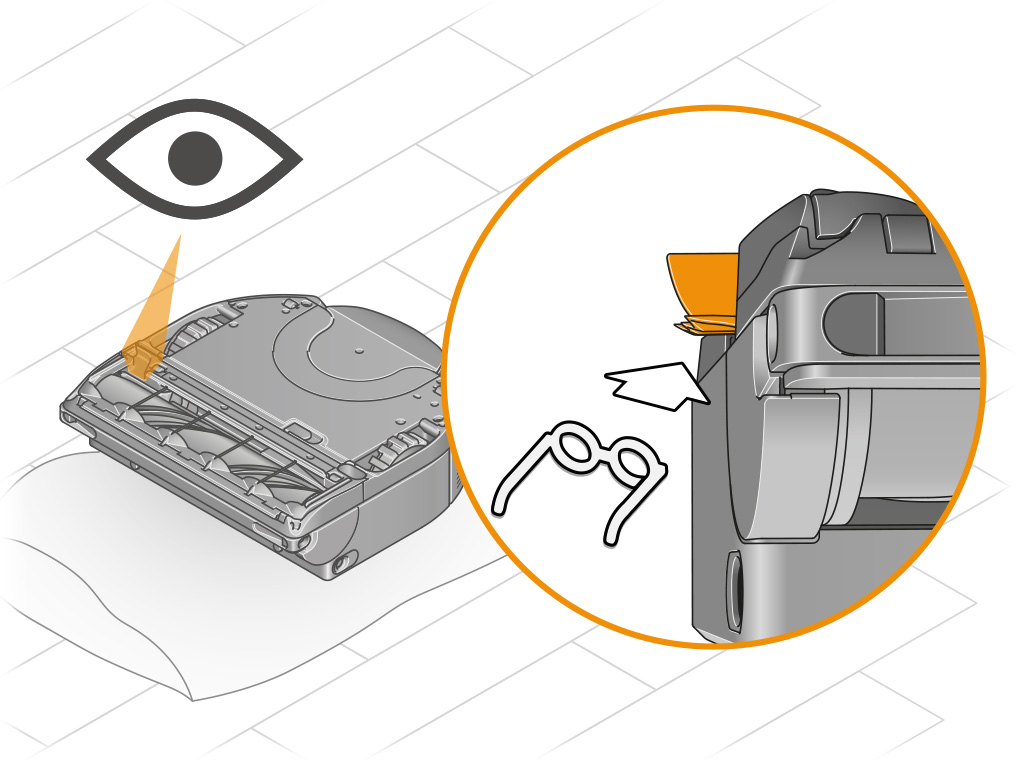
Clear the alert
Return the robot to the same point on the floor, press the LCD screen and step away to resume cleaning.
Edge actuator stuck
The edge cleaner actuator has become stuck. Your robot has paused the clean the prevent damage to the motor.
When supplied with power, your robot's motors require rotation to maintain a normal operating temperature.
If you have just encountered this fault, select "How do I resolve this fault?" from the available options.
For information on how to prevent this fault in future, select "Preventing this fault" from the available options.
Please select the appropriate option
Edge actuator switch stuck
Your robot has detected an issue with its edge cleaner actuator switches. Both are pressed simultaneously, indicating that one of them may be stuck.
Your robot's edge cleaner actuator uses switches to determine if the actuator is open or closed.
If you have just encountered this fault, select "How do I resolve this fault?" from the available options.
For information on how to prevent this fault in future, select "Preventing this fault" from the available options.
Please select the appropriate option
Brush bar motor too hot
Your robot's internal temperature is too high. This is most likely caused by a blockage in its airways or debris may be wrapped around the brush bar.
To avoid damaging its systems, your robot continuously monitors its internal temperature and will stop cleaning when it is outside of the normal operating limits. It is designed to operate in an ambient temperature between 5°C and 35°C.
If you have just encountered this fault, select "How do I resolve this fault?" from the available options.
For information on how to prevent this fault in future, select "Preventing this fault" from the available options.
Please select the appropriate option
Wheel motor too hot
Your robot's internal temperature is too high. This is most likely caused by a blockage in its airways or debris may be wrapped around the brush bar.
To avoid damaging its systems, your robot continuously monitors its internal temperature and will stop cleaning when it is outside of the normal operating limits. It is designed to operate in an ambient temperature between 5°C and 35°C.
If you have just encountered this fault, select "How do I resolve this fault?" from the available options.
For information on how to prevent this fault in future, select "Preventing this fault" from the available options.
Please select the appropriate option
Brush bar stuck
The brush bar has become stuck. Your robot has paused the clean to prevent damage to the motor.
Your robot's brush bar motor requires airflow and rotation to maintain a normal operating temperature.
If you have just encountered this fault, select "How do I resolve this fault?" from the available options.
For information on how to prevent this fault in future, select "Preventing this fault" from the available options.
Please select the appropriate option
Check the brush bar
Turn your robot over and place it on a soft surface.
Lift the red brush bar cover lever on the base of your robot.
Check the airway on the underside of the machine for any blockages.
Press the red brush bar release button and slide the brush bar out of your robot. Remove any debris or objects. Also ensure any hair or other threads are removed from the brush bar bearing.
Replace your brush bar
Slide the brush bar into your robot and push down until the release button pops up.
Close the brush bar cover and push the lever down to lock the cover in place.
Ensure the brush bar cover is fully aligned along the width of the machine before securing the lever.
Clear the alert
Return the robot to the same point on the floor, press the LCD screen and step away to resume cleaning.
If your robot was stuck, reposition the robot away from the problem area to where it has already cleaned.
Wheel stuck
Your robot has detected that its wheel is stuck and has paused the clean to prevent damage to the motor. It's likely there is an obstruction restricting the wheel.
When supplied with power, your robot's motors require rotation to maintain a normal operating temperature.
If you have just encountered this fault, select "How do I resolve this fault?" from the available options.
For information on how to prevent this fault in future, select "Preventing this fault" from the available options.
Please select the appropriate option
Wheel hardware failure
Your robot has detected that one of its traction motor drivers is not responding.
Your robot continuously monitors its sensors and actuators to ensure they operate normally. In the event they are not operating as intended it will raise a fault to enable diagnosis and repair if necessary.
If you have just encountered this fault, select "How do I resolve this fault?" from the available options.
For information on how to prevent this fault in future, select "Preventing this fault" from the available options.
Please select the appropriate option
Robot stuck
Your robot is unable to recover itself from being stuck and has paused the clean.
Your robot uses the rotation of its wheels, an optical flow sensor and accelerometer to track its motion between updates from the 360° camera. When the information from these sensors doesn't align or if the robot detects it is excessively tilted, it will determine that it has become stuck and will attempt to recover itself.
If you have just encountered this fault, select "How do I resolve this fault?" from the available options.
For information on how to prevent this fault in future, select "Preventing this fault" from the available options.
Please select the appropriate option
Robot stuck
Check that you robot is able to move freely and has not become boxed in by obstacles. If it is, simply move the robot off or away from the obstacle and place somewhere it has already cleaned nearby.
Press the LCD touchscreen on your robot to resume cleaning.
Brush bar stuck
The brush bar has become stuck. Your robot has paused the clean to prevent damage to the motor.
Your robot's brush bar motor requires airflow and rotation to maintain a normal operating temperature.
If you have just encountered this fault, select "How do I resolve this fault?" from the available options.
For information on how to prevent this fault in future, select "Preventing this fault" from the available options.
Please select the appropriate option
Brush bar motor too hot
Your robot's internal temperature is too high. This is most likely caused by a blockage in its airways or debris may be wrapped around the brush bar.
To avoid damaging its systems, your robot continuously monitors its internal temperature and will stop cleaning when it is outside of the normal operating limits. It is designed to operate in an ambient temperature between 5°C and 35°C.
If you have just encountered this fault, select "How do I resolve this fault?" from the available options.
For information on how to prevent this fault in future, select "Preventing this fault" from the available options.
Please select the appropriate option
Brush bar motor too cold
Your robot's internal temperature is too low.
To avoid damaging its systems, your robot continuously monitors its internal temperature and will stop cleaning when it is outside of the normal operating limits. It is designed to operate in an ambient temperature between 5°C and 35°C.
If you have just encountered this fault, select "How do I resolve this fault?" from the available options.
For information on how to prevent this fault in future, select "Preventing this fault" from the available options.
Please select the appropriate option
Brush bar motor winding failure
Your robot has detected potential brush bar motor damage. This is likely a temporary issue.
Your robot continuously monitors its sensors and actuators to ensure they operate normally. In the event they are not operating as intended it will raise a fault to enable diagnosis and repair if necessary.
If you have just encountered this fault, select "How do I resolve this fault?" from the available options.
For information on how to prevent this fault in future, select "Preventing this fault" from the available options.
Please select the appropriate option
Brush bar communication failure
Your robot couldn't communicate with its brush bar. This is likely a temporary issue.
Your robot continuously monitors its sensors and actuators to ensure they operate normally. In the event they are not operating as intended it will raise a fault to enable diagnosis and repair if necessary.
If you have just encountered this fault, select "How do I resolve this fault?" from the available options.
For information on how to prevent this fault in future, select "Preventing this fault" from the available options.
Please select the appropriate option
Please select the appropriate fault
Battery pack - ADC error
One of your robot's ADCs has experienced an error. This is likely a temporary issue.
Many of your robot's onboard sensors use an Analogue to Digital Converter (ADC) that allow the robot to monitor the sensors digitally, ensuring they are operating correctly.
If you have just encountered this fault, select "How do I resolve this fault?" from the available options.
For information on how to prevent this fault in future, select "Preventing this fault" from the available options.
Please select the appropriate option
Unable to shut down
Your robot couldn't shut itself down. This is likely a temporary issue.
In the event of a problem your robot can be shut down by pressing and holding the touchscreen down for an extended period. If the screen is responsive, the power menu will be shown briefly after pressing. Continuing to press the screen will cause the robot to shut down.
If you have just encountered this fault, select "How do I resolve this fault?" from the available options.
For information on how to prevent this fault in future, select "Preventing this fault" from the available options.
Please select the appropriate option
Battery locked out
Your robot's battery has detected a problem and has removed power to prevent damage to its cells.
Your robot's battery manages charging and discharging to maintain the health of its cells. The battery communicates its status to your robot so it can adapt its behaviour depending on the state of the battery.
If you have just encountered this fault, select "How do I resolve this fault?" from the available options.
For information on how to prevent this fault in future, select "Preventing this fault" from the available options.
Please select the appropriate option
Battery disconnected
Your robot couldn't communicate with its battery. This is likely a temporary software issue but could also indicate that the battery has become disconnected.
Your robot's battery manages charging and discharging to maintain the health of its cells. The battery communicates its status to your robot so it can adapt its behaviour depending on the state of the battery.
If you have just encountered this fault, select "How do I resolve this fault?" from the available options.
For information on how to prevent this fault in future, select "Preventing this fault" from the available options.
Please select the appropriate option
Battery not detected
Check that the battery is fitted correctly.

Remove your robot from the dock. Return the battery, ensuring it is pressed into place.
Replace the screws on the underside of your robot.
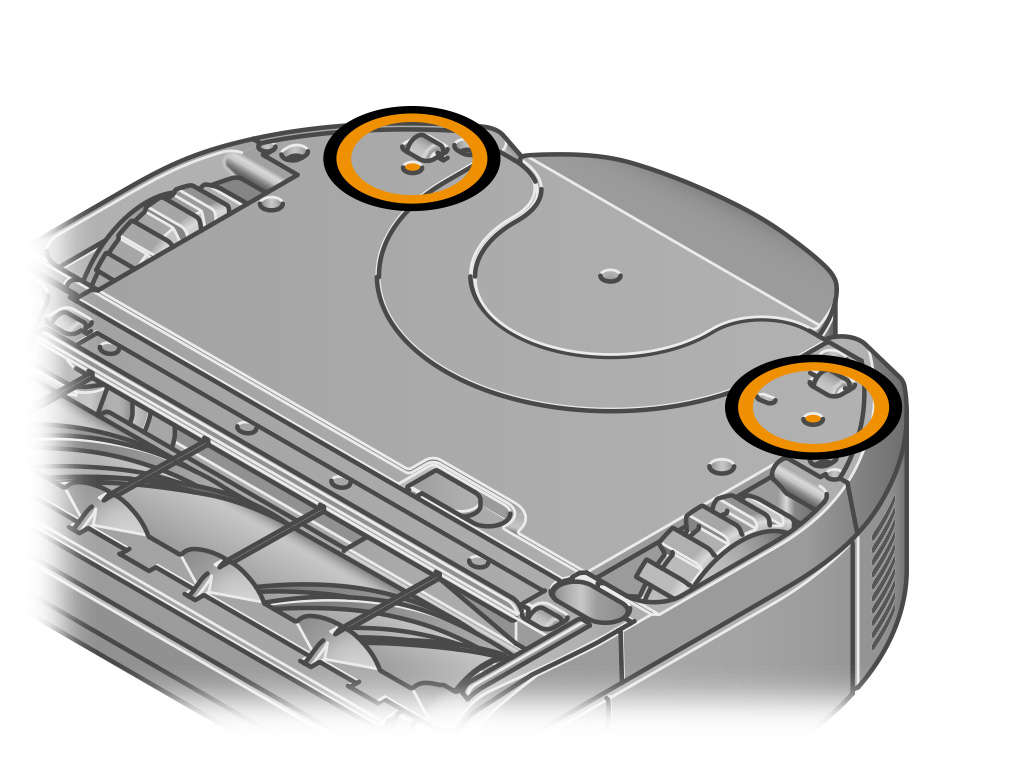
Battery low voltage
Your robot has detected that one of its battery cells is under-voltage and has removed power to prevent damage to the cell. This occurs when the battery charge is very low.
Your robot's battery manages charging and discharging to maintain the health of its cells. The battery communicates its status to your robot so it can adapt its behaviour depending on the state of the battery.
If you have just encountered this fault, select "How do I resolve this fault?" from the available options.
For information on how to prevent this fault in future, select "Preventing this fault" from the available options.
Please select the appropriate option
Battery charge required
Your robot's battery has detected a problem and will need to be fully charged. The clean has been ended.
Your robot's battery manages charging and discharging to maintain the health of its cells. The battery communicates its status to your robot so it can adapt its behaviour depending on the state of the battery.
If you have just encountered this fault, select "How do I resolve this fault?" from the available options.
For information on how to prevent this fault in future, select "Preventing this fault" from the available options.
Please select the appropriate option
Battery too hot
Your robot has detected that one of its battery cells is operating outside of normal temperature limits. It has ended the clean to prevent damage to the cell.
Your robot's battery manages charging and discharging to maintain the health of its cells. The battery communicates its status to your robot so it can adapt its behaviour depending on the state of the battery.
If you have just encountered this fault, select "How do I resolve this fault?" from the available options.
For information on how to prevent this fault in future, select "Preventing this fault" from the available options.
Please select the appropriate option
The serial number can be located in two places.
Behind the clear bin
Find the serial number behind the clear bin as shown on the image.
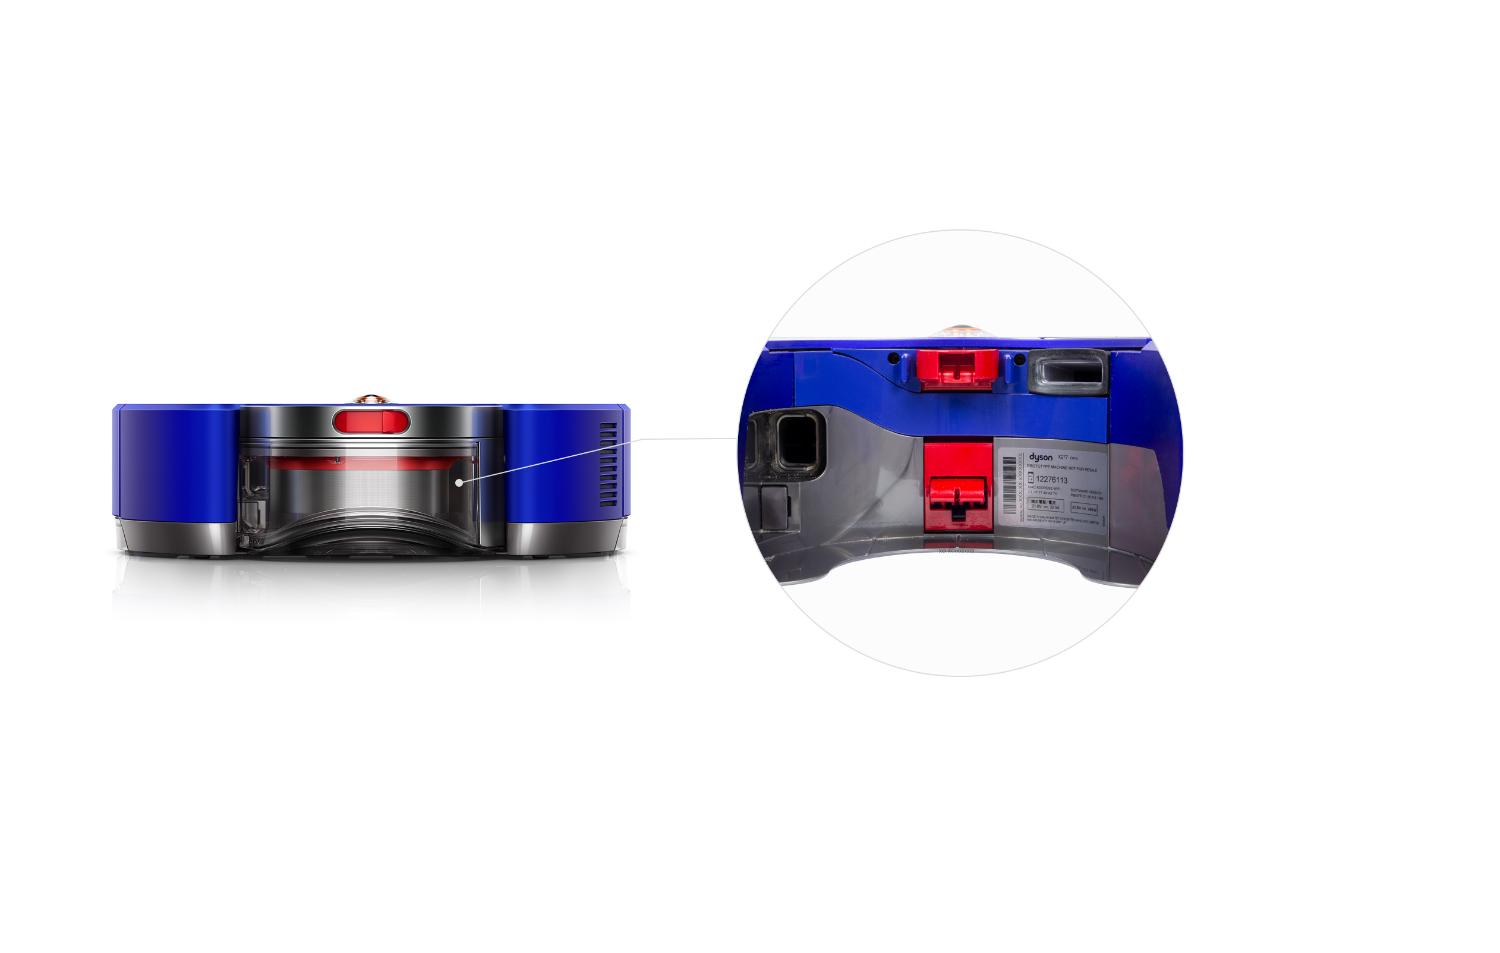
On the underside of the docking station
The serial number can be found on the bottom of the docking station if you turn it upside down.
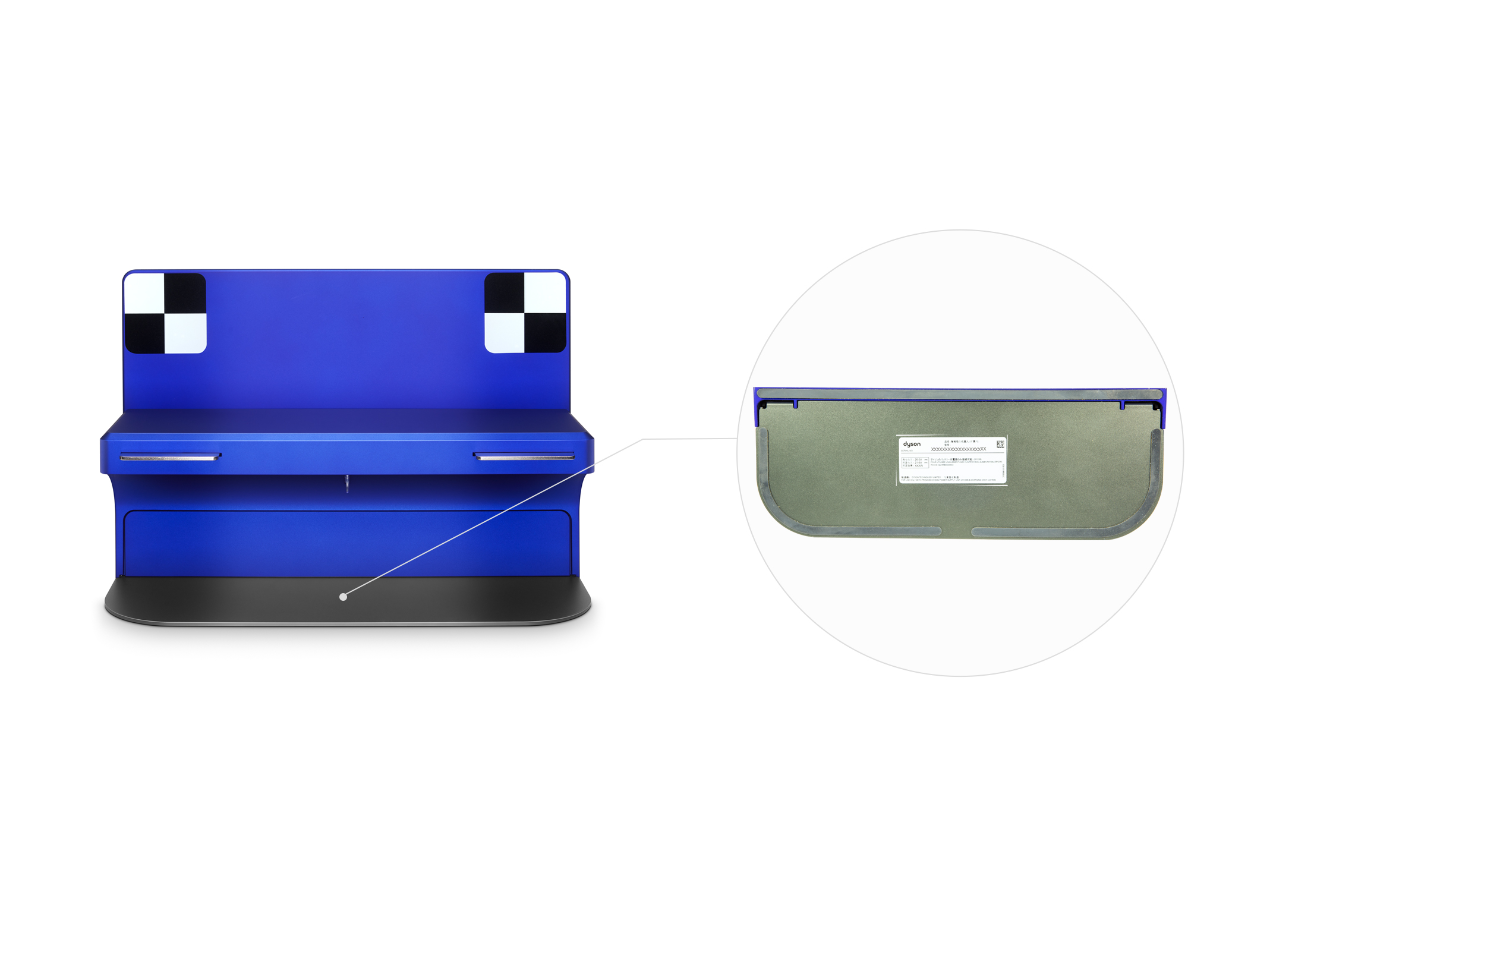
How to buy and fit parts for your machine
Get original replacement parts direct from Dyson and learn how to fit them with your machine.
Main body and cyclone
- Cyclone and handle
- Bin
- Filter
- Filter housing
- Battery
- Brush bar
- Edge cleaner
- Brush bar cover
- Brush bar cover lever
- FDC seal
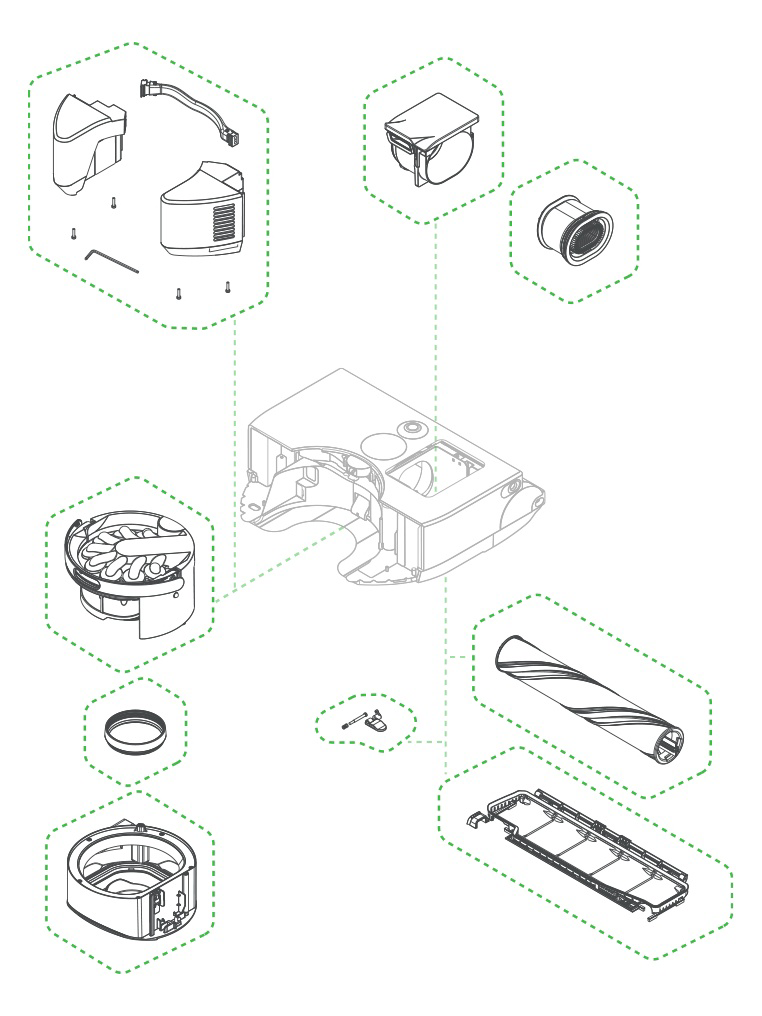
Dock and Power
- Backplate
- Dock
- Power supply
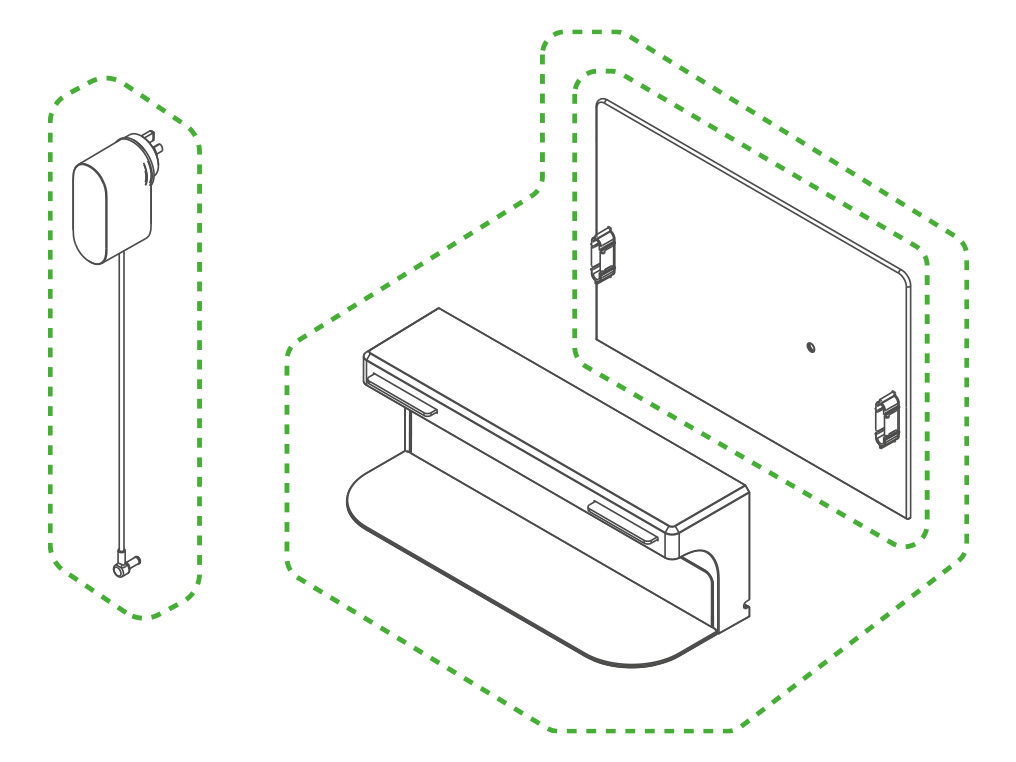
Please select the appropriate option
Dock and power
Choose the part you'd like to replace.
- Backplate
- Dock
- Power supply
Please select the appropriate option


Please select the appropriate option
Always unplug before carrying out any maintenance.
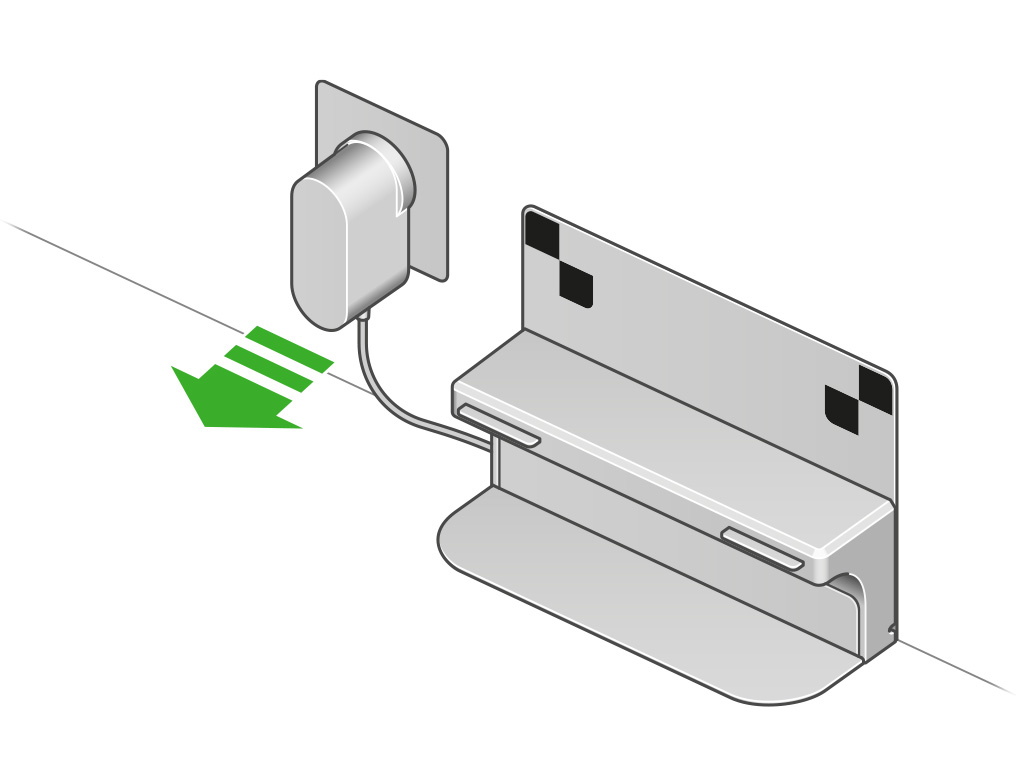
Remove your robot from the dock.
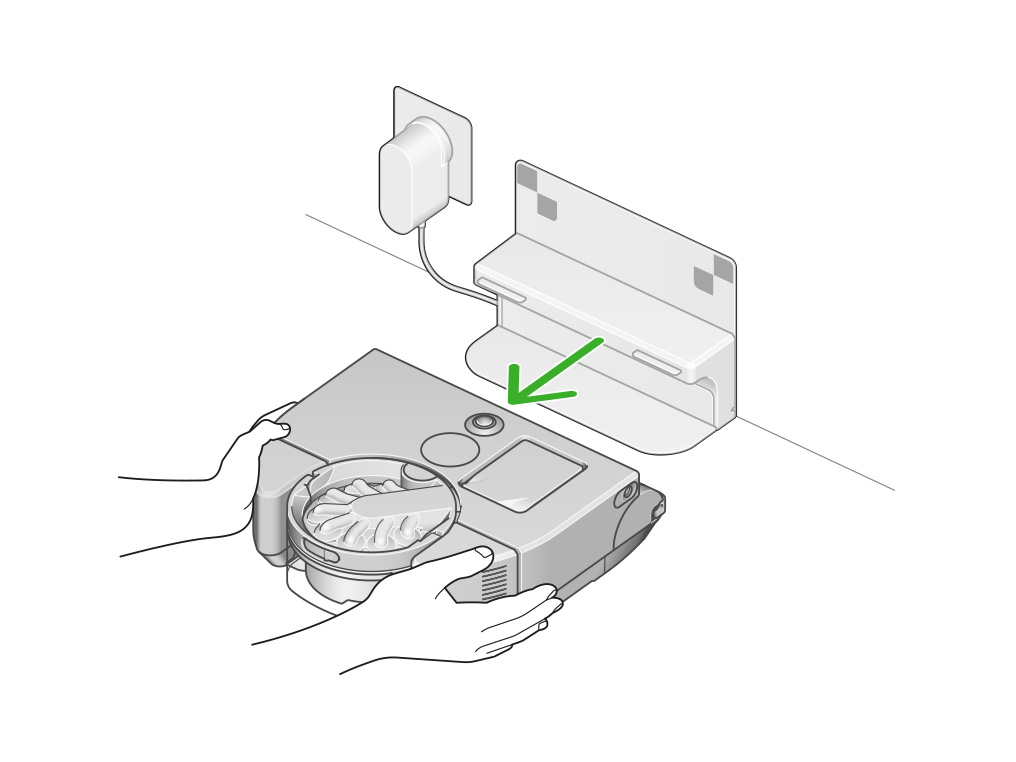
Remove the backplate
Remove the backplate from the dock.
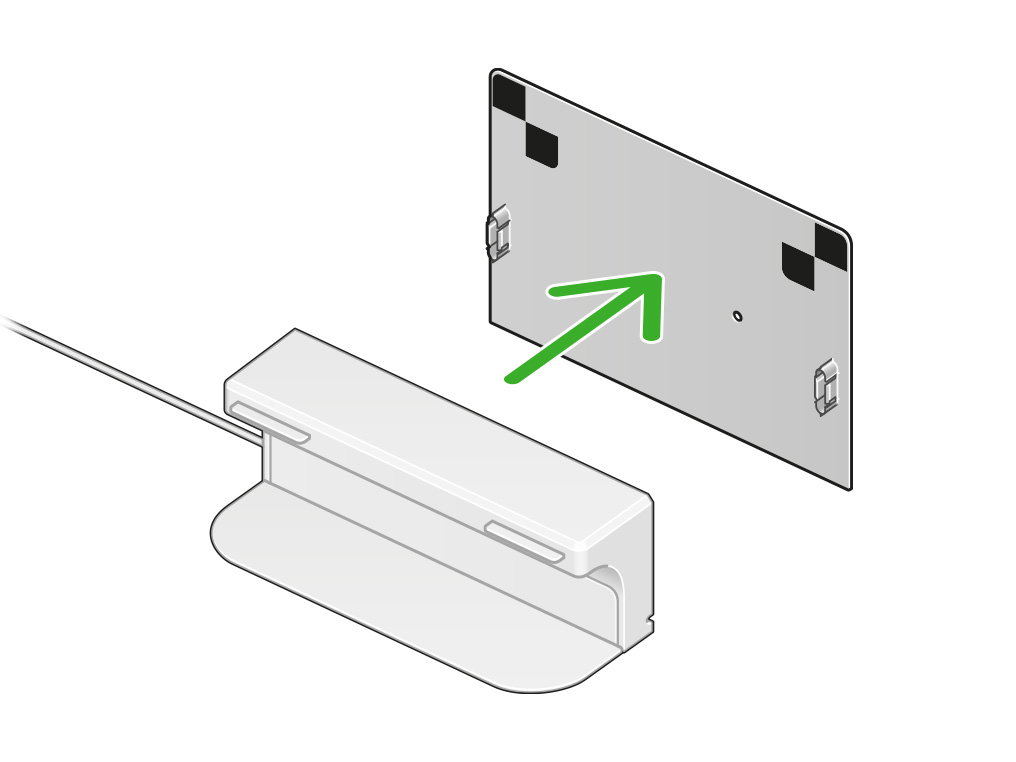
Dispose of any old parts in accordance with local codes and regulations.
Replace the backplate
Align the back panel of the dock with the floor section and press until it clicks into place.
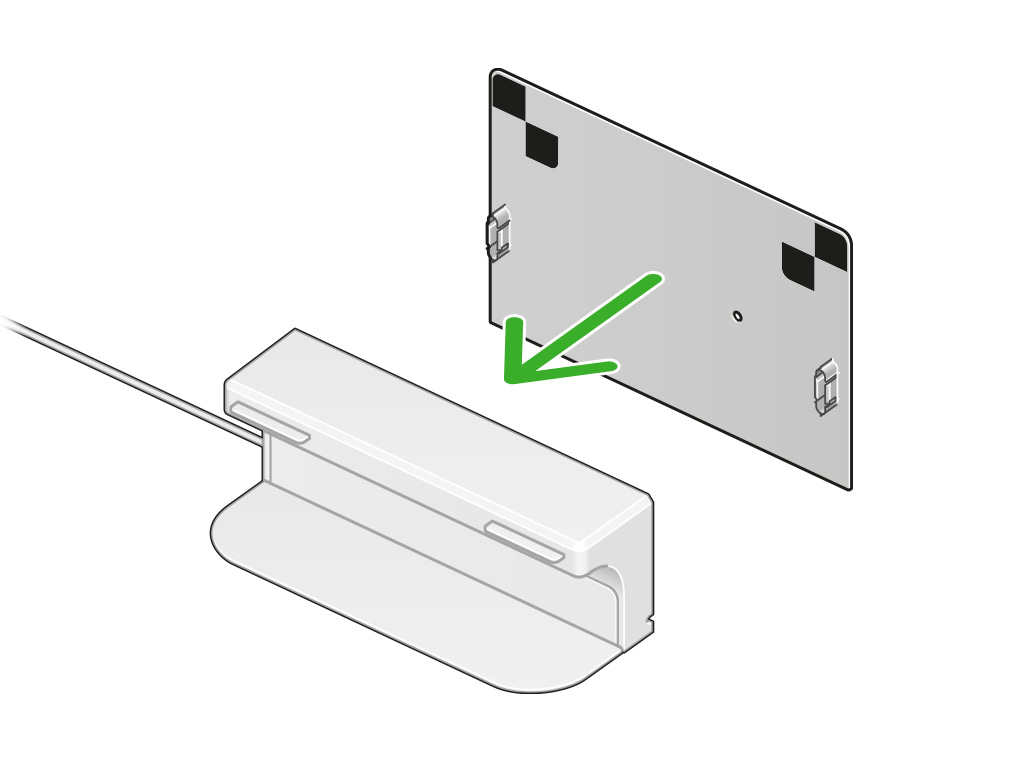
Plug in the power supply unit.
Replace your robot on the dock.
Please select the appropriate option
Always unplug before carrying out any maintenance.
Remove your robot from the dock.
Remove the backplate
Remove the backplate from the dock.
Remove the power cable from the back of the dock.

Dispose of any old parts in accordance with local codes and regulations.
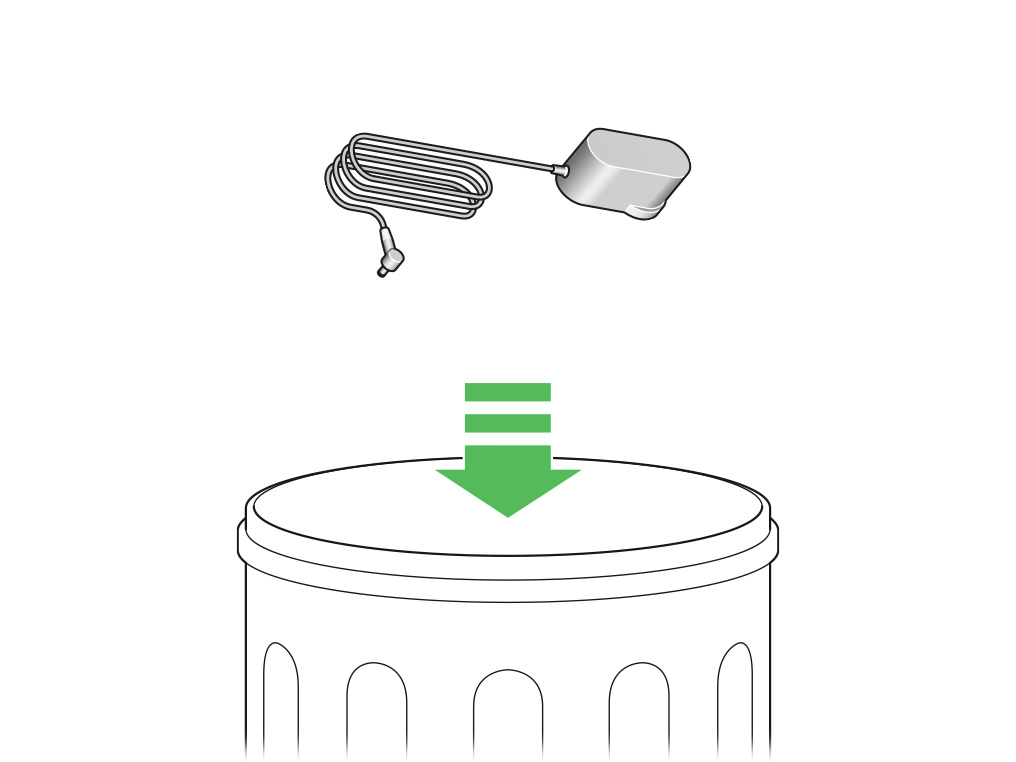
Assemble the dock
Plug the charger connector into the dock and plug into the mains power supply. A blue led will illuminate when connected.
Wrap any excess cable around the cable tidy on the back of the dock.
Align the back panel of the dock with the floor section and press until it clicks into place.
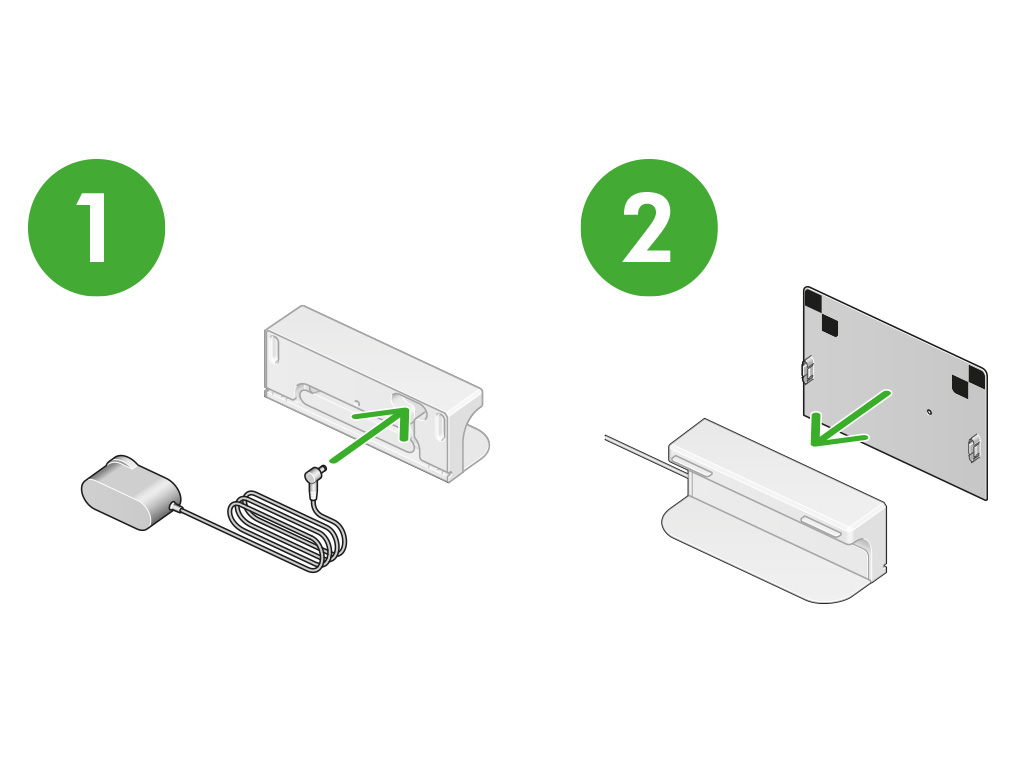
Replace your robot on the dock.
Please select the appropriate option
Always unplug before carrying out any maintenance.
Remove your robot from the dock.
Remove the backplate
Remove the backplate from the dock.
Remove the power cable from the back of the dock.
Dispose of any old parts in accordance with local codes and regulations.
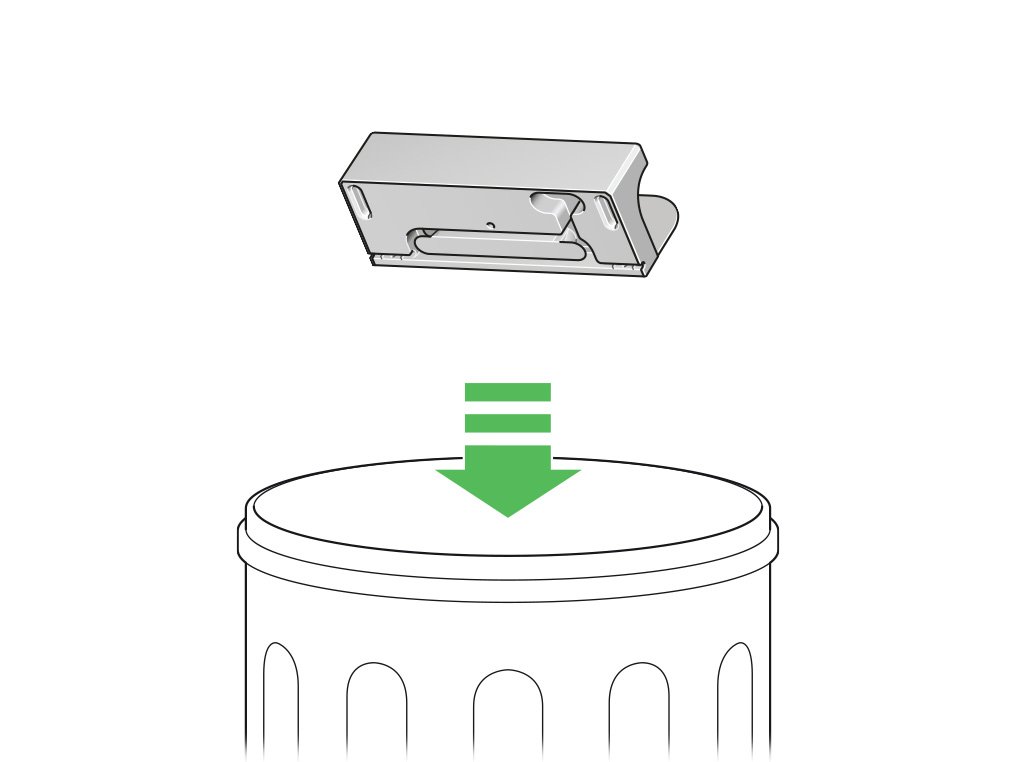
Assemble the dock
Plug the charger connector into the dock and plug into the mains power supply. A blue led will illuminate when connected.
Wrap any excess cable around the cable tidy on the back of the dock.
Align the back panel of the dock with the floor section and press until it clicks into place.
Replace your robot on the dock.
Main body and cyclone
Choose the part you'd like to replace.
- Cyclone and handle
- Bin
- Filter
- Filter housing
- Battery
- Brush bar
- Edge cleaner
- Brush bar cover
- Brush bar cover lever
- FDC seal
Please select the appropriate option


Please select the appropriate option
Tools required
A T8 Torx key is required to replace this part.

Remove the cyclone
Press the cyclone release button and remove the cyclone unit.
Turn your robot over and place it on a soft surface.
Locate the four Torx screws and remove them to release the battery.
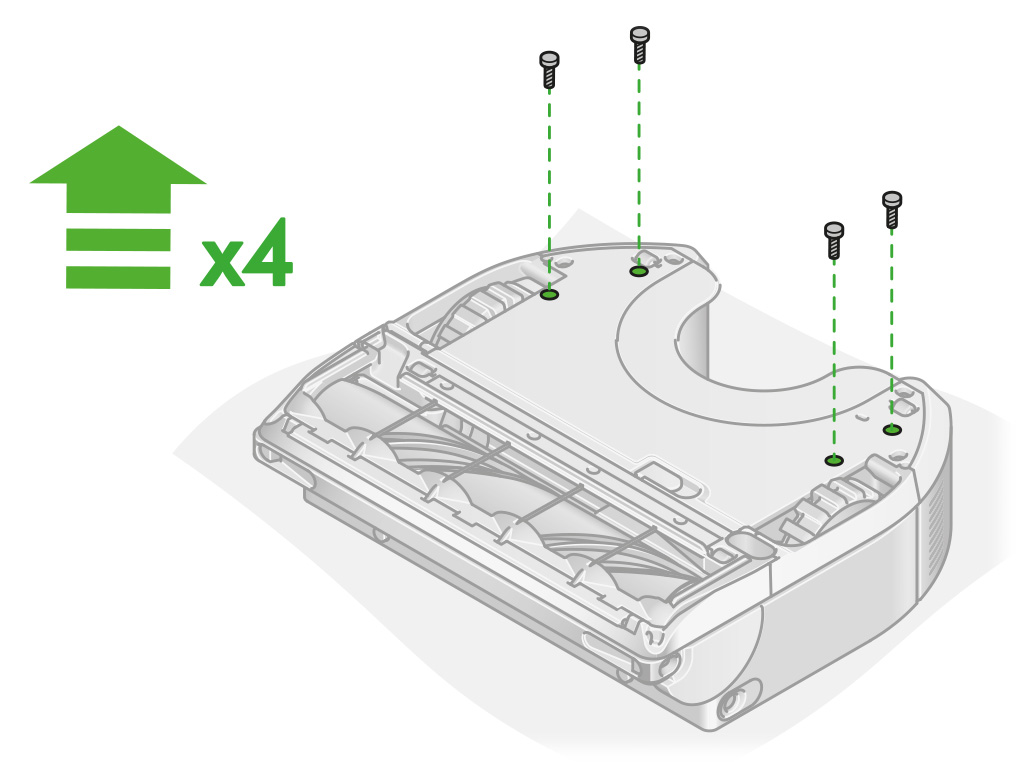
Remove the battery
Pull the harness and both sides the battery away from the main body
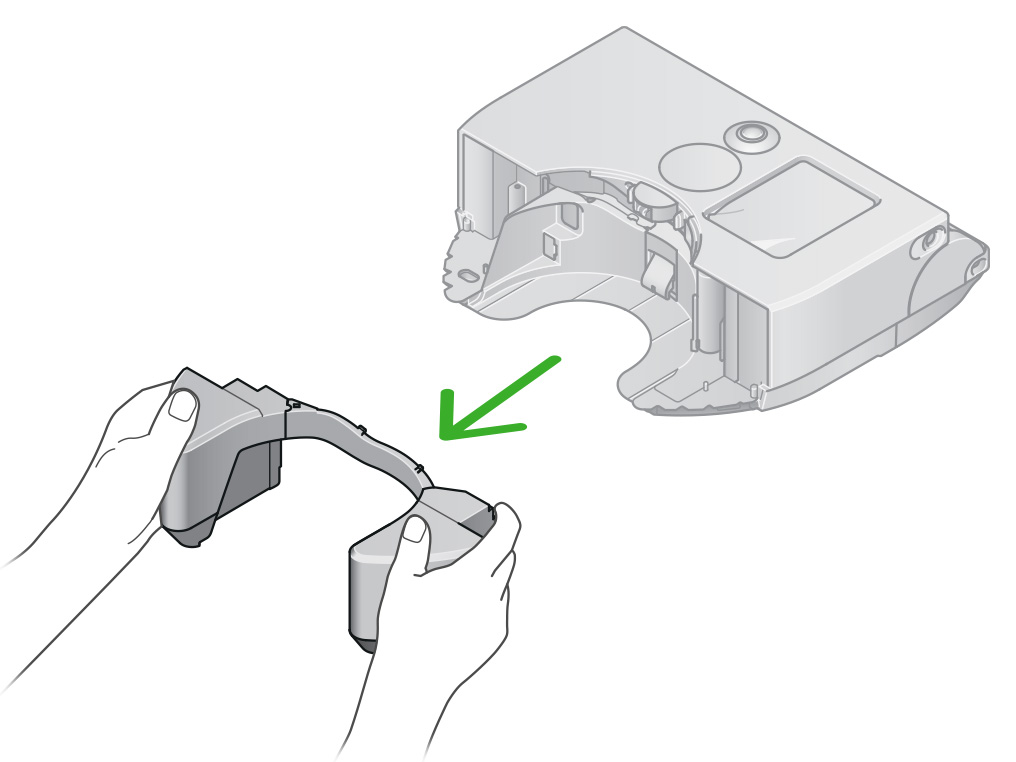
Dispose of any old parts in accordance with local codes and regulations.
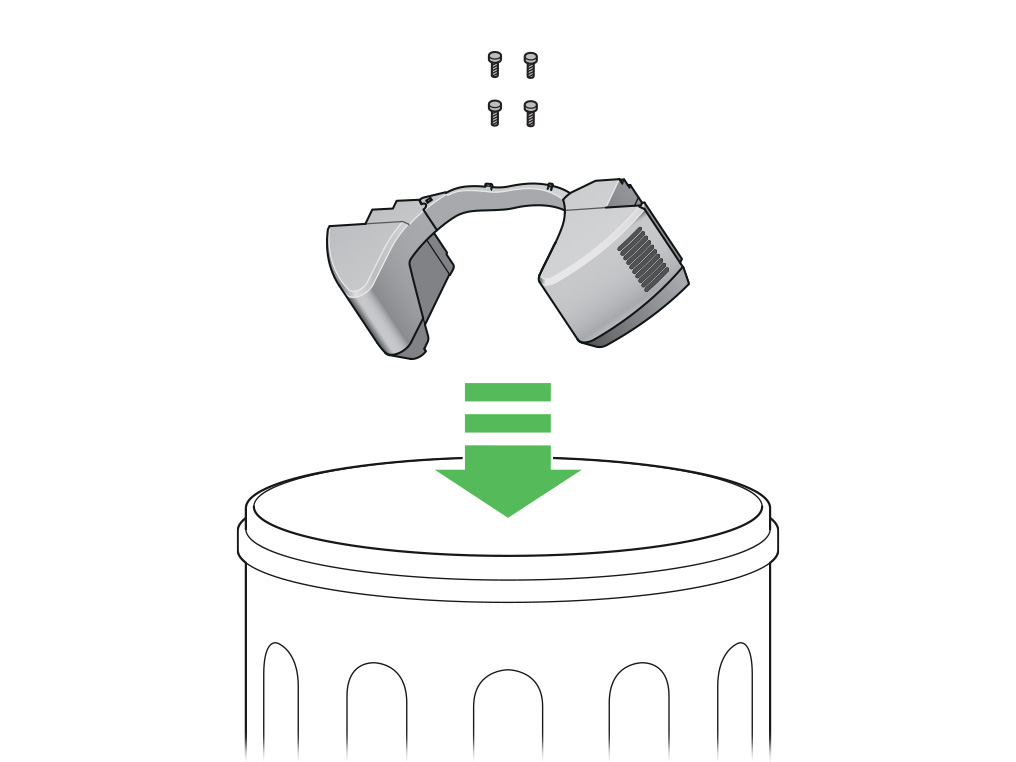
Replace the battery
Slide the battery in, making sure you press in the harness and sides of the battery until you hear a click.
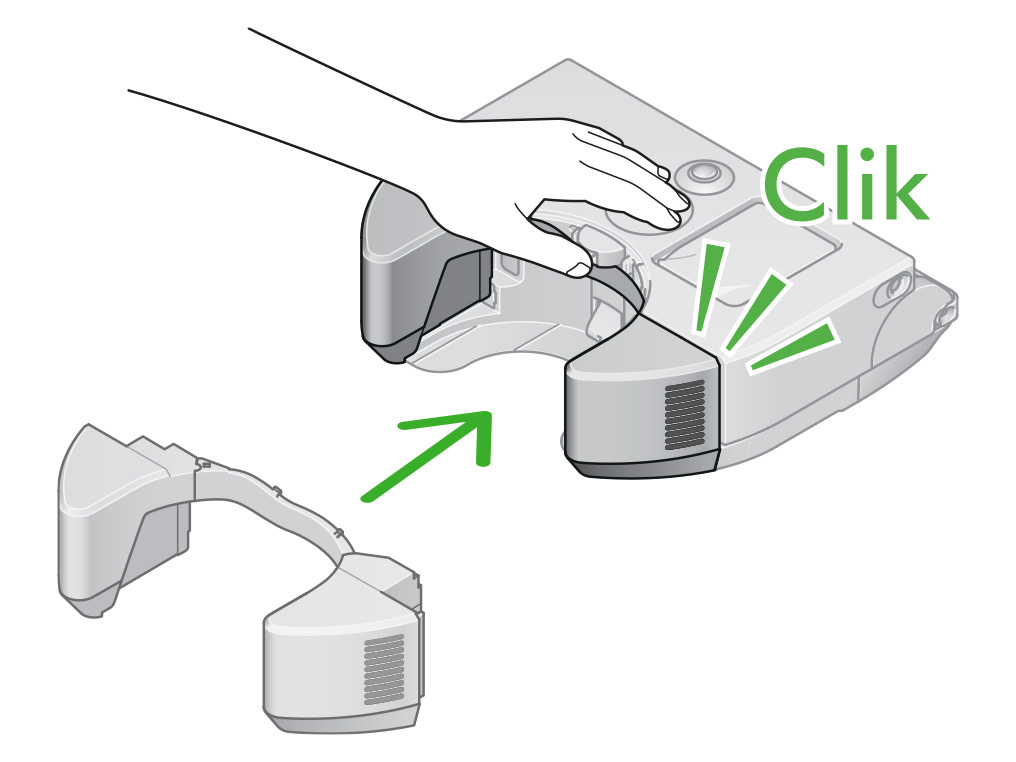
Turn your robot over and place it on a soft surface.
Secure the battery with 4 screws.

Replace the cyclone
Return the cyclone unit, ensuring it clicks into place.
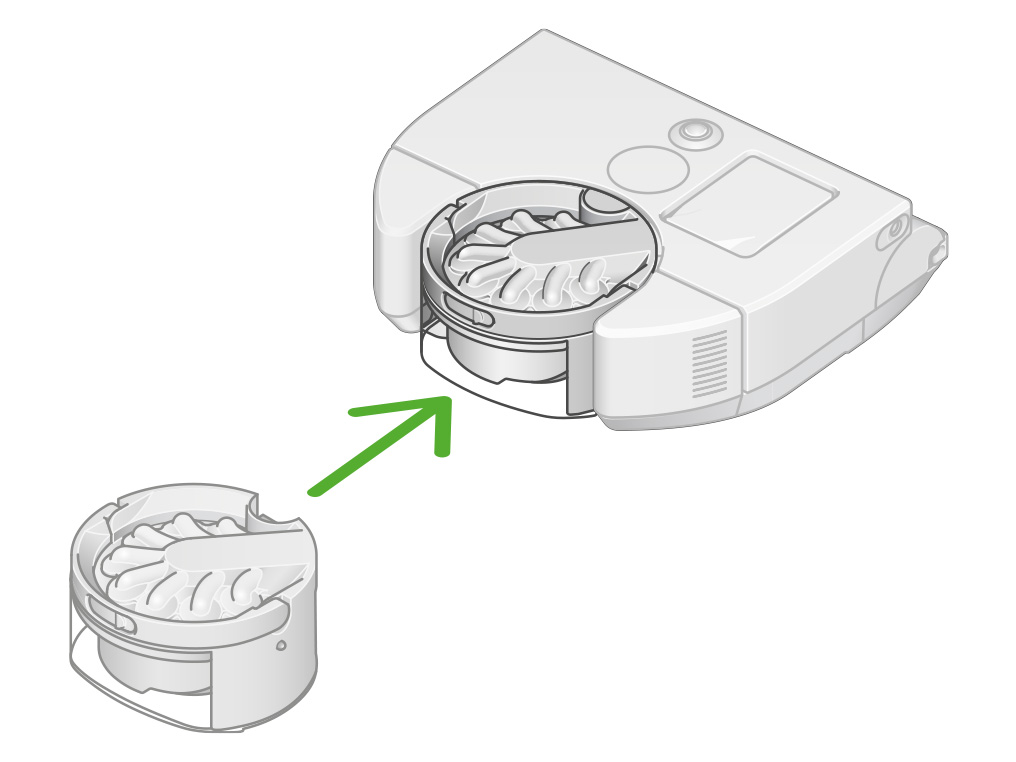
Return your robot to the dock and allow it to recharge for at least 30 minutes.
Please select the appropriate option
Replace the brush bar cover
Please follow the steps in the video.
Find the text version of the step-by-step guide instead, under "Were you able to fit your part?"
Were you able to fit your part?
Tools required
A Phillips head screwdriver is required to replace this part.
Open the brush bar cover
Turn your robot over and place it on a soft surface.
Lift the red brush bar cover lever on the base of your robot and open the brush bar cover.
Remove the brush bar cover
Remove the screws on both sides of the brush bar cover and lift it away from the robot.
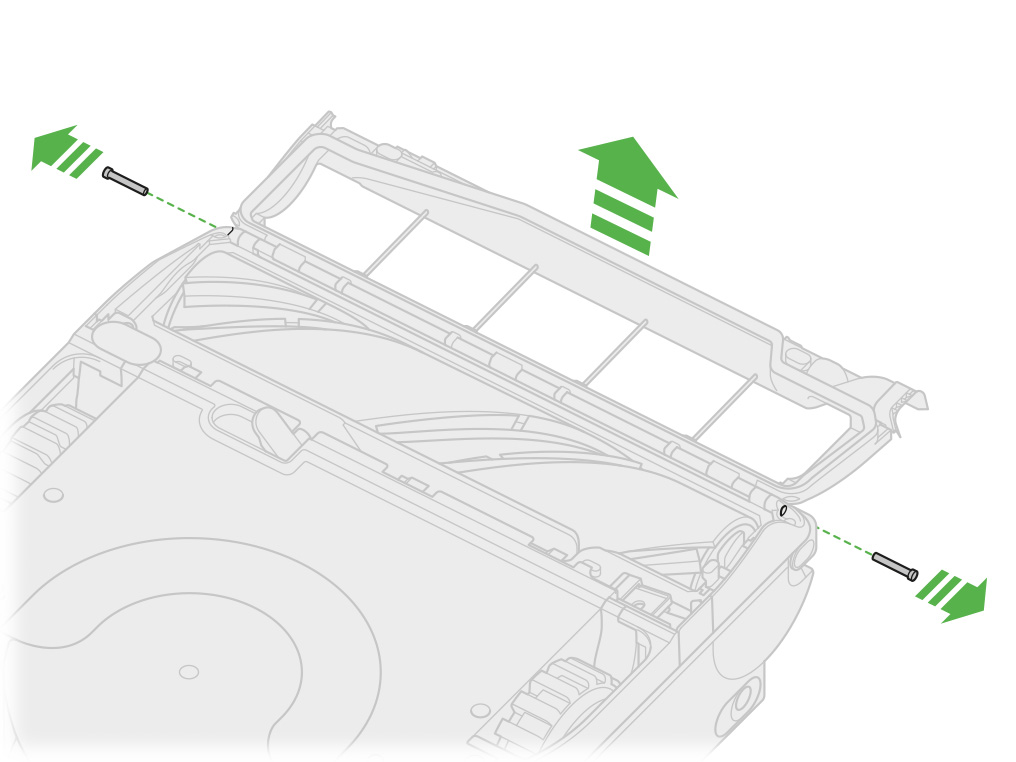
Dispose of any old parts in accordance with local codes and regulations.
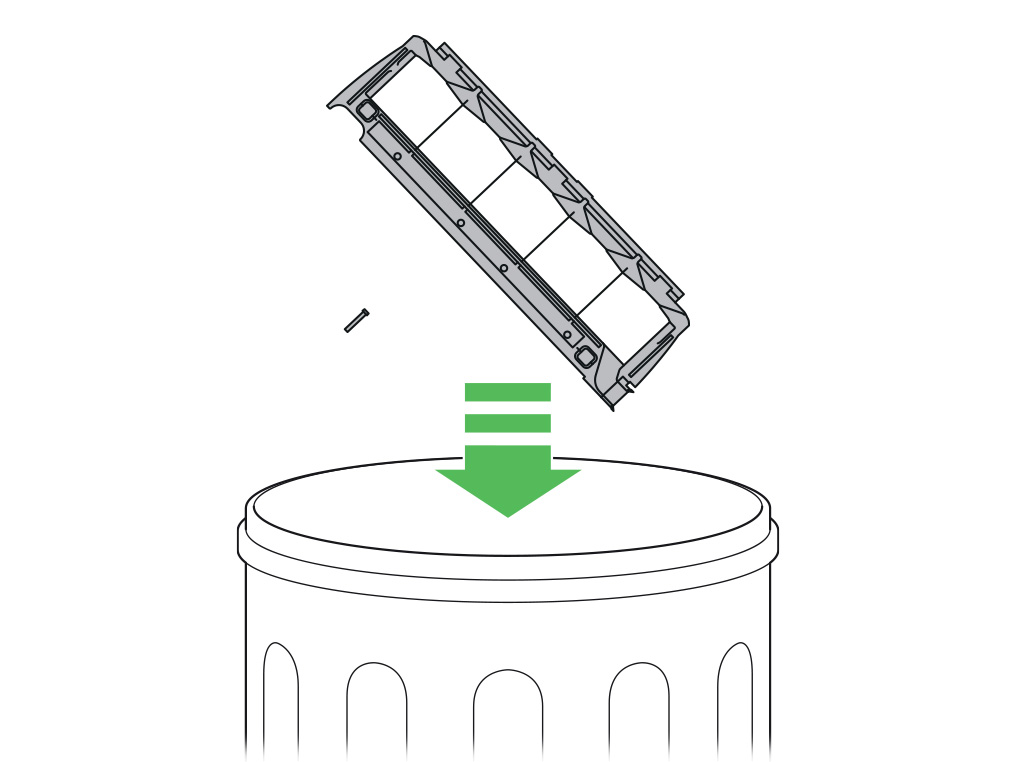
Replace the brush bar cover
Align the hinges of the brush bar cover with your robot and secure with a screw on both sides.
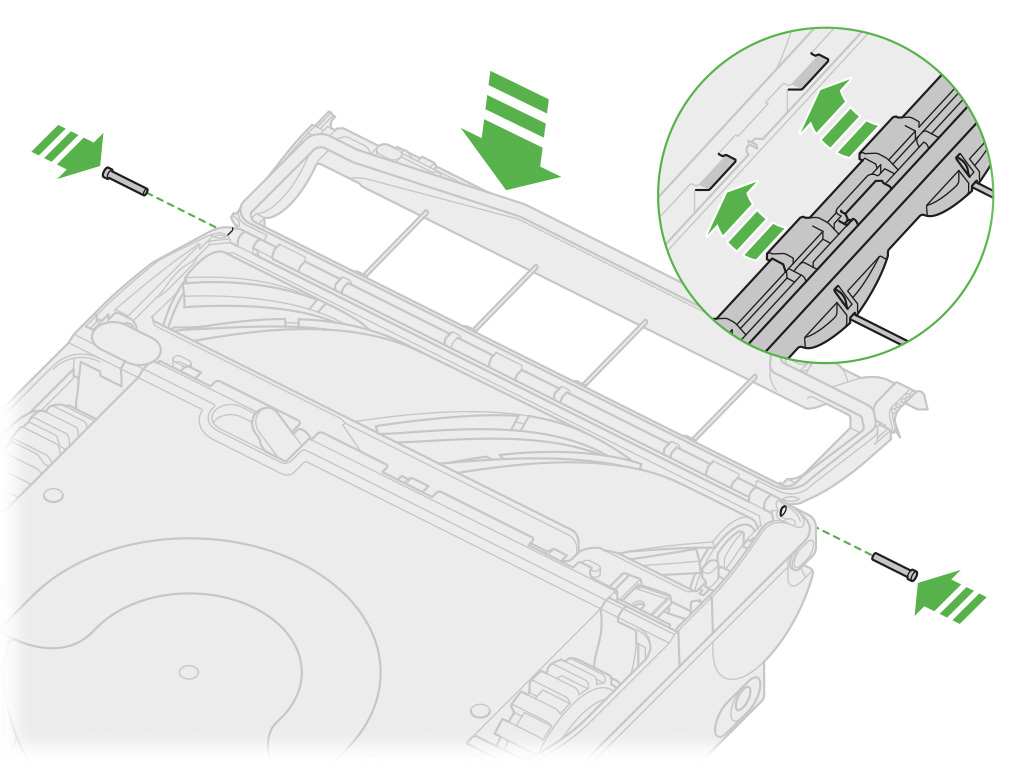
Close the brush bar cover and push the lever down to lock the cover in place.
Ensure the brush bar cover is fully aligned along the width of the machine before securing the lever.
Please select the appropriate option
Remove the cyclone
Press the cyclone release button and remove the cyclone unit.
Remove the bin
Hold your bin over a rubbish container, pointing downwards.
Push the bin release button on the handle.
The bin will slide down, cleaning the shroud as it goes and the bin base will open.
Empty your bin and press the bin release button. This is located under the cyclone, on the bin runner.
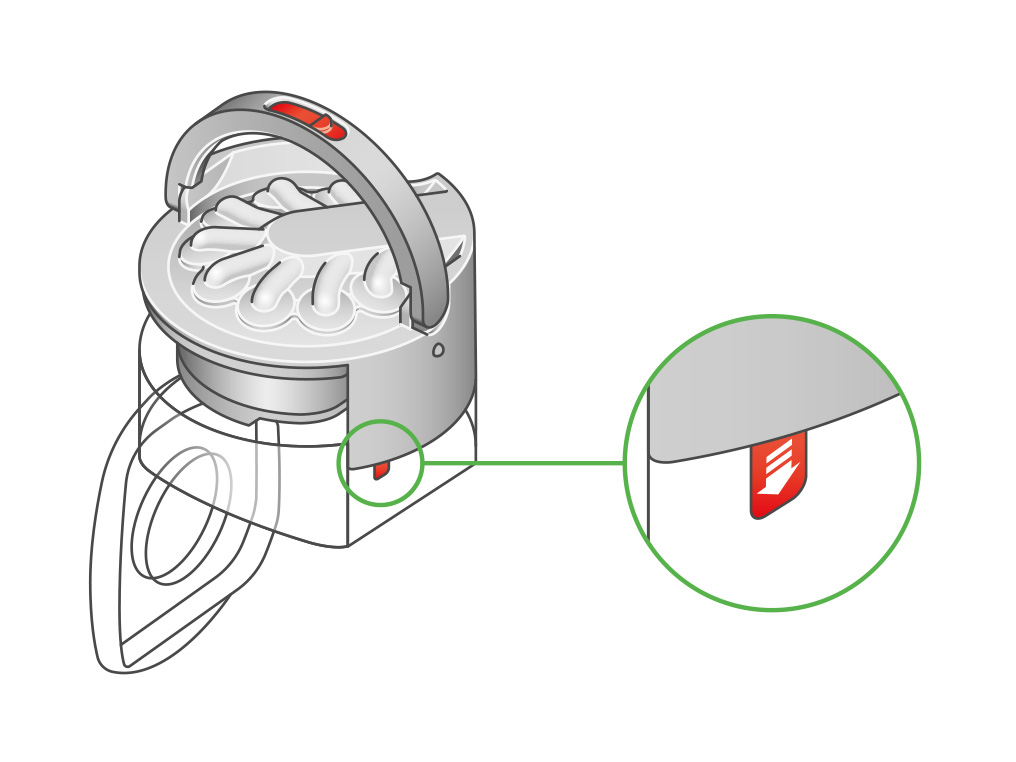
Dispose of any old parts in accordance with local codes and regulations.
Replace the bin
Slide the bin onto its runner on the cyclone unit, making sure the metal connector pin on the opposite side slides into place simultaneously. Push until the bin clicks into place.
Push your bin back into place, make sure it clicks securely back into your robot.
Please select the appropriate option
Remove the brush bar
Turn your robot over and place it on a soft surface.
Lift the red brush bar cover lever on the base of your robot and open the brush bar cover.
Press the red brush bar release button and slide the brush bar out of your robot. Remove any debris or objects. Also ensure any hair or other threads are removed from the brush bar bearing.
Dispose of any old parts in accordance with local codes and regulations.
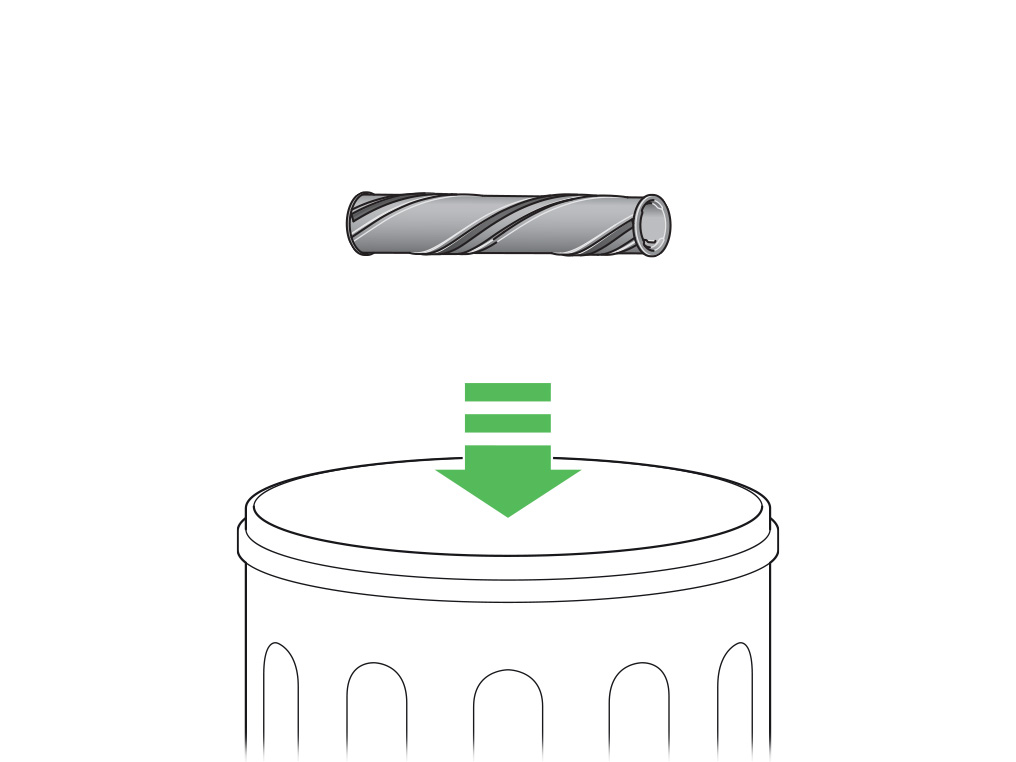
Replace the brush bar
Push the end cap back onto the brush bar. Slide the brush bar back into your robot, push down on it until the release button pops back up.
Close the brush bar cover and push the lever down to lock the cover in place.
Ensure the brush bar cover is fully aligned along the width of the machine before securing the lever.
Please select the appropriate option
Remove the cyclone
Press the cyclone release button and remove the cyclone unit.
Remove the bin
Hold your bin over a rubbish container, pointing downwards.
Push the bin release button on the handle.
The bin will slide down, cleaning the shroud as it goes and the bin base will open.
Empty your bin and press the bin release button. This is located under the cyclone, on the bin runner.
Dispose of any old parts in accordance with local codes and regulations.
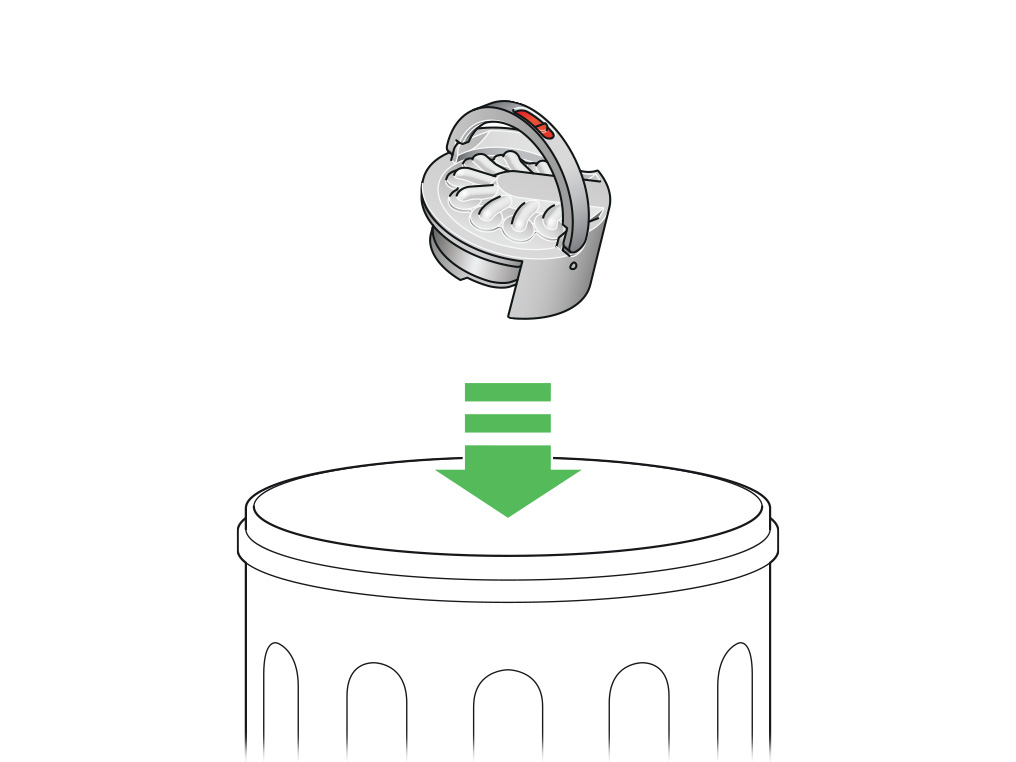
Replace the bin
Slide the bin onto its runner on the cyclone unit, making sure the metal connector pin on the opposite side slides into place simultaneously. Push until the bin clicks into place.
Push your bin back into place, make sure it clicks securely back into your robot.
Please select the appropriate option
Replace the edge cleaner
Please follow the steps in the video.
Find the text version of the step-by-step guide instead, under "Were you able to fit your part?"
Were you able to fit your part?
Tools required
A Phillips head screwdriver is required to replace this part.
Open the brush bar cover
Turn your robot over and place it on a soft surface.
Lift the red brush bar cover lever on the base of your robot and open the brush bar cover.
Remove the edge cleaner
Remove the screw from the edge cleaner and then pull the side cover down to slide it out of its place.
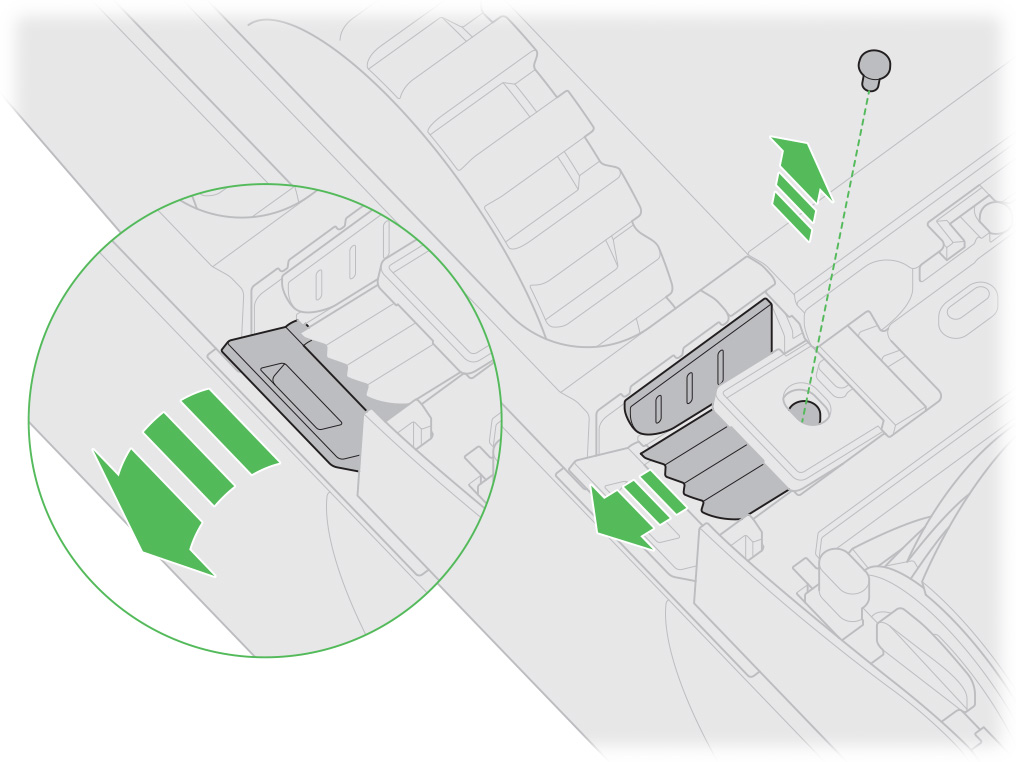
Dispose of any old parts in accordance with local codes and regulations.
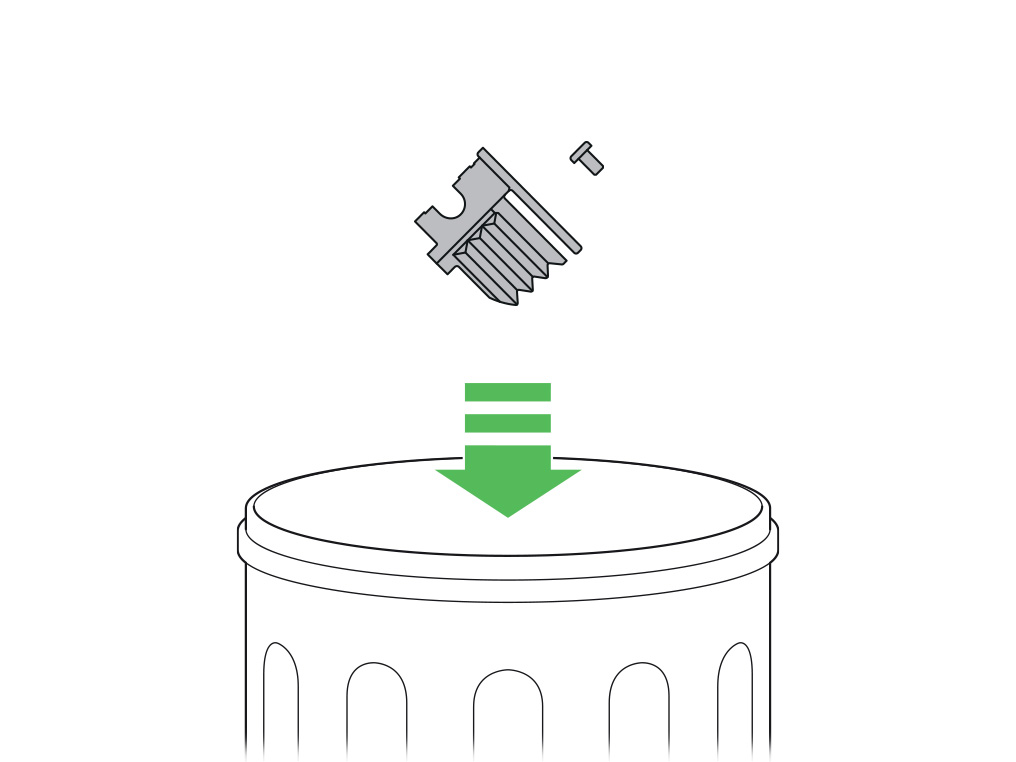
Replace the edge cleaner
Slide the edge cleaner in and push the side cover up so it clicks into place. Secure the part with the screw.
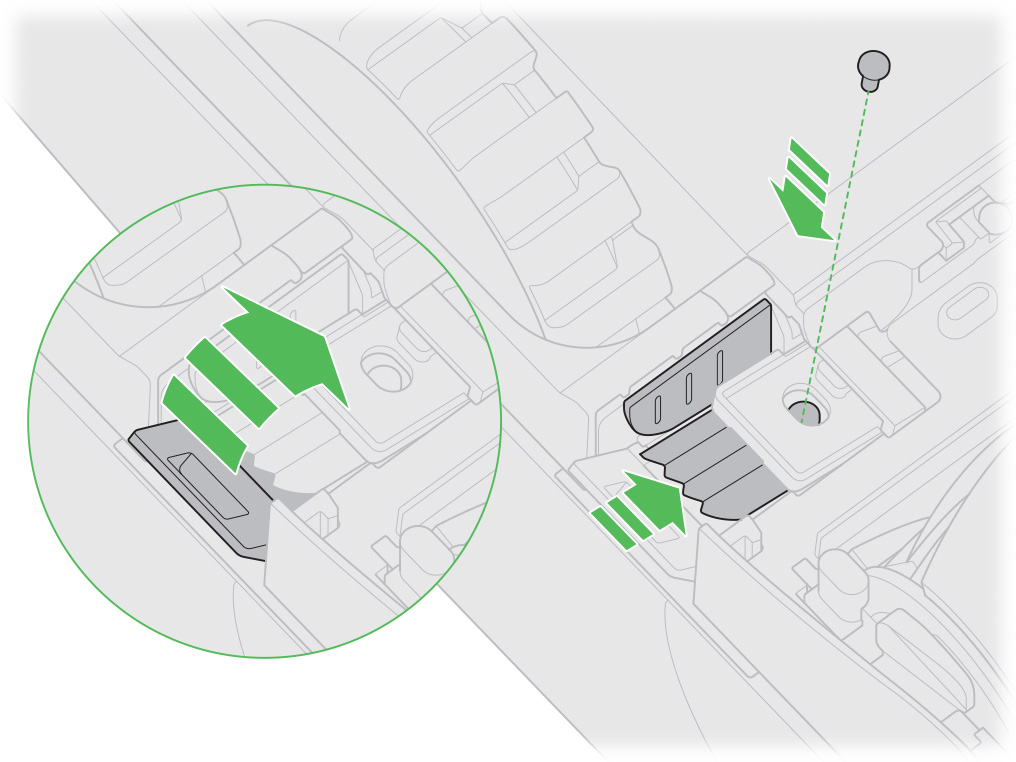
Close the brush bar cover and push the lever down to lock the cover in place.
Ensure the brush bar cover is fully aligned along the width of the machine before securing the lever.
Please select the appropriate option
Remove the cyclone
Press the cyclone release button and remove the cyclone unit.
Remove the bin
Hold your bin over a rubbish container, pointing downwards.
Push the bin release button on the handle.
The bin will slide down, cleaning the shroud as it goes and the bin base will open.
Empty your bin and press the bin release button. This is located under the cyclone, on the bin runner.
Remove the FDC seal
Remove the FDC seal from the bottom of the cyclone.
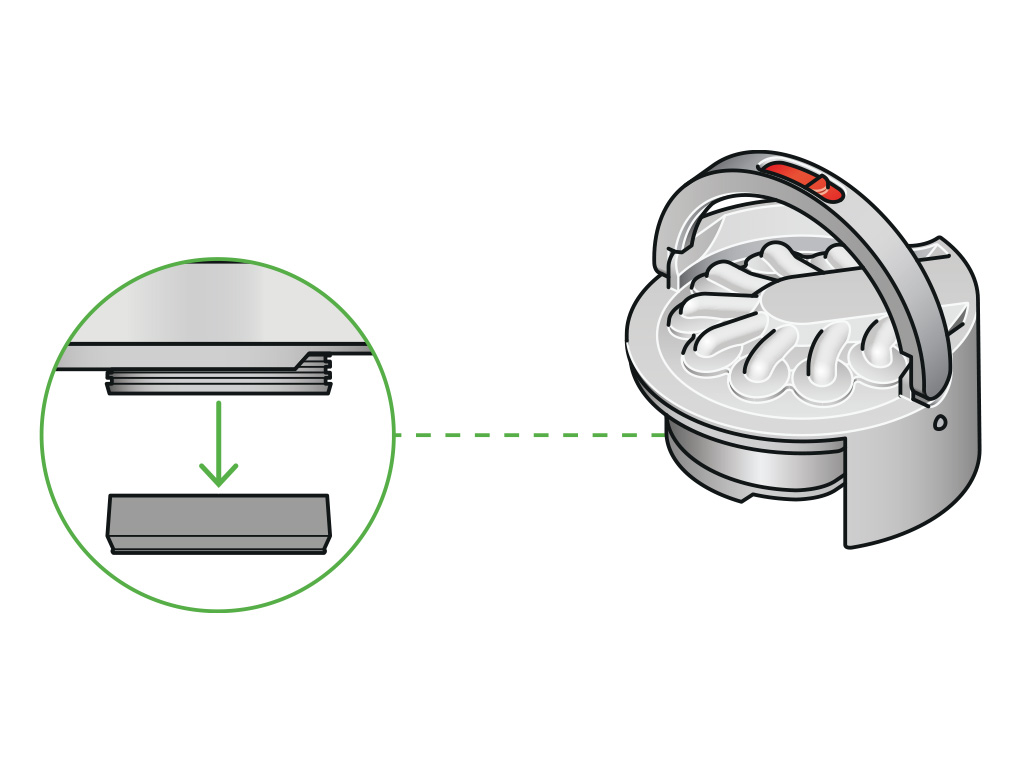
Dispose of any old parts in accordance with local codes and regulations.
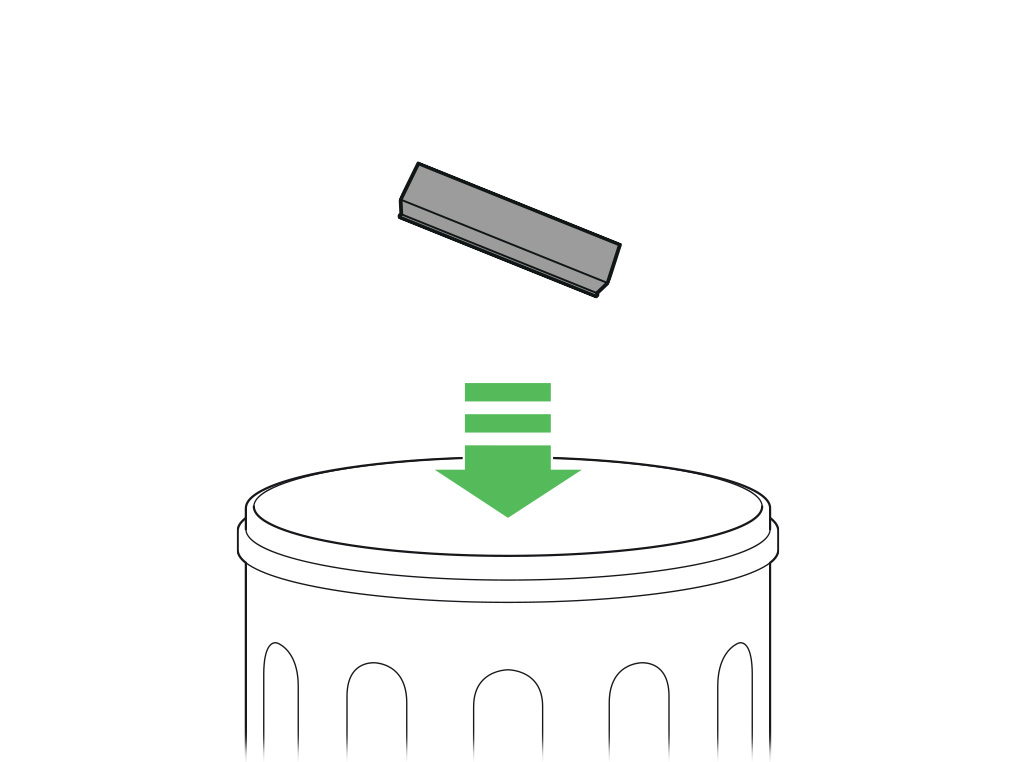
Replace the FDC seal
Fit the FDC seal to the ribbed section of the cyclone, ensuring it is in the correct orientation with the tapered edge facing downwards.
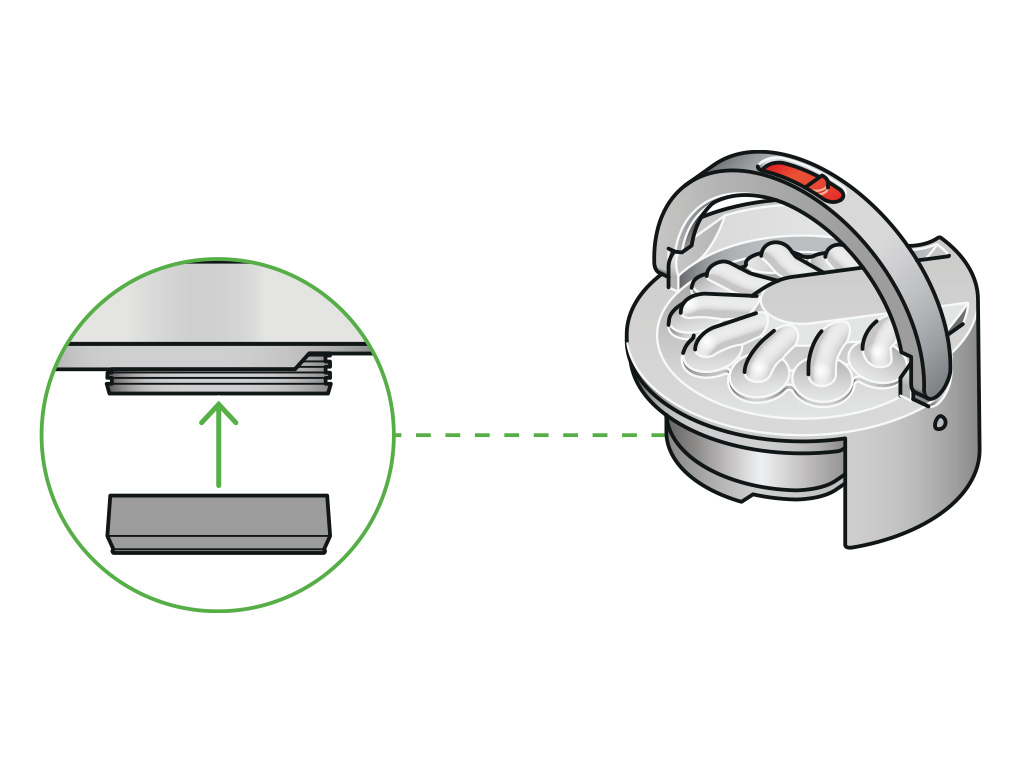
Replace the bin
Slide the bin onto its runner on the cyclone unit, making sure the metal connector pin on the opposite side slides into place simultaneously. Push until the bin clicks into place.
Push your bin back into place, make sure it clicks securely back into your robot.
Please select the appropriate option
Remove the filter
Click to release the filter unit and it will pop up out of your robot.
Remove the filter from the filter unit.
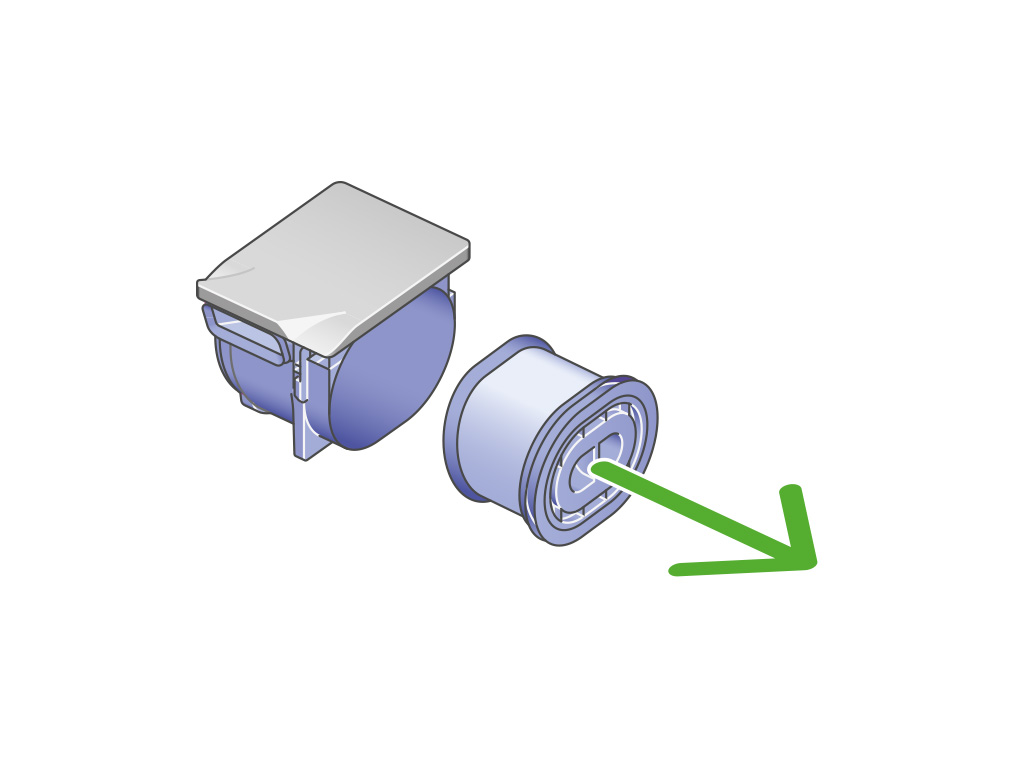
Dispose of any old parts in accordance with local codes and regulations.
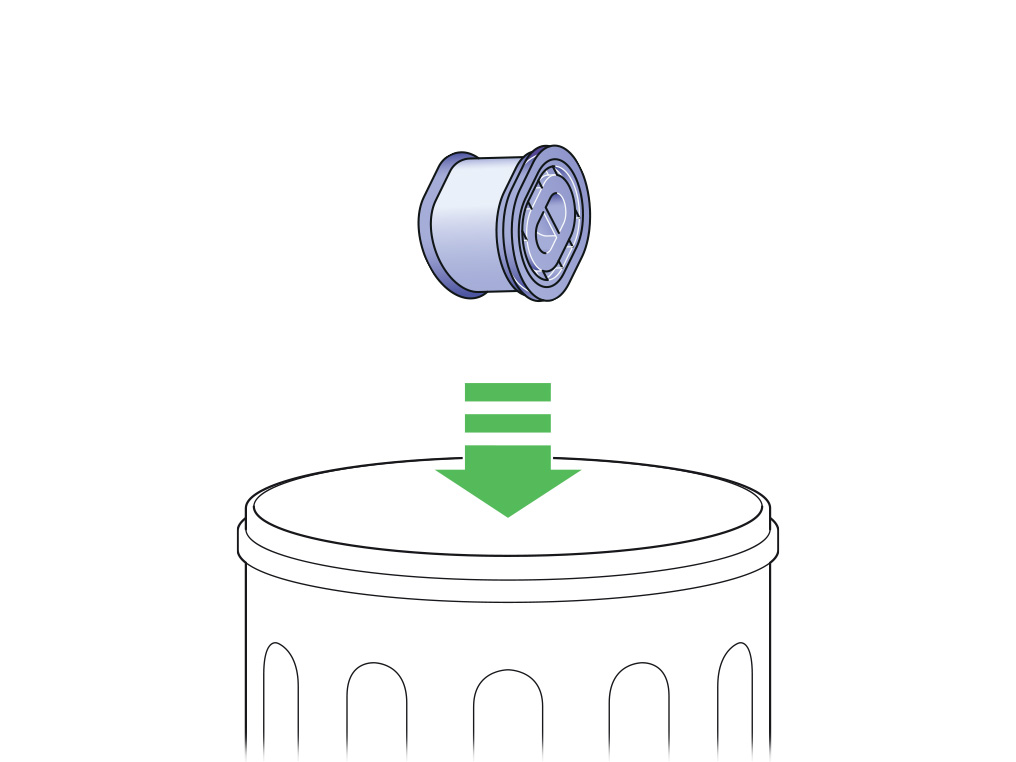
Replace the filter
Reinsert the filter into the filter unit and refit to the machine.
Please select the appropriate option
Remove the filter
Click to release the filter unit and it will pop up out of your robot.
Remove the filter from the filter unit.
Dispose of any old parts in accordance with local codes and regulations.
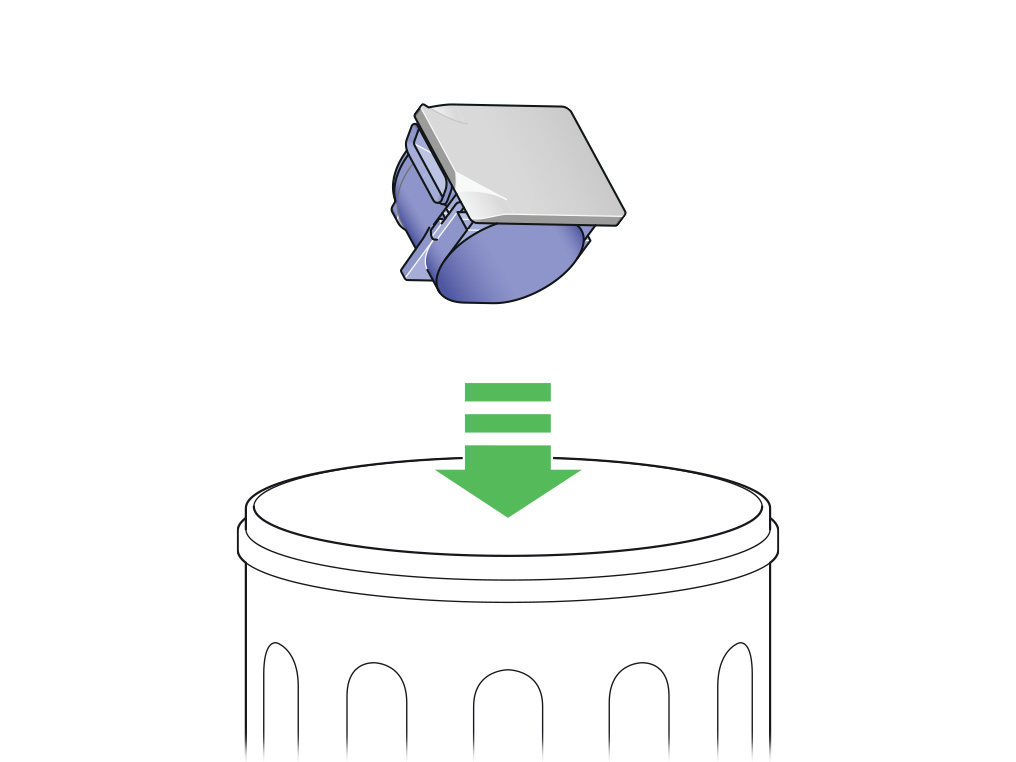
Replace the filter
Reinsert the filter into the filter unit and refit to the machine.
Please select the appropriate option
Replace the brush bar cover lever
Please follow the steps in the video.
Find the text version of the step-by-step guide instead, under "Were you able to fit your part?"
Were you able to fit your part?
Tools required
A Phillips head screwdriver is required to replace this part.
Open the brush bar cover
Turn your robot over and place it on a soft surface.
Lift the red brush bar cover lever on the base of your robot and open the brush bar cover.
Remove the brush bar cover lever
Tilt the lever down, approximately 45 degrees, until the screw becomes visible. Unscrew the lever from the side and remove it.
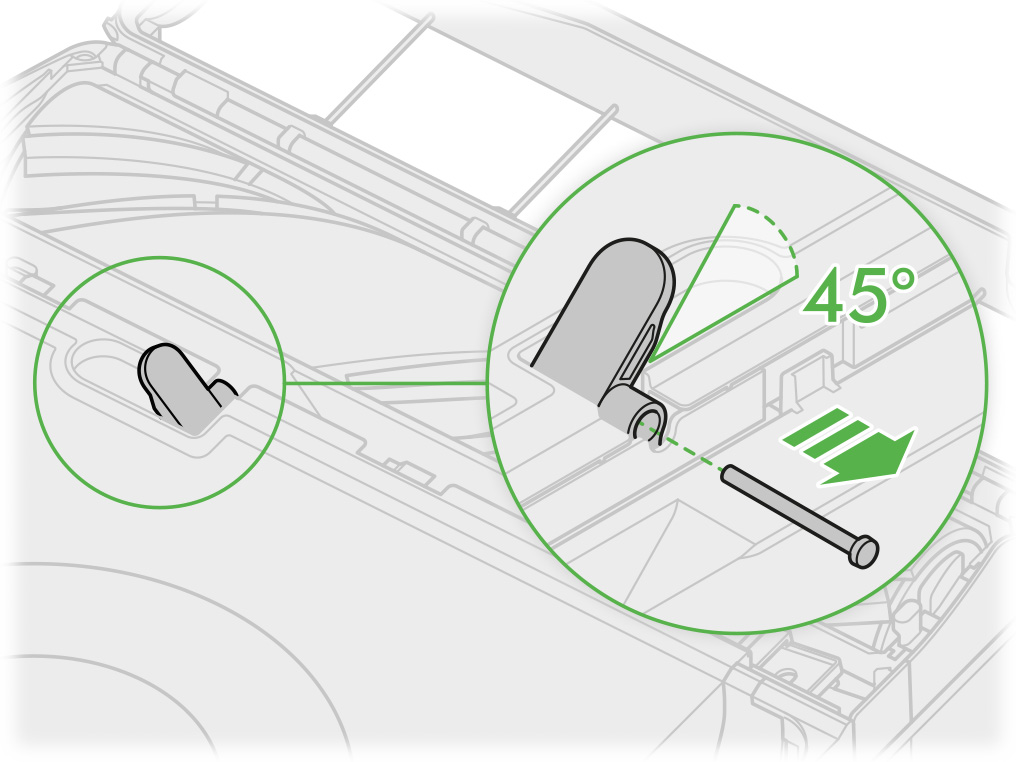
Dispose of any old parts in accordance with local codes and regulations.

Replace the brush bar cover lever
Align the brush bar cover lever with the slot on your robot and secure with a screw, then lift the lever up to allow the cover to close.
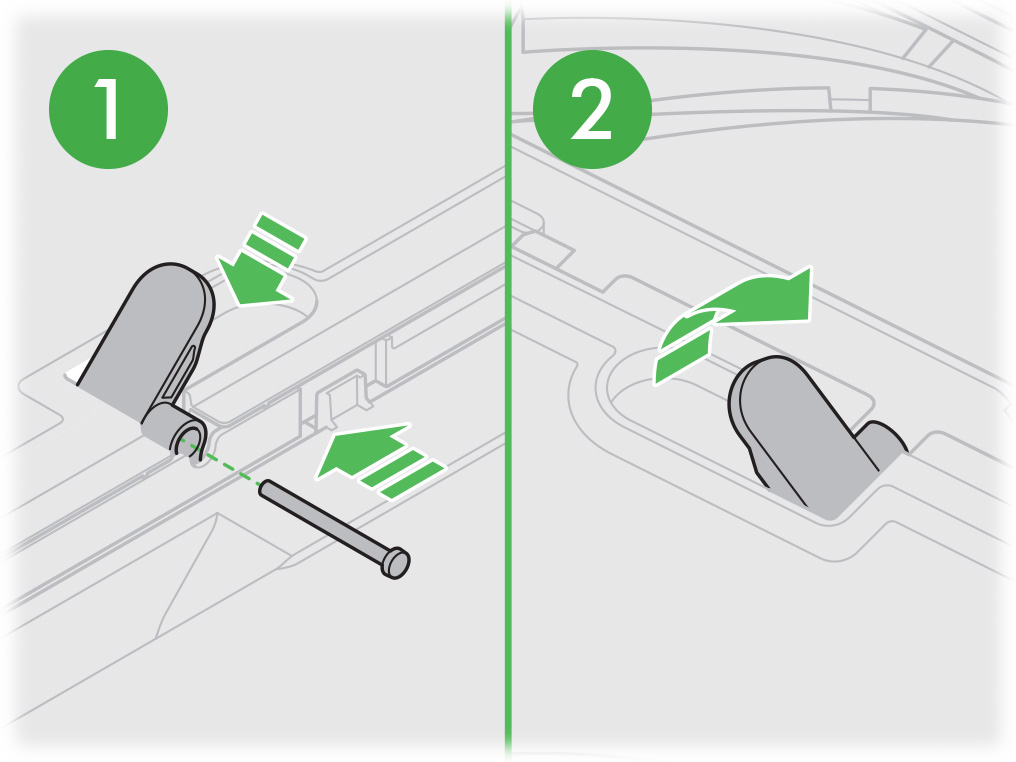
Close the brush bar cover and push the lever down to lock the cover in place.
Ensure the brush bar cover is fully aligned along the width of the machine before securing the lever.
Which alert is showing on the LCD screen?
Removing a blockage
Please follow the steps in the video.
Find the text version of the step-by-step guide instead, under "Has this resolved the problem?"
Has this resolved the problem?
Removing a blockage
Press the cyclone release button and remove the cyclone unit.
Check the cyclone unit and inlet for any obstructions. Empty the bin if it is full.
If hair or debris is stuck in the shroud, you can use the release catch to remove the cyclone for easier cleaning. Use a soft brush to clear any hair or debris from the shroud.
Check the airway on the machine where the bin connects for blockages.
Check the filter
Click to release the filter unit and it will pop up out of your robot.
Remove the filter from the filter unit and check it for blockages.
Reinsert the filter into the filter unit and refit to the machine.
Check the brush bar
Turn your robot over and place it on a soft surface.
Lift the red brush bar cover lever on the base of your robot.
Check the airway on the underside of the machine for any blockages.
Press the red brush bar release button and slide the brush bar out of your robot. Remove any debris or objects. Also ensure any hair or other threads are removed from the brush bar bearing.
Replace your brush bar
Slide the brush bar into your robot and push down until the release button pops up.
Close the brush bar cover and push the lever down to lock the cover in place.
Ensure the brush bar cover is fully aligned along the width of the machine before securing the lever.
Clear the alert
Return the robot to the same point on the floor, press the LCD screen and step away to resume cleaning.
The filter must be completely dry before you put it back into the machine. Your machine could be damaged if used with a damp filter.
Please follow the steps in the video.
Find the text version of the step-by-step guide instead, under "Has this resolved the problem?"
Has this resolved the problem?
The filter must be completely dry before you put it back into the machine. Your machine could be damaged if used with a damp filter.
Washing your filter
Wash the filter at least once a month to maintain optimum suction power.
The filter unit can be wiped with a damp, lint-free cloth to remove any dirt or dust.
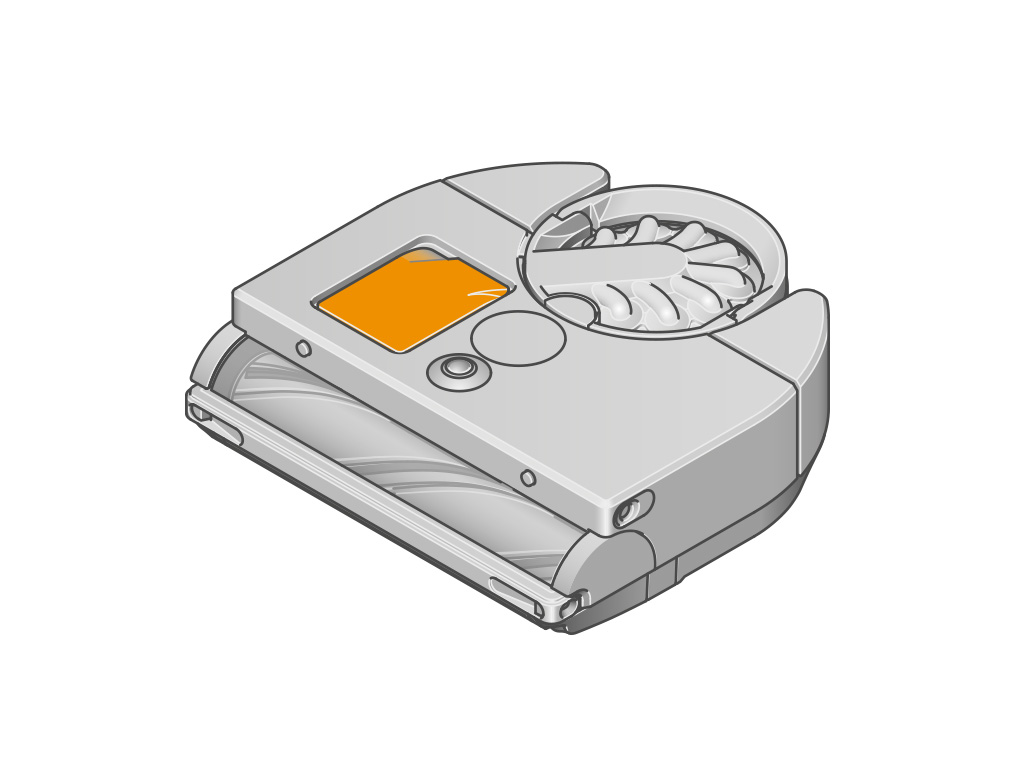
Remove the filter
Click to release the filter unit and it will pop up out of your robot.
Remove the filter from the filter unit and check it for blockages.
Tap the filter
Before washing your filter, tap it gently over a bin to remove any loose dust and debris.
Wash the inside of the filter
Wash with warm, running tap water. Don't use detergent, or wash it in a dishwasher or washing machine.
Place your hand over one end of the filter and fill it with warm tap water.

Place your hand over the open end of the filter and shake it firmly to remove trapped dirt and debris.
Repeat these steps until the water runs clear.
Wash the outside of the filter
Wash with warm, running tap water - gently rubbing your filter with your fingers to remove the dirt.
Repeat until the water runs clear.
Shake out the water
Empty the filter and shake it firmly to remove excess water.
Shake with the filter in both an upward and downward position.
Keep shaking it until there's no water coming from the filter.
Dry the filter
Place your filter on its side and leave to dry for at least 24 hours in a well-ventilated, warm place.
Don't dry the filter in a tumble dryer, microwave or near a naked flame.
Check the bin
The bin needs to be fitted correctly before starting a clean. If the bin is full, empty it.
If hair or debris is stuck in the shroud, you can use the release catch to remove the cyclone for easier cleaning. Use a soft brush to clear any hair or debris from the shroud.
Return the cyclone unit, ensuring it clicks into place.
Please follow the steps in the video.
Find the text version of the step-by-step guide instead, under "Has this resolved the problem?"
Has this resolved the problem?
Check the brush bar
Turn your robot over and place it on a soft surface.
Lift the red brush bar cover lever on the base of your robot.
Check the airway on the underside of the machine for any blockages.
Press the red brush bar release button and slide the brush bar out of your robot. Remove any debris or objects. Also ensure any hair or other threads are removed from the brush bar bearing.
Replace your brush bar
Slide the brush bar into your robot and push down until the release button pops up.
Close the brush bar cover and push the lever down to lock the cover in place.
Ensure the brush bar cover is fully aligned along the width of the machine before securing the lever.
Clear the alert
Return the robot to the same point on the floor, press the LCD screen and step away to resume cleaning.
If your robot was stuck, reposition the robot away from the problem area to where it has already cleaned.
If your robot's brush bar regularly gets stuck in the same place, we'd recommend adding a restriction so your robot vacuums without the brush bar on.
Has this resolved the problem?
Removing a blockage
Please follow the steps in the video.
Find the text version of the step-by-step guide instead, under "Has this resolved the problem?"
Has this resolved the problem?
Check the edge cleaner
Turn your robot over and place it on a soft surface.
Clear any dirt or debris blocking the edge cleaner.
Clear the alert
Return the robot to the same point on the floor, press the LCD screen and step away to resume cleaning.
Removing a blockage
Your robot can detect if the filter requires washing by monitoring for restricted airflow. If it detects this, an alert will show indicating that the filter needs to be washed.
This alert may also be triggered by a blockage, so we would advise carrying out blockage checks before washing the filter.
Please follow the steps in the video.
Find the text version of the step-by-step guide instead, under "Has this resolved the problem?"
Has this resolved the problem?
Removing a blockage
Press the cyclone release button and remove the cyclone unit.
Check the cyclone unit and inlet for any obstructions. Empty the bin if it is full.
If hair or debris is stuck in the shroud, you can use the release catch to remove the cyclone for easier cleaning. Use a soft brush to clear any hair or debris from the shroud.
Check the airway on the machine where the bin connects for blockages.
Check the filter
Click to release the filter unit and it will pop up out of your robot.
Remove the filter from the filter unit and check it for blockages.
Reinsert the filter into the filter unit and refit to the machine.
Check the brush bar
Turn your robot over and place it on a soft surface.
Lift the red brush bar cover lever on the base of your robot.
Check the airway on the underside of the machine for any blockages.
Press the red brush bar release button and slide the brush bar out of your robot. Remove any debris or objects. Also ensure any hair or other threads are removed from the brush bar bearing.
Replace your brush bar
Slide the brush bar into your robot and push down until the release button pops up.
Close the brush bar cover and push the lever down to lock the cover in place.
Ensure the brush bar cover is fully aligned along the width of the machine before securing the lever.
Clear the alert
Return the robot to the same point on the floor, press the LCD screen and step away to resume cleaning.
The filter must be completely dry before you put it back into the machine. Your machine could be damaged if used with a damp filter.
Washing your filter
Please follow the steps in the video.
Find the text version of the step-by-step guide instead, under "Has this resolved the problem?"
Has this resolved the problem?
The filter must be completely dry before you put it back into the machine. Your machine could be damaged if used with a damp filter.
Washing your filter
Wash the filter at least once a month to maintain optimum suction power.
The filter unit can be wiped with a damp, lint-free cloth to remove any dirt or dust.
Remove the filter
Click to release the filter unit and it will pop up out of your robot.
Remove the filter from the filter unit and check it for blockages.
Tap the filter
Before washing your filter, tap it gently over a bin to remove any loose dust and debris.
Wash the inside of the filter
Wash with warm, running tap water. Don't use detergent, or wash it in a dishwasher or washing machine.
Place your hand over one end of the filter and fill it with warm tap water.
Place your hand over the open end of the filter and shake it firmly to remove trapped dirt and debris.
Repeat these steps until the water runs clear.
Wash the outside of the filter
Wash with warm, running tap water - gently rubbing your filter with your fingers to remove the dirt.
Repeat until the water runs clear.
Shake out the water
Empty the filter and shake it firmly to remove excess water.
Shake with the filter in both an upward and downward position.
Keep shaking it until there's no water coming from the filter.
Dry the filter
Place your filter on its side and leave to dry for at least 24 hours in a well-ventilated, warm place.
Don't dry the filter in a tumble dryer, microwave or near a naked flame.
Check the filter
The filter unit needs to be fitted correctly before starting a clean.
Return the filter unit, ensuring it clicks into place.
Dry the filter
If the filter was removed and washed, it must be completely dry before being refitted to the machine.
Place your filter on its side and leave to dry for at least 24 hours in a well-ventilated, warm place.
Don't dry the filter in a tumble dryer, microwave or near a naked flame.
Large drop detected
Your robot hasn't been able to navigate away from a drop. It may have become obstructed when trying to navigate away.
Some very dark or reflective surfaces can appear like a drop to your robot's sensors. In this scenario you will be unable to restart the clean without moving your robot away from the drop.
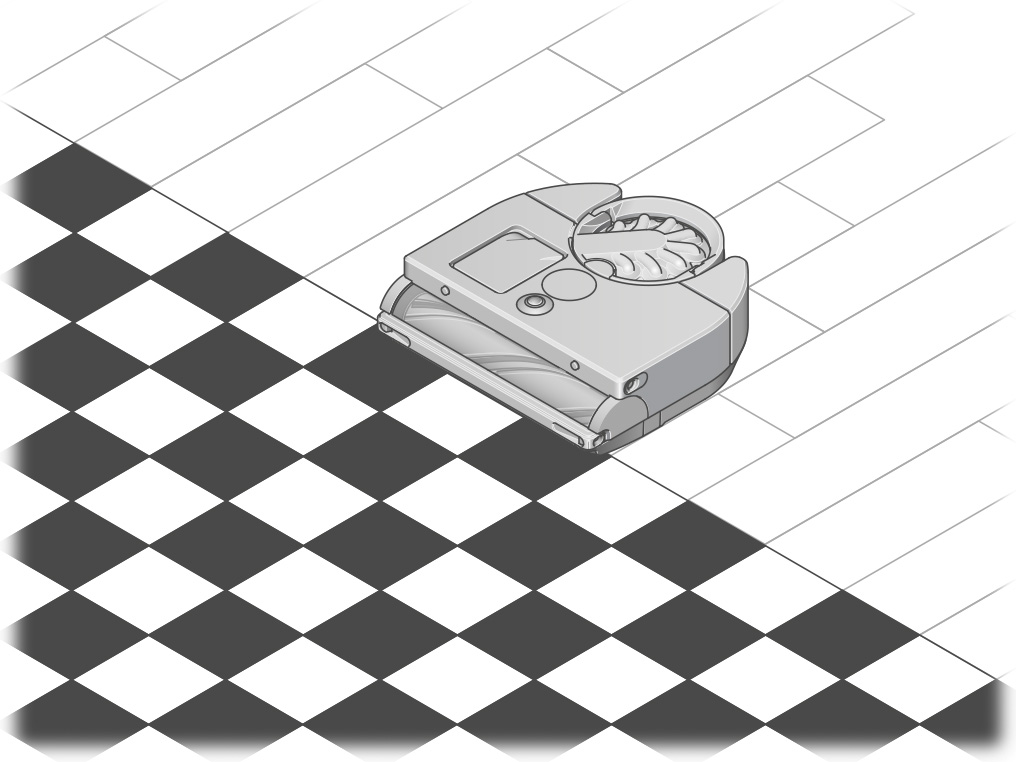
Place your robot away from the drop and somewhere that it has cleaned before, then try to resume the clean by pressing the LCD screen.
Restrictions
If your robot gets stuck in the same place regularly, you can use the MyDyson™ app to add a suitable restriction for that area.
Robot has encountered a problem
Your robot has encountered a problem and cannot complete the clean.
This can be caused by a combination of the robot becoming lost, a change in ambient lighting, the sensors needing to be cleaned or the room not being prepared correctly. Each of which will need to be checked.
The location of the dock may also need to be reconsidered.
Ambient lighting
Your robot will compensate for low light by using its LEDs to selectively illuminate dark areas. It is not designed to operate in complete darkness.
Make sure your robot has adequate illumination to navigate by for the duration of the clean.
It is normal for the LEDs to change in brightness depending on the lighting conditions.
Cleaning the sensors
To maintain optimum performance, keep your camera lens and sensors clean. Use a soft, dry, lint-free cloth to wipe the lens.
Turn your robot over and place it on a soft surface.
Use a soft, dry, lint-free cloth to wipe the optical flow sensor and each drop sensor on the base of your robot. There are seven sensors in total.
Preparing your home
Remove thin rugs or loose objects that your robot may suck up. Tidy small items such as shoe laces or thin cables that your robot won't detect and may get tangled in the brush bar.
Clean any liquid spills or sharp items that could damage your robot.
Dock placement
Your dock should be located against a wall, in a place close to a mains power supply, out of bright sunlight and not obscured under a table or other furniture. It needs at least 50cm of clear space around the front.
You should choose a location close to your Wi-Fi access point to avoid connection issues.
We recommend a location close to the centre of your home, as this can lead to more reliable cleans.
Return your robot to the dock. You can start your next clean as usual.
Auto-update software
Always enable Auto update in your settings menu for the latest software upgrades. This ensures your robot receives important optimisations, bug fixes and features.
Reposition your robot
Your robot has detected movement. If you have lifted or otherwise moved the robot, it will raise this fault.
Your robot uses its drop sensors and accelerometers to detect when it has been moved or lifted. It will turn off its motors and pause the clean when unexpectedly moved.
Auto-update software
Always enable Auto update in your settings menu for the latest software upgrades. This ensures your robot receives important optimisations, bug fixes and features.
Restrictions
If your robot gets stuck in the same place regularly, you can use the MyDyson™ app to add a suitable restriction for that area.
Routine maintenance
Your robot will periodically prompt you to carry out routine maintenance to ensure it continues to perform optimally.
Cleaning the sensors
There may be dirt or debris covering the sensor covers or 360° vision system.
To maintain optimum performance, keep your camera lens and sensors clean. Use a soft, dry, lint-free cloth to wipe the lens.
Check all sensor covers and the navigational camera for dirt, dust, fingerprints and smears.
Do not use cleaning fluids, liquids or sprays of any kind.
Turn your robot over and place it on a soft surface.
Use a soft, dry, lint-free cloth to wipe the optical flow sensor and each drop sensor on the base of your robot. There are seven sensors in total.
To clear the alert, turn your robot off: press and hold the LCD screen until the power menu appears.
Return your robot to the dock. You can start your next clean as usual.
Robot stuck
Check that you robot is able to move freely and has not become boxed in by obstacles. If it is, simply move the robot off or away from the obstacle and place somewhere it has already cleaned nearby.
Press the LCD touchscreen on your robot to resume cleaning.
Restrictions
If your robot gets stuck in the same place regularly, you can use the MyDyson™ app to add a suitable restriction for that area.
You may want to add a "No climb" restriction if your robot is stuck on an obstacle so it avoids climbing in that area. Alternatively, you can add an "Avoid area" restriction to stop your robot from entering that area entirely.
Did you find this helpful?
System errors
If your robot encounters a software problem it can't resolve, a system error fault will be shown on the LCD screen.
You can see your robot's recent fault history in the settings menu on the LCD screen.
Diagnosing a fault code
Select the appropriate code from the options shown to diagnose the fault.
1.-.- includes faults beginning with 1.
3.-.- includes faults beginning with 3.
High temperature
Your robot's internal temperature is too high. This is most likely caused by a blockage in its airways or debris may be wrapped around the brush bar.
Your robot is designed to operate in an ambient temperature between 5°C and 35°C.
Removing a blockage
Press the cyclone release button and remove the cyclone unit.
Check the cyclone unit and inlet for any obstructions. Empty the bin if it is full.
If hair or debris is stuck in the shroud, you can use the release catch to remove the cyclone for easier cleaning. Use a soft brush to clear any hair or debris from the shroud.
Check the airway on the machine where the bin connects for blockages.
Check the filter
Click to release the filter unit and it will pop up out of your robot.
Remove the filter from the filter unit and check it for blockages.
Reinsert the filter into the filter unit and refit to the machine.
Check the brush bar
Turn your robot over and place it on a soft surface.
Lift the red brush bar cover lever on the base of your robot.
Check the airway on the underside of the machine for any blockages.
Press the red brush bar release button and slide the brush bar out of your robot. Remove any debris or objects. Also ensure any hair or other threads are removed from the brush bar bearing.
Replace your brush bar
Slide the brush bar into your robot and push down until the release button pops up.
Close the brush bar cover and push the lever down to lock the cover in place.
Ensure the brush bar cover is fully aligned along the width of the machine before securing the lever.
Return your robot to the dock. You can start your next clean as usual.
Docking failure
Your robot will complete docking when it can detect power on its dock contacts.
Make sure your dock is powered, indicated by the blue light on the back of the dock.
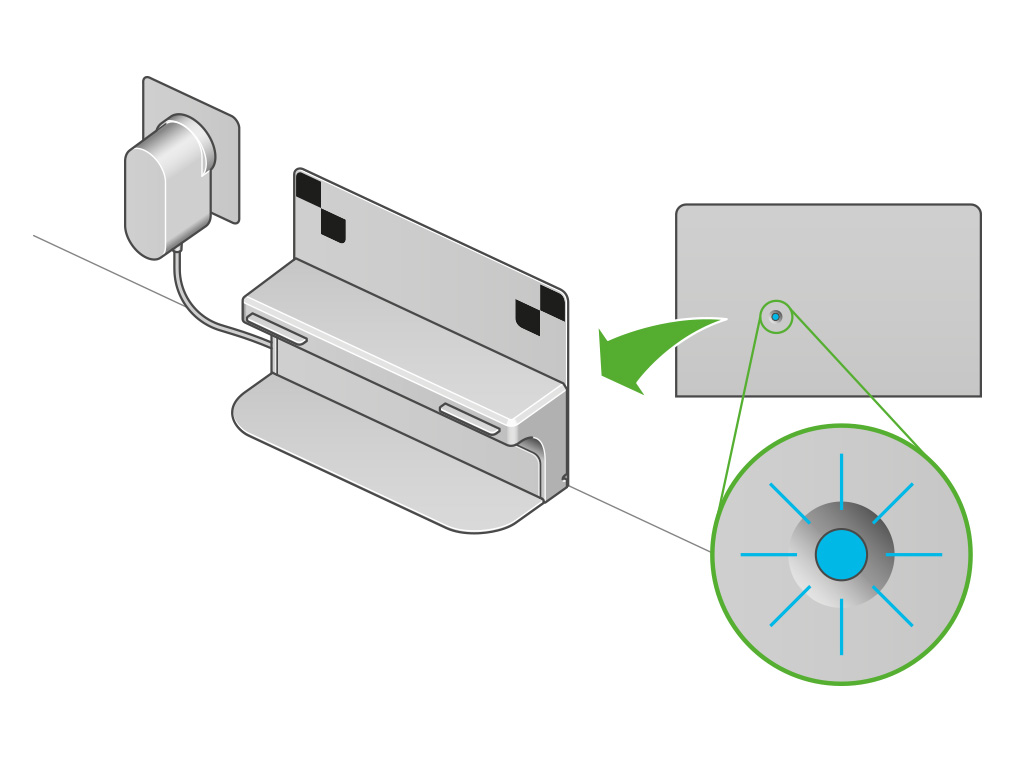
Dock light
The light on the back of the dock will illuminate when there is power. It will switch off when the robot is correctly docked.
To test the power, ensure the robot is undocked.
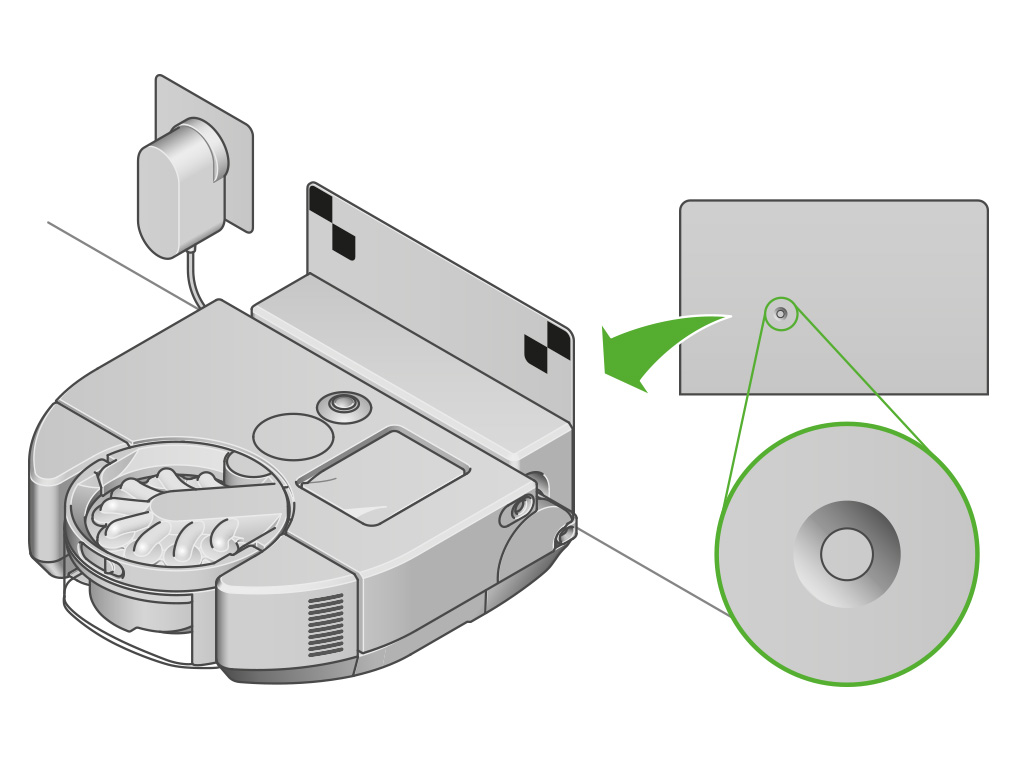
Try to make sure that your robot's dock is located in an open area. Your robot should be able to easily see the targets from all angles in front of the dock.
Ensure there are no obstacles blocking the approach to the dock.
Check the dock
The light on the back of the dock will illuminate when there is power. It will switch off when the robot is correctly docked.
To test the power, ensure the robot is undocked.
Check the dock
Your robot uses its camera to identify and align itself with its docking targets. It should be able to easily see the targets from all angles in front of the dock.
Your dock should be located against a wall, in a place close to a mains power supply, out of bright sunlight and not obscured under a table or other furniture. It needs at least 50cm of clear space around the front.
Cleaning the contacts
Use a soft, dry, lint-free cloth to wipe both metal contacts on the front of the robot and on the dock.
Do not use cleaning fluids, liquids or sprays of any kind.
Place the robot on the dock with the bin facing away from the wall, ensuring the metal contacts are touching.
The LCD touchscreen should indicate that your robot is charging.
Check the power supply
Ensure that the power supply is securely plugged into the wall socket and that the cable is firmly pushed into the socket on the dock.
If the light on the dock is still not illuminated, test the power supply in a different wall socket.
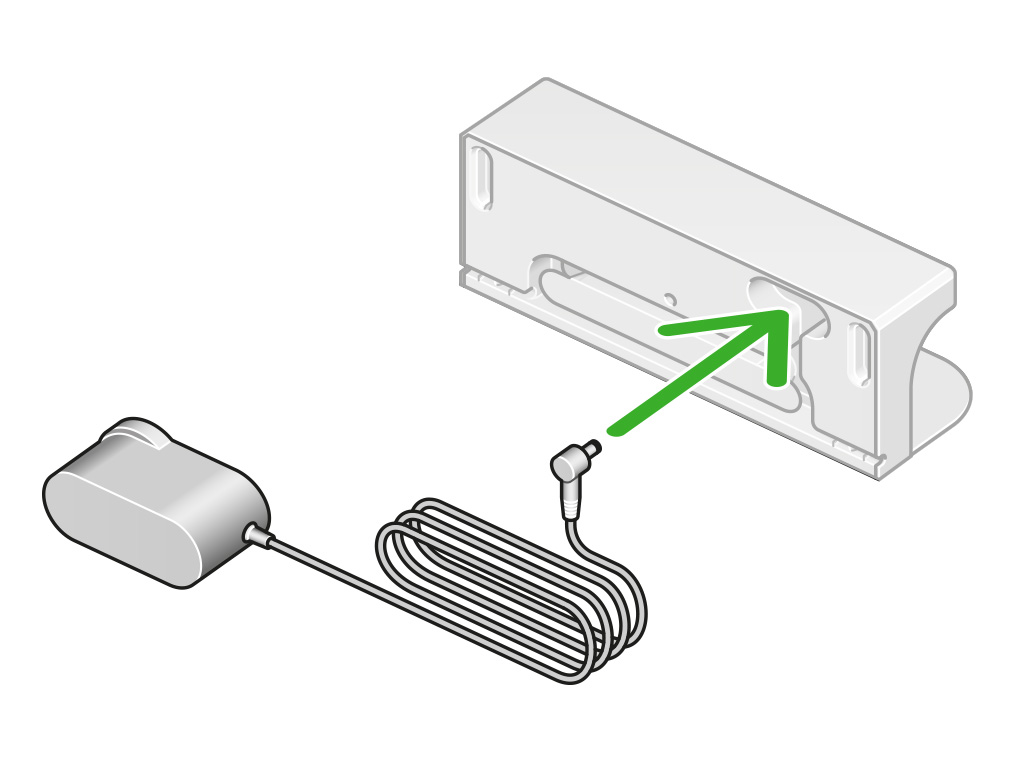
Cleaning the contacts
Use a soft, dry, lint-free cloth to wipe both metal contacts on the front of the robot and on the dock.
Do not use cleaning fluids, liquids or sprays of any kind.
Dock your robot
Place your robot on the dock, the blue LED light on the back of the dock will turn off. Your robot will initialise and the LCD screen will light up.
Unable to return to dock
Your robot believes it knows where it is but is unable to find an unobstructed path back to its dock. It may have become boxed in, a door may have closed, or an obstacle might have been placed in its path.
For future cleans, ensure there is a clear path back to the dock from all areas of your home or selected zones.
Try to make sure that your robot's dock is located in an open area. Your robot should be able to easily see the targets from all angles in front of the dock.
Ensure there are no obstacles blocking the approach to the dock.
Cleaning the sensors
There may be dirt or debris covering the sensor covers or 360° vision system.
To maintain optimum performance, keep your camera lens and sensors clean. Use a soft, dry, lint-free cloth to wipe the sensors and camera lens.
Check all sensor covers and the navigational camera for dirt, dust, fingerprints and smears.
Do not use cleaning fluids, liquids or sprays of any kind.
Turn your robot over and place it on a soft surface.
Use a soft, dry, lint-free cloth to wipe the optical flow sensor and each drop sensor on the base of your robot. There are seven sensors in total.
Return your robot to the dock. You can start your next clean as usual.
Check for obstacles
Check that you robot is able to move freely and has not become boxed in by obstacles. If it is, simply move the robot off or away from the obstacle and place somewhere it has already cleaned nearby.
Check the wheels
If your robot is not stuck due to obstacles, the wheels will need to be checked for obstructions.
Turn your robot over and place it on a soft surface.
Check the wheels and remove any hair, dirt or debris by hand. Ensure the wheel rotates freely and the suspension is free to compress without obstruction.
Clear the alert
Return the robot to the same point on the floor, press the LCD screen and step away to resume cleaning.
If your robot's wheels regularly get stuck in the same place, we'd recommend adding a restriction so your robot avoids that area.
Has this resolved the problem?
Cleaning the sensors
There may be dirt or debris covering the drop sensor covers on your robot.
To maintain optimum performance, keep your camera lens and sensors clean. Use a soft, dry, lint-free cloth to wipe the sensors and camera lens.
Check all sensor covers and the navigational camera for dirt, dust, fingerprints and smears.
Do not use cleaning fluids, liquids or sprays of any kind.
Turn your robot over and place it on a soft surface.
Use a soft, dry, lint-free cloth to wipe the optical flow sensor and each drop sensor on the base of your robot. There are seven sensors in total.
To clear the alert, turn your robot off: press and hold the LCD screen until the power menu appears.
Return your robot to the dock. You can start your next clean as usual.
Has this resolved the problem?
Low temperature
Your robot's internal temperature is too low.
Adjust the temperature of your room and allow the robot to reach its minimum operating temperature.
Your robot is designed to operate in an ambient temperature between 5°C and 35°C.
Exchange required
This can be resolved by arranging an exchange.
If your robot is still cleaning and hasn't alerted you on the MyDyson™ app or the LCD touchscreen, we recommend leaving it to finish the clean. The robot may appear to be lost but is likely to be navigating correctly.
Failed to return
If your robot encounters a problem during the clean and is unable to continue it will display an alert.
If your robot does not display any alert, it is likely that your robot was unable to return to dock to recharge and has shut down when its battery became low.

Ambient lighting
Your robot will compensate for low light by using its LEDs to selectively illuminate dark areas. It is not designed to operate in complete darkness.
Make sure your robot has adequate illumination to navigate by for the duration of the clean.
It is normal for the LEDs to change in brightness depending on the lighting conditions.
Cleaning the sensors
To maintain optimum performance, keep your camera lens and sensors clean. Use a soft, dry, lint-free cloth to wipe the sensors and camera lens.
Preparing your home
Remove thin rugs or loose objects that your robot may suck up. Tidy small items such as shoe laces or thin cables that your robot won't detect and may get tangled in the brush bar.
Clean any liquid spills or sharp items that could damage your robot.
Dock placement
Your dock should be located against a wall, in a place close to a mains power supply, out of bright sunlight and not obscured under a table or other furniture. It needs at least 50cm of clear space around the front.
You should choose a location close to your Wi-Fi access point to avoid connection issues.
We recommend a location close to the centre of your home, as this can lead to more reliable cleans.
Auto-update software
Always enable Auto update in your settings menu for the latest software upgrades. This ensures your robot receives important optimisations, bug fixes and features.
Please select the appropriate option
Which alert is showing on the LCD screen?
Docking failure
Your robot will complete docking when it can detect power on its dock contacts.
Make sure your dock is powered, indicated by the blue light on the back of the dock.
Dock light
The light on the back of the dock will illuminate when there is power. It will switch off when the robot is correctly docked.
To test the power, ensure the robot is undocked.
Try to make sure that your robot's dock is located in an open area. Your robot should be able to easily see the targets from all angles in front of the dock.
Normal behaviour
If your robot is still cleaning and hasn't alerted you on the MyDyson™ app or the LCD touchscreen, we recommend leaving it to finish the clean. The robot may appear to be lost but is likely to be navigating correctly.
If your robot is cleaning zones you have not specified, if it is not following restrictions you have created or if it is moving strangely during the clean, such as driving randomly or rotating on the spot, we recommend relocating your robot.
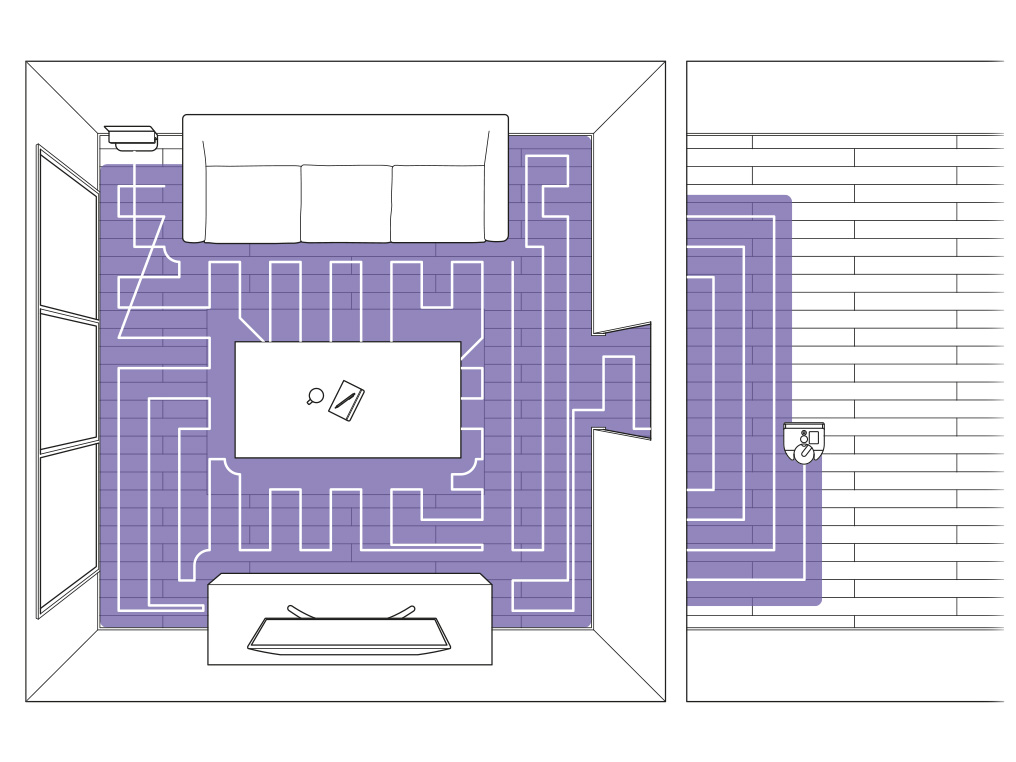
Reposition your robot
Pause the clean using the LCD touchscreen and move your robot to its start location or slightly in front of its dock. Then press the screen to resume.
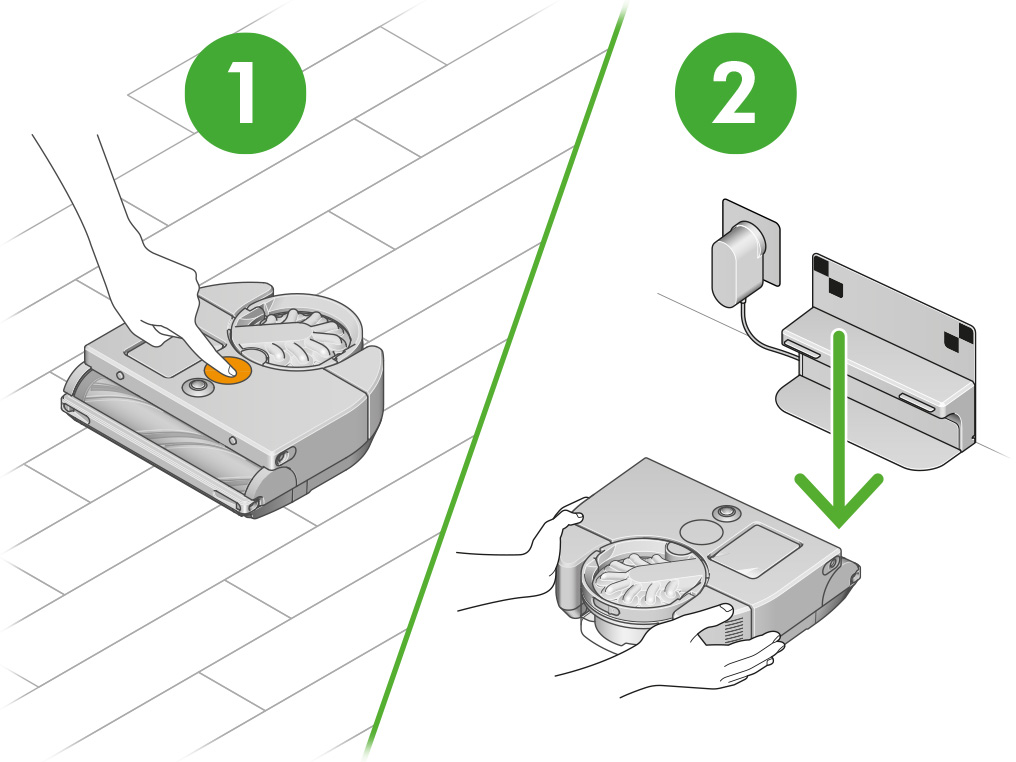
When your robot loses sight of features, it can keep track of its motion for short periods using its wheels and an accelerometer.
Try to make sure that access to new areas does not require the robot to spend long periods under low furniture or in featureless areas, such as long corridors.
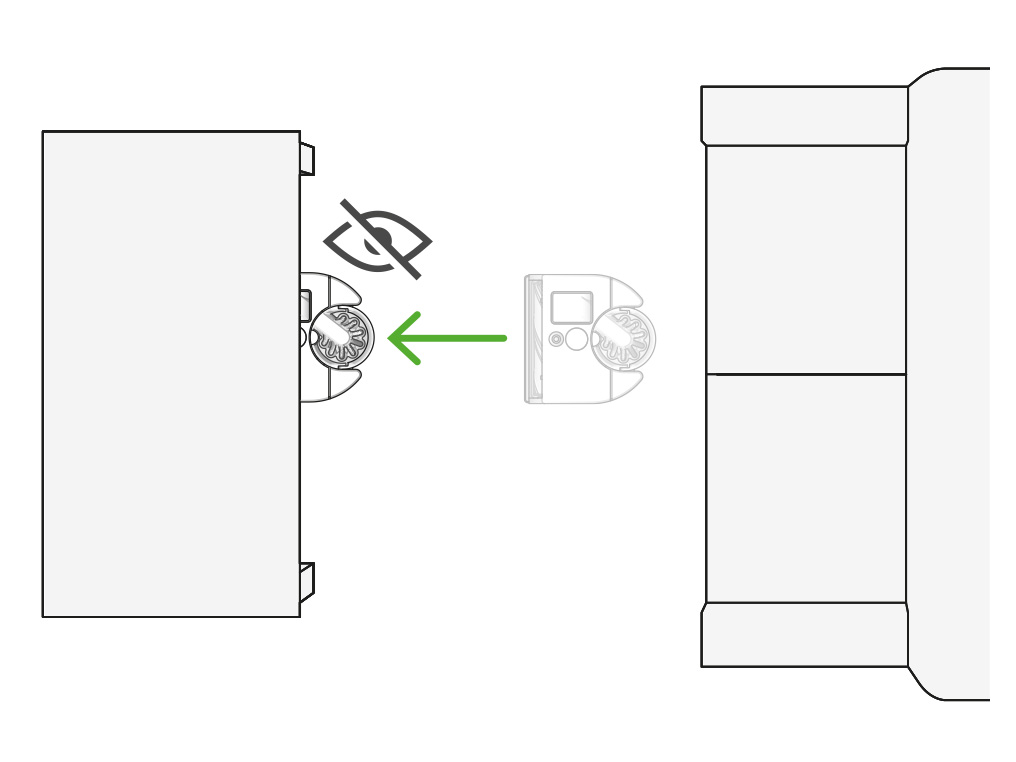
Auto-update software
Always enable Auto update in your settings menu for the latest software upgrades. This ensures your robot receives important optimisations, bug fixes and features.
Did you find this helpful?
Alerts
If your robot encounters a problem during the clean and is unable to continue it will display an alert.
If your robot does not display any alert, it is likely that your robot was unable to return to dock to recharge and has shut down when its battery became low.
Which alert is showing on the LCD screen?
Robot is lost
If your robot gets lost or stuck in the same area repeatedly, ensure there is adequate lighting throughout, the robot's sensors are clean and that the room is prepared before the start of the clean.
The location of the dock may also need to be reconsidered.
Ambient lighting
Your robot will compensate for low light by using its LEDs to selectively illuminate dark areas. It is not designed to operate in complete darkness.
Make sure your robot has adequate illumination to navigate by for the duration of the clean.
It is normal for the LEDs to change in brightness depending on the lighting conditions.
Cleaning the sensors
To maintain optimum performance, keep your camera lens and sensors clean. Use a soft, dry, lint-free cloth to wipe the lens.
Turn your robot over and place it on a soft surface.
Use a soft, dry, lint-free cloth to wipe the optical flow sensor and each drop sensor on the base of your robot. There are seven sensors in total.
Preparing your home
Remove thin rugs or loose objects that your robot may suck up. Tidy small items such as shoe laces or thin cables that your robot won't detect and may get tangled in the brush bar.
Clean any liquid spills or sharp items that could damage your robot.
Dock placement
Your dock should be located against a wall, in a place close to a mains power supply, out of bright sunlight and not obscured under a table or other furniture. It needs at least 50cm of clear space around the front.
You should choose a location close to your Wi-Fi access point to avoid connection issues.
We recommend a location close to the centre of your home, as this can lead to more reliable cleans.
Robot stuck
Check that you robot is able to move freely and has not become boxed in by obstacles. If it is, simply move the robot off or away from the obstacle and place somewhere it has already cleaned nearby.
Press the LCD touchscreen on your robot to resume cleaning.
Preparing your home
Your floorspace should be clear of any potential obstacles before starting a clean.
Remove thin rugs or loose objects that your robot may suck up. Tidy small items such as shoe laces or thin cables that your robot won't detect and may get tangled in the brush bar.
Clean any liquid spills or sharp items that could damage your robot.
Restrictions
If your robot gets stuck in the same place regularly, you can use the MyDyson™ app to add a suitable restriction for that area.
You may want to add a "No climb" restriction if your robot is stuck on an obstacle so it avoids climbing in that area. Alternatively, you can add an "Avoid area" restriction to stop your robot from entering that area entirely.
Your robot may not be able to navigate through gaps smaller than one and a half times its own width. This is so your robot can turn around in the gap if it has to.
If your robot gets stuck in narrow gaps during mapping, we recommend physically blocking off areas so the robot can complete the mapping process.
Auto-update software
Always enable Auto update in your settings menu for the latest software upgrades. This ensures your robot receives important optimisations, bug fixes and features.
Did you find this helpful?
Please select the appropriate option
Adjust restrictions
If your robot is ignoring restrictions you have set, we would advise increasing the size of the restriction area so your robot adheres to it more reliably.
Cleaning the sensors
We would also recommend maintaining your robot's sensors to ensure it can determine its location and navigate more reliably.
To maintain optimum performance, keep your camera lens and sensors clean. Use a soft, dry, lint-free cloth to wipe the sensors and camera lens.
Check all sensor covers and the navigational camera for dirt, dust, fingerprints and smears.
Do not use cleaning fluids, liquids or sprays of any kind.
Turn your robot over and place it on a soft surface.
Use a soft, dry, lint-free cloth to wipe the optical flow sensor and each drop sensor on the base of your robot. There are seven sensors in total.
Location or environment change
Areas that are no longer appearing on the map or have been newly discovered will not have a power mode set against them.
If the dock has recently been moved or a change in layout has occurred within the home, your robot will need to remap the space.
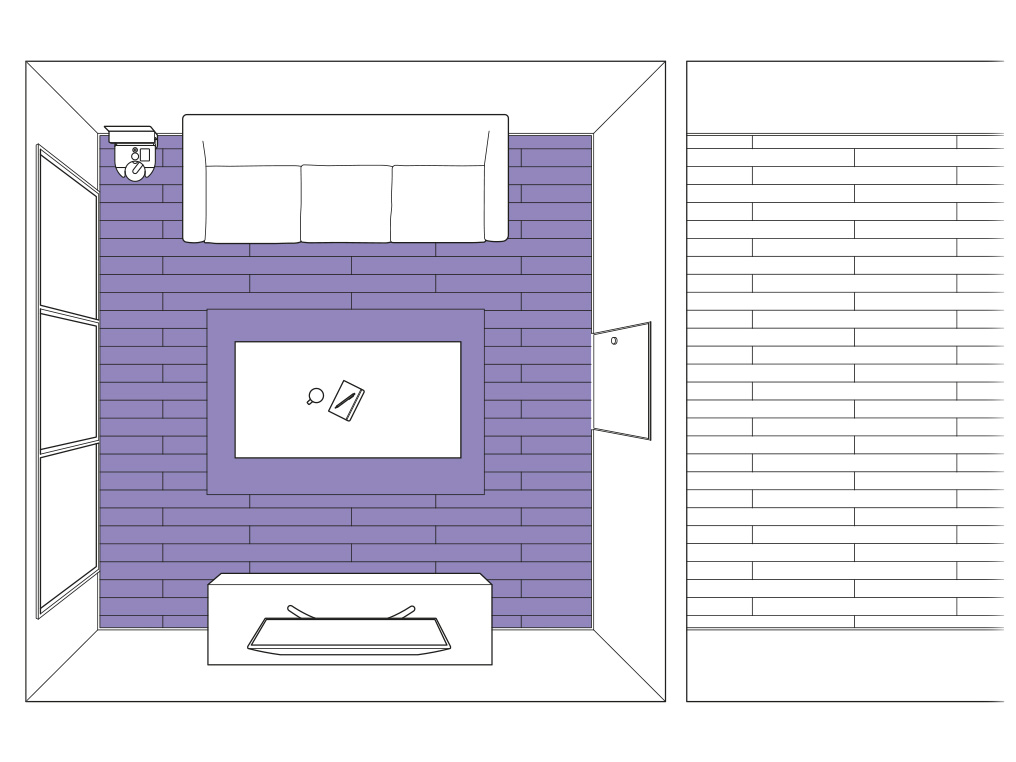
Navigation
If the robot was unable to access a certain area, it will not appear on the map. So that the robot can map the whole home, please ensure there is a clear path for it to navigate.
Tidy up any loose objects from the floor and ensure all internal doors are open while your robot is active.

New area
The robot may have discovered a new or previously blocked area which has yet to be zoned. Existing and new un-zoned maps should be removed.
Auto-update software
Always enable Auto update in your settings menu for the latest software upgrades. This ensures your robot receives important optimisations, bug fixes and features.
Map generation
Your robot will map in Quick mode, with the brush bar and suction turned off to maximise the speed of mapping. For your robot to generate a map successfully, it must return to the dock on its own.
For larger homes, your robot may need to return to the dock to recharge before completing the mapping process.
Errors during mapping
Your robot needs a complete and accurate map of your home, so if there are any problems during mapping, it's better to start again.
Prepare to map your home
Before mapping, it's a good idea to tidy up any loose objects from the floor, open internal doors and remove any items that may be moved between cleans. Place your robot on the dock and you can start mapping.
Ensure that there is a clear path for your robot to navigate, so that it can map your whole home.
Auto-update software
Always enable Auto update in your settings menu for the latest software upgrades. This ensures your robot receives important optimisations, bug fixes and features.
Missing areas
Your robot requires adequate lighting, clean sensors and a prepared floor space to ensure it is able to navigate correctly. We would advise checking each of these to ensure your robot does not miss areas while cleaning.
Your robot is able to climb changes in height of up to 2cm.
Ambient lighting
Your robot will compensate for low light by using its LEDs to selectively illuminate dark areas. It is not designed to operate in complete darkness.
Make sure your robot has adequate illumination to navigate by for the duration of the clean.
It is normal for the LEDs to change in brightness depending on the lighting conditions.
Cleaning the sensors
To maintain optimum performance, keep your camera lens and sensors clean. Use a soft, dry, lint-free cloth to wipe the lens.
Turn your robot over and place it on a soft surface.
Use a soft, dry, lint-free cloth to wipe the optical flow sensor and each drop sensor on the base of your robot. There are seven sensors in total.
Preparing your home
Remove thin rugs or loose objects that your robot may suck up. Tidy small items such as shoe laces or thin cables that your robot won't detect and may get tangled in the brush bar.
Clean any liquid spills or sharp items that could damage your robot.
Navigation
If the robot was unable to access a certain area, it will not appear on the map. So that the robot can map the whole home, please ensure there is a clear path for it to navigate.
Tidy up any loose objects from the floor and ensure all internal doors are open while your robot is active.
Cleaning modes
When cleaning in Quick mode, your robot will not use the edge cleaner and will only clean using the Brush bar.
If your robot is cleaning in Auto mode, it will use the edge cleaner after cleaning the main floorspace.
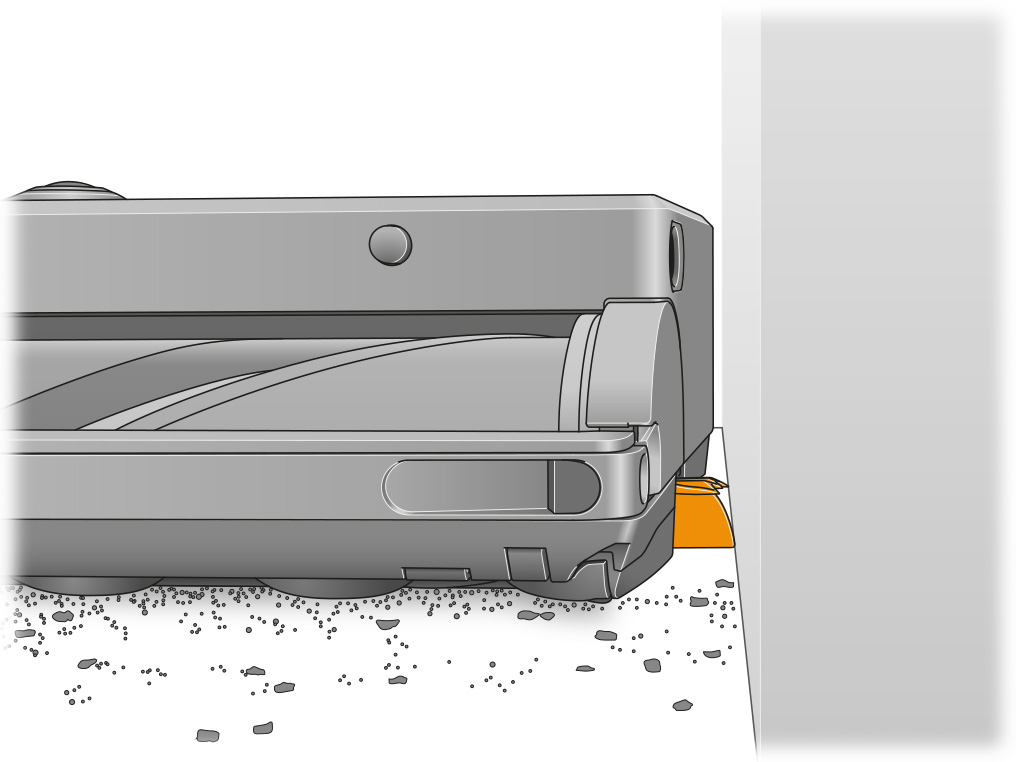
Charging mid-clean
When cleaning a large area, the robot may return to the dock to recharge mid-clean before heading out to continue cleaning. This is normal behaviour.
Auto-update software
Always enable Auto update in your settings menu for the latest software upgrades. This ensures your robot receives important optimisations, bug fixes and features.
Customising cleans
When starting a clean from the app, make sure you are selecting all the zones you want your robot to clean.
You can't change the order of zones, the robot is likely to do the nearest zone first.
Restrictions
If you have set up any restrictions for your robot map, ensure they do not cut off areas you want your robot to clean.
Location or environment change
Areas that are no longer appearing on the map or have been newly discovered will not have a power mode set against them.
If the dock has recently been moved or a change in layout has occurred within the home, your robot will need to remap the space.
Navigation
If the robot was unable to access a certain area, it will not appear on the map. So that the robot can map the whole home, please ensure there is a clear path for it to navigate.
Tidy up any loose objects from the floor and ensure all internal doors are open while your robot is active.
New area
The robot may have discovered a new or previously blocked area which has yet to be zoned. Existing and new un-zoned maps should be removed.
Auto-update software
Always enable Auto update in your settings menu for the latest software upgrades. This ensures your robot receives important optimisations, bug fixes and features.
Please select the appropriate option
Damp or musty
A damp or musty smell is caused when dust in the cyclone has come into contact with water.
It may not be a direct contact with water, for example when vacuuming pet hair that is slightly damp, this moisture will combine with the dust in the cyclone causing the smell.
Additionally the smell may occur if the filter goes back into the machine wet.
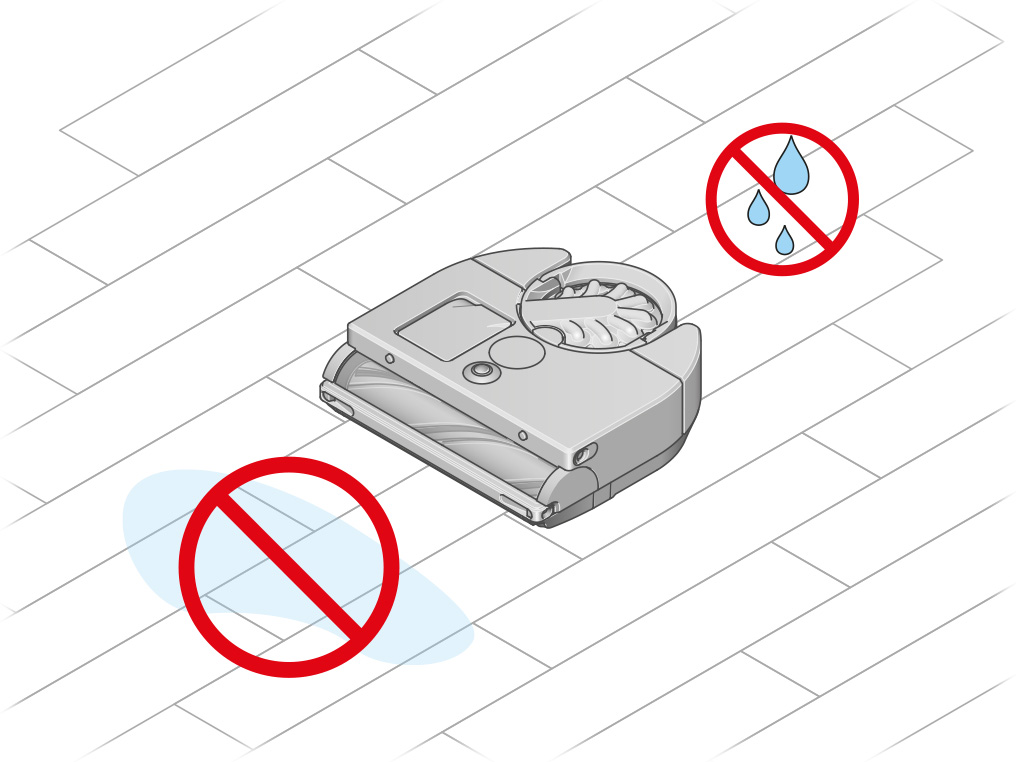
Only the filter and Brush bar can be washed, the bin can be cleaned with a damp cloth only. All parts must be completely dry before being refitted to the machine.
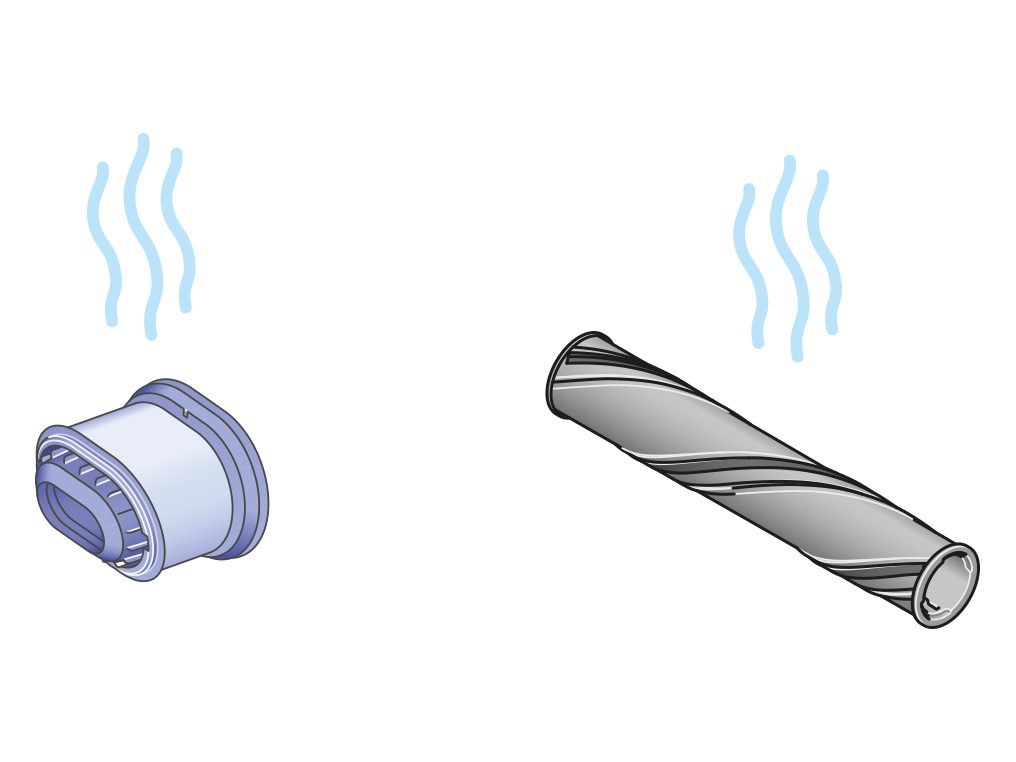
Carry out checks
Under normal use, any unpleasant smell can only be caused by something the machine has picked up. We would advise checking the machine for blockages and washing the filters.
If you are able to identify which part of the machine the smell is coming from, replacing this part may resolve the issue.
Please select the appropriate option
Please follow the steps in the video.
Find the text version of the step-by-step guide instead, under "Has this resolved the problem?"
Has this resolved the problem?
Removing a blockage
Press the cyclone release button and remove the cyclone unit.
Check the cyclone unit and inlet for any obstructions. Empty the bin if it is full.
If hair or debris is stuck in the shroud, you can use the release catch to remove the cyclone for easier cleaning. Use a soft brush to clear any hair or debris from the shroud.
Check the filter
Click to release the filter unit and it will pop up out of your robot.
Remove the filter from the filter unit and check it for blockages.
Reinsert the filter into the filter unit and refit to the machine.
Check the brush bar
Turn your robot over and place it on a soft surface.
Lift the red brush bar cover lever on the base of your robot.
Press the red brush bar release button and slide the brush bar out of your robot. Remove any debris or objects. Also ensure any hair or other threads are removed from the brush bar bearing.
Replace your brush bar
Slide the brush bar into your robot and push down until the release button pops up.
Close the brush bar cover and push the lever down to lock the cover in place.
Ensure the brush bar cover is fully aligned along the width of the machine before securing the lever.
Test the machine
Return the robot to the same point on the floor, press the LCD screen and step away to resume cleaning.
If your robot was not cleaning already, start a clean and check the issue has been resolved.
The filter must be completely dry before you put it back into the machine. Your machine could be damaged if used with a damp filter.
Please follow the steps in the video.
Find the text version of the step-by-step guide instead, under "Has this resolved the problem?"
Has this resolved the problem?
Washing your filter
Wash the filter at least once a month to maintain optimum suction power.
The filter unit can be wiped with a damp, lint-free cloth to remove any dirt or dust.
Remove the filter
Click to release the filter unit and it will pop up out of your robot.
Remove the filter from the filter unit and check it for blockages.
Tap the filter
Before washing your filter, tap it gently over a bin to remove any loose dust and debris.
Wash the inside of the filter
Wash with warm, running tap water. Don't use detergent, or wash it in a dishwasher or washing machine.
Place your hand over one end of the filter and fill it with warm tap water.
Place your hand over the open end of the filter and shake it firmly to remove trapped dirt and debris.
Repeat these steps until the water runs clear.
Wash the outside of the filter
Wash with warm, running tap water - gently rubbing your filter with your fingers to remove the dirt.
Repeat until the water runs clear.
Shake out the water
Empty the filter and shake it firmly to remove excess water.
Shake with the filter in both an upward and downward position.
Keep shaking it until there's no water coming from the filter.
Dry the filter
Place your filter on its side and leave to dry for at least 24 hours in a well-ventilated, warm place.
Don't dry the filter in a tumble dryer, microwave or near a naked flame.
Carry out checks
Under normal use, any unpleasant smell can only be caused by something the machine has picked up. We would advise checking the machine for blockages and washing the filters.
If you are able to identify which part of the machine the smell is coming from, replacing this part may resolve the issue.
Please select the appropriate option
Power modes
The noise of the motor can vary depending on which power mode is active.
If your robot is moving between zones, the motor pitch may change if the zone has been configured with a different power mode.
Auto mode
Auto mode continuously analyses dust levels during the clean and automatically optimises suction power.
The noise of the motor will vary as your robot alternates between power modes.
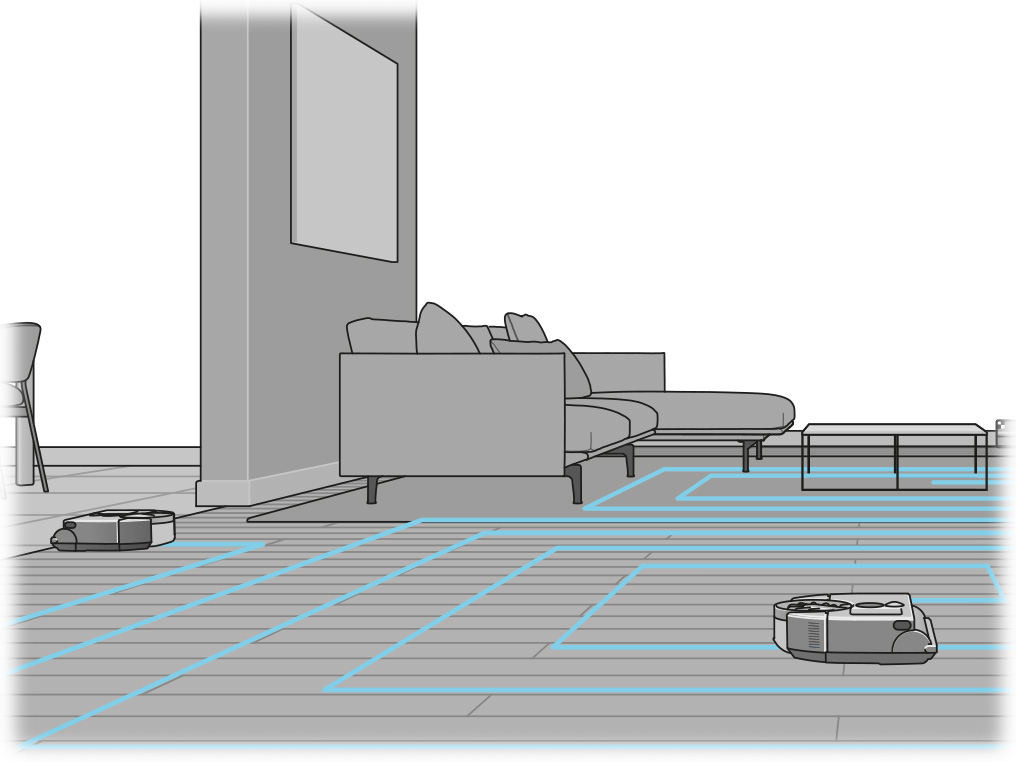
Check the airway
A rattling noise can indicate that there is something stuck in the machine.
Debris caught in the brush bar or the machine's airways could interfere with the piezo sensor readings.
We would suggest carrying out the following checks.
Removing a blockage
Press the cyclone pack release button on the top of your robot and lift your bin away. Use the handle to carry your bin.
Check the cyclone unit and inlet for any obstructions. Empty the bin if it is full.
If hair or debris is stuck in the shroud, you can use the release catch to remove the cyclone for easier cleaning. Use a soft brush to clear any hair or debris from the shroud.
Check the airway on the machine where the bin connects for blockages.
Check the filter
Click to release the filter unit and it will pop up out of your robot.
Remove the filter from the filter unit and check it for blockages.
Reinsert the filter into the filter unit and refit to the machine.
Check the brush bar
Turn your robot over and place it on a soft surface.
Lift the red brush bar cover lever on the base of your robot.
Check the airway on the underside of the machine for any blockages.
Press the red brush bar release button and slide the brush bar out of your robot. Remove any debris or objects. Also ensure any hair or other threads are removed from the brush bar bearing.
Replace your brush bar
Slide the brush bar into your robot and push down until the release button pops up.
Close the brush bar cover and push the lever down to lock the cover in place.
Ensure the brush bar cover is fully aligned along the width of the machine before securing the lever.
Check the wheels
Check the wheels and remove any hair, dirt or debris by hand. Ensure the wheel rotates freely and the suspension is free to compress without obstruction.
Robot wheels
Your robot has rubber moulded wheels for extra grip. These may produce a squeaking noise when moving on hard floors.
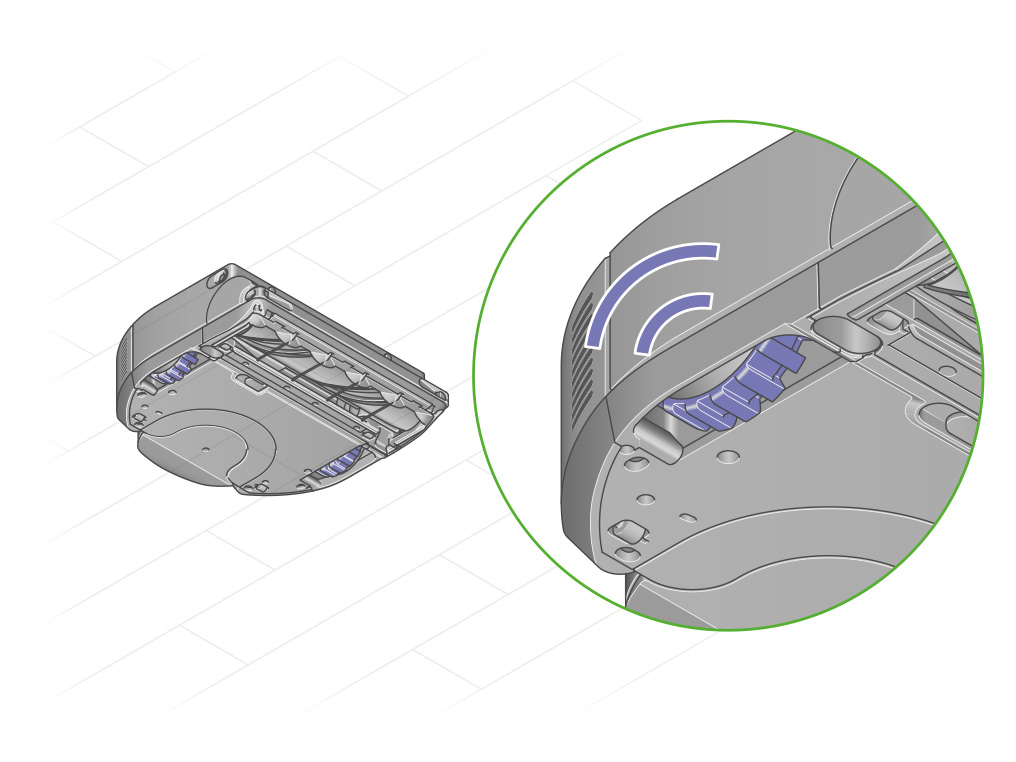
Check the brush bar
If the noise isn't being produced by the wheels, the Brush bar may need to be checked.
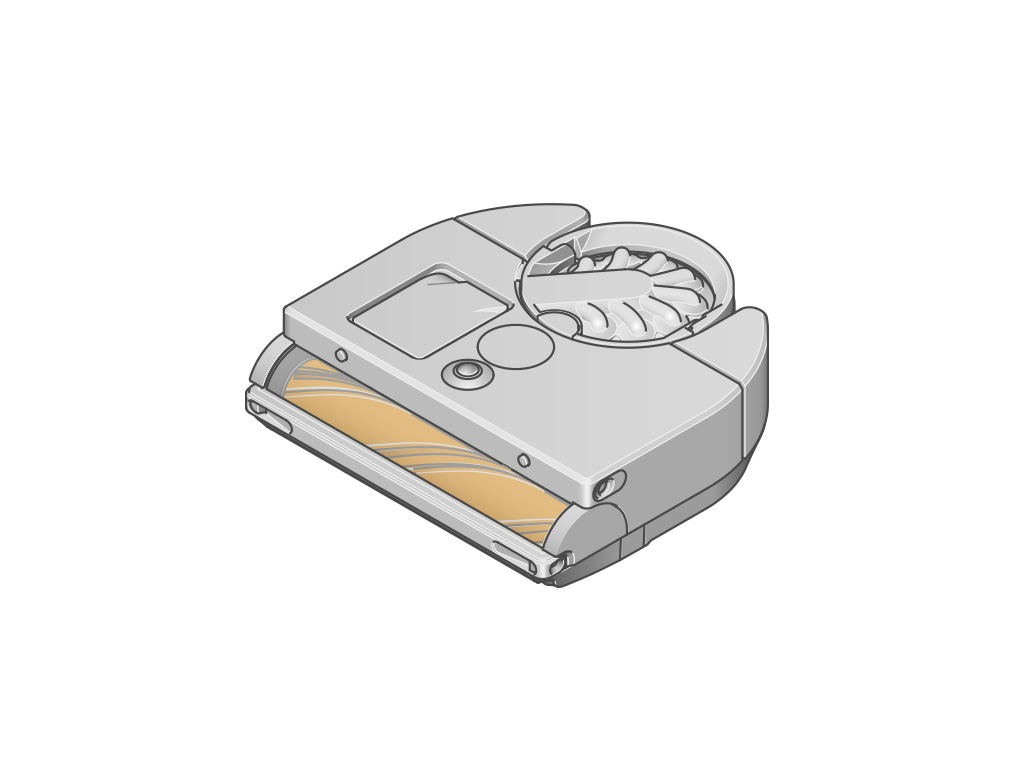
Turn your robot over and place it on a soft surface.
Lift the red brush bar cover lever on the base of your robot.
Press the red brush bar release button and slide the brush bar out of your robot. Remove any debris or objects. Also ensure any hair or other threads are removed from the brush bar bearing.
Replace your brush bar
Slide the brush bar into your robot and push down until the release button pops up.
Close the brush bar cover and push the lever down to lock the cover in place.
Ensure the brush bar cover is fully aligned along the width of the machine before securing the lever.
Clear the alert
Return the robot to the same point on the floor, press the LCD screen and step away to resume cleaning.
Quiet mode
If your robot is too noisy, we would recommend using Quiet mode for when you are in the area.
Using the MyDyson™ app, you can also direct your robot to clean zones you are not occupying, or schedule your robot's cleans for when you are not at home.
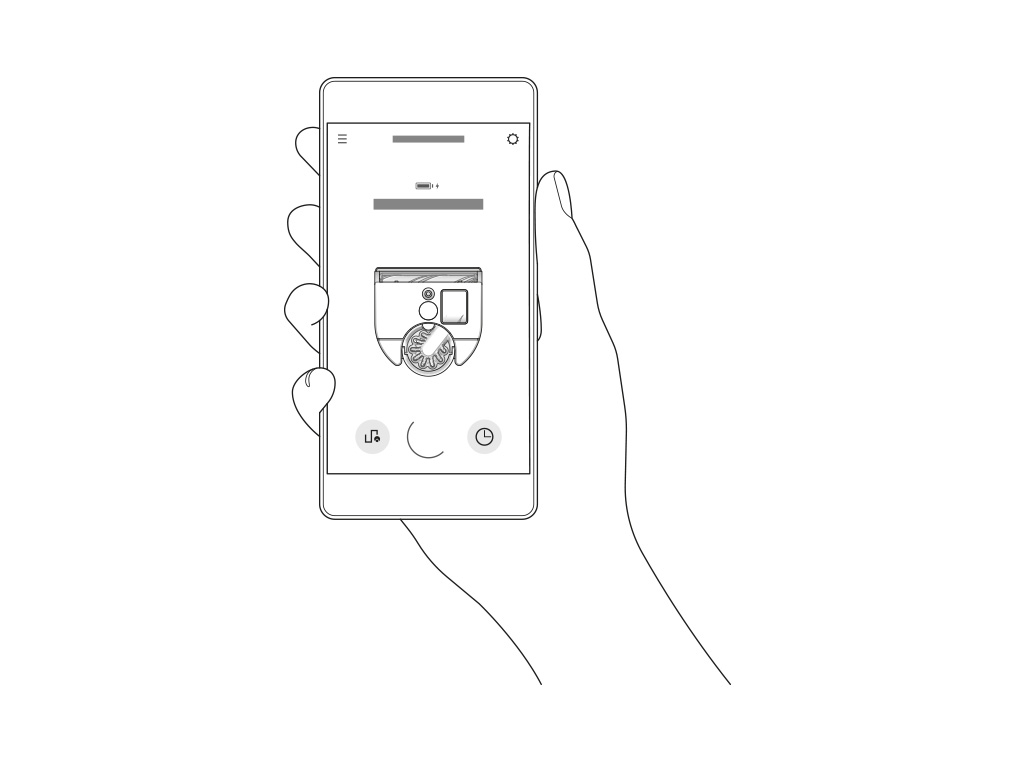
Cooling fan
Your robot has an internal cooling fan for its processor. The fan will operate when the machine is not in standby.
If your robot is fully charged or off the dock, your robot will go into standby after 5 minutes of inactivity. Your robot will not go into standby if it has stopped during a clean.
Please select the appropriate option
Power modes
If your robot is not performing as expected, you may need to adjust its power mode to get the best results for your floor type.
You can configure power modes using the MyDyson™ app or by selecting a power mode on the LCD touchscreen.

If you have mapped and zoned your home, you can assign power modes to each zone.
Boost mode
Boosts suction to clean ground-in dirt and pet hair. Extra power with less run time.
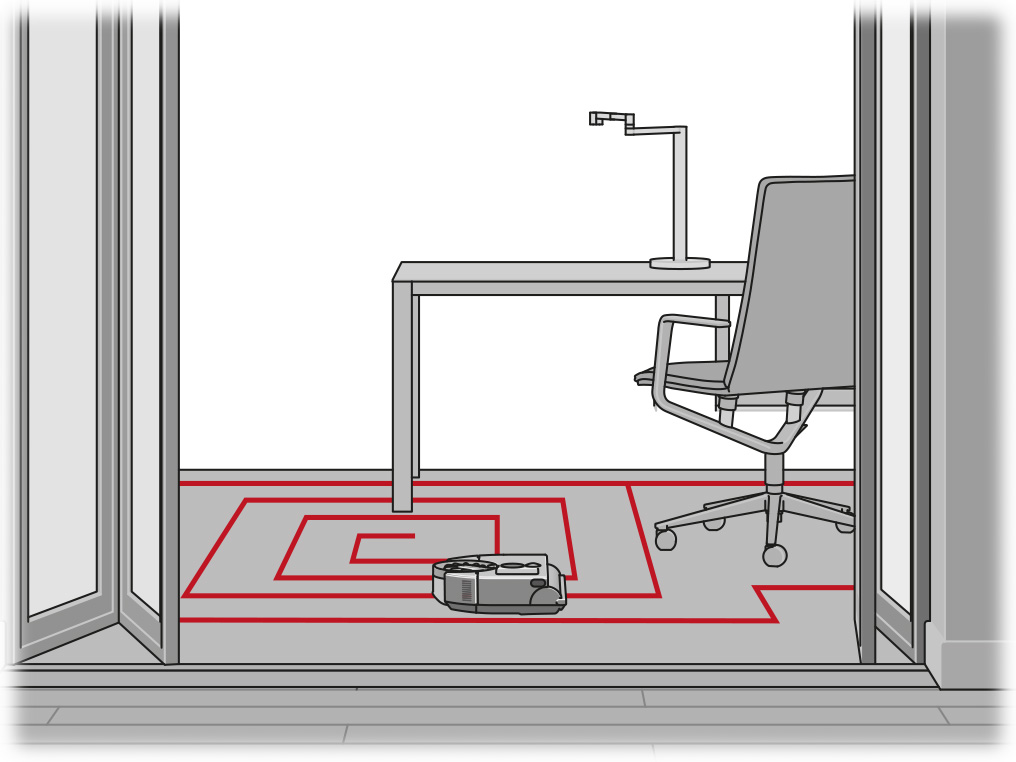
Auto mode
Analyses dust levels, automatically optimising suction power.
Quick mode
Optimises speed to stay on top of everyday cleans in open areas. Your robot won't deep clean edges and corners.
In Quick mode your robot won't concentrate on edges and corners.
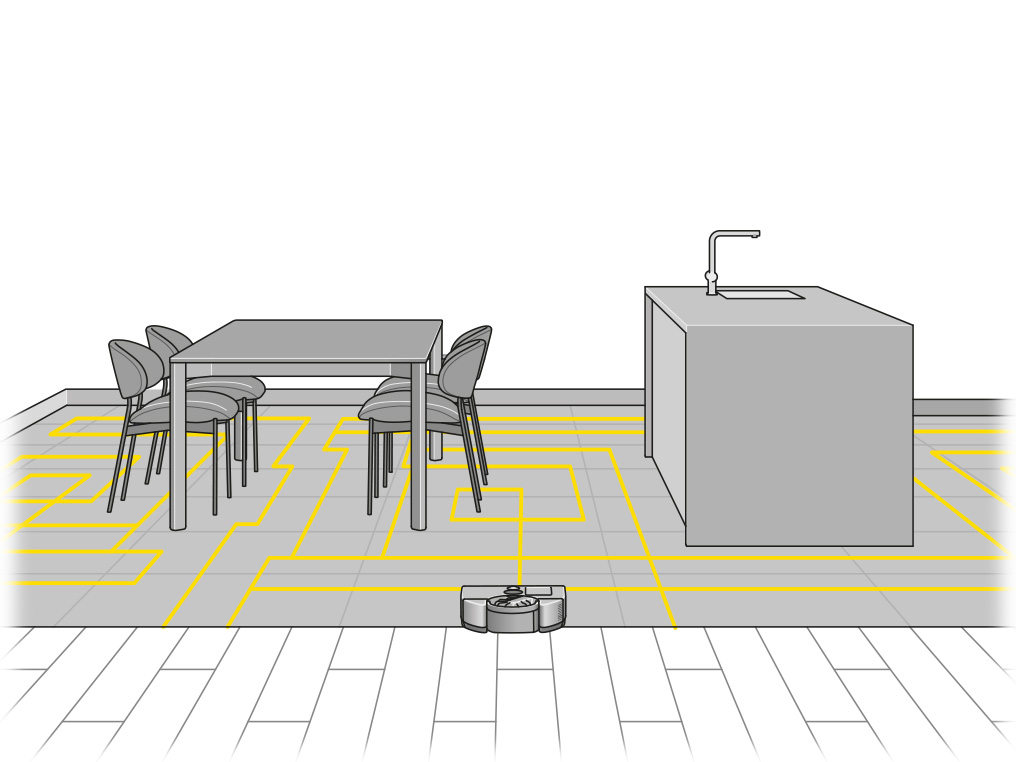
Quiet mode
Reduces noise for peaceful areas - and longer run time.

Airway checks
Please follow the steps in the video.
Find the text version of the step-by-step guide instead, under "Has this resolved the problem?"
Has this resolved the problem?
Removing a blockage
Press the cyclone release button and remove the cyclone unit.
Check the cyclone unit and inlet for any obstructions. Empty the bin if it is full.
If hair or debris is stuck in the shroud, you can use the release catch to remove the cyclone for easier cleaning. Use a soft brush to clear any hair or debris from the shroud.
Check the filter
Click to release the filter unit and it will pop up out of your robot.
Remove the filter from the filter unit and check it for blockages.
Reinsert the filter into the filter unit and refit to the machine.
Check the brush bar
Turn your robot over and place it on a soft surface.
Lift the red brush bar cover lever on the base of your robot.
Press the red brush bar release button and slide the brush bar out of your robot. Remove any debris or objects. Also ensure any hair or other threads are removed from the brush bar bearing.
Replace your brush bar
Slide the brush bar into your robot and push down until the release button pops up.
Close the brush bar cover and push the lever down to lock the cover in place.
Ensure the brush bar cover is fully aligned along the width of the machine before securing the lever.
Test the machine
Return the robot to the same point on the floor, press the LCD screen and step away to resume cleaning.
If your robot was not cleaning already, start a clean and check the issue has been resolved.
Removing a blockage
If your robot prompts you to wash the filter often, there is likely a blockage in the airways causing a restriction of airflow. We advise carrying out blockage checks to resolve this.
Please follow the steps in the video.
Find the text version of the step-by-step guide instead, under "Has this resolved the problem?"
Has this resolved the problem?
Removing a blockage
Press the cyclone release button and remove the cyclone unit.
Check the cyclone unit and inlet for any obstructions. Empty the bin if it is full.
If hair or debris is stuck in the shroud, you can use the release catch to remove the cyclone for easier cleaning. Use a soft brush to clear any hair or debris from the shroud.
Check the airway on the machine where the bin connects for blockages.
Check the filter
Click to release the filter unit and it will pop up out of your robot.
Remove the filter from the filter unit and check it for blockages.
Reinsert the filter into the filter unit and refit to the machine.
Check the brush bar
Turn your robot over and place it on a soft surface.
Lift the red brush bar cover lever on the base of your robot.
Check the airway on the underside of the machine for any blockages.
Press the red brush bar release button and slide the brush bar out of your robot. Remove any debris or objects. Also ensure any hair or other threads are removed from the brush bar bearing.
Replace your brush bar
Slide the brush bar into your robot and push down until the release button pops up.
Close the brush bar cover and push the lever down to lock the cover in place.
Ensure the brush bar cover is fully aligned along the width of the machine before securing the lever.
Clear the alert
Return the robot to the same point on the floor, press the LCD screen and step away to resume cleaning.
Please select the appropriate option
Charging mid-clean
If a clean is started on the dock, the robot will be able to return mid-clean if it needs to recharge.
Depending on the power mode used and the size of the cleaning area, your robot may return to the dock several times to recharge before finishing the clean.
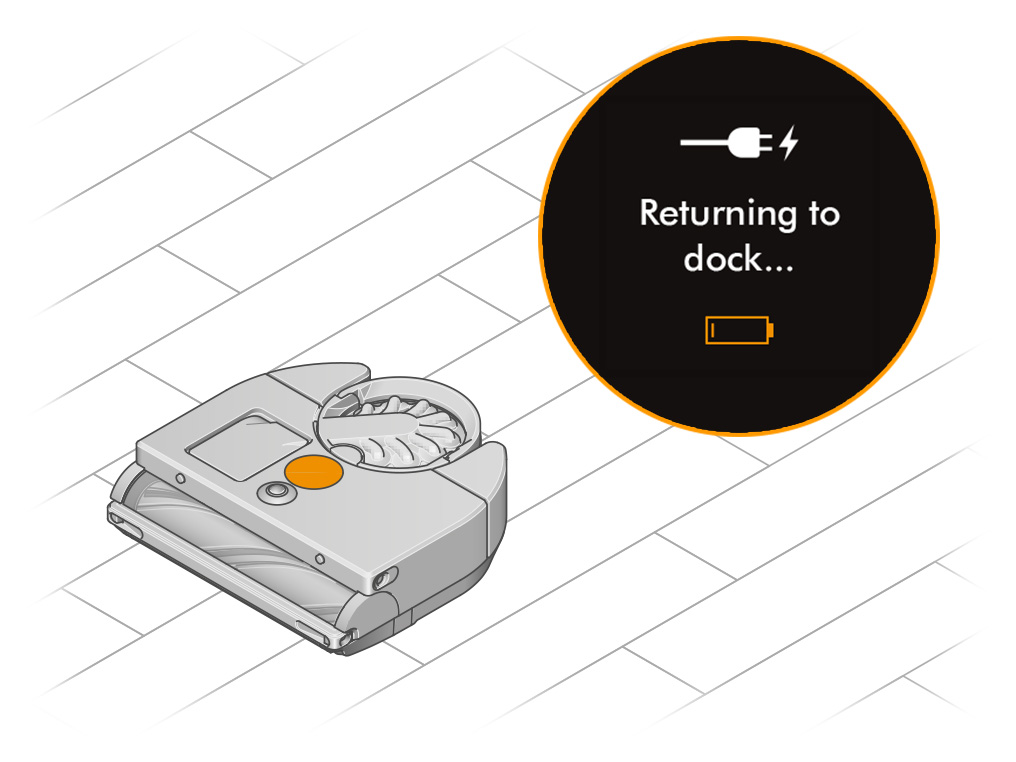
Your robot takes 90 minutes to fully charge but can take longer if the charge contacts have overheated. For safety reasons, your robot will not charge if the charge contacts exceed normal operating temperatures.
Your robot is designed to operate in an ambient temperature between 5°C and 35°C.
To avoid long charge times, we advise setting up your dock in an area away from direct sunlight and regularly cleaning the charge contacts.

Cleaning the contacts
Use a soft, dry, lint-free cloth to wipe both metal contacts on the front of the robot and on the dock.
Do not use cleaning fluids, liquids or sprays of any kind.
Hot to touch
Your robot has a built in safety system that stops the machine if it begins to overheat. This usually happens because the filters need washing or your machine is blocked.
If your machine continues to overheat, please refrain from using it until it has cooled down sufficiently and then carry out the performance checks.
Check the LCD screen
Check the LCD screen on top of your robot.
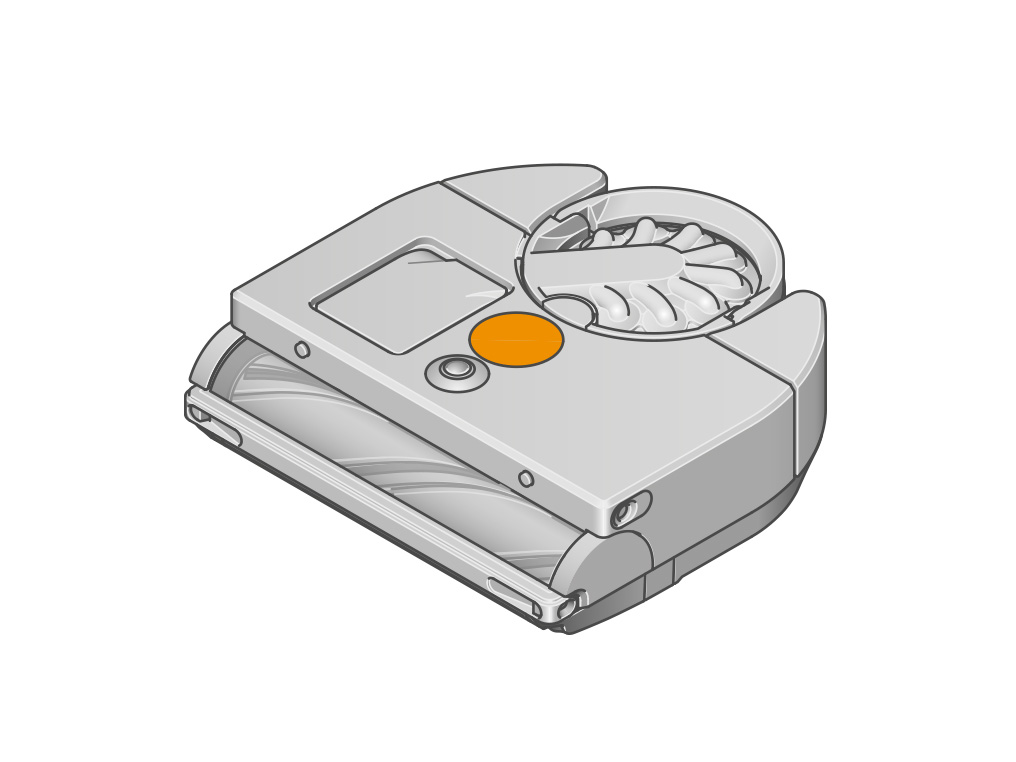
Low battery
If your robot encounters a problem during the clean and is unable to continue it will display an alert.
If your robot does not display any alert, it is likely that your robot was unable to return to dock to recharge and has shut down when its battery became low.
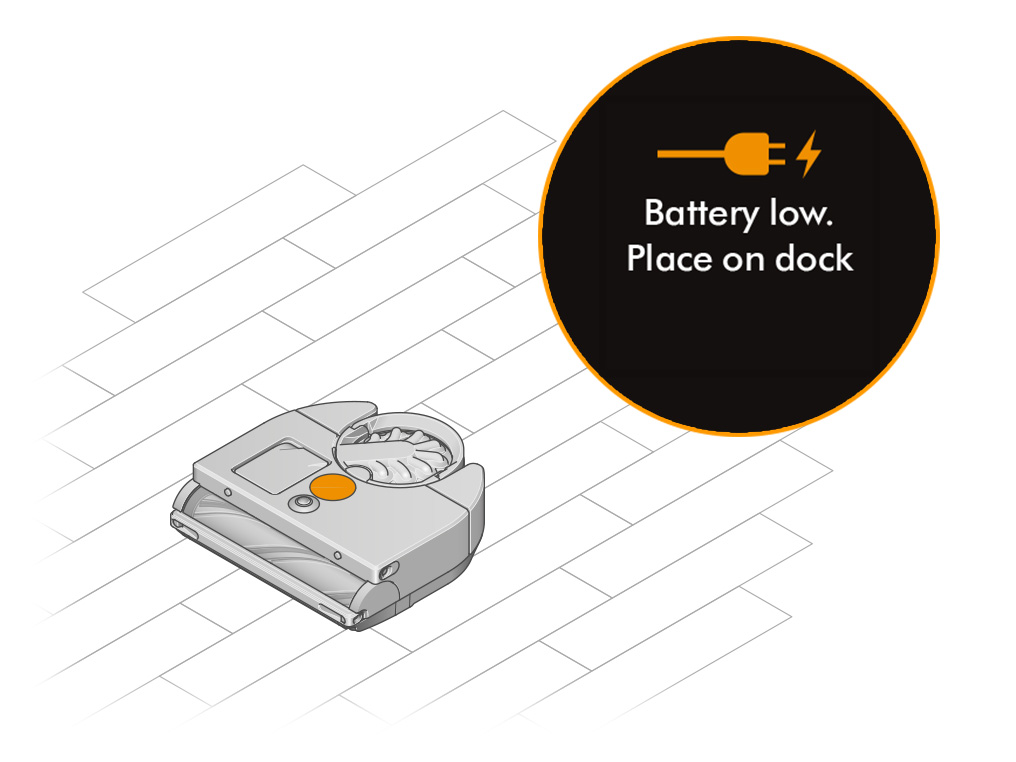
Ambient lighting
Your robot will compensate for low light by using its LEDs to selectively illuminate dark areas. It is not designed to operate in complete darkness.
Make sure your robot has adequate illumination to navigate by for the duration of the clean.
It is normal for the LEDs to change in brightness depending on the lighting conditions.
Cleaning the sensors
To maintain optimum performance, keep your camera lens and sensors clean. Use a soft, dry, lint-free cloth to wipe the lens.
Check all sensor covers and the navigational camera for dirt, dust, fingerprints and smears.
Do not use cleaning fluids, liquids or sprays of any kind.
Turn your robot over and place it on a soft surface.
Use a soft, dry, lint-free cloth to wipe the optical flow sensor and each drop sensor on the base of your robot. There are seven sensors in total.
Preparing your home
Remove thin rugs or loose objects that your robot may suck up. Tidy small items such as shoe laces or thin cables that your robot won't detect and may get tangled in the brush bar.
Clean any liquid spills or sharp items that could damage your robot.
Dock placement
Your dock should be located against a wall, in a place close to a mains power supply, out of bright sunlight and not obscured under a table or other furniture. It needs at least 50cm of clear space around the front.
You should choose a location close to your Wi-Fi access point to avoid connection issues.
We recommend a location close to the centre of your home, as this can lead to more reliable cleans.
Did you find this helpful?
Which alert is showing on the LCD screen?
Check the power supply
Ensure that the power supply is securely plugged into the wall socket and that the cable is firmly pushed into the socket on the dock.
If the light on the dock is still not illuminated, test the power supply in a different wall socket.
Cleaning the contacts
Use a soft, dry, lint-free cloth to wipe both metal contacts on the front of the robot and on the dock.
Do not use cleaning fluids, liquids or sprays of any kind.
Dock your robot
Place your robot on the dock, the blue LED light on the back of the dock will turn off. Your robot will initialise and the LCD screen will light up.
What is the screen showing?
Drop detected
Some very dark or reflective surfaces can appear like a drop to your robot's sensors. In this scenario you will be unable to restart the clean without moving your robot away from the drop.
If the robot is unable to move away from the drop, for example if it is prevented from reversing, then it will pause and wait for recovery.
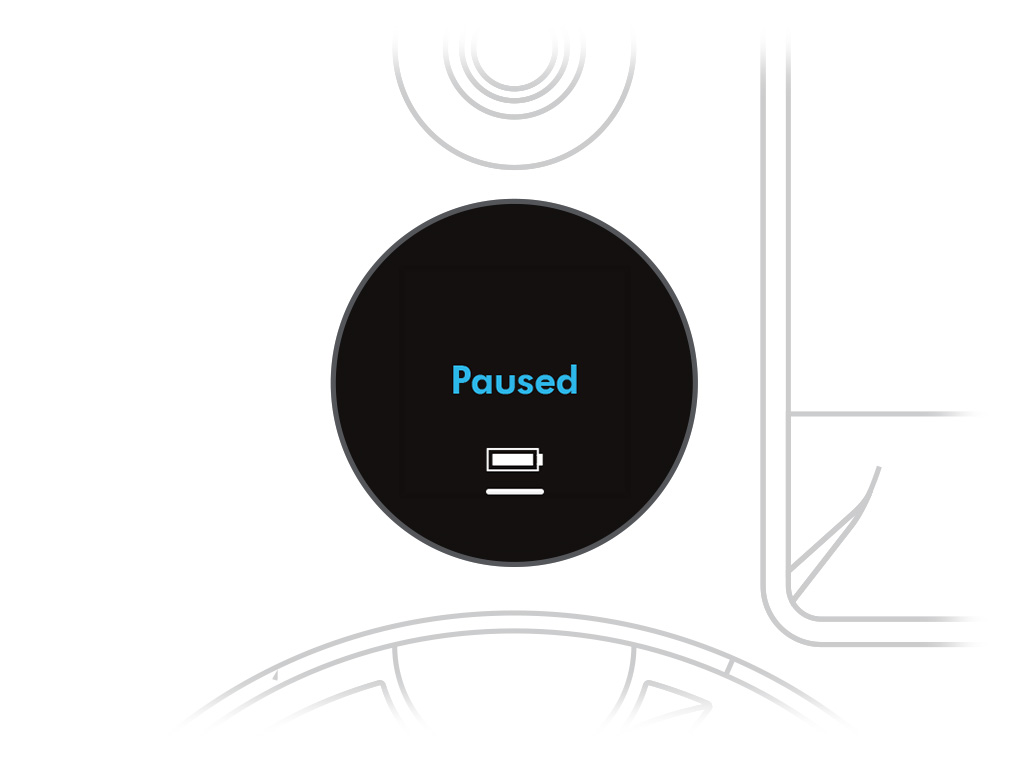
Place your robot away from the drop and somewhere that it has cleaned before, then try to resume the clean by pressing the LCD screen.
Charging mid-clean
If a clean is started on the dock, the robot will be able to return mid-clean if it needs to recharge.
Depending on the power mode used and the size of the cleaning area, your robot may return to the dock several times to recharge before finishing the clean.
Boost mode
Selecting Boost mode will result in deeper cleans but with less run time for your robot. If you find your robot is recharging mid-clean too often, we advise using Auto mode as it automatically optimises suction power throughout the clean.
Before starting a clean, you can set cleaning modes for each of your zones to customise your clean or set a cleaning mode for all areas.
Dust detection
If your robot is recharging too often mid-clean, there may be dust or debris stuck in the airways.
Your robot has a piezo sensor that detects changes in dust levels, allowing your robot to optimise suction power when using Auto mode. Blockages in your robot's airways can cause the robot to detect high levels of dust and increase suction power, resulting in lower run time.
Check the airway
Debris caught in the brush bar or the machine's airways could interfere with the piezo sensor readings.
If your robot is detecting abnormally high volumes of dust, we would suggest carrying out the following checks.
Removing a blockage
Press the cyclone pack release button on the top of your robot and lift your bin away. Use the handle to carry your bin.
Check the cyclone unit and inlet for any obstructions. Empty the bin if it is full.
If hair or debris is stuck in the shroud, you can use the release catch to remove the cyclone for easier cleaning. Use a soft brush to clear any hair or debris from the shroud.
Check the airway on the machine where the bin connects for blockages.
Check the filter
Click to release the filter unit and it will pop up out of your robot.
Remove the filter from the filter unit and check it for blockages.
Reinsert the filter into the filter unit and refit to the machine.
Check the brush bar
Turn your robot over and place it on a soft surface.
Lift the red brush bar cover lever on the base of your robot.
Check the airway on the underside of the machine for any blockages.
Press the red brush bar release button and slide the brush bar out of your robot. Remove any debris or objects. Also ensure any hair or other threads are removed from the brush bar bearing.
Replace your brush bar
Slide the brush bar into your robot and push down until the release button pops up.
Close the brush bar cover and push the lever down to lock the cover in place.
Ensure the brush bar cover is fully aligned along the width of the machine before securing the lever.
Power cycle required
Your robot may have encountered a software problem and will need to be switched off.
Click and hold the screen down until it switches off. This can take up to 30 seconds.
Return your robot to the dock. It will power on automatically and you can start your next clean as usual.
Auto-update software
Always enable Auto update in your settings menu for the latest software upgrades. This ensures your robot receives important optimisations, bug fixes and features.
Please select the appropriate option
Starting a clean from the dock
If a clean is started on the dock, the robot will be able to return mid-clean if it needs to recharge.
Please note that cleans scheduled in the MyDyson™ app can only start from the dock.
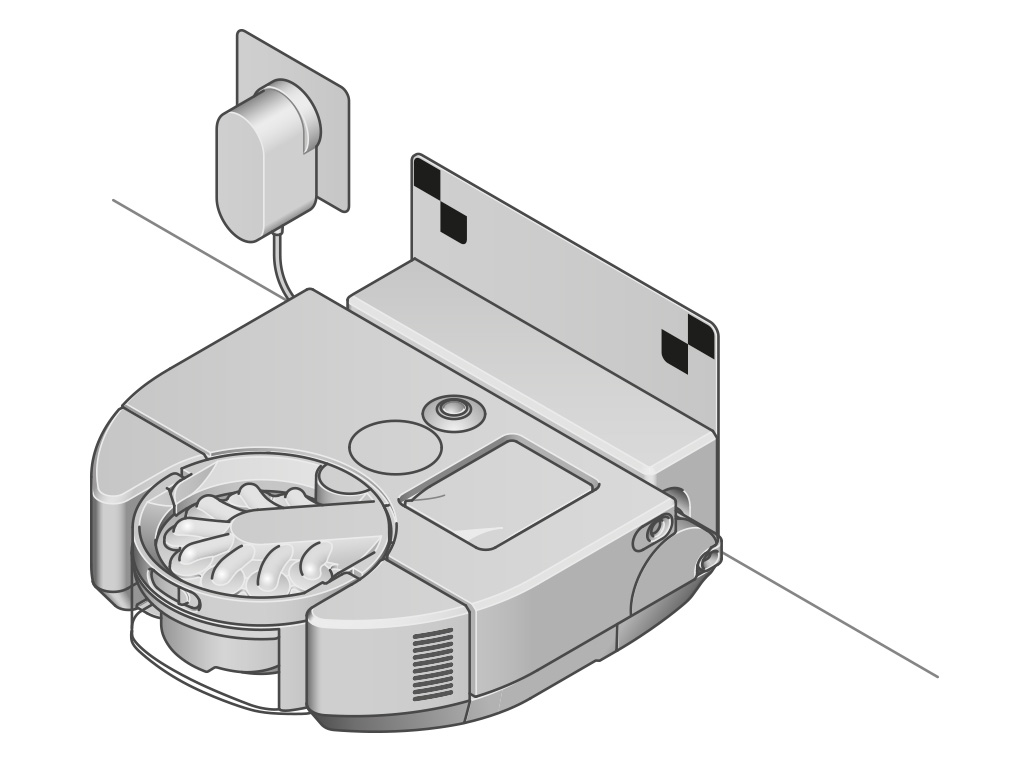
Starting a clean off the dock
For when you want to clean a specific area, do a quick clean or clean rooms on different floors.
If you pick your robot up and place it where you want it to clean, it will stop when it detects that charge is low and return to its starting position.
What type of clean?
Low battery
If you start a clean from the LCD touchscreen when there isn't enough charge, an alert will appear on the screen.
Return your robot to the dock and allow it to recharge for at least 30 minutes.
Check lighting
Your robot may struggle to balance its camera exposure if it is placed in direct sunlight or in a bright, white location at the start of the clean. If this problem occurs, try an alternative start location out of direct sunlight.
Your robot will compensate for low light by using its LEDs to selectively illuminate dark areas. It is not designed to operate in complete darkness.
Make sure your robot has adequate illumination to navigate by for the duration of the clean.
Check the dock
In order for the robot to start a scheduled clean or an unscheduled clean from the MyDyson™ app, the robot must be on a powered dock.
Make sure your dock is powered by removing the robot and checking the light on the back.
Low battery
If you start a clean from the LCD touchscreen when there isn't enough charge, an alert will appear on the screen.
The MyDyson™ app will also indicate if the battery is too low to start a clean.
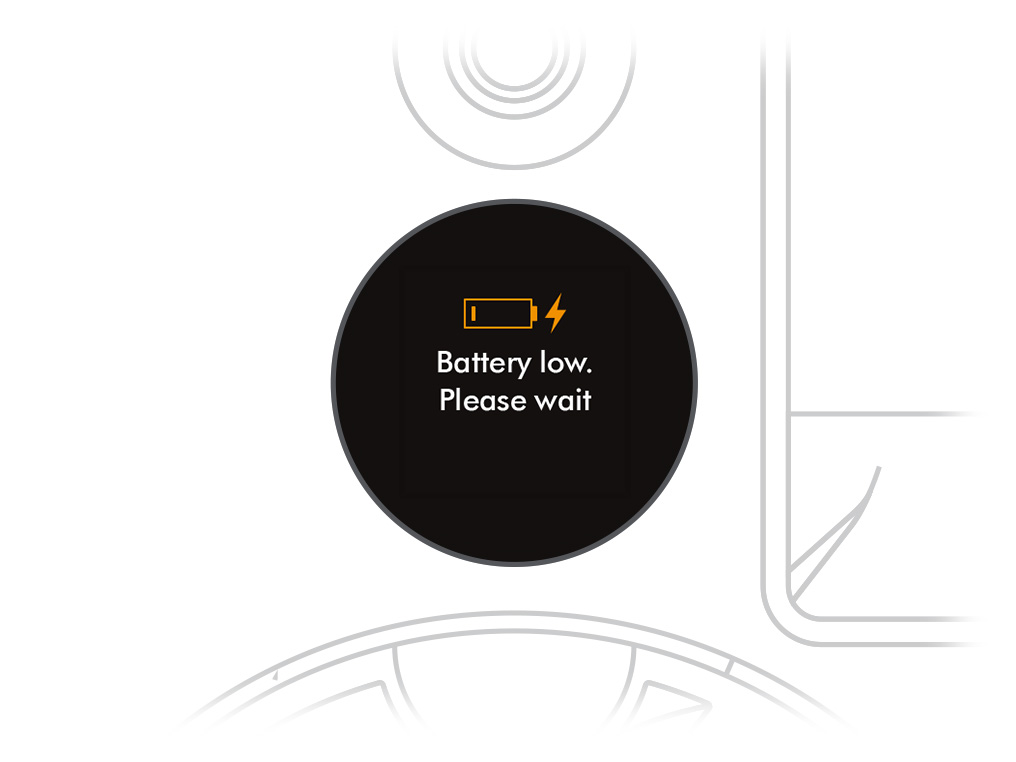
Low battery
If you start a clean from the LCD touchscreen when there isn't enough charge, an alert will appear on the screen.
Return your robot to the dock and allow it to recharge for at least 30 minutes.

Low light conditions
Your robot will compensate for low light by using its LEDs to selectively illuminate dark areas. It is not designed to operate in complete darkness.
Make sure your robot has adequate illumination to navigate by for the duration of the clean.
It is normal for the LEDs to change in brightness depending on the lighting conditions.
If the robot is still not navigating successfully in darker areas, this could be caused by uneven lighting transitions. Closing curtains and blinds can help to avoid uneven lighting.
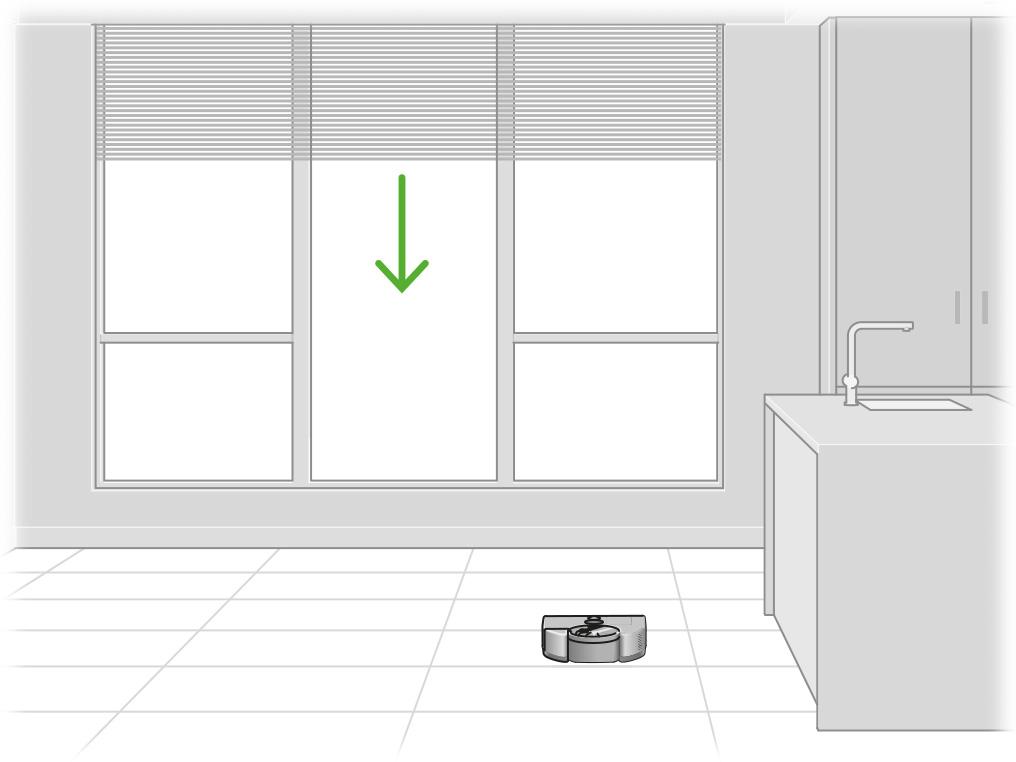
Robot is navigating
Your robot will switch off its vacuum motor and brush bar occasionally during the clean.
If you have created any "No brush bar" restrictions in theMyDyson™ app, your robot will switch off the brush bar when navigating through these areas.
Your robot will also switch off the vacuum motor and brush bar when navigating through areas it has already cleaned or when it returns to the dock.
Robot is navigating
The timer on your robot's LCD touchscreen will continue counting throughout the clean unless the robot is paused or encounters a problem.
If the timer is still counting and your robot has stopped, we recommend leaving it to continue cleaning.
Your robot tracks features using its camera to determine its location.
Your robot may come to a short halt occasionally during the clean to detect its position in the room.
Getting lost
When your robot loses sight of features, it can keep track of its motion for short periods using its wheels and an accelerometer.
Try to make sure that access to new areas does not require the robot to spend long periods under low furniture or in featureless areas, such as long corridors.
Restricting areas of your home
If your robot gets stuck in the same place regularly, you can use the MyDyson™ app to add a suitable restriction for that area.
There are three different types of restrictions you can create to suit your home.
Avoid areas
You can select areas on your map for your robot to avoid. This can be used in areas with cables, clothing or toys, where your robot might get stuck. You can also avoid entire rooms, such as the bathroom.
No brush bar
Your robot will vacuum in this area with the brush bar turned off.
No climb
Your robot will avoid climbing in this area where there may be furniture with pedestals or low level items.
Common checks
If your robot gets lost or stuck in the same area repeatedly, ensure there is adequate lighting throughout, the robot's sensors are clean and that the room is prepared before the start of the clean.
The location of the dock may also need to be reconsidered.
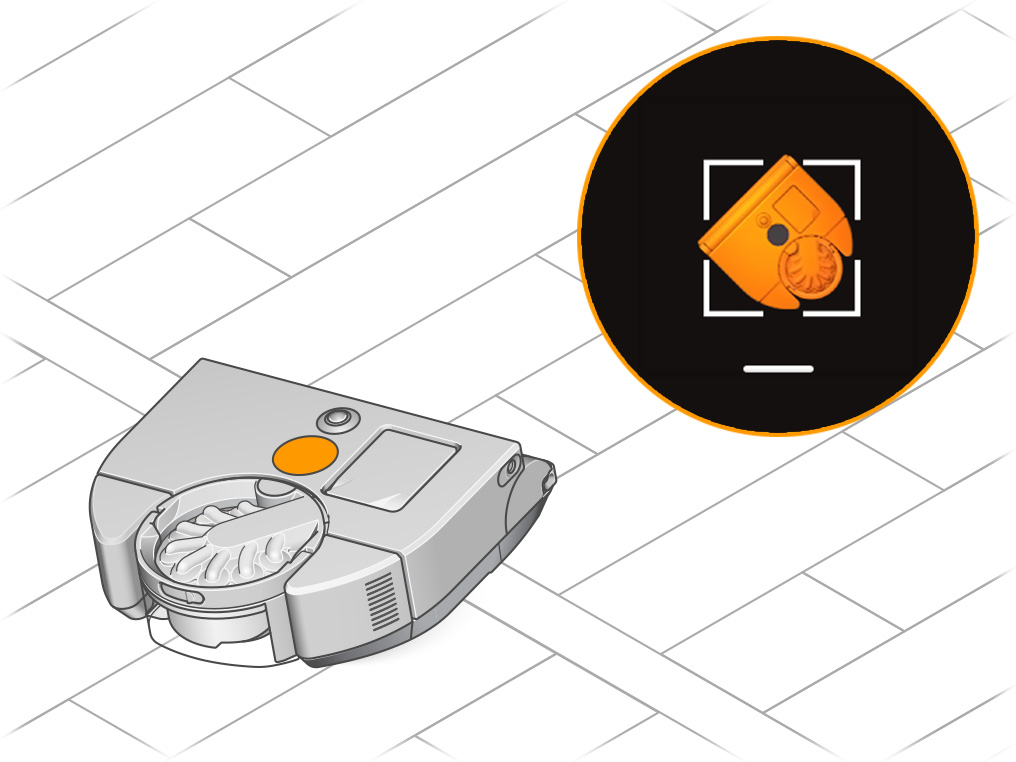
Ambient lighting
Your robot will compensate for low light by using its LEDs to selectively illuminate dark areas. It is not designed to operate in complete darkness.
Make sure your robot has adequate illumination to navigate by for the duration of the clean.
It is normal for the LEDs to change in brightness depending on the lighting conditions.
Cleaning the sensors
To maintain optimum performance, keep your camera lens and sensors clean. Use a soft, dry, lint-free cloth to wipe the lens.
Turn your robot over and place it on a soft surface.
Use a soft, dry, lint-free cloth to wipe the optical flow sensor and each drop sensor on the base of your robot. There are seven sensors in total.
Preparing your home
Remove thin rugs or loose objects that your robot may suck up. Tidy small items such as shoe laces or thin cables that your robot won't detect and may get tangled in the brush bar.
Clean any liquid spills or sharp items that could damage your robot.
Dock placement
Your dock should be located against a wall, in a place close to a mains power supply, out of bright sunlight and not obscured under a table or other furniture. It needs at least 50cm of clear space around the front.
You should choose a location close to your Wi-Fi access point to avoid connection issues.
We recommend a location close to the centre of your home, as this can lead to more reliable cleans.
Object detection
Your robot has infra-red distance sensors to detect obstacles and avoid them.
The sensors and camera are best suited to avoiding large obstacles, such as walls and large furniture. Thin obstacles such as chair or table legs are occasionally not detected. Shiny, dark or clear surfaces such as metallic bins, chrome chair legs, mirrors, glass and windows can also fail to be detected.
In each case the robot relies on a sensitive bump detection system that avoids damage to your belongings when the robot does make contact with them.
While this is a normal behaviour, you can reduce how often the robot bumps into furniture by ensuring the sensors are kept clean and by preparing the room.
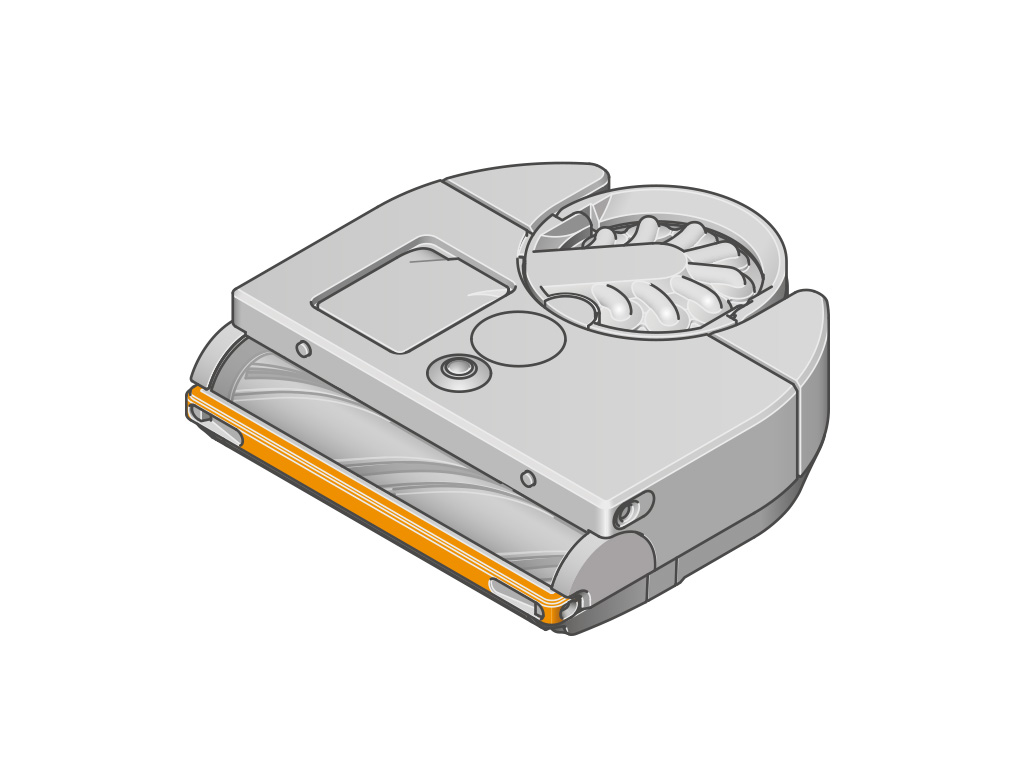
Cleaning the sensors
To maintain optimum performance, keep your camera lens and sensors clean. Use a soft, dry, lint-free cloth to wipe the lens.
Turn your robot over and place it on a soft surface.
Use a soft, dry, lint-free cloth to wipe the optical flow sensor and each drop sensor on the base of your robot. There are seven sensors in total.
Preparing your home
Remove thin rugs or loose objects that your robot may suck up. Tidy small items such as shoe laces or thin cables that your robot won't detect and may get tangled in the brush bar.
Clean any liquid spills or sharp items that could damage your robot.
Restrictions
If your robot often bumps into furniture in a certain area, you can use the MyDyson™ app to add an avoid area restriction.
Did you find this helpful?
Drop detected
Some very dark or reflective surfaces can appear like a drop to your robot's sensors. In this scenario you will be unable to restart the clean without moving your robot away from the drop.
If the robot is unable to move away from the drop, for example if it is prevented from reversing, then it will pause and wait for recovery.
Place your robot away from the drop and somewhere that it has cleaned before, then try to resume the clean by pressing the LCD screen.
Restrictions
If your robot regularly pauses in the same place, we'd recommend adding a restriction so your robot avoids this area.
Cleaning the sensors
There may be dirt or debris covering the sensor covers or 360° vision system.
To maintain optimum performance, keep your camera lens and sensors clean. Use a soft, dry, lint-free cloth to wipe the sensors and camera lens.
Check all sensor covers and the navigational camera for dirt, dust, fingerprints and smears.
Do not use cleaning fluids, liquids or sprays of any kind.
Turn your robot over and place it on a soft surface.
Use a soft, dry, lint-free cloth to wipe the optical flow sensor and each drop sensor on the base of your robot. There are seven sensors in total.
Cleaning grids
The robot cleans in 5m x 5m grids. It will clean each grid section before moving on to an adjacent 5m x 5m grid.
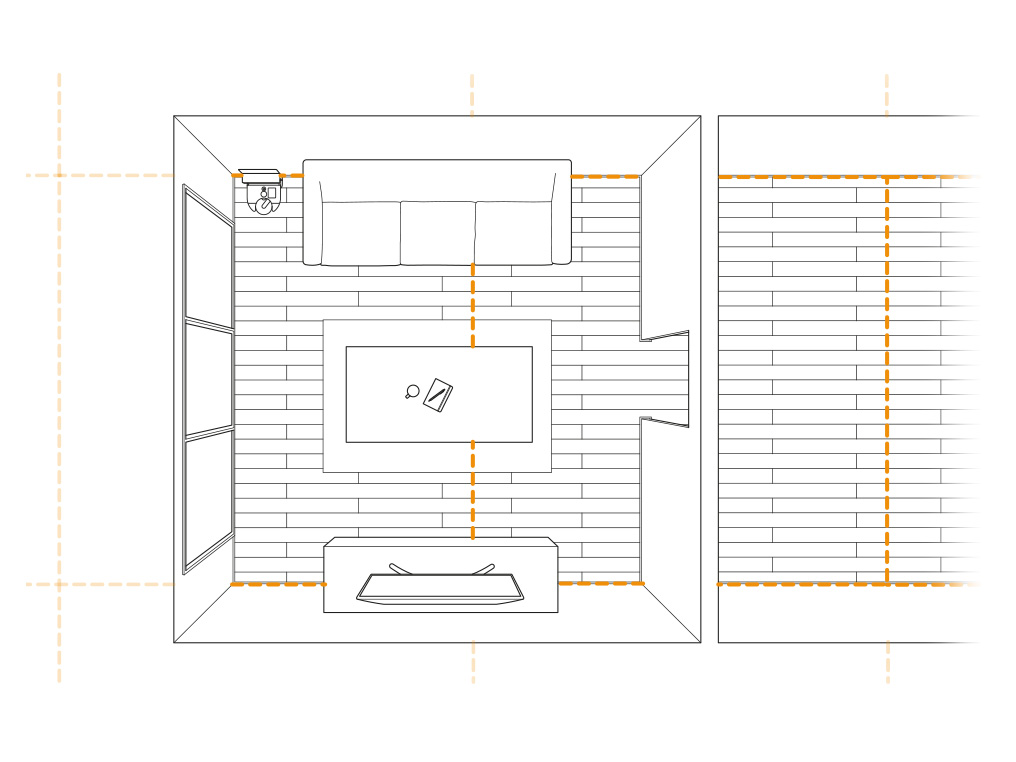
When starting a clean from the dock, the first grid will extend outwards from the wall. If a clean is started with the robot off the dock, the first grid will be centred on its start position.
The robot often cleans in a spiral pattern, but it should not be spinning on the spot.
Pause the clean
Press the LCD touchscreen on your robot to pause the clean.
Check the brush bar
Turn your robot over and place it on a soft surface.
Lift the red brush bar cover lever on the base of your robot.
Press the red brush bar release button and slide the brush bar out of your robot. Remove any debris or objects. Also ensure any hair or other threads are removed from the brush bar bearing.
Replace your brush bar
Slide the brush bar into your robot and push down until the release button pops up.
Close the brush bar cover and push the lever down to lock the cover in place.
Ensure the brush bar cover is fully aligned along the width of the machine before securing the lever.
Check the wheels
Check the wheels and remove any hair, dirt or debris by hand.
Resume the clean
Press the LCD touchscreen on your robot to resume cleaning.
Charging mid-clean
When cleaning a large area, the robot may return to the dock to recharge mid-clean before heading out to continue cleaning. This is normal behaviour.
Cleaning schedule
Your robot may also be carrying out a scheduled clean. You can see all active schedules for your robot using the MyDyson™ app.
Empty your bin as soon as the dirt reaches the MAX level
Remove the bin
Press the cyclone pack release button on the top of your robot and lift your bin away. Use the handle to carry your bin.
Release the dirt
Hold your bin over a rubbish container, pointing downwards.
Push the bin release button on the handle.
The bin will slide down, cleaning the shroud as it goes and the bin base will open.
Minimise dust contact
Cover your bin tightly in a dust proof bag while you empty. Remove the bin carefully, seal the bag tightly and dispose.
Close the bin
Push the bin base upwards until the bin and bin base click into place.
Push your bin back into place, make sure it clicks securely back into your robot.
The brush bar must be completely dry before you put it back into the machine. Your machine could be damaged if used with a damp brush bar.
Washing your brush bar
Please follow the steps in the video.
Find the text version of the step-by-step guide instead, under "Did you find this helpful?"
Did you find this helpful?
The brush bar must be completely dry before you put it back into the machine. Your machine could be damaged if used with a damp brush bar.
Washing your brush bar
Your robot has a washable brush bar. To maintain optimum performance, check and wash your brush bar regularly.
Remove your brush bar
Turn your robot over and place it on a soft surface.
Lift the red brush bar cover lever on the base of your robot.
Press the red brush bar release button and slide the brush bar out of your robot. Remove any debris or objects.
Pull the silver end cap from the brush bar. Don't wash the end cap.
Wash and dry your brush bar
Hold your brush bar under running water and gently rub to remove any lint or dirt.
Remove as much excess water as possible. Run your hand down the length of the brush bar to squeeze out the water.
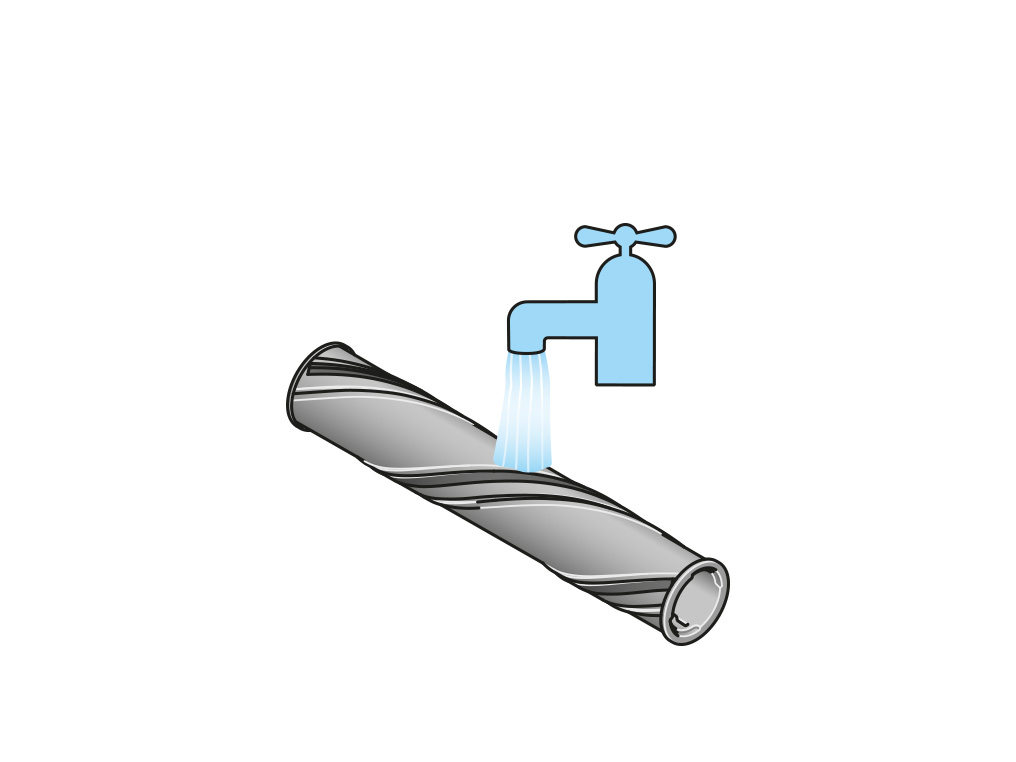
Stand your brush bar upright. Leave to dry completely for at least 24 hours.
Replace your brush bar
Before replacing, check that your brush bar is completely dry.
Push the end cap back onto the brush bar. Slide the brush bar back into your robot, push down on it until the release button pops back up.
Close the brush bar cover and push the lever down to lock the cover in place.
Ensure the brush bar cover is fully aligned along the width of the machine before securing the lever.
The filter must be completely dry before you put it back into the machine. Your machine could be damaged if used with a damp filter.
Washing your filter
Please follow the steps in the video.
Find the text version of the step-by-step guide instead, under "Did you find this helpful?"
Did you find this helpful?
The filter must be completely dry before you put it back into the machine. Your machine could be damaged if used with a damp filter.
Washing your filter
Wash the filter at least once a month to maintain optimum suction power.
The filter unit can be wiped with a damp, lint-free cloth to remove any dirt or dust.
Remove the filter
Click to release the filter unit and it will pop up out of your robot.
Remove the filter from the filter unit and check it for blockages.
Tap the filter
Before washing your filter, tap it gently over a bin to remove any loose dust and debris.
Wash the inside of the filter
Wash with warm, running tap water. Don't use detergent, or wash it in a dishwasher or washing machine.
Place your hand over one end of the filter and fill it with warm tap water.
Place your hand over the open end of the filter and shake it firmly to remove trapped dirt and debris.
Repeat these steps until the water runs clear.
Wash the outside of the filter
Wash with warm, running tap water - gently rubbing your filter with your fingers to remove the dirt.
Repeat until the water runs clear.
Shake out the water
Empty the filter and shake it firmly to remove excess water.
Shake with the filter in both an upward and downward position.
Keep shaking it until there's no water coming from the filter.
Dry the filter
Place your filter on its side and leave to dry for at least 24 hours in a well-ventilated, warm place.
Don't dry the filter in a tumble dryer, microwave or near a naked flame.
Please select the appropriate option
What is intelligent dust predictions?
The Robot will prioritise the order of the zones cleaned based on the dust build up in each zone.
My dust prediction does not align with my understanding
The prediction will improve with further cleaning sessions. You can still clean whichever zone you prefer.
My dust prediction does not align with my clean map
This is normal. The clean map is based on the last clean, dust prediction reflects the current dust level.
I only have a few or no dust predictions
Dust predictions become available when there is enough data. Performing more cleaning sessions will increase the data available. There are some instances where no prediction will be available such as if the area is very small or is not cleaned very often.
My Robot does not clean in order of predictions
Your robot will clean all the zones selected but may not clean the highest dust area first depending on the most efficient route it can take.
My dust predictions change
This is normal. The prediction is based on the dust level from previous cleans so will increase over time.
Choose a location
It's important that you locate the dock carefully as the robot will need clear access to it.
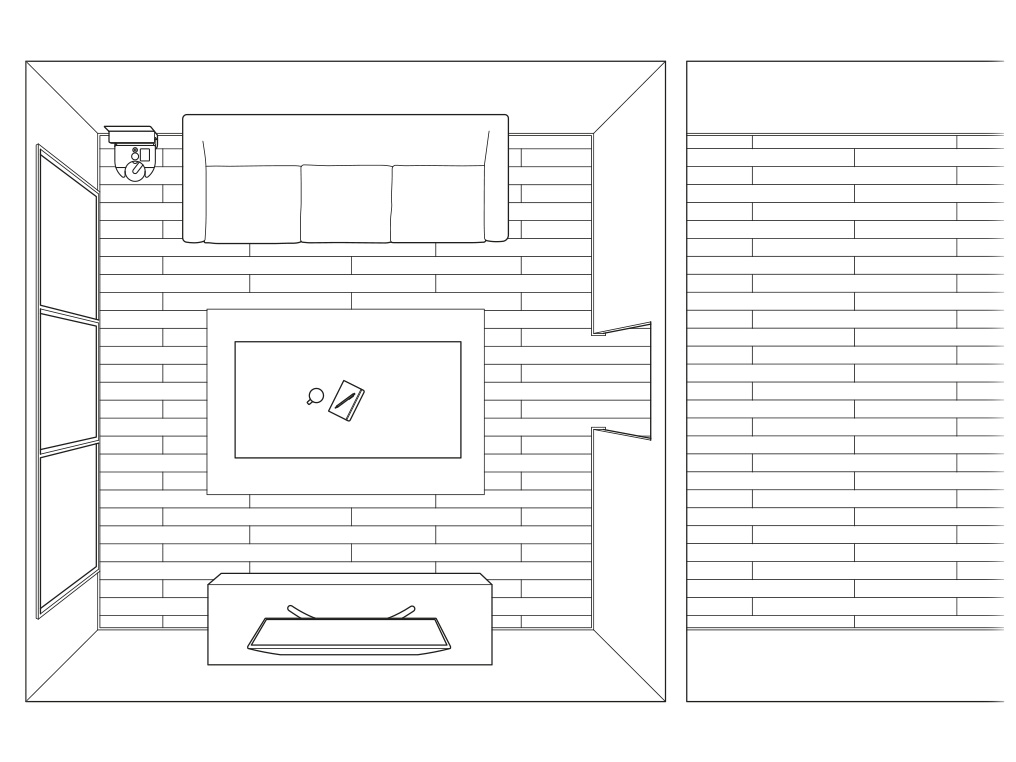
Your dock should be located against a wall, in a place close to a mains power supply, out of bright sunlight and not obscured under a table or other furniture. It needs at least 50cm of clear space around the front.
You should choose a location close to your Wi-Fi access point to avoid connection issues.
We recommend a location close to the centre of your home, as this can lead to more reliable cleans.
Assemble your dock
Plug the charger connector into the dock and plug into the mains power supply. A blue LED will illuminate when connected.
Wrap any excess cable around the cable tidy on the back of the dock.
Align the back panel of the dock with the floor section and press until it clicks into place. The back panel is removable if your need to change the location of your dock.
Dock your robot
Place your robot on the dock, the blue LED light on the back of the dock will turn off. Your robot will initialise and the LCD screen will light up.
Starting a clean
Use the MyDyson™ app to start your clean or press and click the LCD touchscreen. You can start your clean from the dock or pick up your robot and move it to a specific position.
Start from the dock with the MyDyson™ app or voice control
Start the clean using either the MyDyson™ app or with voice control that you have set up.
Choose to use a customised clean of an individual room, a selection of rooms, or clean all accessible areas. Your robot will clean following your mapping, zoning and restriction settings in the MyDyson™ app.
Starting a clean from the dock
Start the clean by choosing your power mode and press and click the LCD touchscreen to start the clean. Your robot will clean all areas that are accessible.
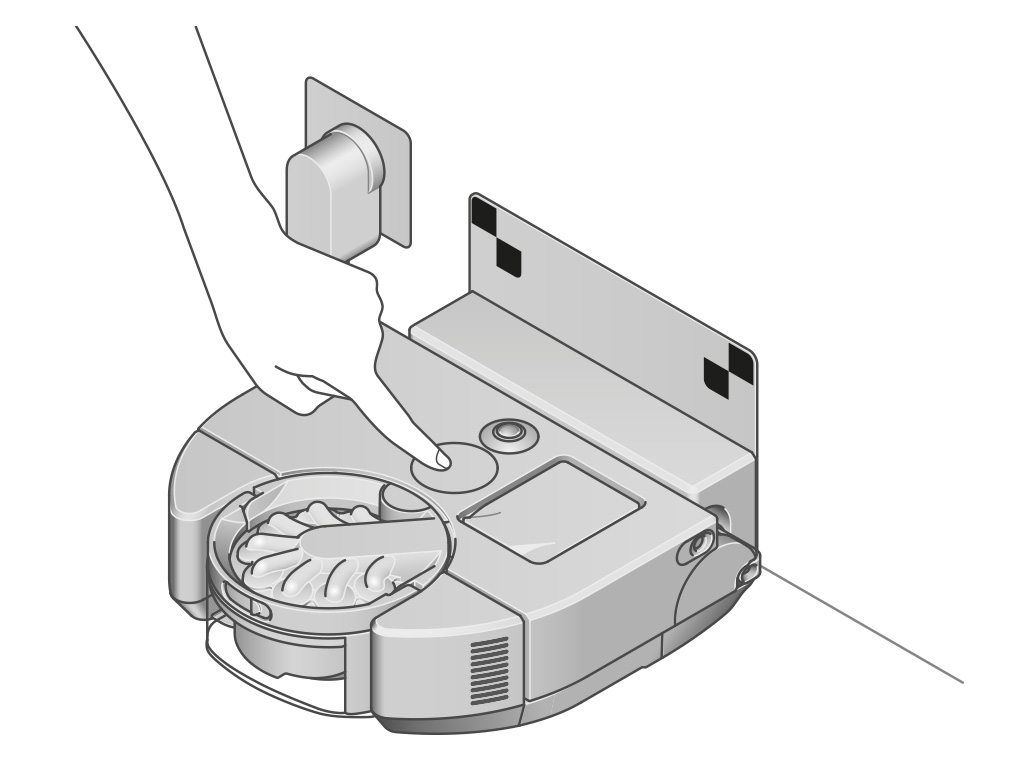
Starting a clean off the dock
To clean a specific area or a different floor, start your robot away from the dock.
Your robot will clean all the accessible space it can reach on a single charge.
Your robot won't return to the dock to charge, when the battery is low, but return to its starting point.
We need a little more information to help us solve your issue.
Please contact our customer service team on 01-475-7109, or directly on Live Chat through our Digital Assistant by clicking the purple icon at the bottom of the page. You can start a conversation with an Expert by clicking the agent icon at the bottom left of the chat window.
We're glad the problem's been solved.
Please let us know if there's anything else we can help you with.
The Dyson guarantee

'How to ' videos and tips

Exclusive owner benefits

Expert advice. 7 days a week.

Hassle-free repairs and replacement
Please get in touch.
Our experts are ready to help you.
UK based helpline open
8:00am- 8:00pm Monday to Friday
8:00am- 6:00pm Saturday and Sunday
Further help
Dyson 360 Vis Nav™