Let's get your machine working
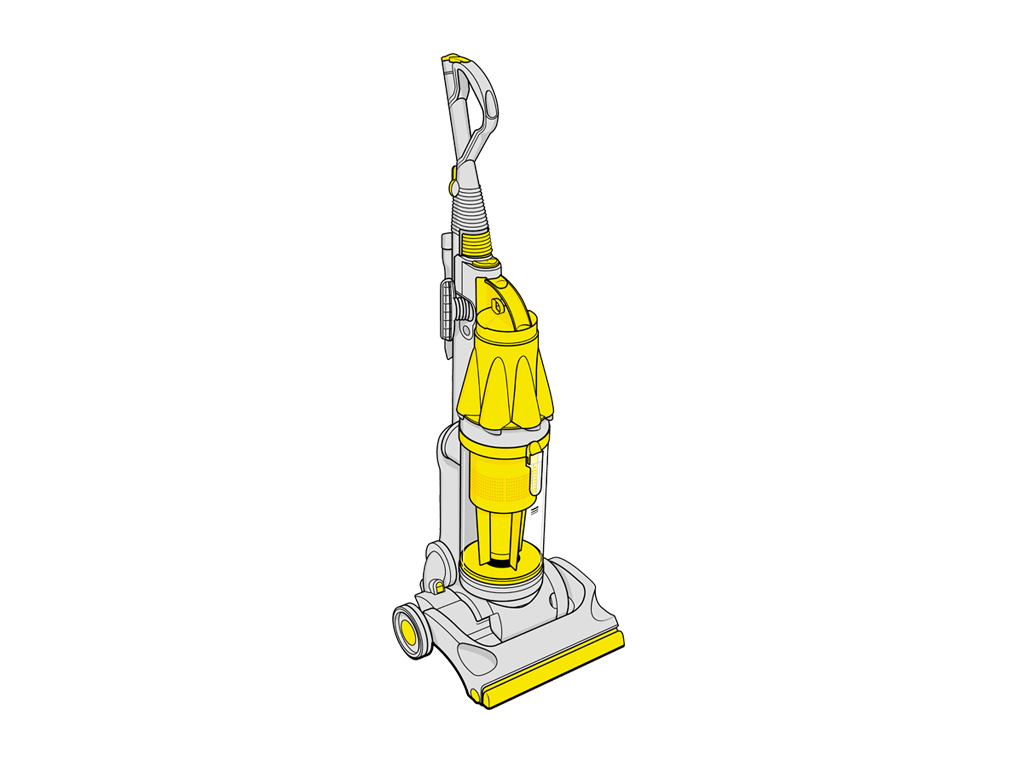
DC07 Standard™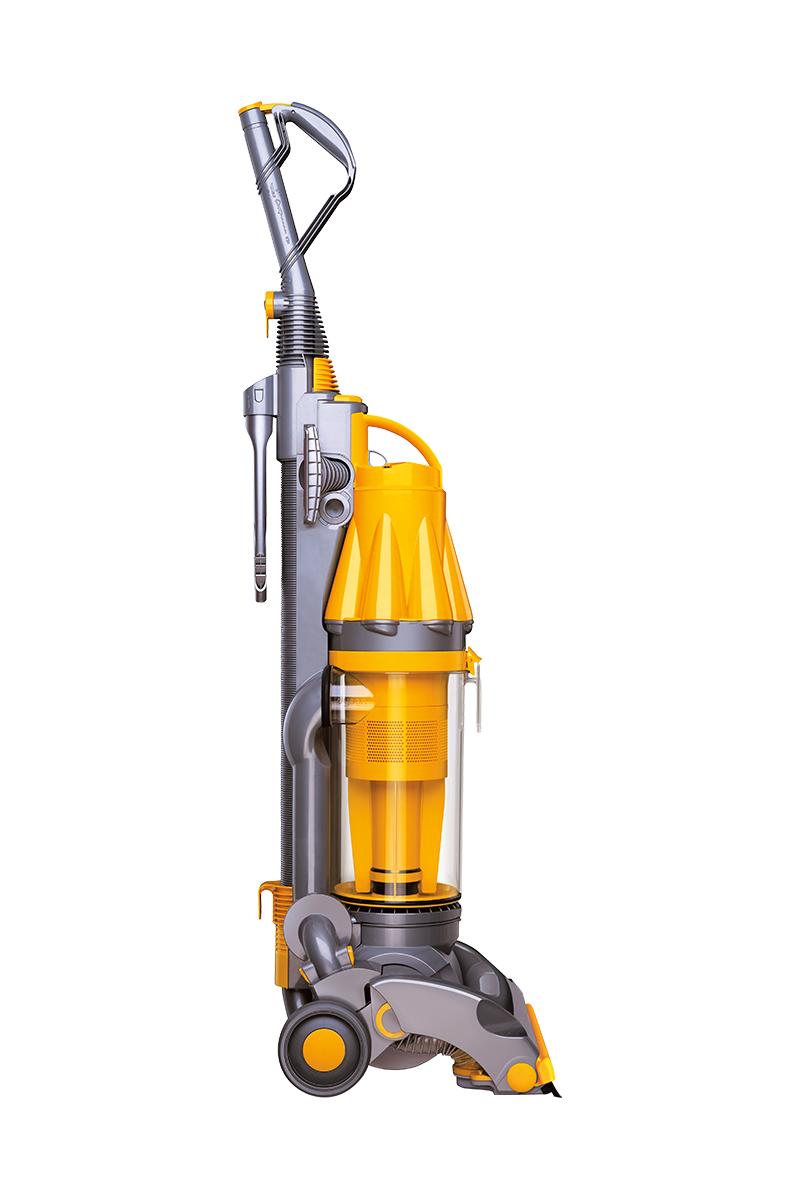
Let's get your machine working
DC07 Standard™
-
-
Cleaning the bin and cyclone
-
More help required
-
Troubleshooting
-
Unusual noise
-
Whistle noise
-
Strong suction
-
Check the Brush bar
-
Airway inspection checks
-
Check the Cleaner head
-
Issue resolved
-
Check duct, bin and cyclone
-
Wash the filter
-
Wash the filter
-
Issue not resolved, please speak to our Customer Support Team
-
Check duct, bin and cyclone
-
Check the Cleaner head
-
Check the belt
-
Issue not resolved, please speak to our Customer Support Team
-
Replacing the belt
-
Issue resolved
-
Checking the upright lock
-
Issue not resolved, please speak to our Customer Support Team
-
Airway inspection checks
-
Check the hose
-
Check the Wand
-
Check duct, bin and cyclone
-
Check the U-bend
-
Check duct, bin and cyclone
-
Grating or grinding noise
-
Issue not resolved, please speak to our Customer Support Team
-
Rattle noise
-
Check duct, bin and cyclone
-
Check the Cleaner head
-
Check the U-bend and hose
-
Check Wand and hose
-
Wash the filter
-
Wash the filter
-
Issue not resolved, please speak to our Customer Support Team
-
Issue not resolved, please speak to our Customer Support Team
-
Pick up issue
-
Power or electrical issue
-
Switch not working
-
Issue not resolved, please speak to our Customer Support Team
-
Issue not resolved, please speak to our Customer Support Team
-
Issue not resolved, please speak to our Customer Support Team
-
No power
-
No power
-
Less than two hours
-
Pick up issue
-
Wash the filter
-
Wash the filter
-
Issue not resolved, please speak to our Customer Support Team
-
Unusual smell
-
Issue not resolved, please speak to our Customer Support Team
-
Musty or damp smell
-
Wash the filter
-
Issue not resolved, please speak to our Customer Support Team
-
Wash the filter
-
Visible issue
-
Check the Brush bar
-
Issue not resolved, please speak to our Customer Support Team
-
Issue not resolved, please speak to our Customer Support Team
-
Spitting out dust
-
My machine won't stand upright
-
Check the upright lock
-
Issue not resolved, please speak to our Customer Support Team
-
User guide
-
How to assemble your Dyson machine
-
How to use the accessories
-
Serial number location
-
How to carry your Dyson machine
-
Emptying the bin
-
Washing the filter
-
Wash the filter
-
Popular queries
We're glad the problem's been solved.
Please let us know if there's anything else we can help you with.
The Dyson guarantee

'How to ' videos and tips

Exclusive owner benefits

Expert advice. 7 days a week.

Hassle-free repairs and replacement
We need a little more information to help us solve your issue.
Please contact our customer service team on 01-475-7109, or directly on Live Chat through our Digital Assistant by clicking the purple icon at the bottom of the page. You can start a conversation with an Expert by clicking the agent icon at the bottom left of the chat window.
We need a little more information to help us solve your issue.
But our Customer Support Team will be able to solve your problem.
Please contact our customer service team on 01-475-7109, or directly on Live Chat through our Digital Assistant by clicking the purple icon at the bottom of the page. You can start a conversation with an Expert by clicking the agent icon at the bottom left of the chat window.
We're glad the problem's been solved.
Please let us know if there's anything else we can help you with.
The Dyson guarantee

'How to ' videos and tips

Exclusive owner benefits

Expert advice. 7 days a week.

Hassle-free repairs and replacement
We need a little more information to help us solve your issue.
But our Customer Support Team will be able to solve your problem.
Please contact our customer service team on 01-475-7109, or directly on Live Chat through our Digital Assistant by clicking the purple icon at the bottom of the page. You can start a conversation with an Expert by clicking the agent icon at the bottom left of the chat window.
We need a little more information to help us solve your issue.
But our Customer Support Team will be able to solve your problem.
Please contact our customer service team on 01-475-7109, or directly on Live Chat through our Digital Assistant by clicking the purple icon at the bottom of the page. You can start a conversation with an Expert by clicking the agent icon at the bottom left of the chat window.
We need a little more information to help us solve your issue.
Please contact our customer service team on 01-475-7109, or directly on Live Chat through our Digital Assistant by clicking the purple icon at the bottom of the page. You can start a conversation with an Expert by clicking the agent icon at the bottom left of the chat window.
Please select the appropriate option
How to clean the bin and cyclone
Press the release catch located at the top of the bin and detach from the machine.
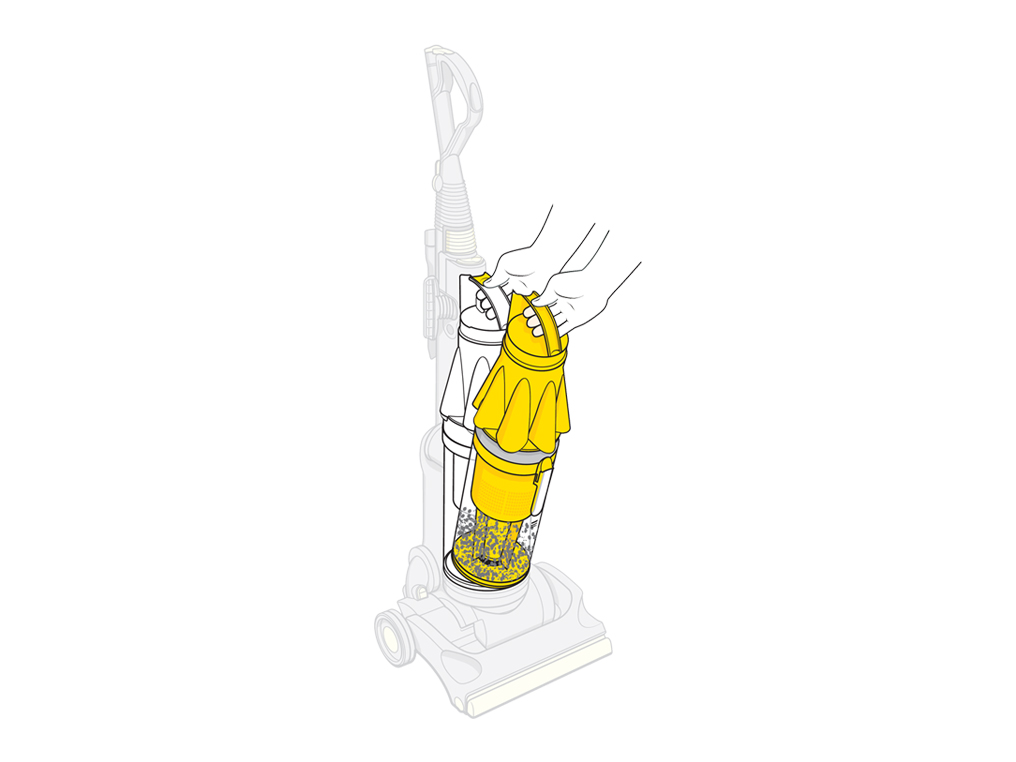
Pull the release catch located on the cyclone top, under the handle.
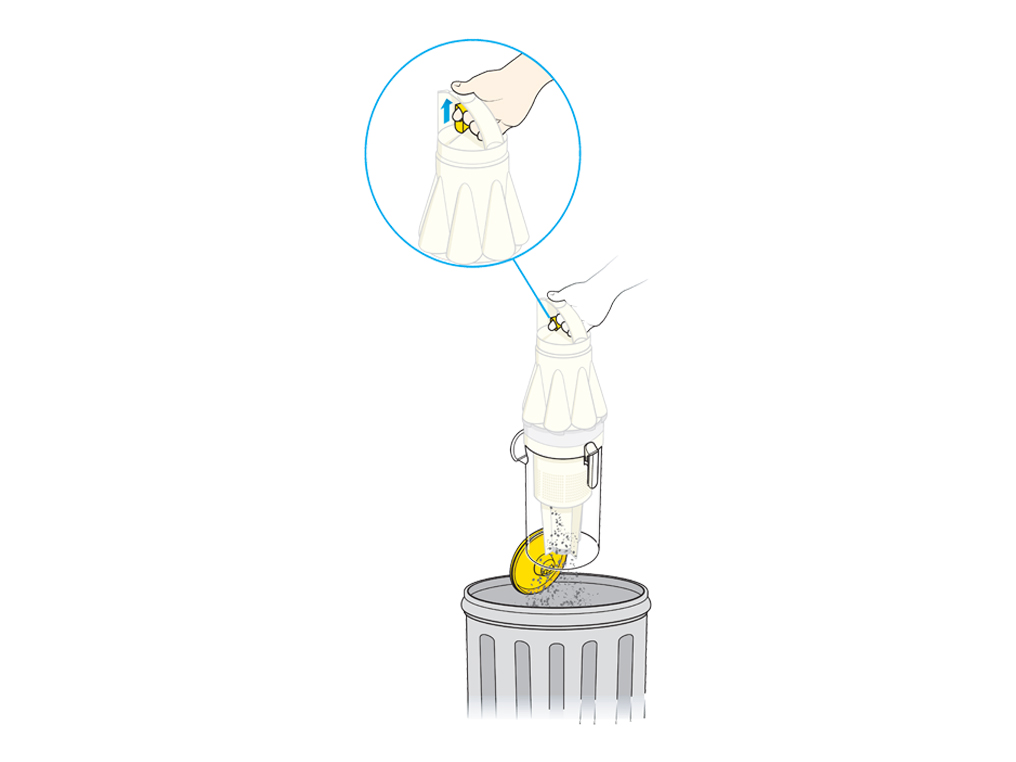
Release the bin from the cyclone by pressing the front release catch.

Clean the cyclone with a cloth and tap gently to remove dust.
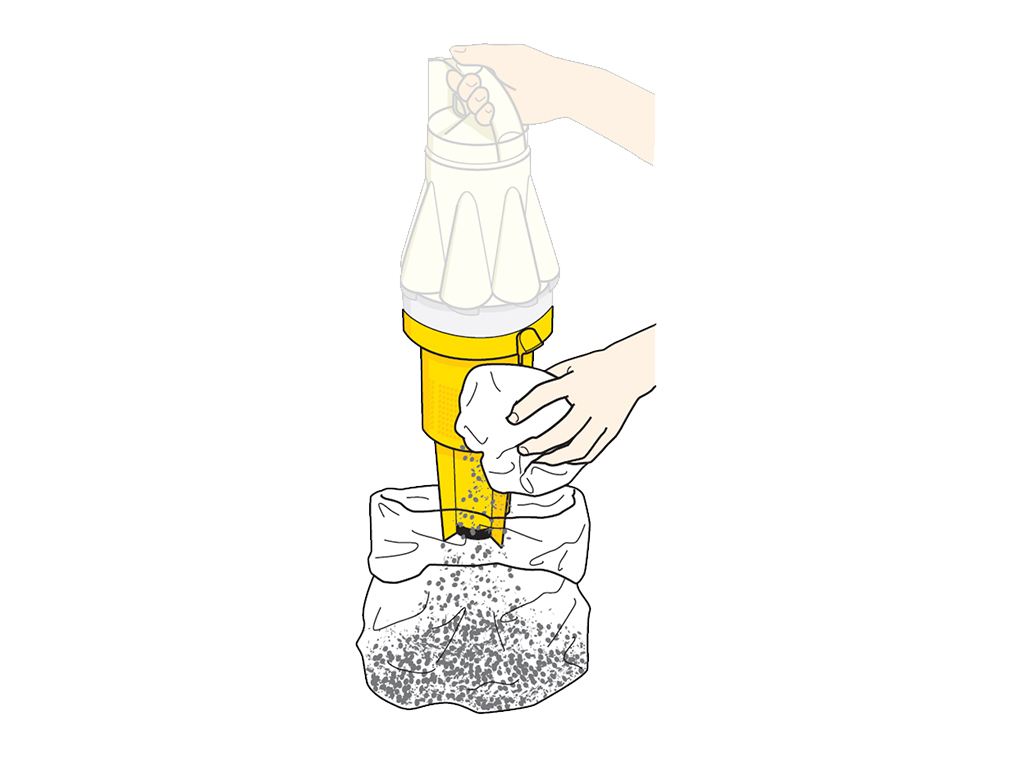
You can use cold water to clean the clear bin. Do not use detergents or other chemicals.
Reassemble clear bin and close the bin lid before placing on the machine.
Please select the appropriate option
Please select the appropriate option
What sort of noise?
Test the suction
A whistle suggests that air is escaping due to a missing seal or blockage.
Make sure the machine is standing in the upright position.
Pull back the Wand cap.
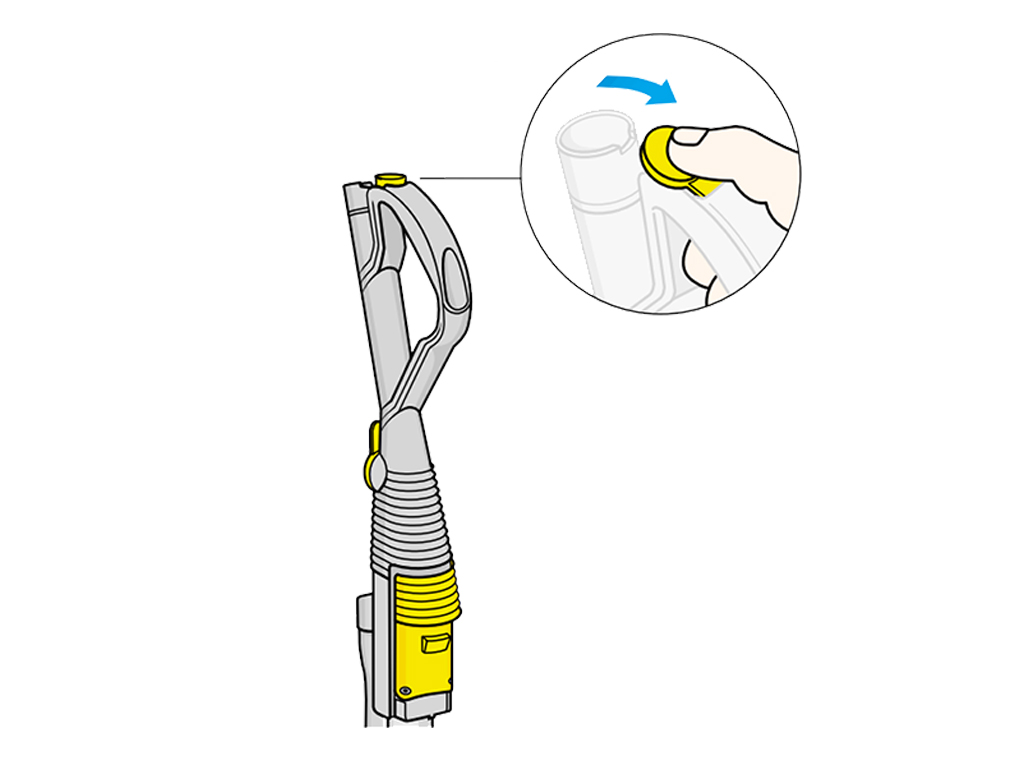
Turn the machine on and place your hand of the end of the Wand.
Is the suction strong or weaker than usual?
Keep your hands and clothing away from the Brush bar area at all times.
Inspect the Brush bar
Tilt the machine back into the vacuuming position.
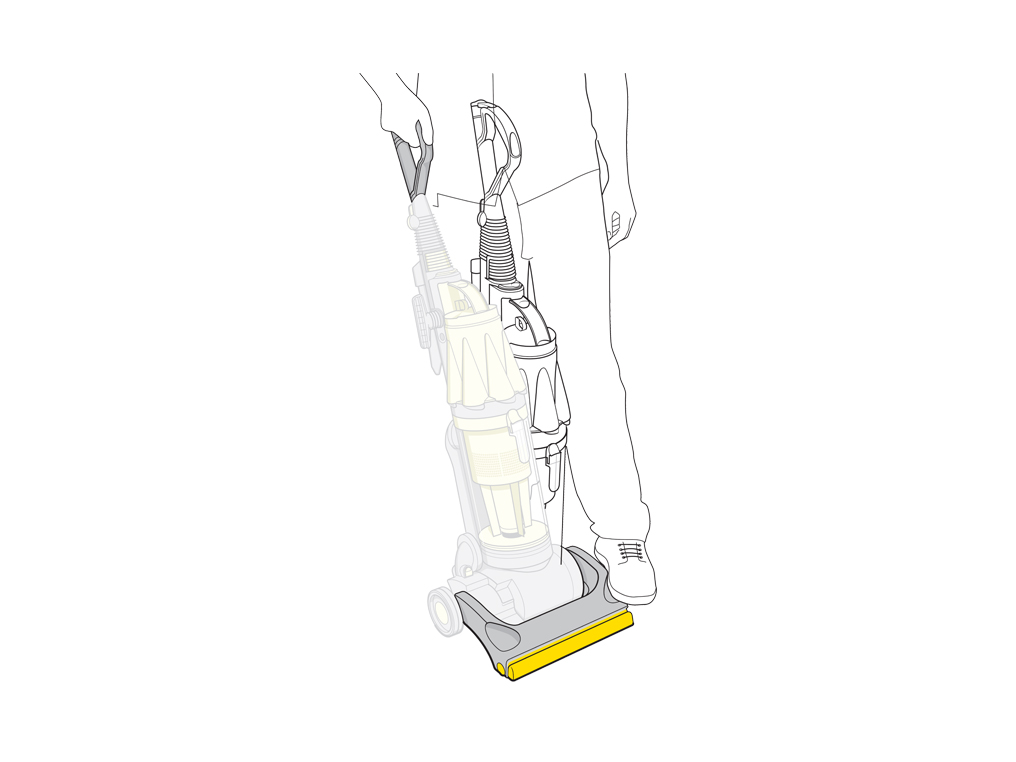
Lay the machine on its side, keeping it in the vacuuming position.
Turn the machine on and check to see if the Brush bar is spinning.
If the machine has a Brush bar on/off control, check that the arrow on the clutch control dial moves forward to the carpeted floors position
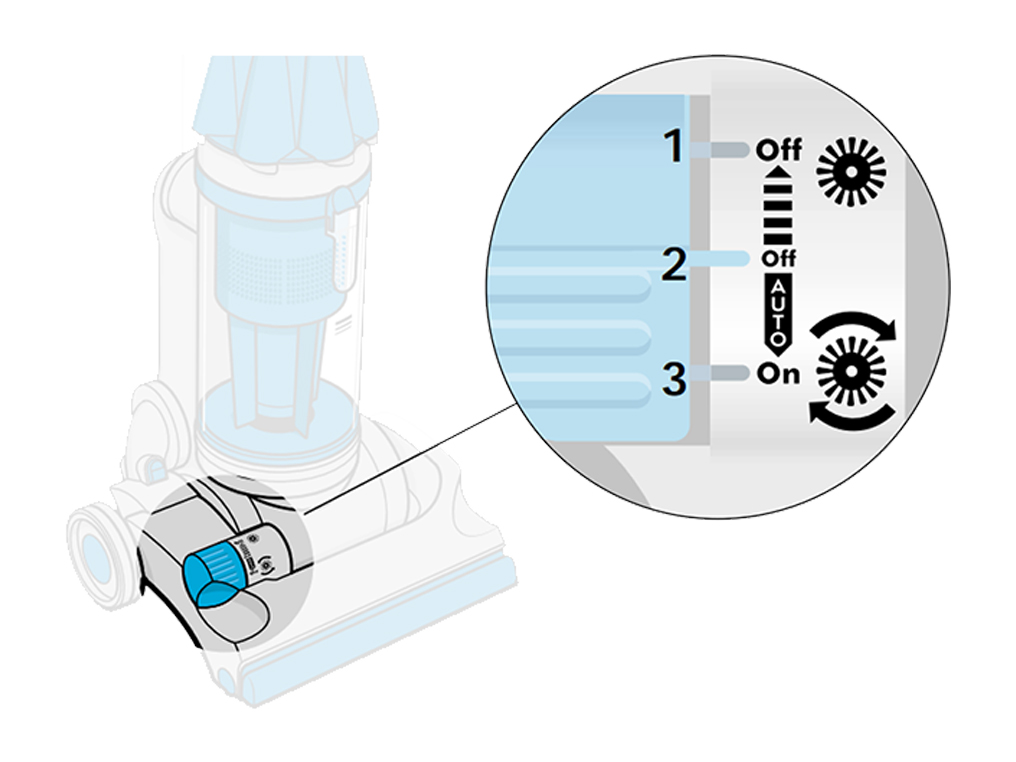
Inspect for any debris or damage
Remove the valve pipe, near to the base of the machine.
Check the valve pipe for blockages and remove as necessary.
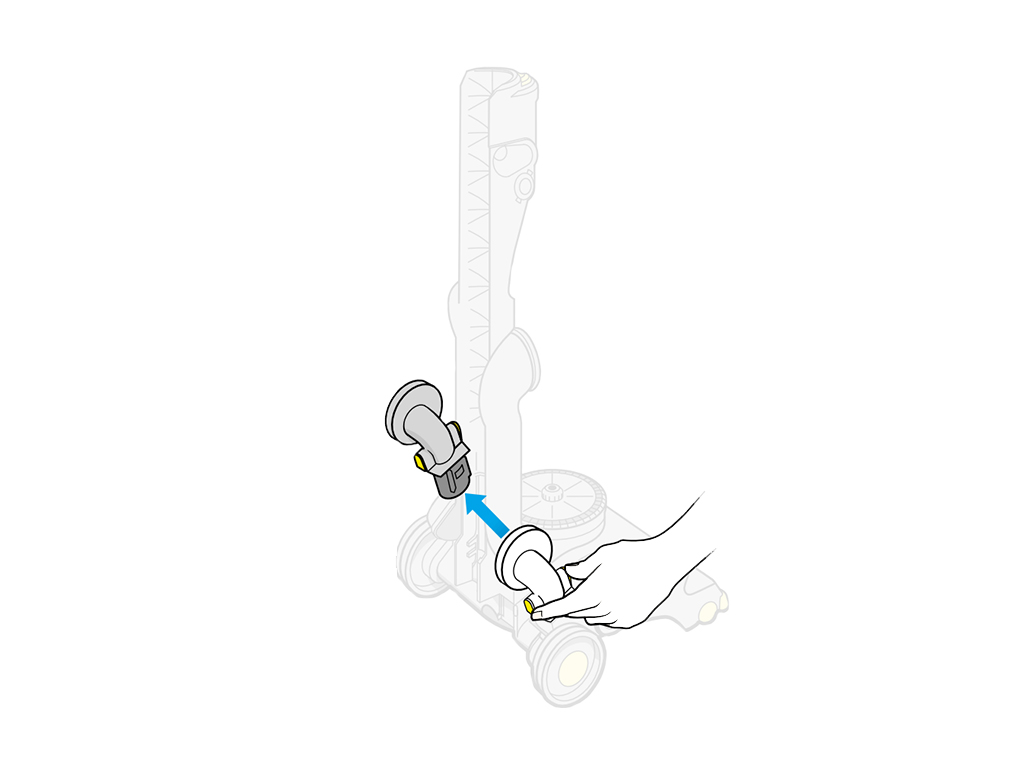
Check the seal on the valve pipe for any damage.
Check the seal on the machine for any damage.
Plug the machine in and switch ON. Place your hand over the airway inspection and test the suction.
Is the suction strong or weaker than usual?
Switch off and unplug the machine before proceeding.
Inspect the Cleaner head
Turn off power, lay the machine flat on the floor and turn over so that the base can be viewed.
Using a coin turn each fastener a quarter of a turn to the left. Remove the soleplate.
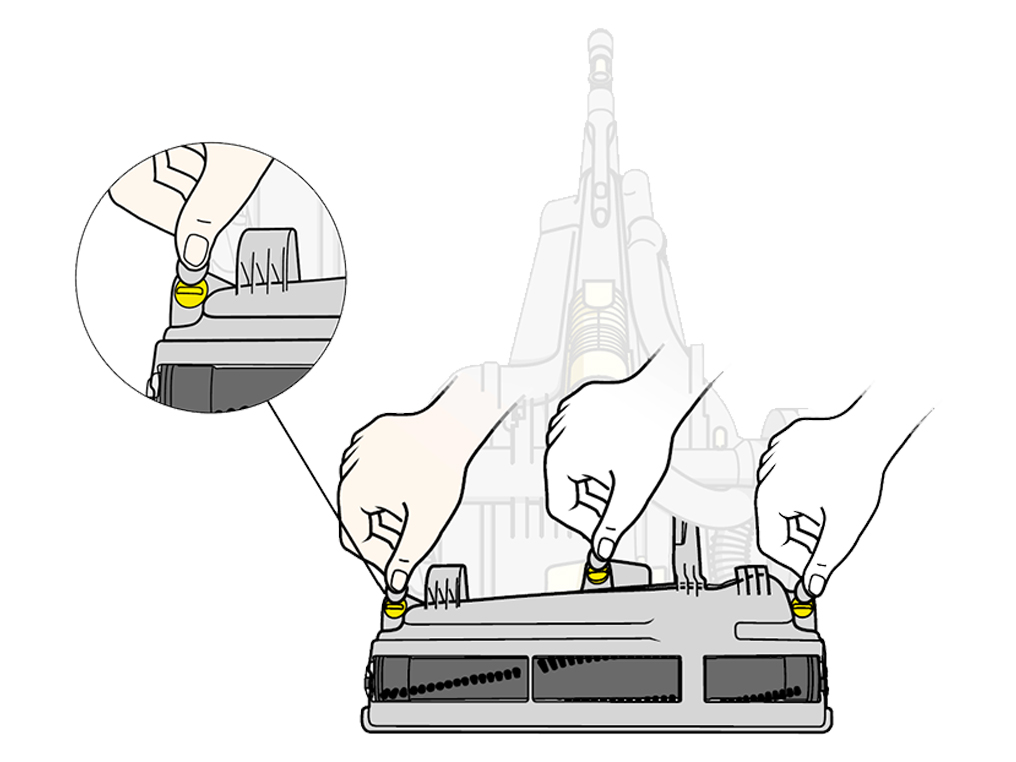
Carefully remove any blockages from the Brush bar using a pair of scissors to cut away any hair and fibres if necessary.
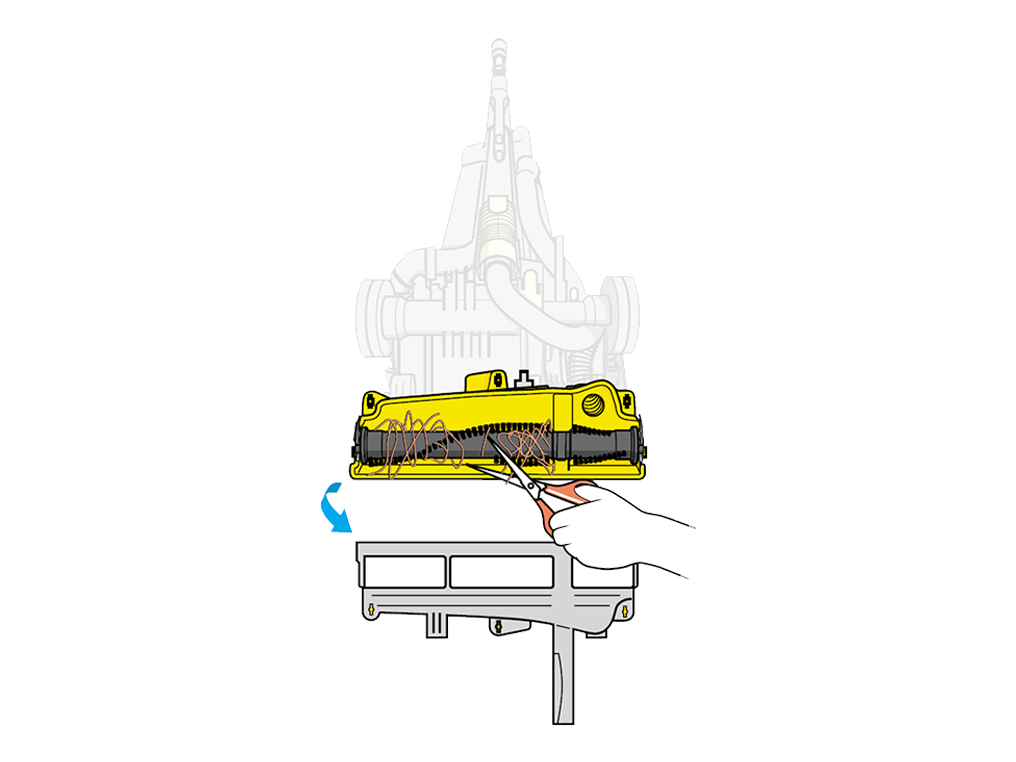
Inspect the internal hose for blockages and damage and ensure that both ends of the hose are fitted securely.
If a blockage is present, remove any debris.
Reassemble and test the machine.
Clearing duct, bin and cyclone
Turn the machine off and remove the cyclone and bin.

Check the duct:
Check the entry seal located on the left side of the duct is not missing or damaged.
Check the entry pipe and exhaust pipe on the main duct for any blockages and remove as necessary.
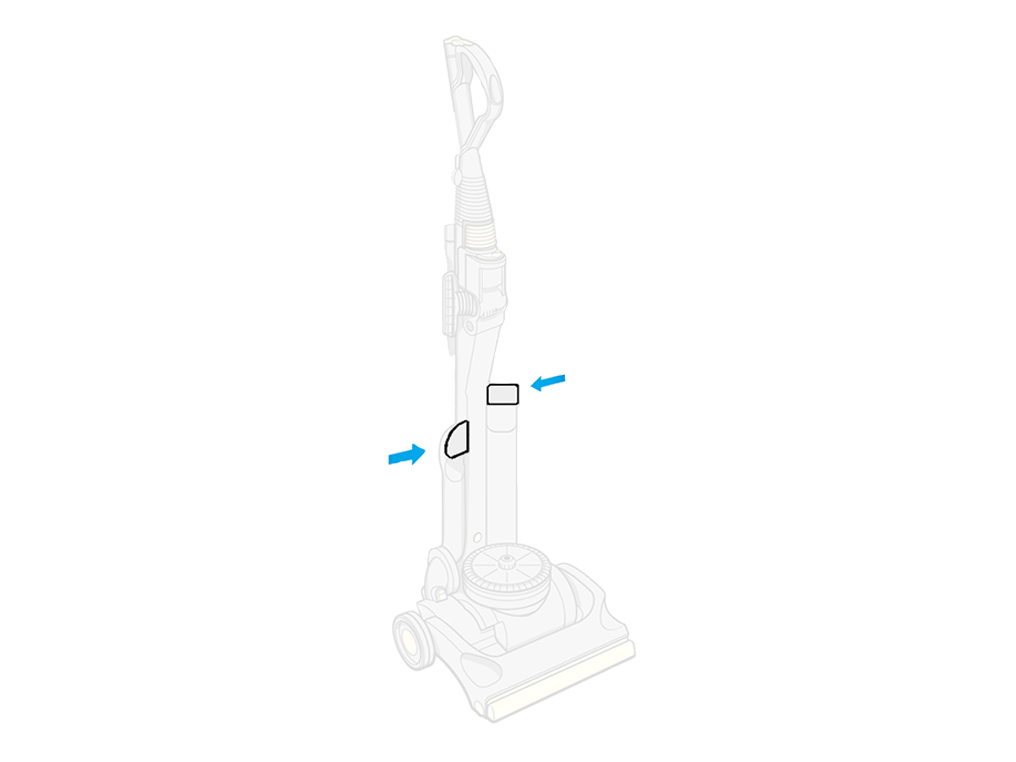
Check the bin and cyclone:
Check the cyclone entry seal is not missing or damaged.
Check both entry inlets on the bin and cyclone for blockages, and remove as necessary.
Empty the bin and ensure the bin base remains open.

Release the clear bin by pressing the bin release catch on the front of the cyclone.

Clean cyclone shroud as necessary and check the cyclone seal is not missing or damaged.

Reassemble and test the machine.
How to wash the filter
Please follow the steps in the video.
Has washing the filter resolved the problem?
Washing the filter
Press the release catch and remove the filter housing from the machine.

Remove the filter from the housing. (Only the blue foam and yellow cage should be washed).

Wash both parts in cold water only.
WARNING: Do not use detergent. Do not wash in a dishwasher or washing machine.
Repeat until the water runs clear.

Leave filter to dry in a warm place until filter is completely dry. Do not dry the filter in a tumble dryer, microwave, oven or near an open flame.
Ensure the filter is completely dry before replacing in the machine.

The filter should be washed at least once every 3-6 months.
NB: The post-motor filter located under the clear bin should last the lifetime of the machine and does not need to be washed.
Inspect the duct, bin and cyclone
Turn the machine off and remove the cyclone and bin assembly.

Check the duct:
Check the entry seal located on the left side of the duct is not missing or damaged.
Check the entry pipe and exhaust pipe on the main duct for any blockages and remove as necessary.

Check the bin and cyclone:
Check the cyclone entry seal is not missing or damaged.
Check both entry inlets on the bin and cyclone for blockages, and remove as necessary.
Open the bin lid being careful to ensure dust is captured.

Release the clear bin by pressing the bin release catch on the front of the cyclone.

Clean cyclone shroud as necessary and check the cyclone seal is not missing or damaged.

Reassemble and test the machine.
Inspect the Cleaner head
Turn off the power and lay the machine flat on the floor, and turn over so that the base can be viewed.
Remove the soleplate
Using a coin, turn each fastener by a quarter turn to the left. Remove the soleplate.

Carefully remove any blockages from the Brush bar using a pair of scissors to cut away any hair and fibres if necessary.

Inspect the internal hose for blockages and damage and ensure that both ends of the hose are fitted securely.
If a blockage is present, remove any debris.
Reassemble and test the machine.
Check the belt
Ensure the machine is switched off and unplugged before proceeding.
Recline the machine and turn over so that you can access the Brush bar.
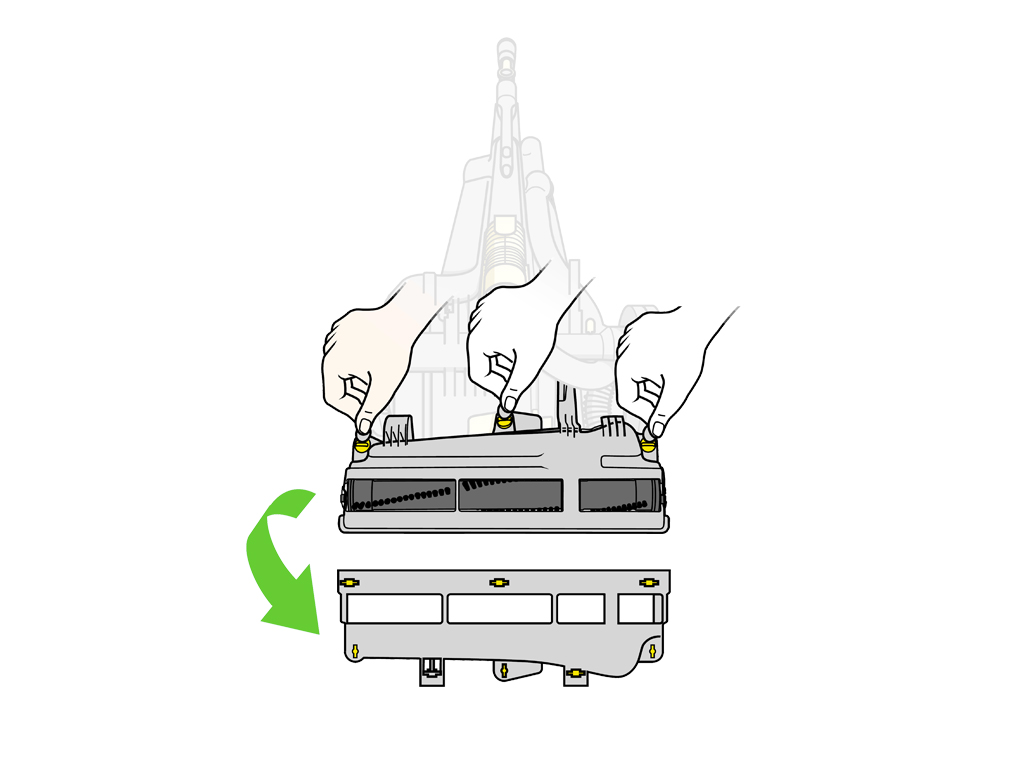
Remove the soleplate by using a coin to turn the fasteners by a quarter.
Clear any blockages around the Brush bar and check if the belt has been damaged.
Spin the Brush bar. If the belt is slack or broken, the issue could be resolved by ordering a replacement belt. If the Brush bar has snapped you will also need to place an order for this item.
If the Brush bar has not been damaged and you have a spare belt, please choose the 'how to replace the belt' option.
Has this resolved the problem?
Replacing the belt
Ensure the machine is turned off and unplugged before proceeding.
Remove the soleplate by using a coin to turn the fastener by a quarter.
Pull out the Brush bar ensuring there is no damage and remove belt debris.
Attach the new belt.
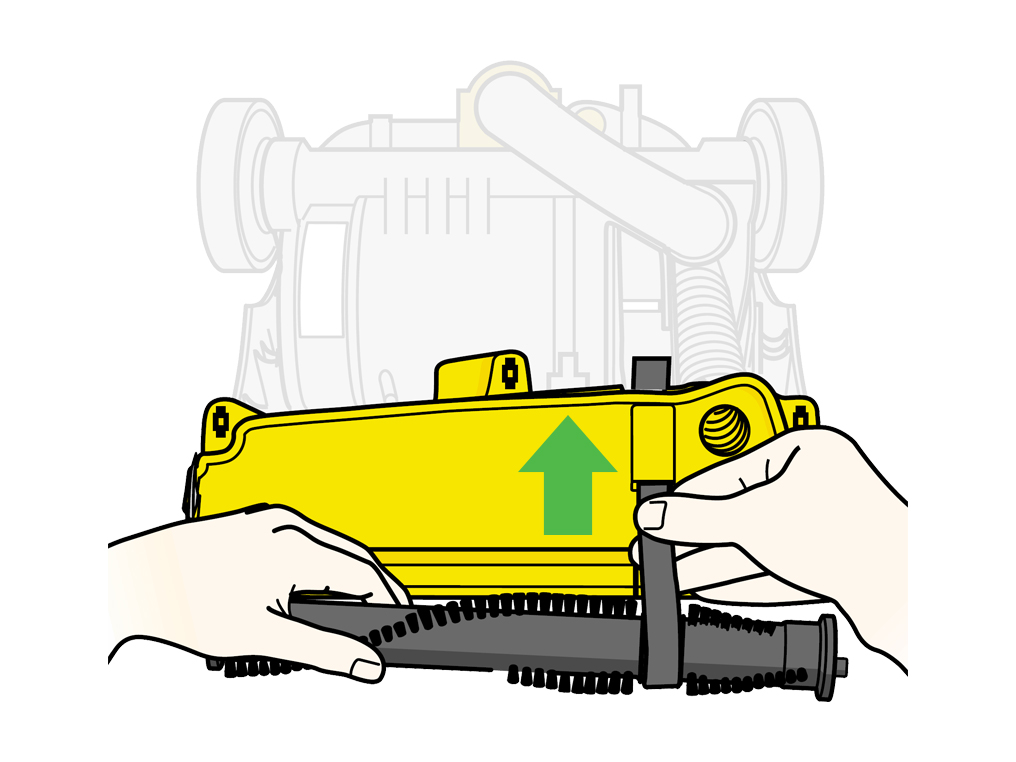
Make sure the end caps are correctly in place.
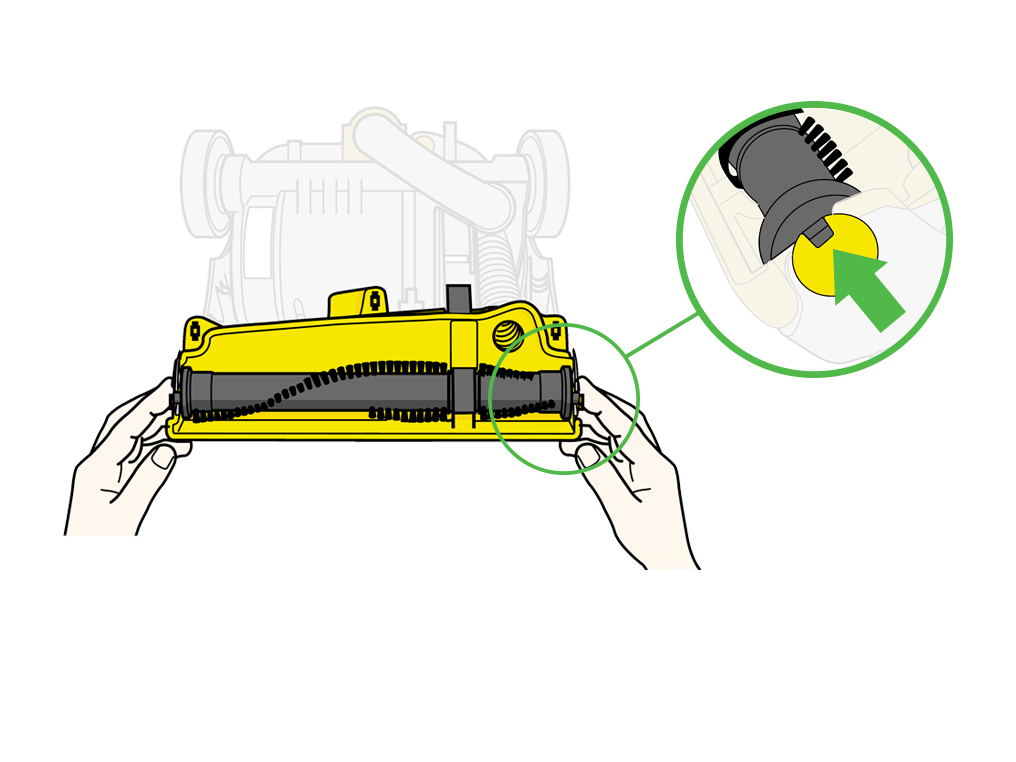
Attaching the belt to the motor pin:
Loop the belt around your thumb
Using the back of the cleaner as a lever, stretch the belt over the motor spindle and release
Ensure that the belt is free of twists
Important: Rotate the Brush bar several times to centralise the belt onto the motor spindle.
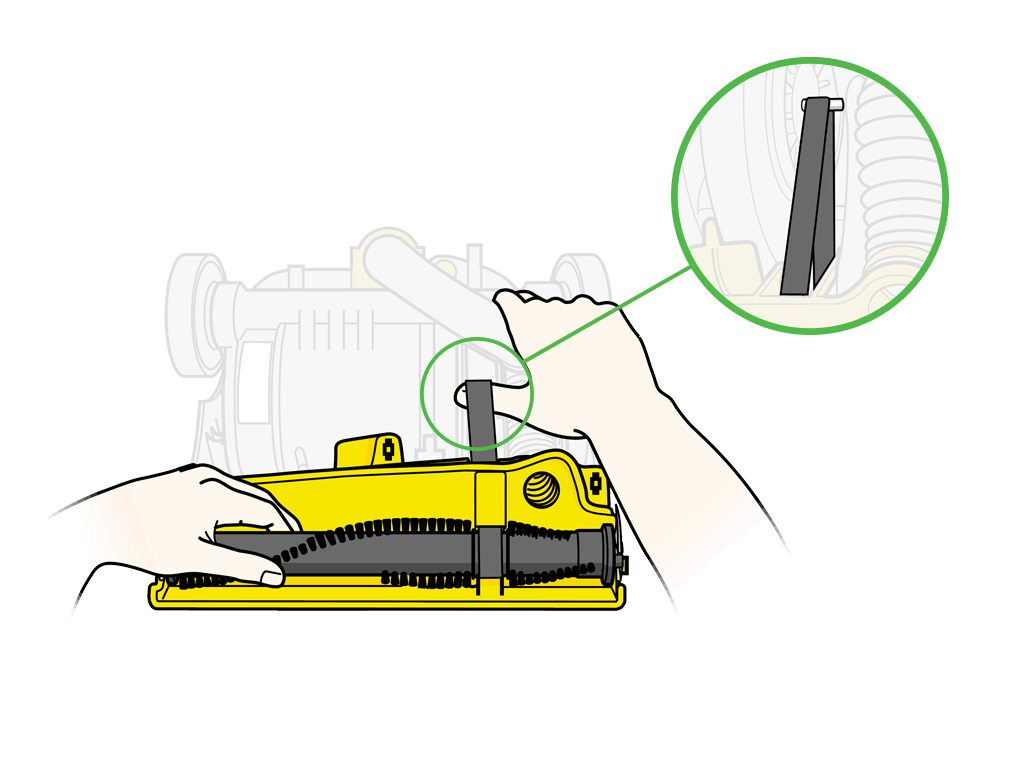
Re-assemble the soleplate:
The three soleplate tabs need to be located inside the bumper strip before the soleplate can be pivoted into position
Replace the soleplate and fasten the three soleplate fasteners with a coin
Make sure the soleplate is fitted flush against the brush housing
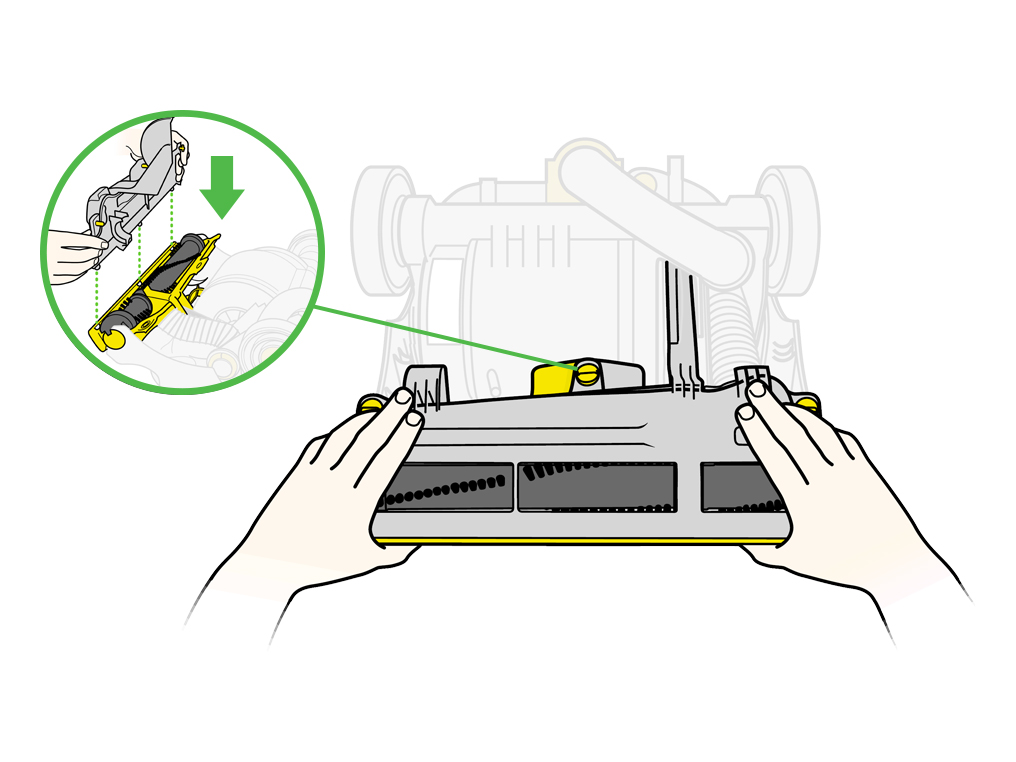
Switch off and unplug the machine before proceeding.
Checking the upright lock
The upright lock can become displaced and cause the machine to not stand correctly. This can be easily resolved by following the procedure shown on the video.
The video may show a different variant although the process remains the same.
Recline the machine and stand behind.
On the right side, by the back wheel you will find the valve pipe carriage.
Check the valve pipe is clear of blockages by pressing the push button to remove it from the valve carriage.

Lock the valve carriage into place by pressing the large push button in front (visible when reclined).
Retest the machine.
Check for any debris or damage
Remove the valve pipe, near to the base of the machine.

Check for blockages:
Check the valve pipe for blockages and remove as necessary. Ensure that the entry seal located on the left side of the duct is not missing or damaged.
Check the seal on the valve pipe for any damage.
Check the seal on the machine for any damage.
Plug the machine in and switch ON. Place your hand over the airway inspection and test the suction.
Is the suction strong or weaker than usual?
Hose inspection
Please refit the Valve pipe before continuing.
Disconnect the Wand from the hose. Stretch out the hose and check for any splits.
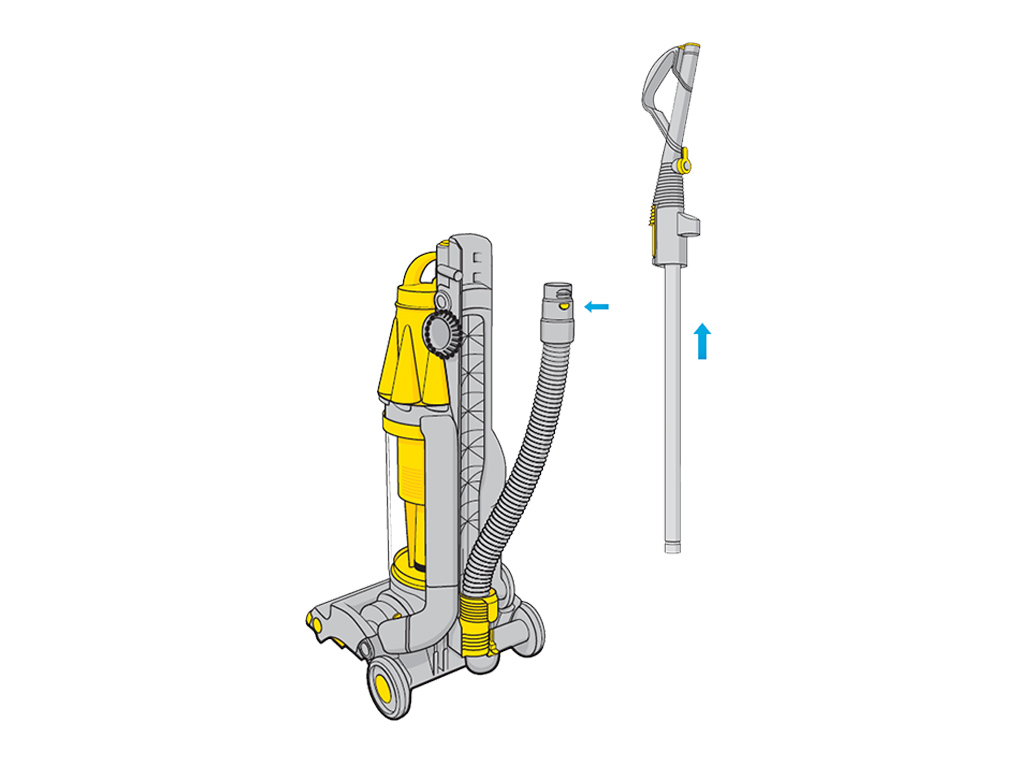
Plug the machine in and switch it ON. Place your hand over the end of the hose and test the suction.

Is the suction from the hose strong or weaker than usual?
Inspect the wand
Look through the Wand. You should see light shining through. If not, remove the blockage.
Connect the Wand to the hose and test the machine.
Inspect the duct, bin and cyclone
Turn the machine off and remove the cyclone and bin assembly.

Check the duct:
Check the entry seal located on the left side of the duct is not missing or damaged
Check the entry pipe and exhaust pipe on the main duct for any blockages, and remove as necessary

Check the duct:
Check the entry seal located on the left side of the duct is not missing or damaged.
Check the entry pipe and exhaust pipe on the main duct for any blockages and remove as necessary.
Empty the bin and ensure the bin base remains open.

Release the clear bin by pressing the bin release catch on the front of the cyclone.

Clean cyclone shroud as necessary and check the cyclone seal is not missing or damaged.

Reassemble and test the machine.
Inspect the U-bend and hose
Tilt the machine forward and unclip the U-bend airway inspection which is located at the base of the hose.
Check for blockages and remove as necessary.

Remove the hose.
Remove the bin from the machine.
The hose release is located at the front. Press the release catch and pull the hose from the back at the same time.
Check the hose at both ends for blockages, and remove as necessary
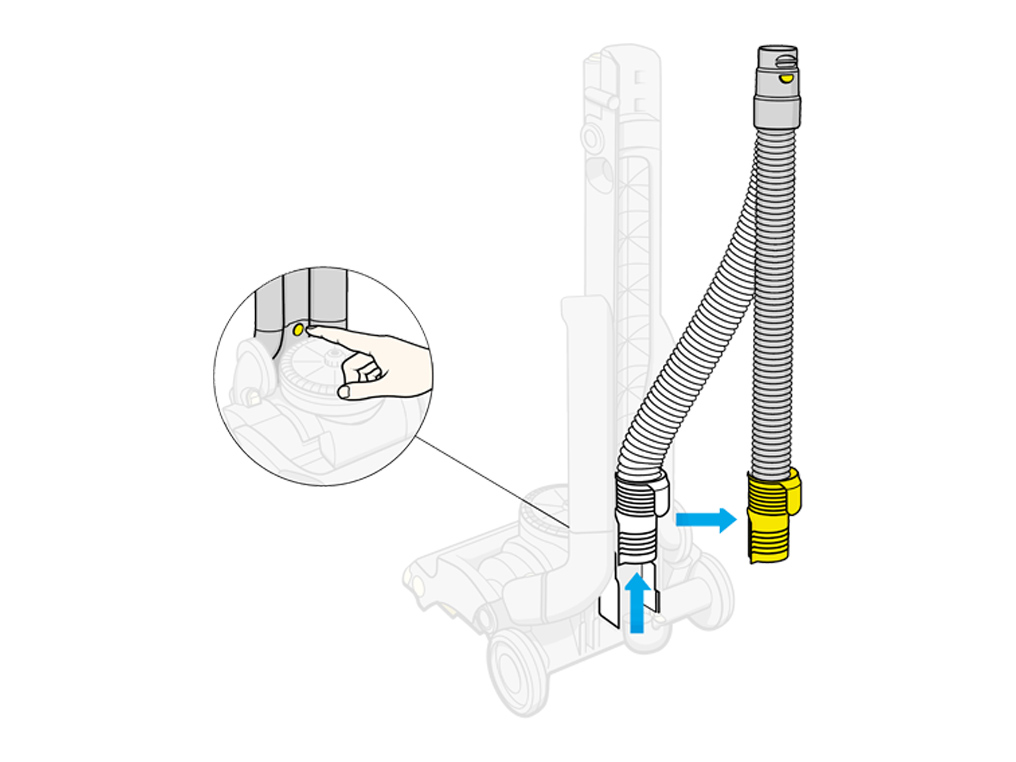
Reassemble:
Reconnect the bin
Reconnect the hose, ensuring it clicks into place and is secure
Reconnect the U-bend, ensuring it clicks into place.
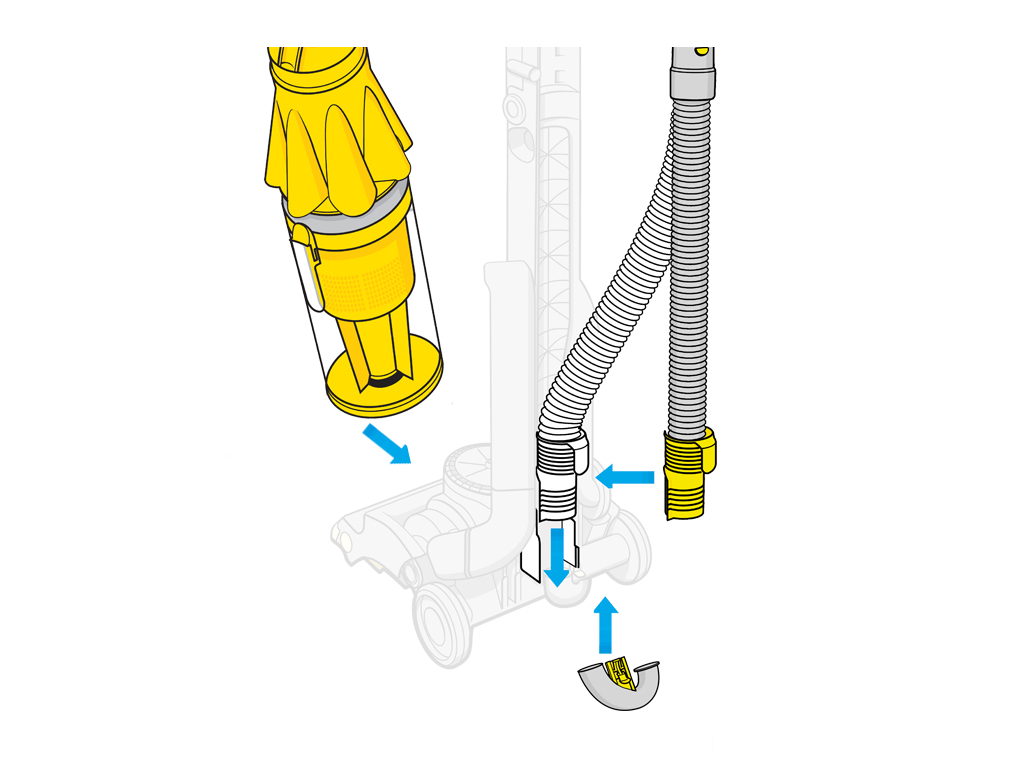
Inspect the duct, bin and cyclone
Turn the machine off and remove the cyclone and bin assembly.

Check the duct:
Check the entry seal located on the left side of the duct is not missing or damaged.
Check the entry pipe and exhaust pipe on the main duct for any blockages and remove as necessary.

Check the bin and cyclone:
Check the cyclone entry seal is not missing or damaged.
Check both entry inlets on the clear bin and cyclone for blockages, and remove as necessary.
Open the bin lid being careful to ensure dust is captured.

Release the clear bin by pressing the bin release catch on the front of the cyclone.

Clean cyclone shroud as necessary and check the cyclone seal is not missing or damaged.

Reassemble and test the machine.
Keep your hands and clothing away from the Brush bar area at all times.
Check the Brush bar
Ensure the machine is turned off and unplugged before proceeding.
Tilt the machine into vacuuming position.
Recline the soleplate by turning the 3 fasteners by a quarter. A coin is best used.
Remove blockages as necessary.
Spin the Brush bar and check for any damage.
If the Brush bar is damaged, choose 'place an order'.
If the Brush bar is not damaged, this issue could be resolved by booking a repair.
Test without the bin and cyclone
Plug the machine in at the wall.
Remove the bin and cyclone, and check to ensure the entry seal located on the left side of the duct is not missing or damaged.

Turn the machine on.

Inspect duct, bin and cyclone
Turn the machine off and remove the cyclone and bin assembly.

Check the duct:
Check the entry seal located on the left side of the duct is not missing or damaged.
Check the entry pipe and exhaust pipe on the main duct for any blockages and remove as necessary.

Check the bin and cyclone:
Check the cyclone entry seal is not missing or damaged.
Check both entry inlets on the clear bin and cyclone for blockages, and remove as necessary.
Open the bin lid being careful to ensure dust is captured.

Release the clear bin by pressing the bin release catch on the front of the cyclone.

Clean cyclone shroud as necessary and check the cyclone seal is not missing or damaged.

Reassemble and test the machine.
Inspect the Cleaner head
Turn off the power and lay the machine flat on the floor, and turn over so that the base can be viewed.
Remove the soleplate by using a coin to turn the fasteners by a quarter.

Carefully remove any blockages from the Brush bar using a pair of scissors to cut away any hair and fibres if necessary.

Inspect the internal hose for blockages and damage and ensure that both ends of the hose are fitted securely.
If a blockage is present, remove any debris.
Reassemble and test the machine.
Inspect the U-bend and hose
Tilt the machine forward and unclip the U-bend airway inspection which is located at the base of the hose.
Check for blockages and remove as necessary.

Remove the hose.
Remove the bin from the machine.
The hose release is located at the front. Press the release catch and pull the hose from the back at the same time.
Check the hose at both ends for blockages, and remove as necessary

Reassemble:
Reconnect the bin
Reconnect the hose, ensuring it clicks into place and is secure
Reconnect the U-bend, ensuring it clicks into place.

Retest the machine.
Check the Wand
Disconnect the Wand from the hose.

Look through the Wand. You should see light shining through. If not, remove the blockage.
How to wash the filter
Please follow the steps in the video.
Has washing the filter resolved the problem?
Washing the filter
Press the release catch and remove the filter housing from the machine.

Remove the filter from the housing. (Only the blue foam and yellow cage should be washed).

Wash both parts in cold water only.
WARNING: Do not use detergent. Do not wash in a dishwasher or washing machine.
Repeat until the water runs clear.

Leave filter to dry in a warm place until filter is completely dry. Do not dry the filter in a tumble dryer, microwave, oven or near an open flame.
Ensure the filter is completely dry before replacing in the machine.

The filter should be washed at least once every 3-6 months.
NB: The post-motor filter located under the clear bin should last the lifetime of the machine and does not need to be washed.
Test the Wand
Make sure the machine is standing in the upright position.

Pull back the Wand cap.

Turn the machine on and place your hand on the end of the Wand.

Is the suction strong or weaker than usual?
Please select the appropriate option
The switch does not light up.
Press the switch
Press the rear of the switch to make sure it stays in the on position.
Please select the appropriate option
Check electrical supply
Is the power cord or plug damaged?
Are the other household appliances working?
Does the vacuum work when plugged into another socket?
When did the machine last have power?
Thermal cut out
Most Dyson vacuums have a built in safety system that stops the machine if it begins to overheat. This usually happens because the filters need washing or your machine is blocked.
Carry out the performance checks, and if your machine cuts out unplug and leave for at least 2 hours to cool down.
Please select the appropriate option
Is the suction strong or weaker than usual?
How to wash the filter
Please follow the steps in the video.
Is there anything else we can help with?
Washing the filter
Press the release catch and remove the filter housing from the machine.

Remove the filter from the housing. (Only the blue foam and yellow cage should be washed).

Wash both parts in cold water only.
WARNING: Do not use detergent. Do not wash in a dishwasher or washing machine.
Repeat until the water runs clear.

Leave filter to dry in a warm place until filter is completely dry. Do not dry the filter in a tumble dryer, microwave, oven or near an open flame.
Ensure the filter is completely dry before replacing in the machine.

The filter should be washed at least once every 3-6 months.
NB: The post-motor filter located under the clear bin should last the lifetime of the machine and does not need to be washed.
What sort of smell?
Clean the bin and cyclone
Empty the clear bin
Place the bin inside a bag, close the bag around the bin and press the button to release the dust and debris.
Shake or tap firmly to remove all dust and debris from inside the bin and fine dust collector.

Remove the clear bin:
With the bin base open, press release catch at the top of the clear bin to separate the bin from the cyclone

Clean the cyclone.
Clean the shroud with a dry cloth or by using the combination tool.
Tap gently to remove dust from within the cyclone.
WARNING: Do not use any liquids to clean the cyclone.

Clean the bin:
WARNING: Clean the bin with cold water only, do not use any detergents or polish on the bin
Reconnect cyclone and close lid to place back onto the machine.

Rebuild and test the machine.
How to wash the filter
Please follow the steps in the video.
Has washing the filters resolved the problem?
Washing the filter
Press the release catch and remove the filter housing from the machine.

Remove the filter from the housing. (Only the blue foam and yellow cage should be washed).

Wash both parts in cold water only.
WARNING: Do not use detergent. Do not wash in a dishwasher or washing machine.
Repeat until the water runs clear.

Leave filter to dry in a warm place until filter is completely dry. Do not dry the filter in a tumble dryer, microwave, oven or near an open flame.
Ensure the filter is completely dry before replacing in the machine.

The filter should be washed at least once every 3-6 months.
NB: The post-motor filter located under the clear bin should last the lifetime of the machine and does not need to be washed.
Please select the appropriate option
Keep your hands and clothing away from the Brush bar area at all times.
Check the Brush bar
Ensure the machine is turned off and unplugged before proceeding.
Tilt the machine into vacuuming position.
Recline the machine and turn over so that you can access the Brush bar.
Remove the soleplate by turning the 3 fasteners by a quarter. A coin is best used.

Remove blockages as necessary.
Spin the Brush bar and check for any damage.
If there's no damage, reassemble and, whilst keeping your hands and clothing away from the Brush bar, turn the machine on.
If you notice the belt has snapped, choose 'how to replace belt'.
Has checking the Brush bar resolved the problem?
Test the suction
If the machine is spitting out dust, there may be a blockage.
Make sure the machine is standing in the upright position.
Pull back the Wand cap.

Turn the machine on and place your hand on the end of the Wand.
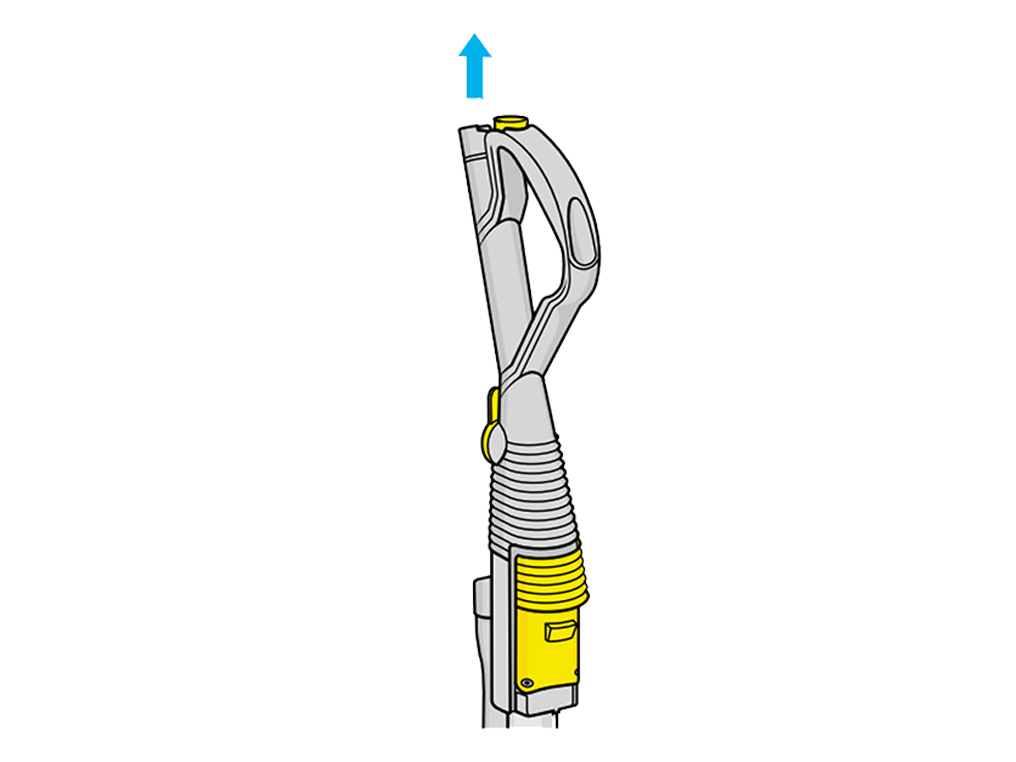
Is the suction strong or weaker than usual?
The video may show a different model but the process remains the same.
Please follow the steps in the video.
Has checking the upright lock resolved the problem?
Checking the upright lock
The upright lock can become displaced and cause the machine to not stand correctly. This can be easily resolved by following the procedure shown on the video.
The video may show a different variant although the process remains the same.
Recline the machine and stand behind.
On the right side, by the back wheel you will find the valve pipe carriage.
Check the valve pipe is clear of blockages by pressing the push button to remove it from the valve carriage.

Lock the valve carriage into place by pressing the large push button in front (visible when reclined).
Retest the machine.
Please select the appropriate option
How to assemble your Dyson machine
Connect the hose to the bottom of the machine, ensure the hose clicks into place.
The wand is thread through the hose and clicks to the top of the duct.

The brush and stair tool attach to the top of the duct, and the crevice tool attaches to the wand.
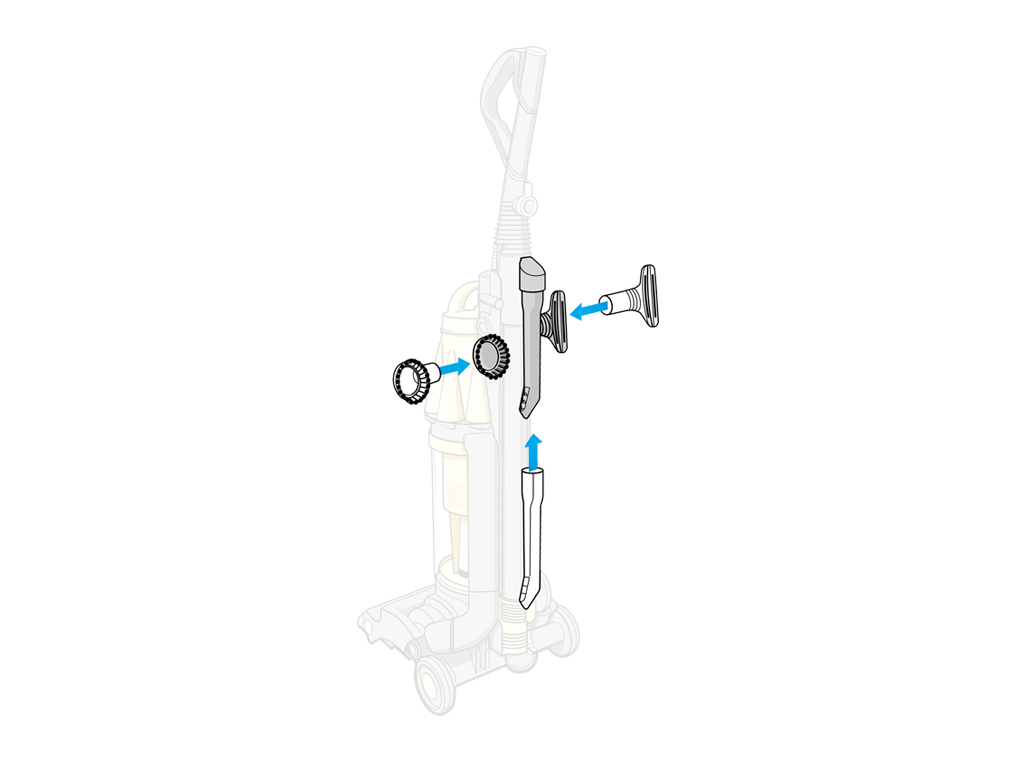
The cable wraps around the bottom hose cuff and the top of the Wand.
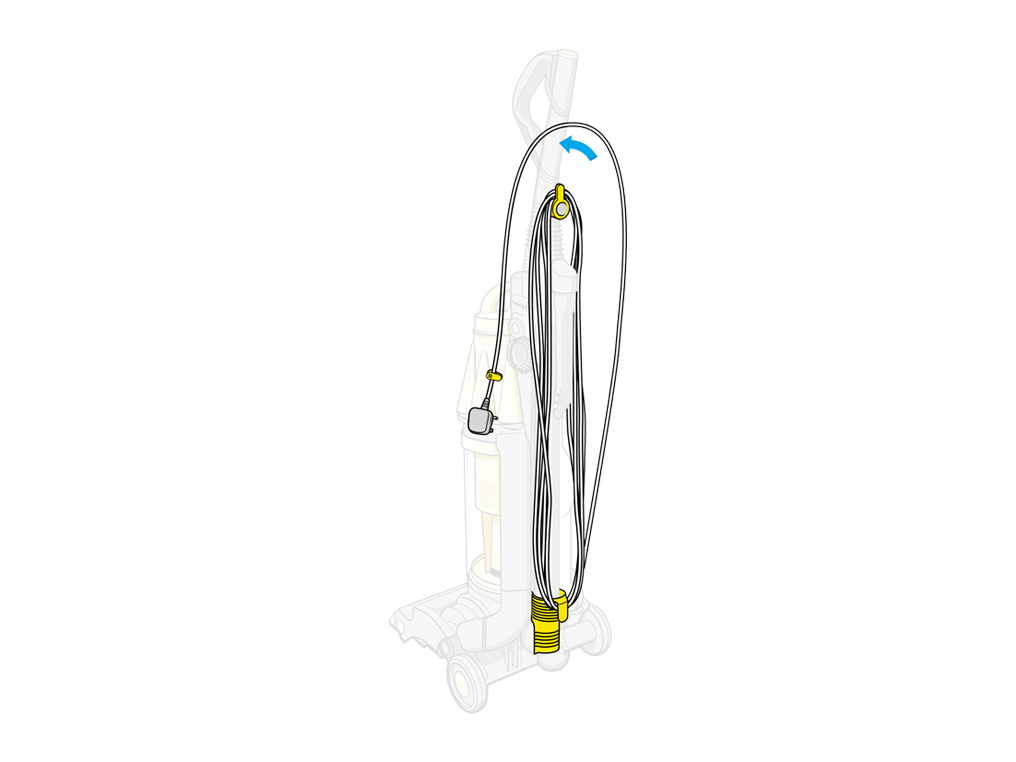
How to attach the accessories
Ensure the machine is in upright position before using tools.

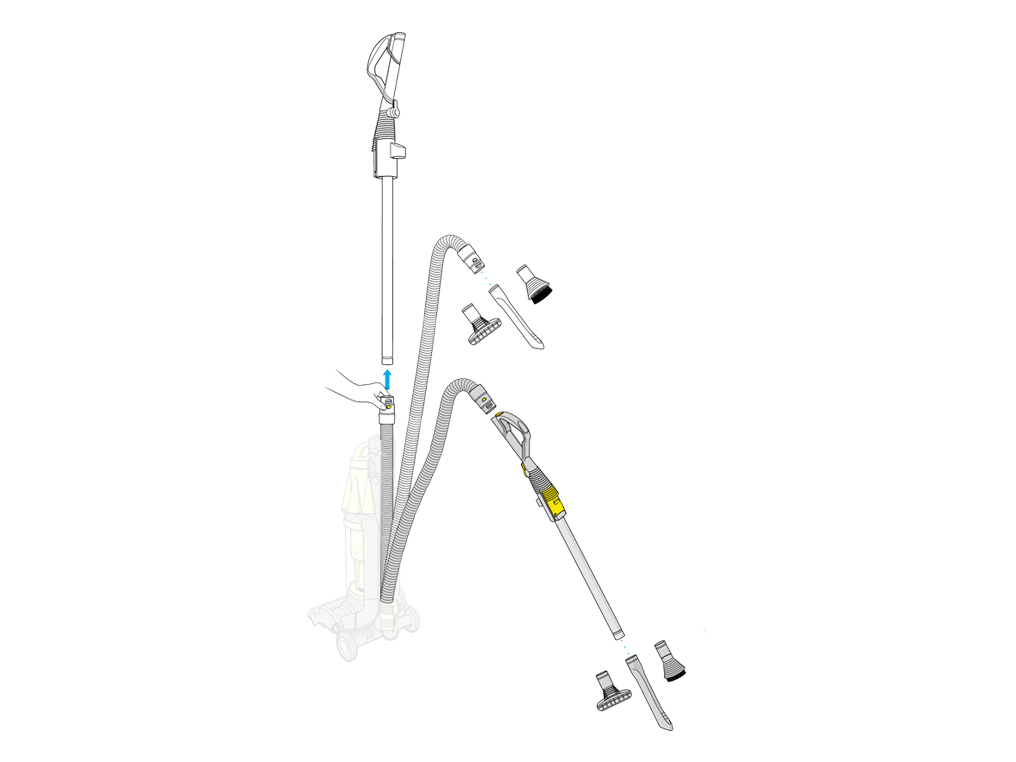
Press the release catch on the wand to release from the duct.

Attaching tools:
Attach tools to either side of Wand. Slide the Wand cap back to attach on this side
Attach tools direct to the hose
Serial number location
The serial number can be found underneath the machine between the wheels.
Carrying your Dyson machine
For your safety, do not press the cyclone release catch when carrying your machine.
To lift the machine, use the carrying handle on the cyclone top only.
How to empty the bin
Press the release catch located at the top of the bin and detach from the machine.

Pull the release catch located on the cyclone top, under the handle.

Release the bin from the cyclone by pressing the front release catch.

Clean the cyclone with a cloth and tap gently to remove dust.

Reassemble clear bin and close the bin lid before placing on the machine.
Wash the filter
Please follow the steps in the video to wash the filter.
Is there anything else we can help with?
Washing the filter
Press the release catch and remove the filter housing from the machine.

Remove the filter from the housing. (Only the blue foam and yellow cage should be washed).

Wash both parts in cold water only.
WARNING: Do not use detergent. Do not wash in a dishwasher or washing machine.
Repeat until the water runs clear.

Leave filter to dry in a warm place until filter is completely dry. Do not dry the filter in a tumble dryer, microwave, oven or near an open flame.
Ensure the filter is completely dry before replacing in the machine.

The filter should be washed at least once every 3-6 months.
NB: The post-motor filter located under the clear bin should last the lifetime of the machine and does not need to be washed.
Further help
DC07 Standard™


