Let's get your machine working.
Dyson V11 Animal (Purple/Nickel)
Let's get your machine working.
Dyson V11 Animal (Purple/Nickel)-
SV14
-
Troubleshooting
-
Unusual noise
-
Machine is pulsating
-
Issue resolved
-
Clear the bin
-
Washing the filter - video
-
Replacement part required
-
Washing the filter - step-by-step
-
Grating or rattle
-
Test the machine
-
Direct drive cleaner head
-
Replacement part required
-
High torque cleaner head
-
Replacement part required
-
Quick-release Mini motorised head
-
Replacement part required
-
Soft roller cleaner head
-
Replacement part required
-
Washable brush bars - step by step
-
Test the machine
-
Replacement part required
-
Check the bin inlet
-
Replacement part required
-
High pitched whistle
-
The cyclone and bin
-
Clear the bin
-
Direct drive cleaner head
-
Replacement part required
-
High torque cleaner head pulsing
-
Replacement part required
-
Mini motorised head
-
Replacement part required
-
Soft roller cleaner head
-
Pick up issues
-
Check for blockages
-
Select floor tool
-
Accessory blocked
-
Machine is pulsating
-
Direct drive cleaner head pulsing
-
QR Mini motorised head pulsing
-
Soft roller cleaner head pulsing
-
Washable brush bars - step by step
-
Cutting out
-
Blockage light
-
Power or electrical issue
-
time remaining but machine cut out
-
Charge the machine
-
Issue not resolved, please speak to our Customer Support Team
-
High level of charge
-
Cutting out
-
Digital screen showing alert
-
Filter attachment alert
-
Washing the filter - step by step
-
No further assistance required
-
Battery alerts
-
Charging the battery
-
LEDs whilst charging
-
No power
-
Replacement part required
-
Replacement part required
-
No LEDs whilst charging
-
Blue flashing LEDs whilst charging
-
Inspect display
-
Replacement part required
-
Replacement part required
-
Blockage alert
-
Diagnostic screen
-
Issue resolved
-
Unable to exit manually
-
Issue resolved
-
Filter wash alert
-
Machine will not turn on
-
LED showing
-
Inspect display
-
No power
-
Replacement part required
-
Issue not resolved, please speak to our Customer Support Team
-
No LED
-
Blue flashing LEDs whilst charging
-
Machine will not turn on
-
LED showing
-
Machine overheating
-
Performance checks
-
Check for blockages
-
Cutting out
-
Unusual smell
-
Issue not resolved, please speak to our Customer Support Team
-
Damp or musty
-
Damp or musty smell
-
Replacement part required
-
Damp or musty smell still present
-
Clean the bin
-
Washing the filter - video
-
Damp or musty smell
-
Washing the filter - step-by-step
-
Visible issue
-
The Brush bar is not spinning on the floor tool
-
Replacement part required
-
Replacement part required
-
Filter blocking frequently
-
Emptying the bin - step by step
-
Scratches or marks on the Wand
-
Replacement part required
-
Issue not resolved, please speak to our Customer Support Team
-
Machine is not picking up well
-
Popular queries
We're glad the problem's been solved.
Please let us know if there's anything else we can help you with.
The Dyson guarantee

'How to ' videos and tips

Exclusive owner benefits

Expert advice. 7 days a week.

Hassle-free repairs and replacement
We need a little more information to help us solve your issue.
But our Customer Support Team will be able to solve your problem.
Please contact our customer service team on 01-475-7109, or directly on Live Chat through our Digital Assistant by clicking the purple icon at the bottom of the page. You can start a conversation with an Expert by clicking the agent icon at the bottom left of the chat window.
You might need a replacement part.
It looks like the Gold torque drive is not working. You can solve this by ordering a new one below.
Gold torque drive
Part no. 970100-03
High Torque cleaner head With Dynamic Load Sensor (DLS) technology. Intelligently adapts suction to deep clean carpets. Extends run time on hard floors.
€86.10
Gold torque drive
Part no. 970100-03
High Torque cleaner head With Dynamic Load Sensor (DLS) technology. Intelligently adapts suction to deep clean carpets. Extends run time on hard floors.
€86.10
€86.10
We need a little more information to help us solve your issue.
But our Customer Support Team will be able to solve your problem.
Please contact our customer service team on 01-475-7109, or directly on Live Chat through our Digital Assistant by clicking the purple icon at the bottom of the page. You can start a conversation with an Expert by clicking the agent icon at the bottom left of the chat window.
You might need a replacement part.
It looks like the Bin is not working. You can solve this by ordering a new one below.
Bin
Part no. 970050-01
Replacement bin for your Dyson vacuum cleaner.
€51.66
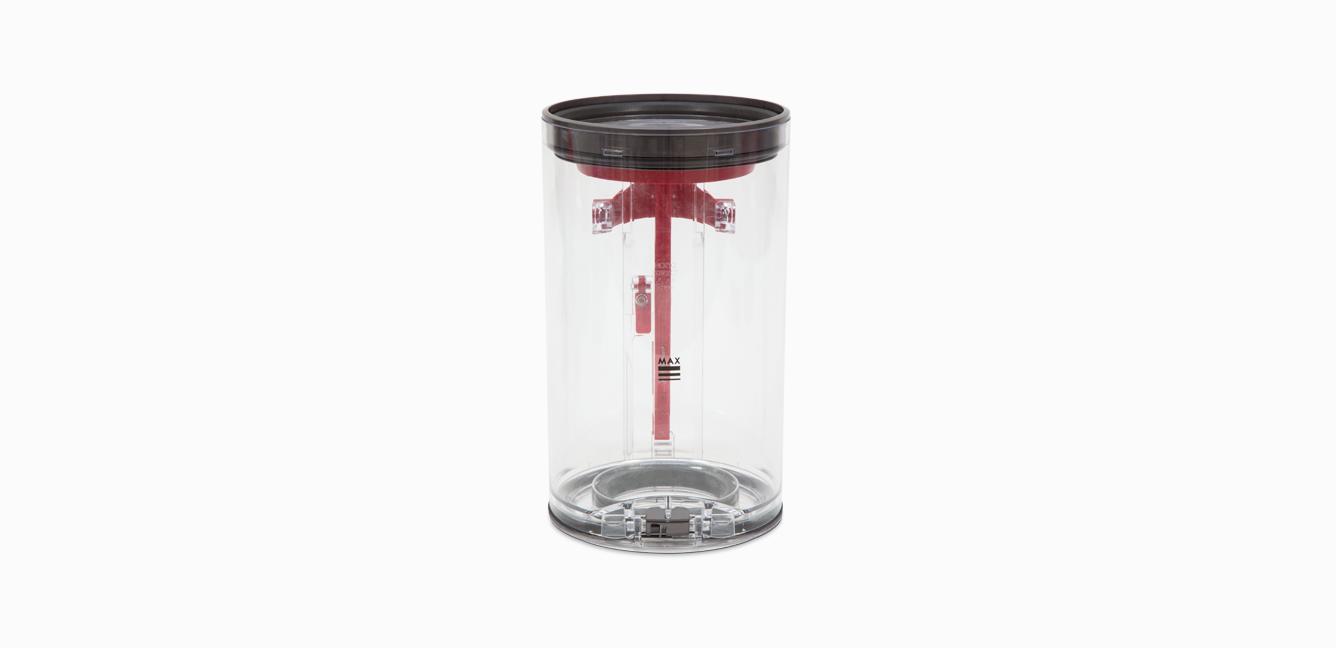
Bin
Part no. 970050-01
Replacement bin for your Dyson vacuum cleaner.
€51.66
€51.66
We need a little more information to help us solve your issue.
But our Customer Support Team will be able to solve your problem.
Please contact our customer service team on 01-475-7109, or directly on Live Chat through our Digital Assistant by clicking the purple icon at the bottom of the page. You can start a conversation with an Expert by clicking the agent icon at the bottom left of the chat window.
We need a little more information to help us solve your issue.
Please contact our customer service team on 01-475-7109, or directly on Live Chat through our Digital Assistant by clicking the purple icon at the bottom of the page. You can start a conversation with an Expert by clicking the agent icon at the bottom left of the chat window.
We're glad the problem's been solved.
Please let us know if there's anything else we can help you with.
The Dyson guarantee

'How to ' videos and tips

Exclusive owner benefits

Expert advice. 7 days a week.

Hassle-free repairs and replacement
Please call us to resolve this problem.
It looks like the Main body & Cyclone isn't working. We know how to fix it – we just can’t do it online.
One of our Dyson experts can help you get the parts or assistance you need.
Main body & Cyclone
Part no. 970142-01
Replacement Body & Big Cyclone for your Dyson cordless vacuum.
If you require this part please email us.
€104.55

Main body & Cyclone
Part no. 970142-01
Replacement Body & Big Cyclone for your Dyson cordless vacuum.
If you require this part please email us.
€104.55
Please call us to resolve this problem.
It looks like the Main body & Cyclone isn't working. We know how to fix it – we just can’t do it online.
One of our Dyson experts can help you get the parts or assistance you need.
Main body & Cyclone
Part no. 970142-01
Replacement Body & Big Cyclone for your Dyson cordless vacuum.
If you require this part please email us.
€104.55

Main body & Cyclone
Part no. 970142-01
Replacement Body & Big Cyclone for your Dyson cordless vacuum.
If you require this part please email us.
€104.55
You might need a replacement part.
It looks like the Battery is not working. You can solve this by ordering a new one below.
Battery
Part no. 970145-06
Replacement battery for your Dyson cordless vacuum.
€95.00
Battery
Part no. 970145-06
Replacement battery for your Dyson cordless vacuum.
€95.00
€95.00
We need a little more information to help us solve your issue.
But our Customer Support Team will be able to solve your problem.
Please contact our customer service team on 01-475-7109, or directly on Live Chat through our Digital Assistant by clicking the purple icon at the bottom of the page. You can start a conversation with an Expert by clicking the agent icon at the bottom left of the chat window.
We're glad the problem's been solved.
Please let us know if there's anything else we can help you with.
The Dyson guarantee

'How to ' videos and tips

Exclusive owner benefits

Expert advice. 7 days a week.

Hassle-free repairs and replacement
We're glad the problem's been solved.
Please let us know if there's anything else we can help you with.
The Dyson guarantee

'How to ' videos and tips

Exclusive owner benefits

Expert advice. 7 days a week.

Hassle-free repairs and replacement
Please call us to resolve this problem.
It looks like the Main body & Cyclone isn't working. We know how to fix it – we just can’t do it online.
One of our Dyson experts can help you get the parts or assistance you need.
Main body & Cyclone
Part no. 970142-01
Replacement Body & Big Cyclone for your Dyson cordless vacuum.
If you require this part please email us.
€104.55

Main body & Cyclone
Part no. 970142-01
Replacement Body & Big Cyclone for your Dyson cordless vacuum.
If you require this part please email us.
€104.55
We need a little more information to help us solve your issue.
But our Customer Support Team will be able to solve your problem.
Please contact our customer service team on 01-475-7109, or directly on Live Chat through our Digital Assistant by clicking the purple icon at the bottom of the page. You can start a conversation with an Expert by clicking the agent icon at the bottom left of the chat window.
We need a little more information to help us solve your issue.
Please contact our customer service team on 01-475-7109, or directly on Live Chat through our Digital Assistant by clicking the purple icon at the bottom of the page. You can start a conversation with an Expert by clicking the agent icon at the bottom left of the chat window.
Please call us to resolve this problem.
It looks like the Main body & Cyclone isn't working. We know how to fix it – we just can’t do it online.
One of our Dyson experts can help you get the parts or assistance you need.
Main body & Cyclone
Part no. 970142-01
Replacement Body & Big Cyclone for your Dyson cordless vacuum.
If you require this part please email us.
€104.55

Main body & Cyclone
Part no. 970142-01
Replacement Body & Big Cyclone for your Dyson cordless vacuum.
If you require this part please email us.
€104.55
You might need a replacement part.
It looks like the Wand is not working. You can solve this by ordering a new one below.
Wand
Part no. 969109-04
Replacement wand for your Dyson vacuum cleaner.
€38.50

Wand
Part no. 969109-04
Replacement wand for your Dyson vacuum cleaner.
€38.50
€38.50
You might need a replacement part.
It looks like the Wand is not working. You can solve this by ordering a new one below.
Wand
Part no. 969109-04
Replacement wand for your Dyson vacuum cleaner.
€38.50

Wand
Part no. 969109-04
Replacement wand for your Dyson vacuum cleaner.
€38.50
€38.50
Please call us to resolve this problem.
It looks like the Main body & Cyclone isn't working. We know how to fix it – we just can’t do it online.
One of our Dyson experts can help you get the parts or assistance you need.
Main body & Cyclone
Part no. 970142-01
Replacement Body & Big Cyclone for your Dyson cordless vacuum.
If you require this part please email us.
€104.55

Main body & Cyclone
Part no. 970142-01
Replacement Body & Big Cyclone for your Dyson cordless vacuum.
If you require this part please email us.
€104.55
Unless prompted to do so, do not press the trigger when checking any part of the machine. Operating the machine while it is partially dismantled could result in personal injury.
Please select the appropriate option
Please select the appropriate option
Check the bin inlet
Check the inlet at the front of the machine for any blockages and remove as necessary.
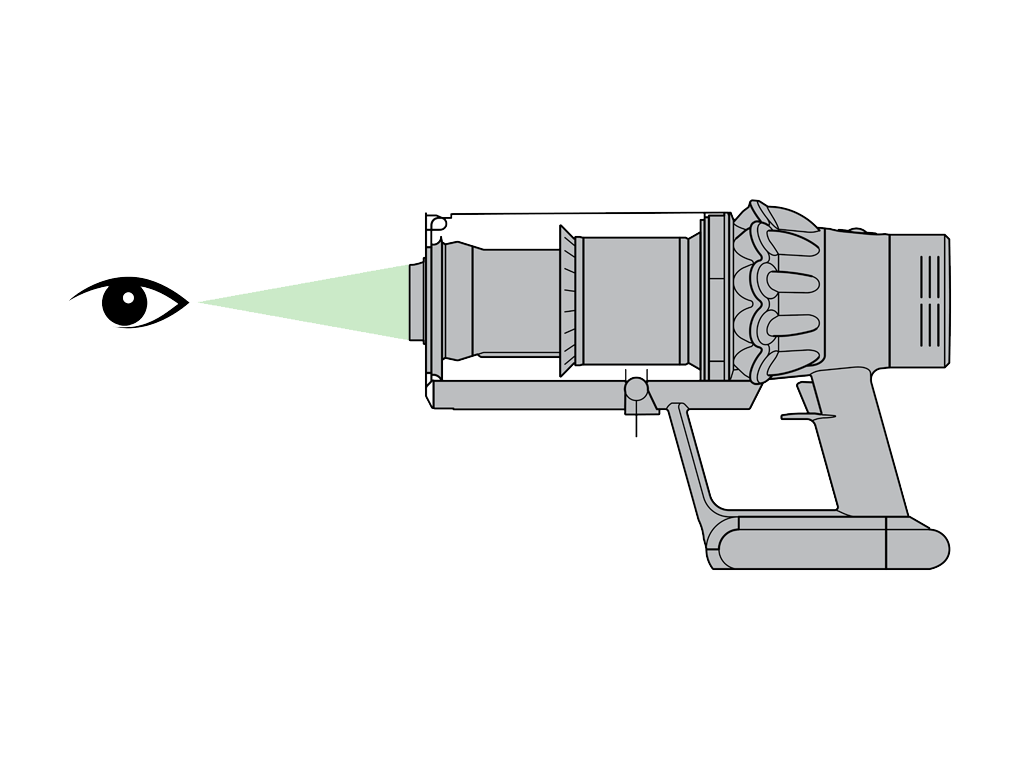
Check the shroud opening
Hold the machine with the bin in a downwards position. Firmly push the red bin release button. The bin will slide down opening the bin base. The bin base will not open if the red button is not pushed down fully.
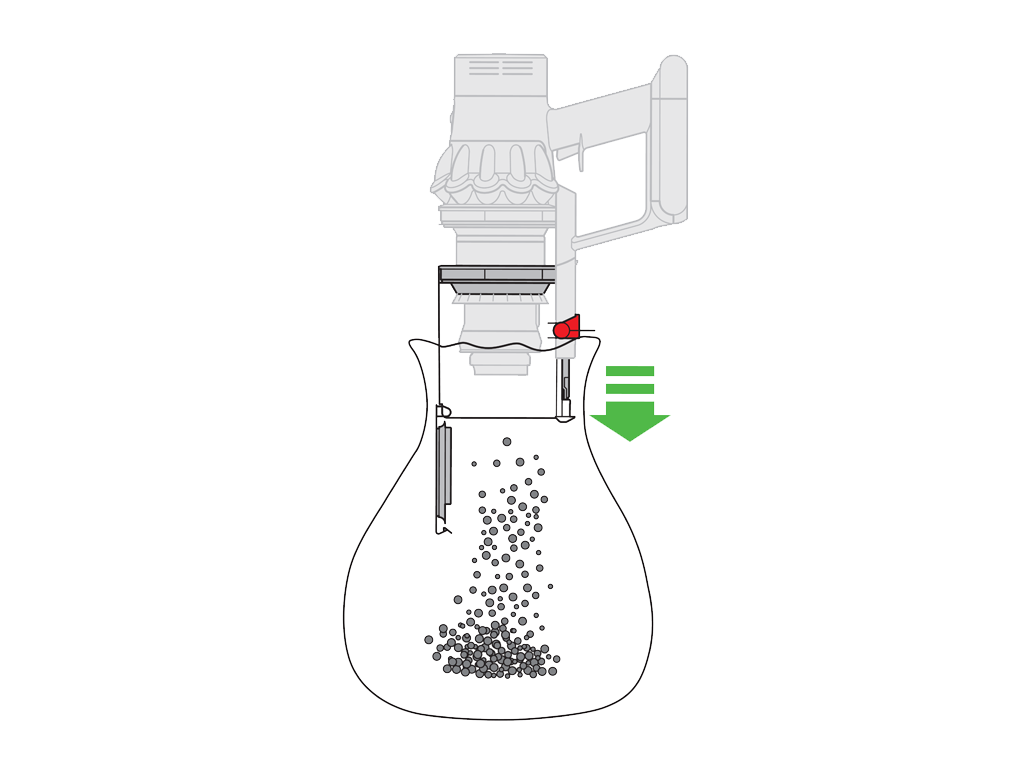
Check the opening on the cyclone shroud for any blockages. Remove as necessary.
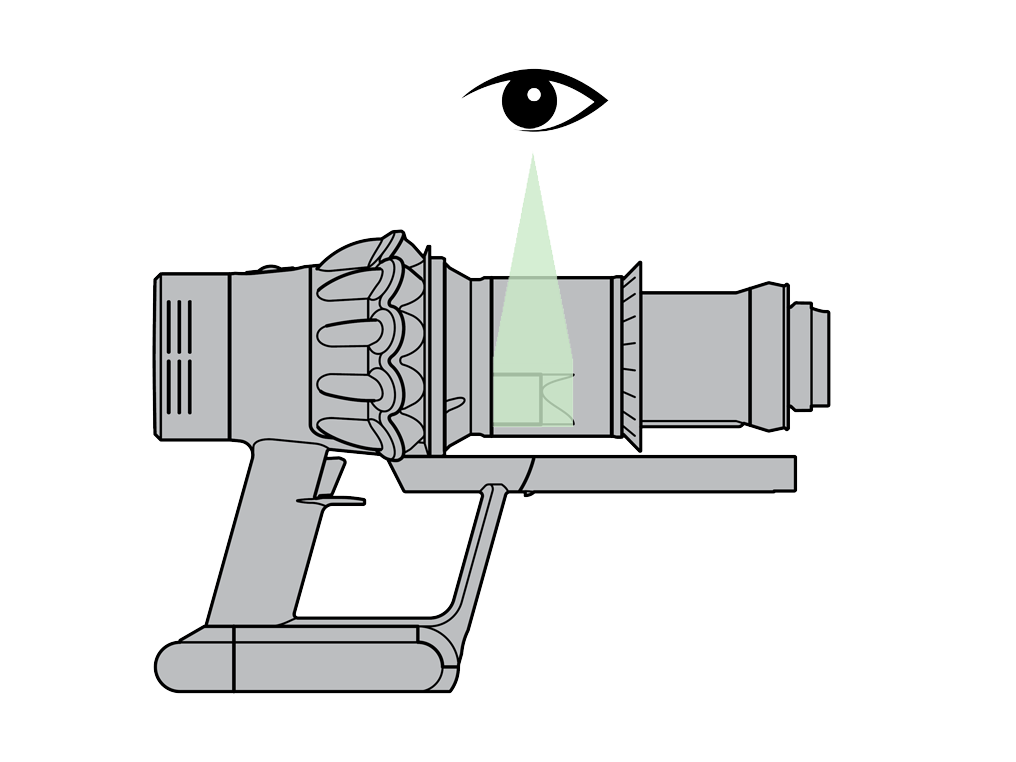
Close the clear bin by pushing the bin base upwards until it clicks into place.

Press and hold the trigger for 10 seconds.
Remove the bin
Hold the machine with the bin in a downwards position. Firmly push the red bin release button. The bin will slide down opening the bin base.

Press the red button located on the bin runner to release the bin and slide the bin off the runner.

Gently tap the side of the cyclone over a bin. This will remove any fine dust clogged up in the cyclone. Using the Combination tool, clean the shroud to remove any debris around the cyclone.
Check the cyclone for blockages and remove as necessary.
To refit the clear bin
Insert the spine into the bin runner.
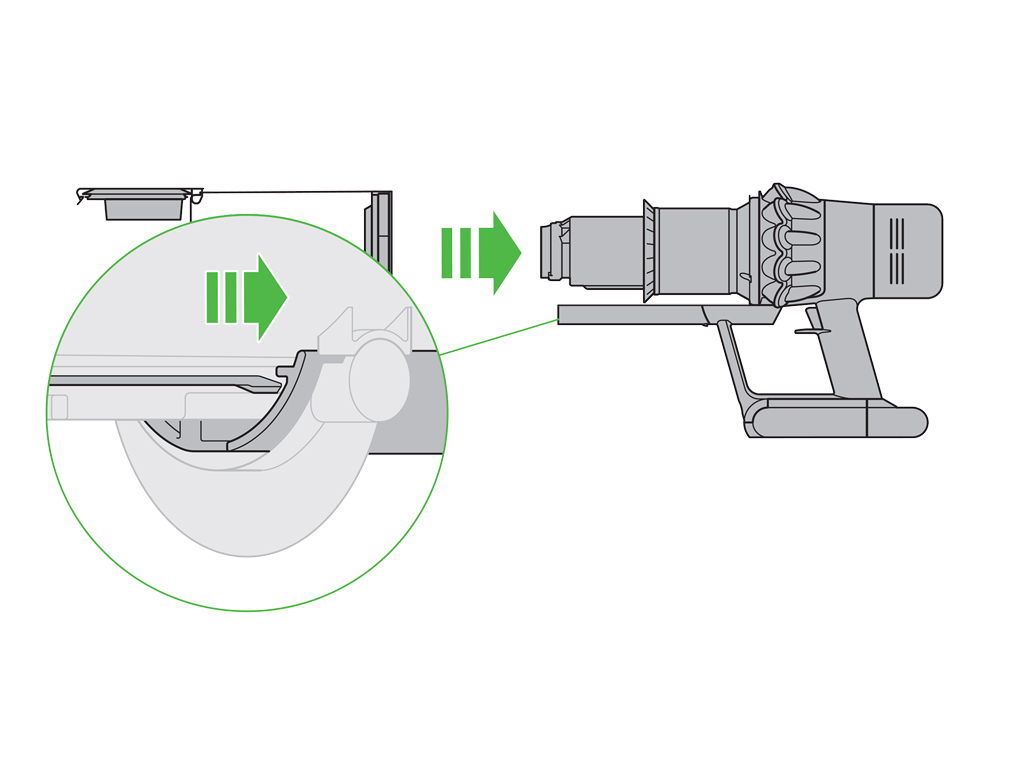
Close the clear bin by pushing the bin base upwards until it clicks into place.

Attach the wand and cleaner head and test the machine.
Our cordless vacuum filters are engineered to capture microscopic particles. Over time, these can build up in the filter and reduce performance. By washing the filter once a month you can help maintain suction power and prevent the machine from pulsating.
This indicates the filter needs washing.
Please follow the steps in the video.
Find the text version of the step-by-step guide instead, under "Has this resolved the problem?".
Leave the filter unit to dry completely in a dry environment with good airflow, for a minimum of 24 hours. Ensuring it is completely dry before refitting.
Press and hold the trigger for 10 seconds.
Has this resolved the problem?
Removing the filter
Remove the filter unit by twisting it counter clockwise. Gently pull away from the machine.

Gently tap the filter unit to remove any excess dust and debris before washing it.
Wash the filter in cold water only.
WARNING: Please do not use detergent, do not wash in a dishwasher or washing machine.
Wash the pleated paper element of the filter unit first; hold the filter unit under a cold water tap with the foam element downwards and run cold water over the pleated paper. Continue washing until the water runs clear.

Wash the foam element of the filter unit next; hold the filter unit under a cold water tap with the foam element downwards so that dirty water does not contaminate the pleated paper element. Run cold water over the inside and outside of the foam element and squeeze the foam gently to expel the dirt. Continue washing until the water runs clear.

Wash the outside of the filter unit. Then fill the unit with cold water, place your hands over the open ends and shake gently. Repeat washing the elements and outside of the filter unit until the water runs clear.

Gently shake the filter unit to remove any excess water and leave to drain with the foam element end facing up.

Drying
Leave the filter unit to dry completely in a dry environment with good airflow, for a minimum of 24 hours. Check that the filter unit is completely dry.

Refit
To refit, return the filter unit to the main body and twist clockwise until it clicks into place.

The filter unit may require more frequent washing if vacuuming fine dust or if use is mainly in Boost mode.
Test the machine
Remove all tools and accessories from the machine e.g. Wand, Cleaner head, Crevice tool etc. Please ensure the bin is empty before continuing with any checks.
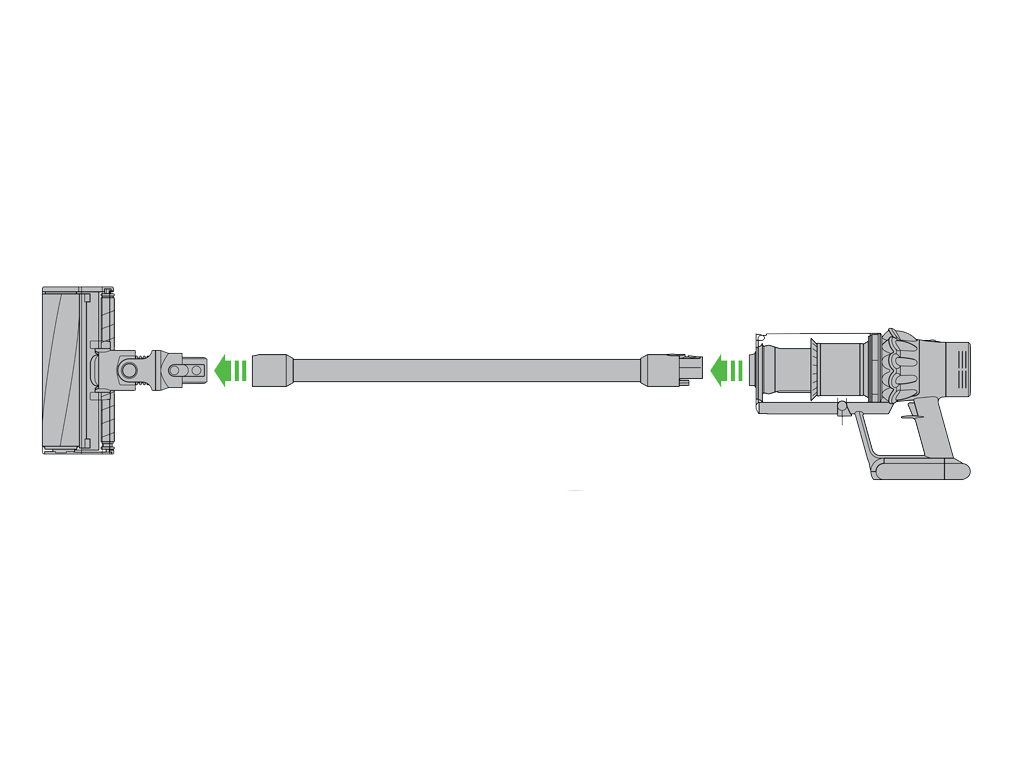
Put the machine in Boost mode.
Press and hold the trigger for 10 seconds.
Check for blockages
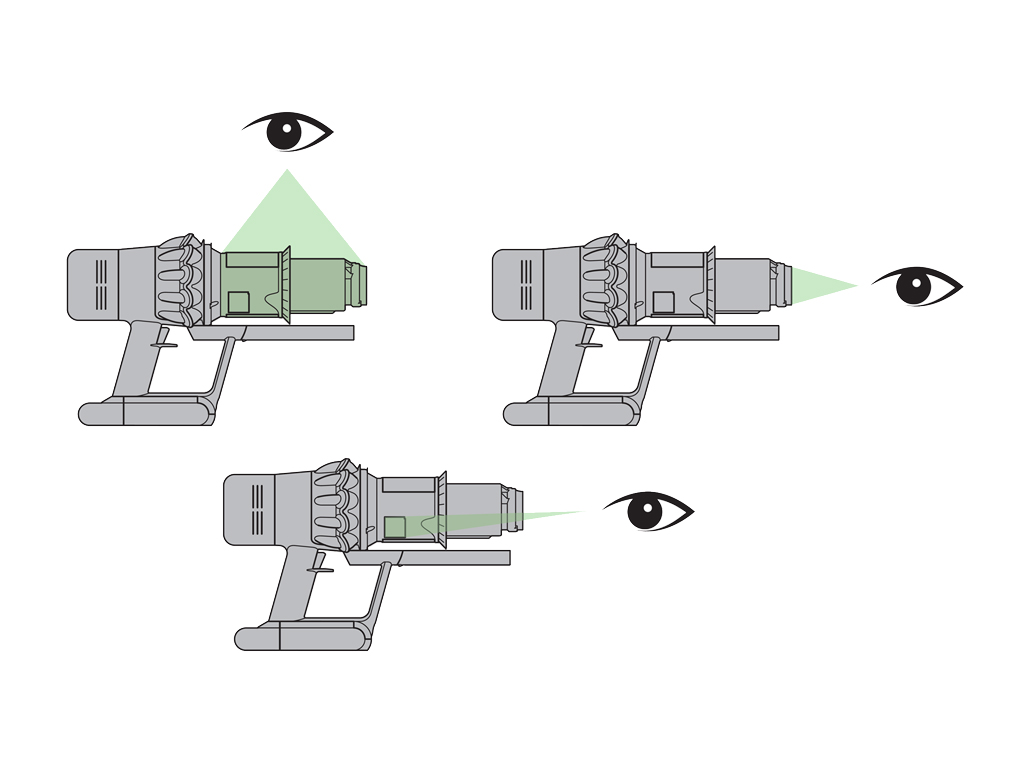
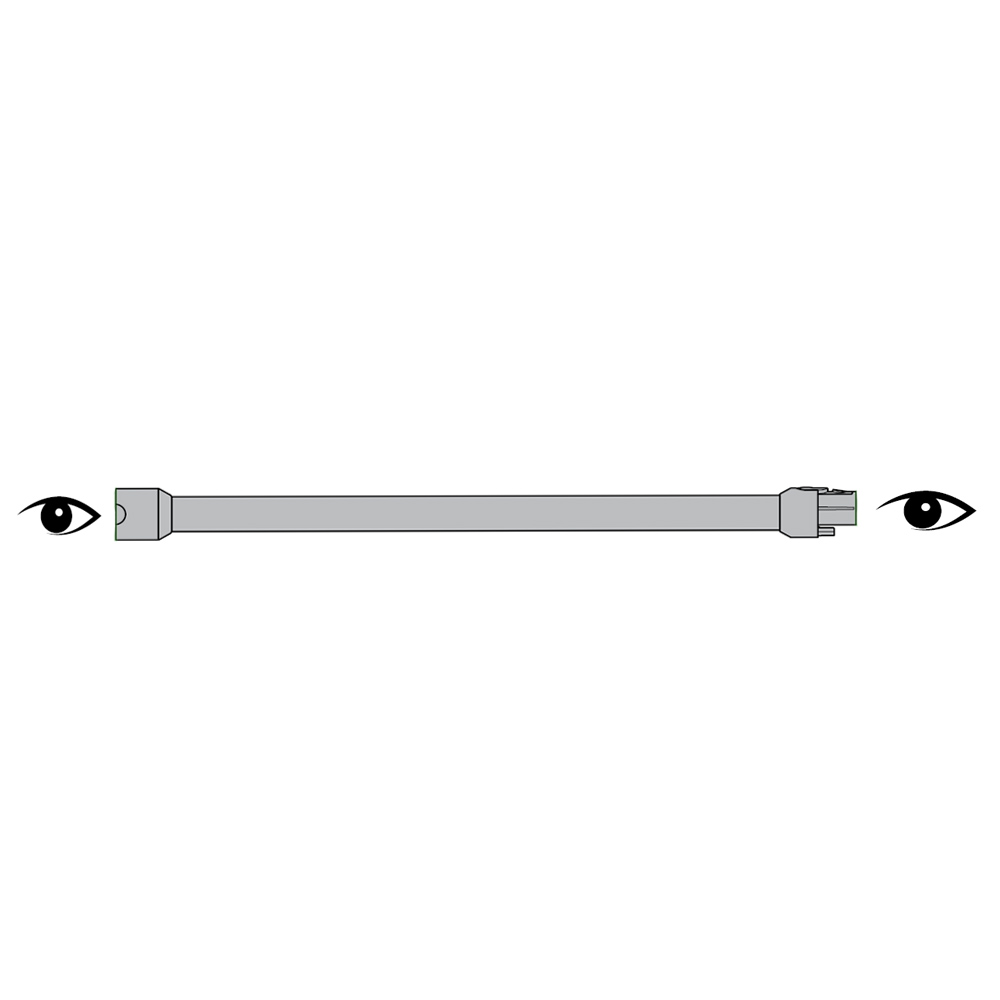
Check both ends of the Wand for blockages and remove as necessary.
Refit the Cleaner head, tool or accessories being used back onto the wand and connect the wand back onto the machine.
Press and hold the trigger for 10 seconds.
If the noise is still present, select the floor tool you have been using.
Which floor tool are you using?
Clear the floor tool
With the Direct drive cleaner head removed from the machine, turn it over and undo the fastener.
Locate the end cap and using a coin, turn it anticlockwise a quarter of the way. This will allow you to remove it.
Note: There should be a small padlock icon along with directional arrows to help you unlock the end cap.

Remove the Brush bar from the Direct drive cleaner head and clear away any hair or fibres. Check the neck of the Cleaner head (where the Cleaner head connects to the Wand) for any blockages. Ensure there is no build-up of dust or debris in the small crevice between where the Brush bar sits and the neck of the Cleaner head.

With the Brush bar clear from any debris, refit it back into the Cleaner head and securely fasten the end cap.

For deep pile rugs or carpets you may find the brush bar stops spinning when moved close to the positive position. This is to protect both the machine and the carpet itself.
Clear the floor tool
With the High torque cleaner head removed from the machine, turn it over and undo the fastener.
Locate the end cap and using a coin, turn it anticlockwise a quarter of the way. This will allow you to remove it.
Note: There should be a small padlock icon along with directional arrows to help you unlock the end cap.
Remove the Brush bar from the High torque cleaner head and clear away any hair or fibres. Check the neck of the Cleaner head (where the Cleaner head connects to the Wand) for any blockages. Ensure there is no build-up of dust or debris in the small crevice between where the Brush bar sits and the neck of the Cleaner head.
With the Brush bar clear from any debris, refit it back into the Cleaner head and securely fasten the end cap.
Place the Cleaner head onto the bin, change the Suction control slider to the positive position and test the machine.
Switching the Suction control slider to the negative setting and continue testing.
Clear the floor tool
With the Quick-release Mini motorised head removed from the machine, turn it over and undo the fastener. Locate the end cap and using a coin, turn it anticlockwise a quarter of the way. This will allow you to remove it.
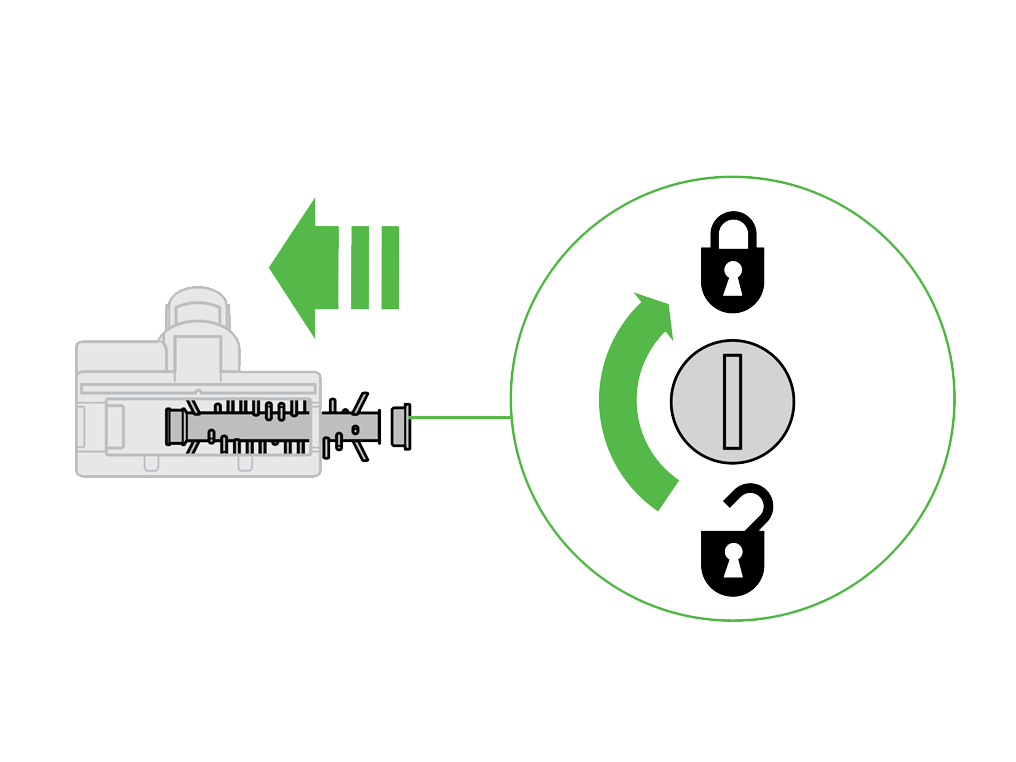
Note: There should be a small padlock icon along with directional arrows to help you unlock the end cap.
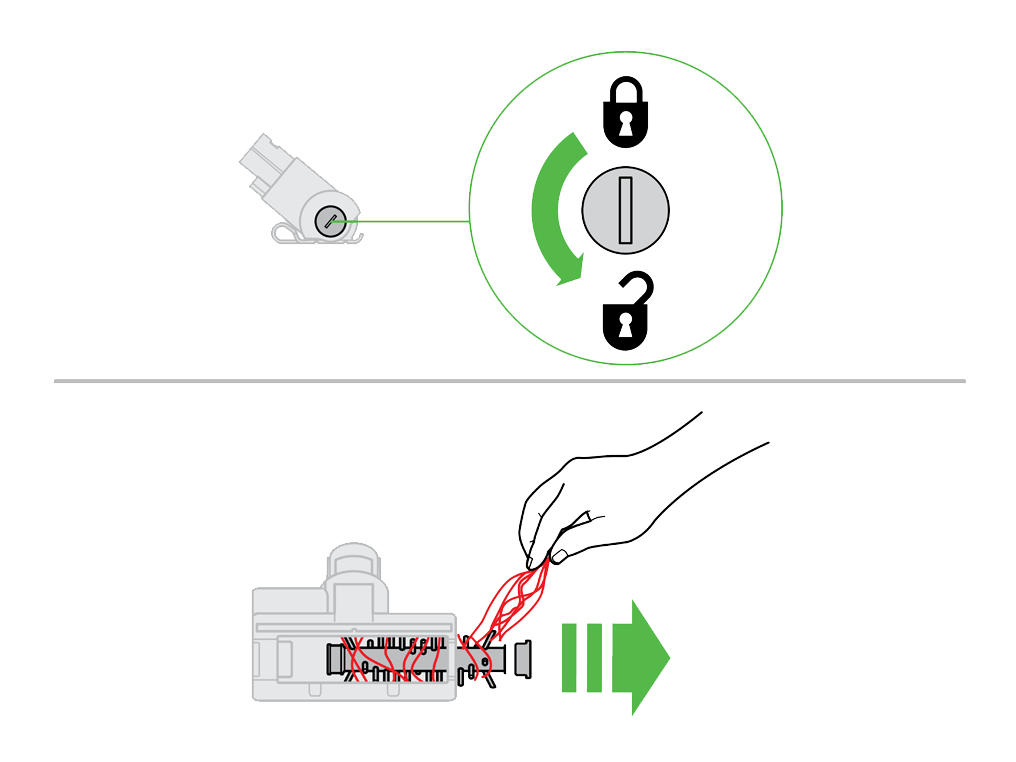
Remove the Brush bar from the Quick-release Mini motorised head and clear away any hair or fibres. Check the neck of the Cleaner head (where the Cleaner head connects to the Wand) for any blockages. Ensure there is no build-up of dust or debris in the small crevice between where the Brush bar sits and the neck of the Cleaner head.
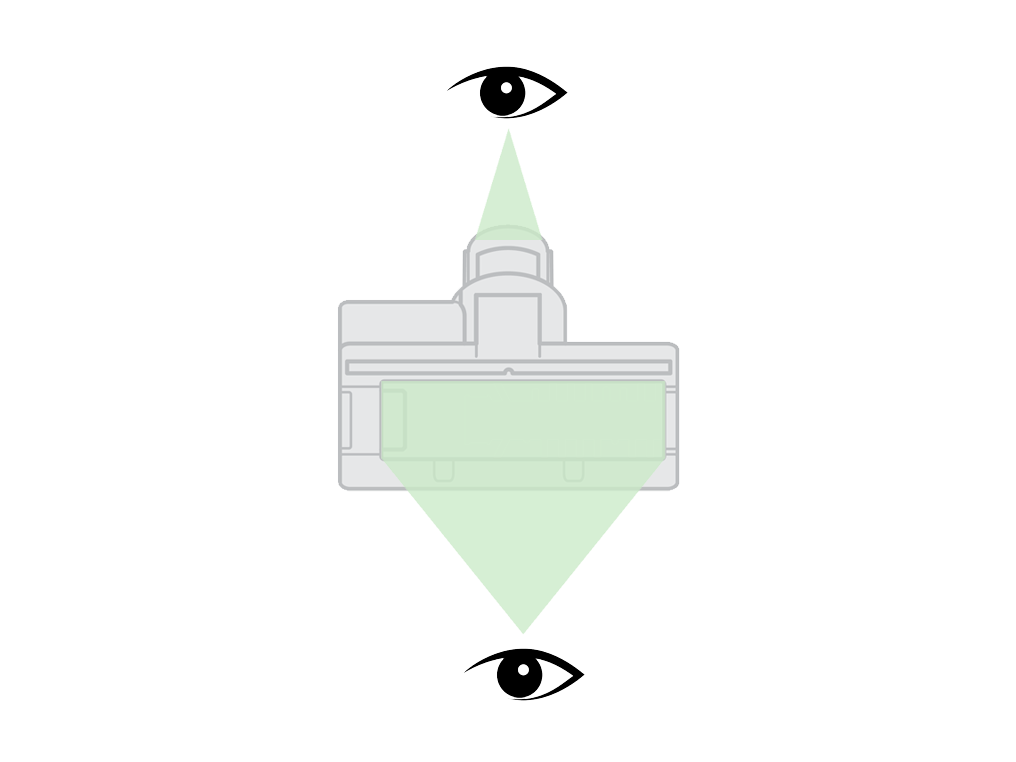
With the Brush bar clear from any debris, refit it back into the Cleaner head and securely fasten the end cap.
Clear the floor tool
With the Cleaner head removed from the machine, turn it over. On the underside of the Cleaner head by the Soft roller, locate the fastener. Using a coin, turn the fastener anticlockwise a quarter of the way to remove the end cap.
Note: There should be a small padlock icon along with directional arrows to help you unlock the end cap.
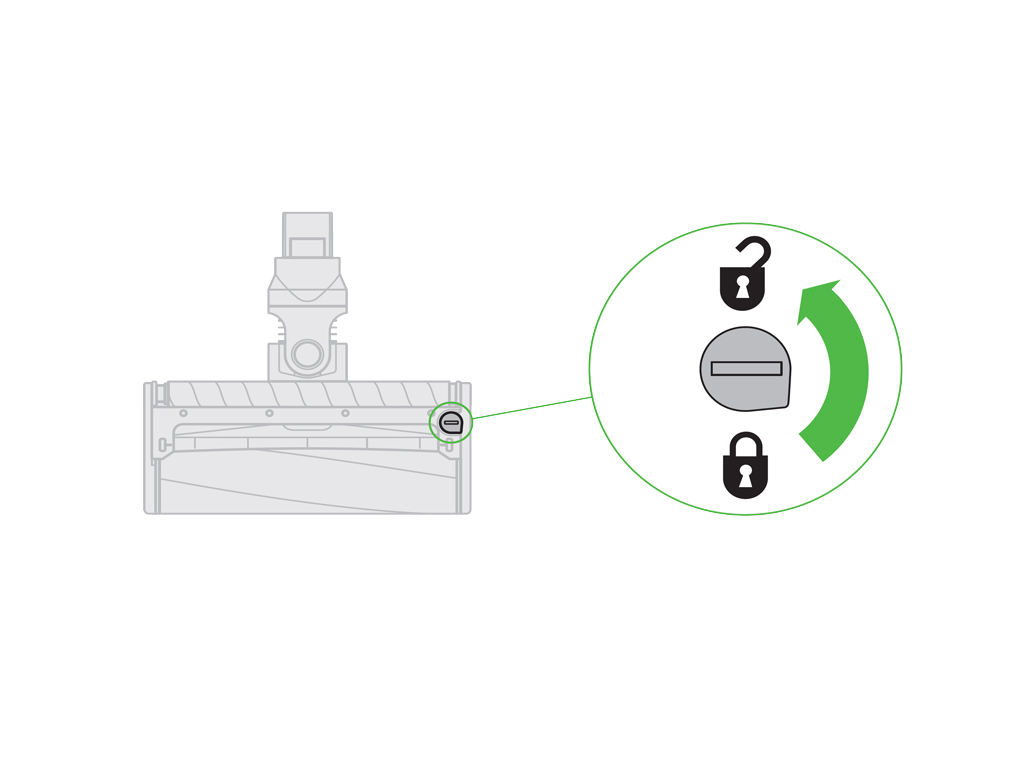
Remove the Brush bar from the Soft roller cleaner head and clear away any hair or fibres. Check the neck of the Cleaner head (where the Cleaner head connects to the Wand) for any blockages. Ensure there is no build-up of dust or debris in the small crevice between where the Brush bar sits and the neck of the Cleaner head.
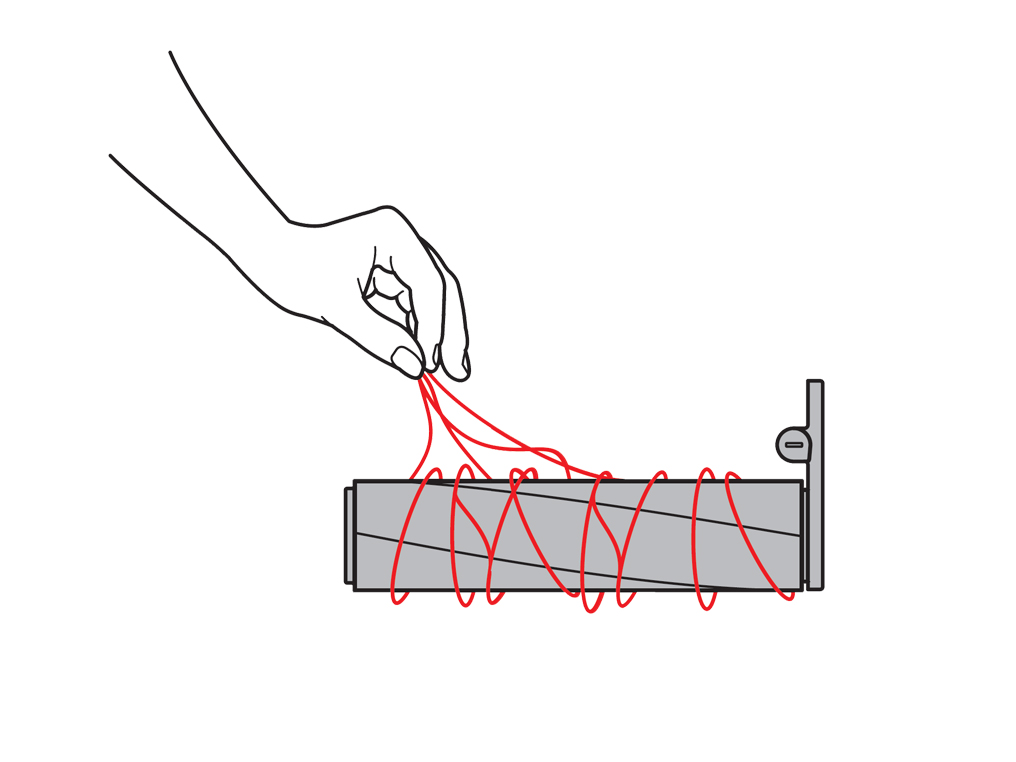
With the Brush bar clear from any debris, refit it back into the Cleaner head and securely fasten the end cap.
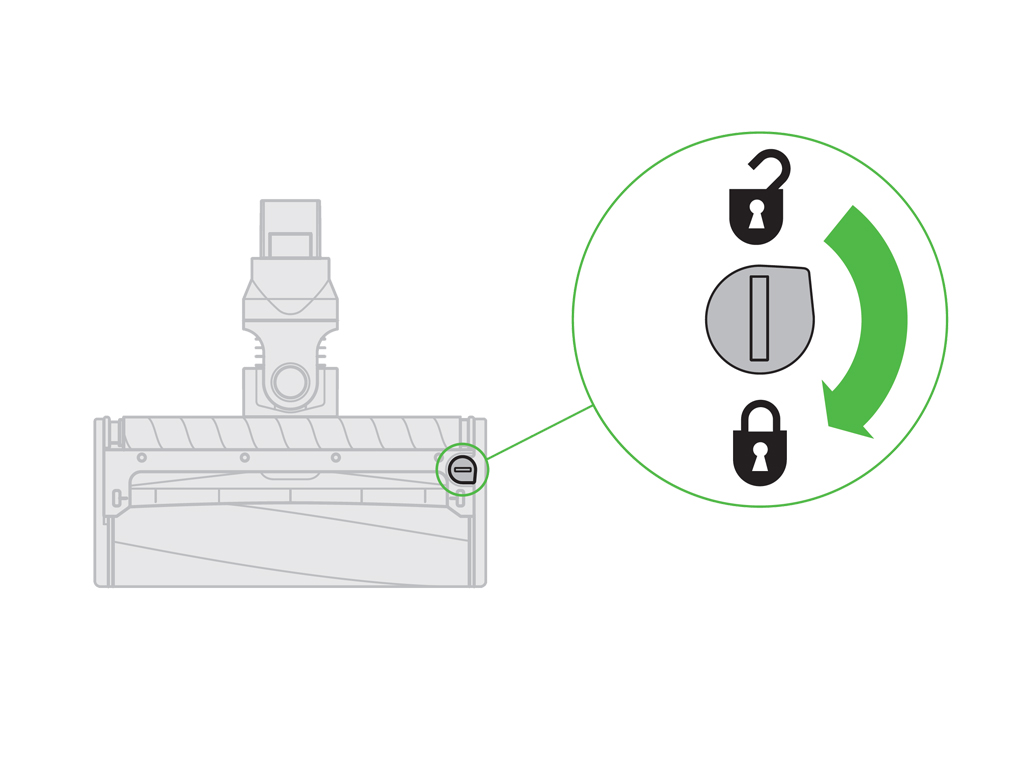
The Soft roller cleaner head has two washable brush bars. Check and wash them regularly as per the step by step instructions.
Has this resolved the problem?
To remove, wash and replace the brush bars:
With the cleaner head removed from the machine, turn it upside down so the underside of the cleaner head is facing you. Use a coin to turn the end cap a quarter counter clockwise until it clicks into the unlocked position. Rotate the end cap to the open position. Gently slide the main brush bar out of the cleaner head. Remove the end cap from the main brush bar. Do not wash the end cap.
Gently slide the rear brush bar out of the cleaner head.
Hold the brush bars under running water and gently rub to remove any lint or dirt.
Stand the brush bars upright. Leave to dry completely for a minimum of 24 hours. Before replacing, check that the brush bars are completely dry.
Slide the rear brush bar back into the cleaner head.
Slide the main brush bar back into the cleaner head.
Reattach the end cap to the large Brush bar.
The end cap should be in the open position. Once in place, rotate the end cap back into the closed position.
Close the fastener by turning it a quarter clockwise. Ensure that the fastener is fully turned and the brush bars are secure.
Refit the Cleaner head on the machine.
Press and hold the trigger for 10 seconds.
Remove the bin
Hold the machine with the bin in a downwards position. Firmly push the red bin release button. The bin will slide down opening the bin base.

Press the red button located on the bin runner to release the bin and slide the bin off the runner.

Gently tap the side of the cyclone over a bin. This will remove any fine dust clogged up in the cyclone. Using the Combination tool, clean the shroud to remove any debris around the cyclone.
Press and hold the trigger for 10 seconds.
Check the bin inlet
Check the opening on the cyclone shroud for any blockages. Remove as necessary.

To refit the clear bin
Insert the spine into the bin runner.

Close the clear bin by pushing the bin base upwards until it clicks into place.

Press and hold the trigger for 10 seconds.
A high pitch whistle could indicate a seal is damaged or the machine is blocked.
If the noise occurs with the wand and cleaner head attached, it is likely to be caused by something caught in the cleaner head. Select the appropriate cleaner head.
If the noise occurs without the wand and cleaner head, it is likely to be caused by either the bin or cyclone.
Please select the appropriate option
Check the bin inlet
Check the inlet at the front of the machine for any blockages and remove as necessary.
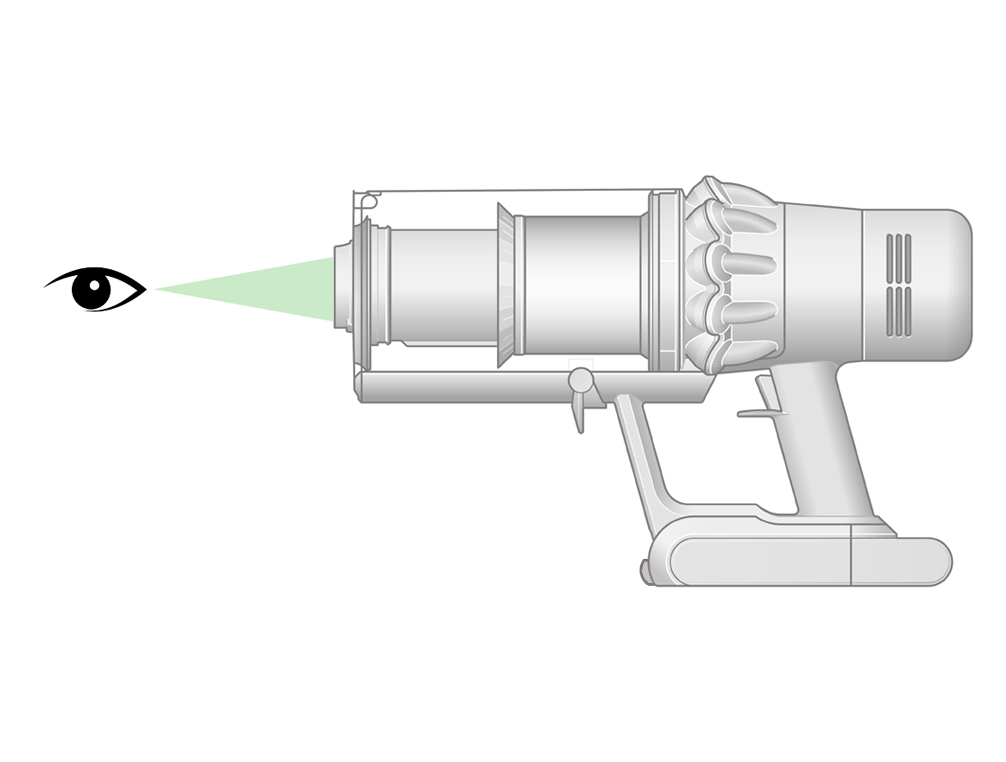
Check the shroud opening
Hold the machine with the bin in a downwards position. Firmly push the red bin release button. The bin will slide down opening the bin base. The bin base will not open if the red button is not pushed down fully.
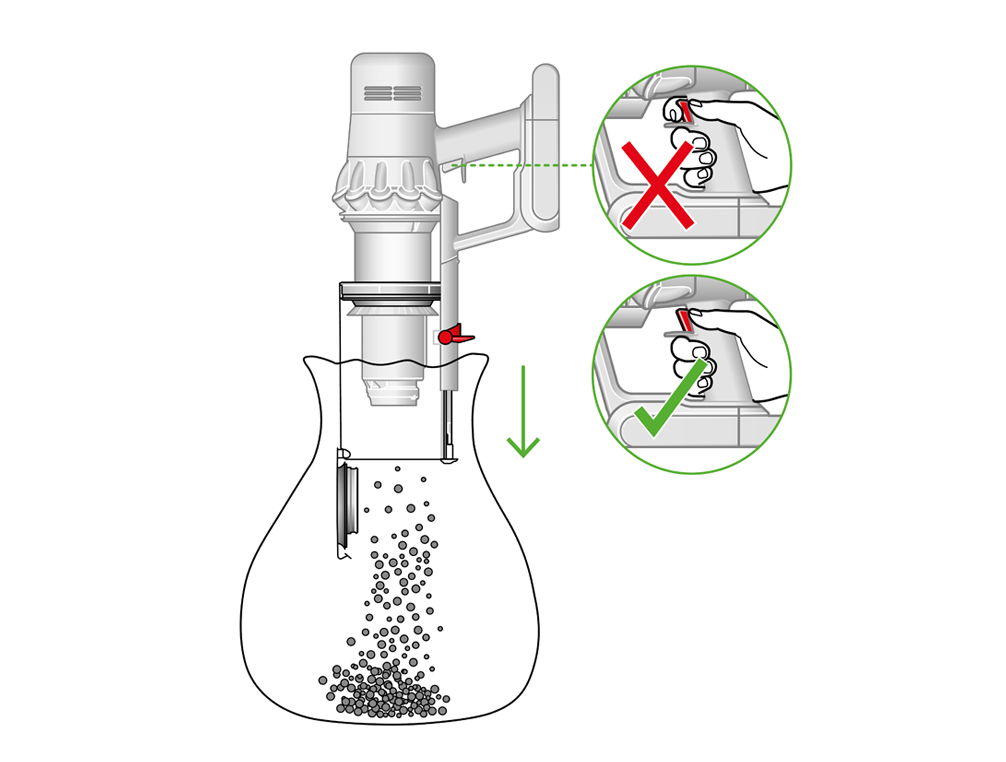
Check the opening on the cyclone shroud for any blockages. Remove as necessary.
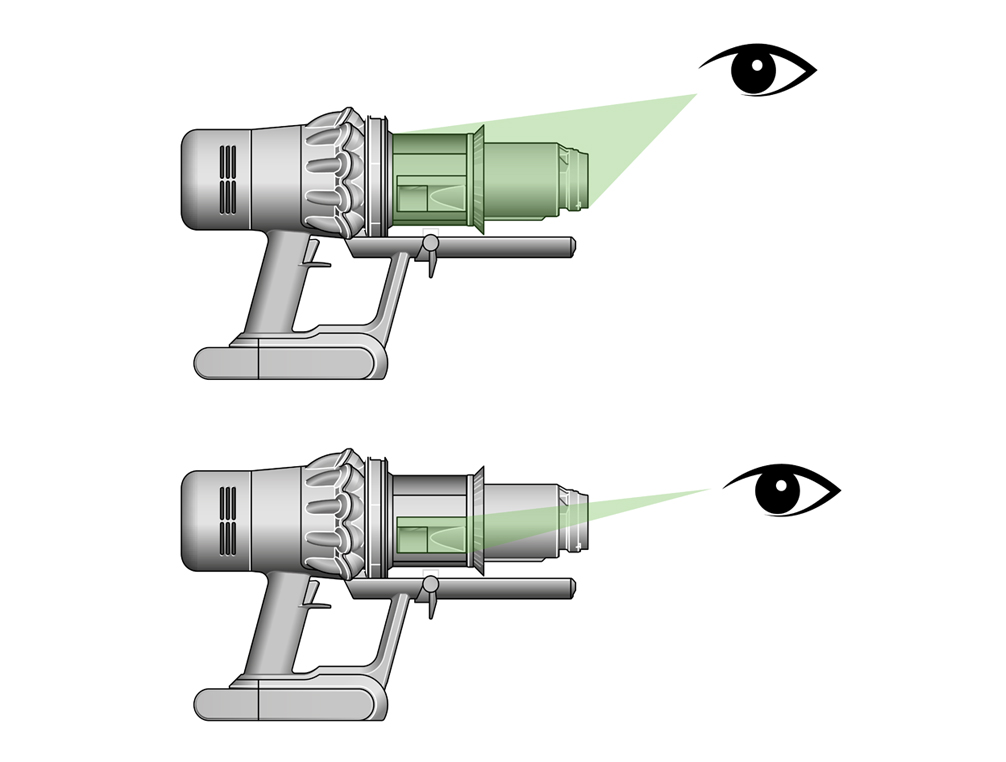
Close the clear bin by pushing the bin base upwards until it clicks into place.

Press and hold the trigger for 10 seconds.
Remove the bin
Hold the machine with the bin in a downwards position. Firmly push the red bin release button. The bin will slide down opening the bin base. The bin base will not open if the red button is not pushed down fully.

Press the red button located on the bin runner to release the bin and slide the bin off the runner.
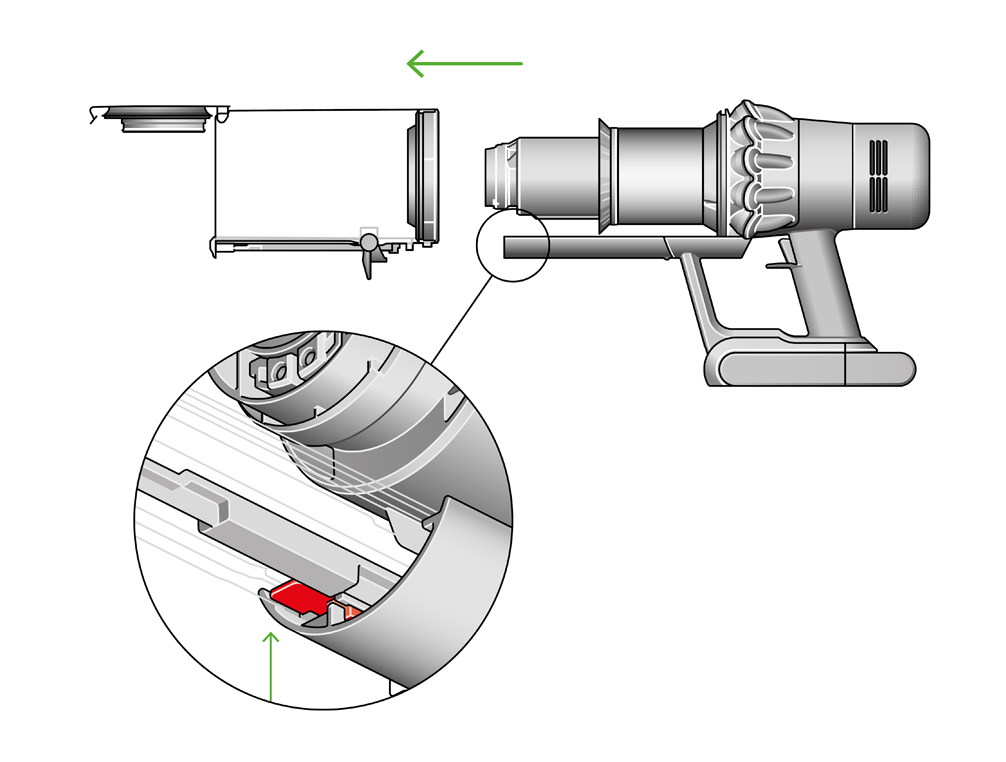
Gently tap the side of the cyclone over a bin. This will remove any fine dust clogged up in the cyclone. Using the combination tool, clean the shroud to remove any debris around the cyclone.
Check the cyclone for blockages and remove as necessary.

To refit the clear bin
Insert the spine into the bin runner.

Close the clear bin by pushing the bin base upwards until it clicks into place.

Attach the wand and cleaner head and test the machine.
Clear the floor tool
With the Direct drive cleaner head removed from the machine, turn it over and undo the fastener.
Locate the end cap and using a coin, turn it anticlockwise a quarter of the way. This will allow you to remove it.
Note: There should be a small padlock icon along with directional arrows to help you unlock the end cap.

Remove the Brush bar from the Direct drive cleaner head and clear away any hair or fibres. Check the neck of the Cleaner head (where the Cleaner head connects to the Wand) for any blockages. Ensure there is no build-up of dust or debris in the small crevice between where the Brush bar sits and the neck of the Cleaner head.

With the Brush bar clear from any debris, refit it back into the Cleaner head and securely fasten the end cap.

Clear the floor tool
With the High torque cleaner head removed from the machine, turn it over and undo the fastener.
Locate the end cap and using a coin, turn it anticlockwise a quarter of the way. This will allow you to remove it.
Note: There should be a small padlock icon along with directional arrows to help you unlock the end cap.
Remove the Brush bar from the High torque cleaner head and clear away any hair or fibres. Check the neck of the Cleaner head (where the Cleaner head connects to the Wand) for any blockages. Ensure there is no build-up of dust or debris in the small crevice between where the Brush bar sits and the neck of the Cleaner head.
With the Brush bar clear from any debris, refit it back into the Cleaner head and securely fasten the end cap.
Place the Cleaner head onto the bin, change the Suction control slider to the positive position and test the machine.
Switching the Suction control slider to the negative setting and continue testing.
Clear the floor tool
With the Quick-release Mini motorised head removed from the machine, turn it over and undo the fastener. Locate the end cap and using a coin, turn it anticlockwise a quarter of the way. This will allow you to remove it.
Note: There should be a small padlock icon along with directional arrows to help you unlock the end cap.

Remove the Brush bar from the Quick-release Mini motorised head and clear away any hair or fibres. Check the neck of the Cleaner head (where the Cleaner head connects to the Wand) for any blockages. Ensure there is no build-up of dust or debris in the small crevice between where the Brush bar sits and the neck of the Cleaner head.

With the Brush bar clear from any debris, refit it back into the Cleaner head and securely fasten the end cap.

Clear the floor tool
With the Cleaner head removed from the machine, turn it over. On the underside of the Cleaner head by the Soft roller, locate the fastener. Using a coin, turn the fastener anticlockwise a quarter of the way to remove the end cap.
Note: There should be a small padlock icon along with directional arrows to help you unlock the end cap.

Remove the Brush bar from the Soft roller cleaner head and clear away any hair or fibres. Check the neck of the Cleaner head (where the Cleaner head connects to the Wand) for any blockages. Ensure there is no build-up of dust or debris in the small crevice between where the Brush bar sits and the neck of the Cleaner head.

With the Brush bar clear from any debris, refit it back into the Cleaner head and securely fasten the end cap.

Please select the appropriate option
Before testing the machine please ensure that any hair or loose clothing is clear from the machine.
The suction power of the machine varies depending which power mode you have selected. Boost mode being the most powerful.
If the machine is not performing as well as it used to this is typically caused by a partial or full blockage within the openings of the machine.
Be careful not to pull the 'ON' trigger while looking for blockages. Operating the machine while it is partially dismantled could result in personal injury.
Remove the tools
Remove all tools and accessories from the machine e.g. Wand, Cleaner head, Crevice tool etc. Please ensure the bin is empty before continuing with any checks.

Press and hold the trigger for 10 seconds.
Check for blockages
Check both ends of the Wand for blockages and remove as necessary.

Refit the Cleaner head, tool or accessories being used back onto the wand and connect the wand back onto the machine.
Press and hold the trigger for 10 seconds.
Which floor tool are you using?
Check for blockages
With the accessory removed from the machine, check both ends for blockages and remove as necessary.
Refit the accessory back onto the machine.
Press and hold the trigger for 10 seconds.
Check the bin inlet
Check the inlet at the front of the machine for any blockages and remove as necessary.

Check the shroud opening
Hold the machine with the bin in a downwards position. Firmly push the red bin release button. The bin will slide down opening the bin base. The bin base will not open if the red button is not pushed down fully.

Check the opening on the cyclone shroud for any blockages. Remove as necessary.

Close the clear bin by pushing the bin base upwards until it clicks into place.

Press and hold the trigger for 10 seconds.
Clear the floor tool
On the side of the Cleaner head, locate the end cap. Using a coin, turn the end cap anticlockwise a quarter of the way to remove it.
Note: There should be a small padlock icon along with directional arrows to help you unlock the end cap.

Remove the Brush bar from the Direct drive cleaner head and clear away any hair or fibres. Check the neck of the Cleaner head (where the Cleaner head connects to the Wand) for any blockages. Ensure there is no build-up of dust or debris in the small crevice between where the Brush bar sits and the neck of the Cleaner head.

With the Brush bar clear from any debris, refit it back into the Cleaner head and securely fasten the end cap.
Place the Cleaner head onto the bin and test the machine.

Clear the floor tool
On the side of the Mini motorised head, locate the end cap. Using a coin, turn the end cap anticlockwise a quarter of the way to remove it.
Note: There should be a small padlock icon along with directional arrows to help you unlock the end cap.

Remove the Brush bar from the Quick-release Mini motorised head and clear away any hair or fibres. Check the neck of the Cleaner head (where the Cleaner head connects to the Wand) for any blockages. Ensure there is no build-up of dust or debris in the small crevice between where the Brush bar sits and the neck of the Cleaner head.

With the Brush bar clear from any debris, refit it back into the Cleaner head and securely fasten the end cap.

Clear the floor tool
Under the Cleaner head by the Soft roller, locate the fastener. Using a coin, turn the fastener anticlockwise a quarter of the way to unlock the end cap, and slide it up to remove.
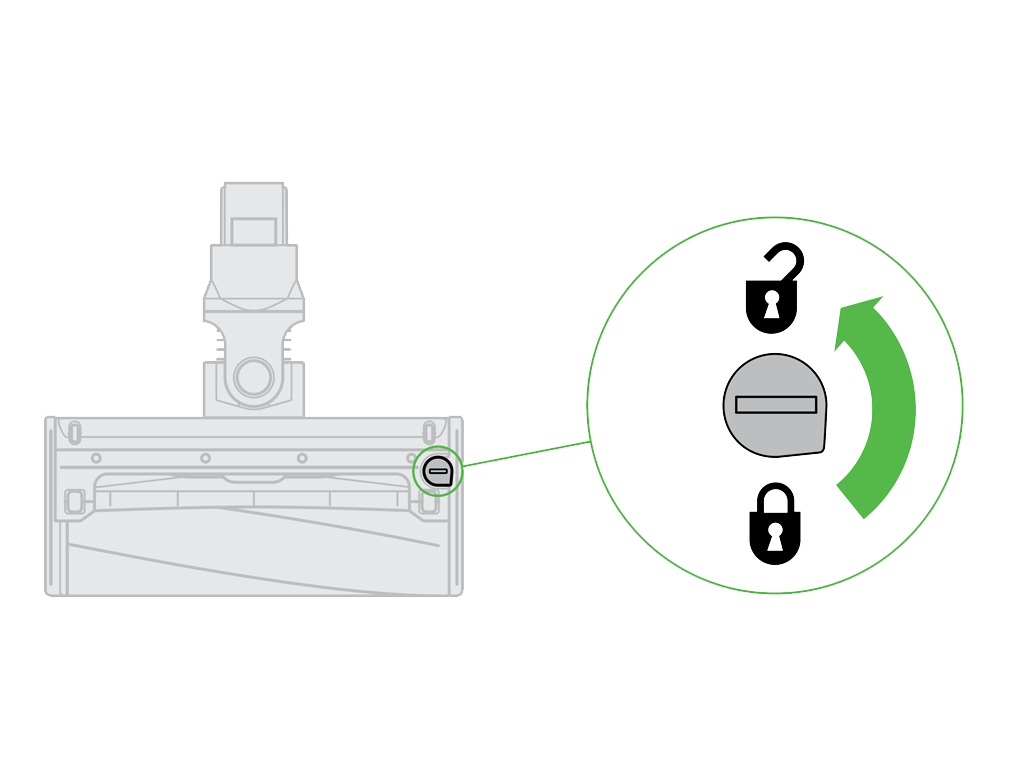
Remove the Brush bar from the Soft roller cleaner head and clear away any hair or fibres. Check the neck of the Cleaner head (where the Cleaner head connects to the Wand) for any blockages. Ensure there is no build-up of dust or debris in the small crevice between where the Brush bar sits and the neck of the Cleaner head.

With the Brush bar clear from any debris, refit it back into the Cleaner head and securely fasten the end cap.

The Soft roller cleaner head has two washable brush bars. Check and wash them regularly as per the step by step instructions.
Has this resolved the problem?
To remove, wash and replace the brush bars:
With the cleaner head removed from the machine, turn it upside down so the underside of the cleaner head is facing you. Use a coin to turn the end cap a quarter counter clockwise until it clicks into the unlocked position. Rotate the end cap to the open position. Gently slide the main brush bar out of the cleaner head. Remove the end cap from the main brush bar. Do not wash the end cap.
Gently slide the rear brush bar out of the cleaner head.
Hold the brush bars under running water and gently rub to remove any lint or dirt.
Stand the brush bars upright. Leave to dry completely for a minimum of 24 hours. Before replacing, check that the brush bars are completely dry.
Slide the rear brush bar back into the cleaner head.
Slide the main brush bar back into the cleaner head.
Reattach the end cap to the large Brush bar.
The end cap should be in the open position. Once in place, rotate the end cap back into the closed position.
Close the fastener by turning it a quarter clockwise. Ensure that the fastener is fully turned and the brush bars are secure.
Refit the Cleaner head on the machine.
Press and hold the trigger for 10 seconds.
Check the bin inlet
Check the inlet at the front of the machine for any blockages and remove as necessary.

Check the shroud opening
Hold the machine with the bin in a downwards position. Firmly push the red bin release button. The bin will slide down opening the bin base. The bin base will not open if the red button is not pushed down fully.

Check the opening on the cyclone shroud for any blockages. Remove as necessary.

Close the clear bin by pushing the bin base upwards until it clicks into place.

Press and hold the trigger for 10 seconds.
Before testing the machine please ensure that any hair or loose clothing is clear from the machine.
Automatic cut-out
Large items may block the machine or tools. If any part becomes blocked or the filter needs washing, the machine may automatically cut out.
Motor is pulsating
1 solid blue light will indicate the machine has a low level of charge.
If the machine is cutting out/pulsating, this will indicate a blockage.
Be careful not to pull the 'ON' trigger while looking for blockages. Operating the machine while it is partially dismantled could result in personal injury.
Remove the tools
Remove all tools and accessories from the machine e.g. Wand, Cleaner head, Crevice tool etc. Please ensure the bin is empty before continuing with any checks.

Press and hold the trigger for 10 seconds.
Please select the appropriate option
The Dyson V11™ battery and monitoring system work together to gauge how much run time is remaining. The system calculates run time using an algorithm that ‘learns’ how your machine works over time. To get the best experience, we recommend fully charging your machine after every use. This helps the battery and monitoring system's algorithm to more accurately calculate and display remaining run time.
The actual run time of your machine remains unaffected while the algorithm learns to more accurately gauge remaining power.
The battery is designed to be left on charge permanently, and this will ensure that the machine is fully charged when it's next used. It will take up to 4.5 hours to fully charge your machine. Once the battery is fully charged, your machine won't use any more electricity.
If your machine continues to cut out even though run time remains on the screen, we recommend fully charging your machine, then using it continuously until the battery runs out. This should be completed within one cleaning session, but the trigger doesn't need to be held down throughout. We advise using Auto/Med mode for this clean. The more this process is repeated, the more accurate the algorithm becomes.
The battery is designed to be left on charge permanently, and this will ensure that the machine is fully charged when it's next used. It will take up to 4.5 hours to fully charge your machine. Once the battery is fully charged, your machine won't use any more electricity.
Automatic cut-out
This machine is fitted with an automatic cut-out. If any part becomes blocked, the machine may automatically cut out.
The display of your machine will alert you when simple maintenance steps are needed.
If the digital screen isn't showing any alerts, please check the LED lights on the Main body
Please select the appropriate option
The screen will alert you when your machine needs your attention.
The alert will flash for approximately 5 seconds, proceeded by a playable graphic. Follow the instructions on screen to maintain performance.
Which alert is showing?
If the filter isn't correctly fitted, the machine will not turn on when pressing the trigger.

Before fitting, check the filter material has not gone hard by rubbing the material between fingers to loosen and soften the fabric.
Twist the Main body of the machine clockwise until it clicks and locks.

Press and hold the trigger for 10 seconds.
Removing the filter
Remove the filter unit by twisting it counter clockwise. Gently pull away from the machine.

Gently tap the filter unit to remove any excess dust and debris before washing it.
Wash the filter in cold water only.
WARNING: Please do not use detergent, do not wash in a dishwasher or washing machine.
Wash the pleated paper element of the filter unit first; hold the filter unit under a cold water tap with the foam element downwards and run cold water over the pleated paper. Continue washing until the water runs clear.

Wash the foam element of the filter unit next; hold the filter unit under a cold water tap with the foam element downwards so that dirty water does not contaminate the pleated paper element. Run cold water over the inside and outside of the foam element and squeeze the foam gently to expel the dirt. Continue washing until the water runs clear.

Wash the outside of the filter unit. Then fill the unit with cold water, place your hands over the open ends and shake gently. Repeat washing the elements and outside of the filter unit until the water runs clear.

Gently shake the filter unit to remove any excess water and leave to drain with the foam element end facing up.

Drying
Leave the filter unit to dry completely in a dry environment with good airflow, for a minimum of 24 hours. Check that the filter unit is completely dry.

Refit
To refit, return the filter unit to the main body and twist clockwise until it clicks into place.

The filter unit may require more frequent washing if vacuuming fine dust or if use is mainly in Boost mode.
Low battery
Fully charge the machine.

The machine should be charged with the battery attached to the machine.

Please select the appropriate option
Please ensure the battery is charged to 100% after every use.
Charge the machine
Connect to charger either directly or in the docking station.
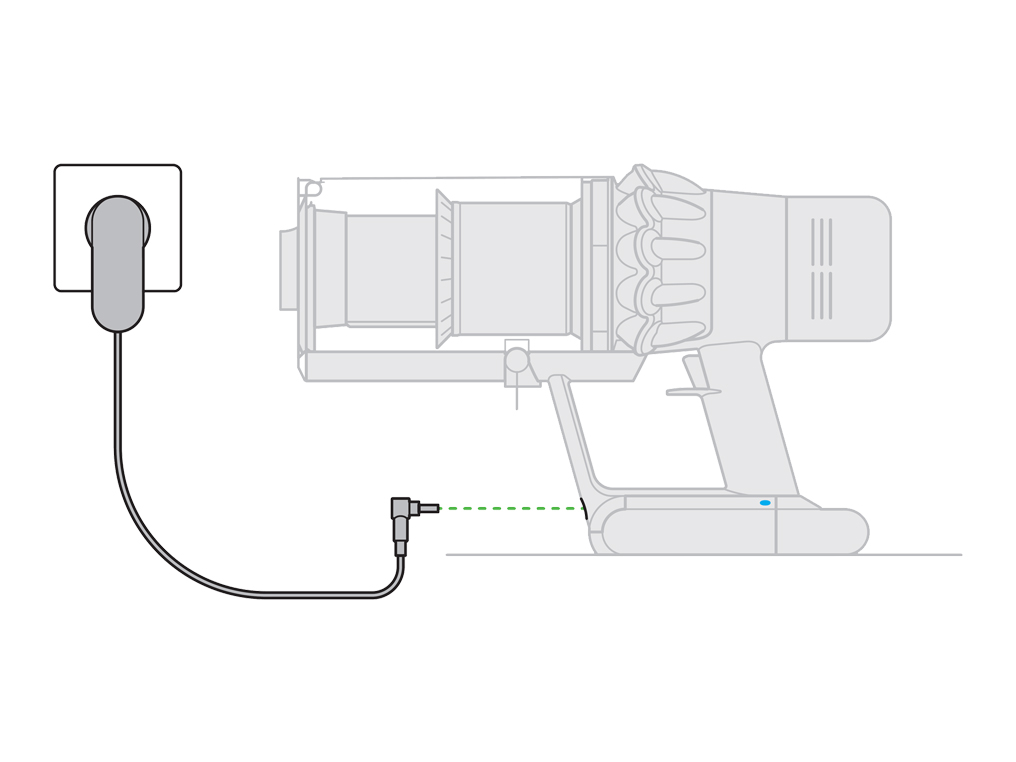
The blue LEDs on each side of the battery should light up.
What do the lights on the machine show?
The blue LEDs – one on each side of the battery – will flash on and off during charging.
When the battery is charged, both LEDs will light for 5 seconds, then go out.
The screen will also show the battery charge level at 100%.

The machine can take up to 4.5 hours to fully charge.
Pull the trigger
Remove the charger from the machine and pull the trigger.
The LED Lights should be on constantly when in use.
LED Lights Blinking
When the trigger is pulled, should the LED lights blink on/off for approximately 10 second, please select 'LED lights blinking' from the available options.
Do the blue LED lights appear on either side of the battery?
Dock charging
If the machine is being charged through the docking station, please disconnect the charger and connect it directly into the machine.

Please check household electrics or use an alternative plug socket.
The blue LEDs – one on each side of the battery – will flash on and off during charging.
When the battery is charged, both LEDs will light for 5 seconds, then go out.
The screen will also show the battery charge level at 100%.

The machine can take up to 4.5 hours to fully charge.
Remove the charger
Press and hold the trigger for 10 seconds.
Before testing the machine please ensure that any hair or loose clothing is clear from the machine.
Automatic cut-out
This machine is fitted with an automatic cut-out. If any part becomes blocked, the machine may automatically cut out.

Motor is pulsating
This will happen after the motor pulses a number of times (i.e. switches on and off in quick succession) and the blockage indicator will light. This is to prevent damage to the machine. Leave to cool down before looking for blockages.
Be careful not to pull the 'ON' trigger while looking for blockages. Operating the machine while it is partially dismantled could result in personal injury.
Remove the tools
Remove all tools and accessories from the machine e.g. Wand, Cleaner head, Crevice tool etc. Please ensure the bin is empty before continuing with any checks.

Press and hold the trigger for 10 seconds.
Diagnostic screen
The menu is access through pressing the selector button whilst the filter is removed. Two options are displayed when accessing this menu screen.
Basic, by default is 'off'. 'on' removes the run time figures on the display screen.
Diagnostic, displays a series of numbers, letter and percentages.

Check the filter
Before exiting the menu, please ensure the filter is correctly fitting.
The filter unit should be securely fitted onto the main body and twist clockwise until it clicks into place.

Exiting the menu
Once the filter is securely in place, press and hold the selector button for approximately 10 seconds or until the screen reverts back to the main display screen.
If you are unable to revert back to the main display screen manually, it can be achieved by leaving the machine to go inactive (around 15 minutes of no interaction).
This alert will continue until maintenance has been carried out.

This indicates the filter needs washing.
Please follow the steps in the video.
Find the text version of the step-by-step guide instead, under "Has this resolved the problem?"
Leave the filter unit to dry completely in a dry environment with good airflow, for a minimum of 24 hours. Ensuring it is completely dry before refitting.
Before fitting, check the filter material has not gone hard by rubbing the material between fingers to loosen and soften the fabric.
Press and hold the trigger for 10 seconds.
Has this resolved the problem?
Charge the machine
Connect to charger either directly or in the docking station.

Charge the machine
When the battery is charged, both LEDs will light for 5 seconds, then go out.
Remove the charger
Press and hold the trigger for 10 seconds.
Pull the trigger
Press and hold the trigger for 10 seconds.
The display on the digital screen should turn on.
Pull the trigger
Press and hold the trigger for 10 seconds.
The LED Lights should be on constantly when in use.
LED Lights Blinking
When the trigger is pulled, should the LED lights blink on/off for approximately 10 second, please select 'LED lights blinking' from the available options.
Do the blue LED lights appear on either side of the battery?
Charging
If the machine is being charged through the docking station, please disconnect the charger and connect it directly into the machine.

Please check household electrics or use an alternative plug socket.
The blue LEDs – one on each side of the battery – will flash on and off during charging.
When the battery is charged, both LEDs will light for 5 seconds, then go out.
The machine can take up to 4.5 hours to fully charge.
Remove the charger
Press and hold the trigger for 10 seconds.
Charge the machine
Connect to charger either directly or in the docking station.
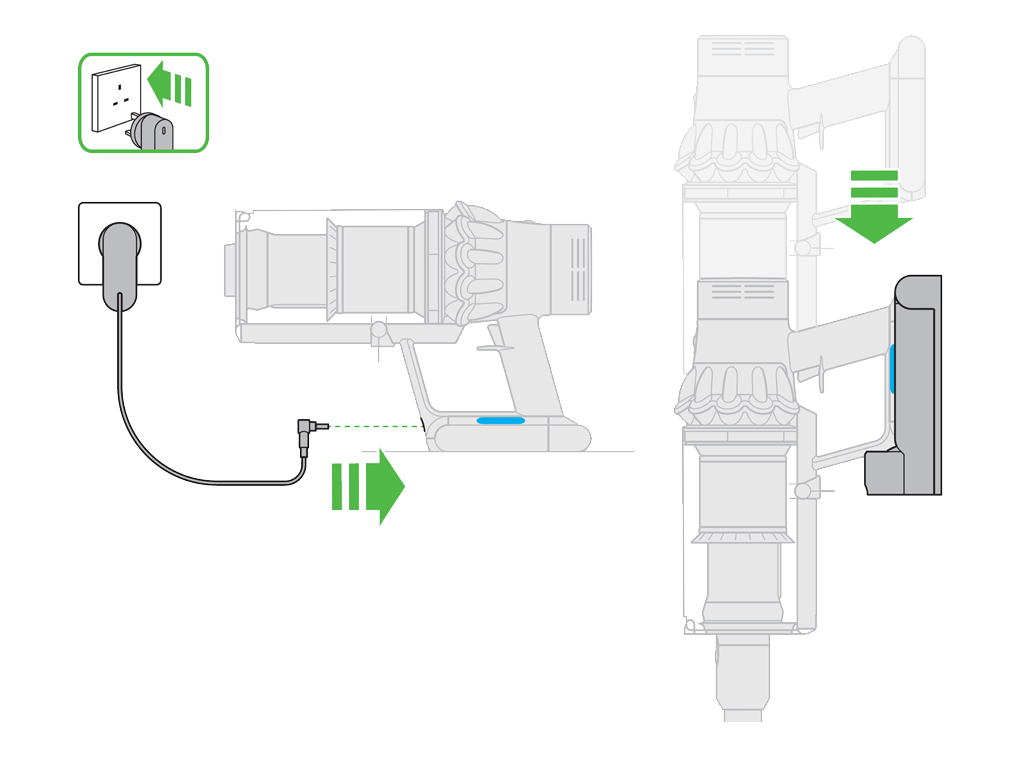
The blue LEDs – one on each side of the battery – will flash on and off during charging.
Charge the machine
When the battery is charged, both LEDs will light for 5 seconds, then go out.
Remove the charger
Press and hold the trigger for 10 seconds.
Most Dyson vacuums have a built in safety system that stops the machine if it begins to overheat. This usually happens because the filters need washing or your machine is blocked.
If your machine continues to overheat, please refrain from using it until it has cooled down sufficiently and then carry out the performance checks.
Please select the appropriate option
Before testing the machine please ensure that any hair or loose clothing is clear from the machine.
Automatic cut-out
This machine is fitted with an automatic cut-out. If any part becomes blocked, the machine may automatically cut out.
Motor is pulsating
This will happen after the motor pulses a number of times (i.e. switches on and off in quick succession) and the blockage indicator will light. Leave to cool down before looking for blockages.
Be careful not to pull the 'ON' trigger while looking for blockages. Operating the machine while it is partially dismantled could result in personal injury.
Remove the tools
Remove all tools and accessories from the machine e.g. Wand, Cleaner head, Crevice tool etc. Please ensure the bin is empty before continuing with any checks.

Press and hold the trigger for 10 seconds.
Check for blockages
Check both ends of the Wand for blockages and remove as necessary.

Refit the Cleaner head, tool or accessories being used back onto the wand and connect the wand back onto the machine.
Press and hold the trigger for 10 seconds.
Check the bin inlet
Check the inlet at the front of the machine for any blockages and remove as necessary.

Check the shroud opening
Hold the machine with the bin in a downwards position. Firmly push the red bin release button. The bin will slide down opening the bin base. The bin base will not open if the red button is not pushed down fully.

Check the opening on the cyclone shroud for any blockages. Remove as necessary.

Close the clear bin by pushing the bin base upwards until it clicks into place.

Press and hold the trigger for 10 seconds.
Please select the appropriate option
Damp or musty
A damp or musty smell is caused when dust in the cyclone has come into contact with water.
It may not be a direct contact with water, for example when vacuuming pet hair that is slightly damp, this moisture will combine with the dust in the cyclone causing the smell.
Additionally the smell may occur if the filter goes back into the machine wet.
Only the filter and the two washable brush bars from the soft roller cleaner head can be washed. The bin can be cleaned with a damp cloth only, and both must be completely dry before being re-fitted to the machine.
Damp or musty smell still present
Under normal use, any unpleasant smell can only be caused by something the machine has picked up. Please select pick up issues to carry out checks.
If you are able to identify which part of the machine the smell is coming from, replacing this part may resolve the issue.
Please select the appropriate option
Remove the bin
Hold the machine with the bin in a downwards position. Firmly push the red bin release button. The bin will slide down opening the bin base.

Press the red button located on the bin runner to release the bin and slide the bin off the runner.

Gently tap the side of the cyclone over a bin. This will remove any fine dust clogged up in the cyclone. Using the Combination tool, clean the shroud to remove any debris around the cyclone.
Check the opening on the cyclone shroud for any blockages. Remove as necessary.

The clear bin is not dishwasher safe and the use of detergents, polishes or air fresheners to clean the clear bin is not recommended as this may damage your machine. Clean the clear bin with a damp cloth only.
To refit the clear bin
Insert the spine into the bin runner.

Close the clear bin by pushing the bin base upwards until it clicks into place.

This indicates the filter needs washing.
Please follow the steps in the video.
Find the text version of the step-by-step guide instead, under "Has this resolved the problem?"
Leave the filter unit to dry completely in a dry environment with good airflow, for a minimum of 24 hours. Ensuring it is completely dry before refitting.
Press and hold the trigger for 10 seconds.
Has this resolved the problem?
Damp or musty smell still present
Under normal use, any unpleasant smell can only be caused by something the machine has picked up. Please select pick up issues to carry out checks.
Please select the appropriate option
Removing the filter
Remove the filter unit by twisting it counter clockwise. Gently pull away from the machine.

Gently tap the filter unit to remove any excess dust and debris before washing it.
Wash both filters in cold water only until the water runs clear. Do not use detergent. Do not wash in a dishwasher or washing machine.
Wash the pleated paper element of the filter unit first; hold the filter unit under a cold water tap with the foam element downwards and run cold water over the pleated paper. Continue washing until the water runs clear.

Wash the foam element of the filter unit next; hold the filter unit under a cold water tap with the foam element downwards so that dirty water does not contaminate the pleated paper element. Run cold water over the inside and outside of the foam element and squeeze the foam gently to expel the dirt. Continue washing until the water runs clear.

Wash the outside of the filter unit. Then fill the unit with cold water, place your hands over the open ends and shake gently. Repeat washing the elements and outside of the filter unit until the water runs clear.

Gently shake the filter unit to remove any excess water and leave to drain with the foam element end facing up.

Drying
Leave the filter unit to dry completely in a dry environment with good airflow, for a minimum of 24 hours. Check that the filter unit is completely dry.

Refit
To refit, return the filter unit to the main body and twist clockwise until it clicks into place.

The filter unit may require more frequent washing if vacuuming fine dust or if use is mainly in Boost mode.
Please select the appropriate option
Please check all floor tools
Please connect the floor tool directly on to the bin.
If the Brush bar on every tool spins when connected to the bin, please select the Wand is damaged.
If the brush bar isn't spinning on any tool, please select "The Brush bar does not spin on any Cleaner head".
Should the dirt in the bin exceed the MAX mark, the excess dirt can be pulled directly into the filter causing a blockage.
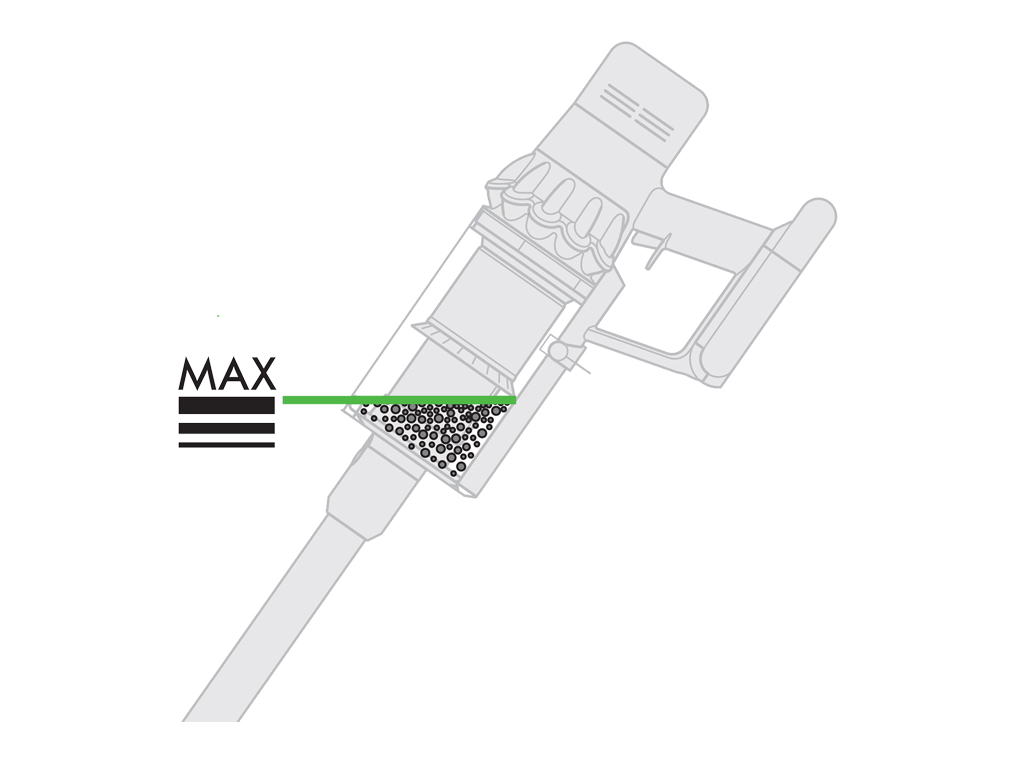
Please ensure that you are emptying the bin as soon as the dirt reaches the level of the MAX mark.
Has this resolved the problem?
Empty as soon as the dirt reaches the level of the MAX mark - do not overfill. Ensure the machine is disconnected from the charger before emptying the clear bin. Be careful not to pull the 'ON' trigger.

Remove the Wand by pressing the red Wand release button and pulling away from the bin.
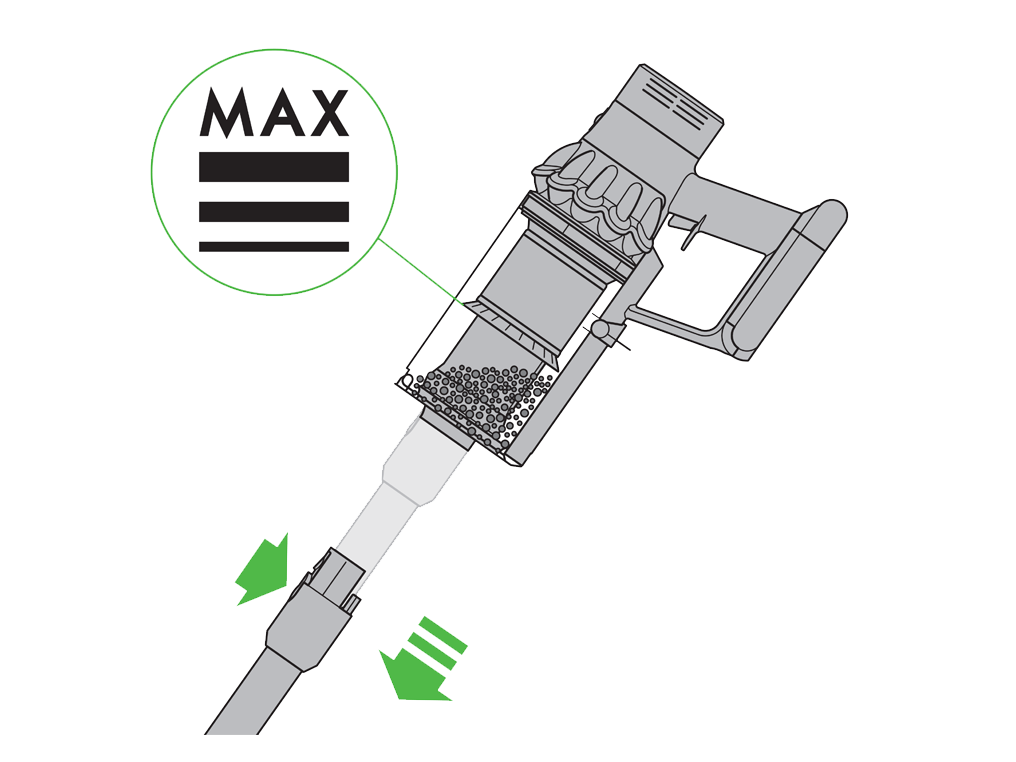
To release the dirt:
Hold the machine with the bin in a downwards position. Firmly push the red bin release button. The bin will slide down opening the bin base. The bin base will not open if the red button is not pushed down fully.
Closing the bin
Close the clear bin by pushing the bin base upwards until it clicks into place.

Scratches or marks on the Wand
Marks on the Wand can be caused when it has come into contact with a painted surface such as a door frame.
These can be removed by wiping with a damp cloth.
Further help
Dyson V11 Animal (Purple/Nickel)


